2002 BMW Z3 spare tire
[x] Cancel search: spare tirePage 26 of 187

26n
Fuel specifications Tire inflation pressuresThe engine uses lead-free gasoline
only.
Required fuel:
>Premium Unleaded Gasoline,
min. 91 AKI.
AKI = Anti Knock Index
Do not use leaded fuels. The use
of leaded fuels will cause perma-
nent damage to the system's oxygen
sensor and the catalytic converter.<
The inflation pressures are indicated on
a label attached to the B-pillar behind
the driver's door (visible with door
open).Check tire pressuresAll pressure specifications are indicated
in psi (kilopascal [kPa]) with the tires at
ambient temperature (refer also to the
next page).
Check tire inflation pressures
regularly Ð at least every two
weeks and before every extended
journey. Incorrect tire pressure can
otherwise lead to tire damage and acci-
dents.
Check the inflation pressure of the
spare tire as well. Refer to the following
table and to page 110.<367de388
Comply with tire approval
specificationsThe inflation pressures in the table apply
to tires made by BMW-approved manu-
facturers. Your BMW center is familiar
with these pressures. Higher pressures
may be specified for tires made by other
manufacturers. You will find a list of
approved tires beginning on page 116.
Your vehicle is equipped with tires that
meet both US standards and European
standards. We recommend the exclu-
sive use of BMW-approved tires.
Page 27 of 187
![BMW Z3 2002 Owners Manual 27n
IndexDataTechnologyRepairsMaintenanceControlsOverview
Tire inflation pressuresBMW Tires
All tire pressures are in psi
(kilopascals [kPa])
Z3 roadster 2.5i225/50 R 16 92 V
225/50 ZR 1629 (200) 32 BMW Z3 2002 Owners Manual 27n
IndexDataTechnologyRepairsMaintenanceControlsOverview
Tire inflation pressuresBMW Tires
All tire pressures are in psi
(kilopascals [kPa])
Z3 roadster 2.5i225/50 R 16 92 V
225/50 ZR 1629 (200) 32](/manual-img/1/94697/w960_94697-26.png)
27n
IndexDataTechnologyRepairsMaintenanceControlsOverview
Tire inflation pressuresBMW Tires
All tire pressures are in psi
(kilopascals [kPa])
Z3 roadster 2.5i225/50 R 16 92 V
225/50 ZR 1629 (200) 32 (220)
Front: 225/45 ZR 17
Rear: 245/40 ZR 1729 (200)
ÐÐ
32 (220)
205/60 R 15 91 Q M+S
205/55 R 16 91 Q M+S
225/50 R 16 92 Q M+S
225/45 R 17 91 Q M+S32 (220) 35 (240)
Spare tire:
T 115/90 R 16 92 M61 (420) 61 (420)
Z3 roadster 3.0i
Z3 coupe 3.0i225/50 R 16 92 V
225/50 ZR 1629 (200) 32 (220)
Front: 225/45 ZR 17
Rear: 245/40 ZR 1729 (200)
ÐÐ
32 (220)
205/55 R 16 91 Q M+S
225/50 R 16 92 Q M+S
225/45 R 17 91 Q M+S32 (220) 35 (240)
Spare tire:
T 115/90 R 16 92 M61 (420) 61 (420)
Page 110 of 187

110n
Information for your safetyThe factory-approved radial tires are
matched to the vehicle and have been
selected to provide optimum safety and
driving comfort on your vehicle.
In a very real sense, both tire life and
your own safety are riding on correct
tire specifications and inflation pres-
sures, refer to page 26.
Incorrect tire inflation pressure is
a frequent cause of tire damage. It
also significantly influences the road-
holding ability of your BMW. Be sure to
check the tire inflation pressures,
including the spare tire, on a regular
basis, at least twice a month and before
doing any extended driving, refer to
page 26. If this is not done, incorrect
tire pressures can cause driving insta-
bility and tire damage, ultimately
resulting in accidents.<
Check the inflation pressure of
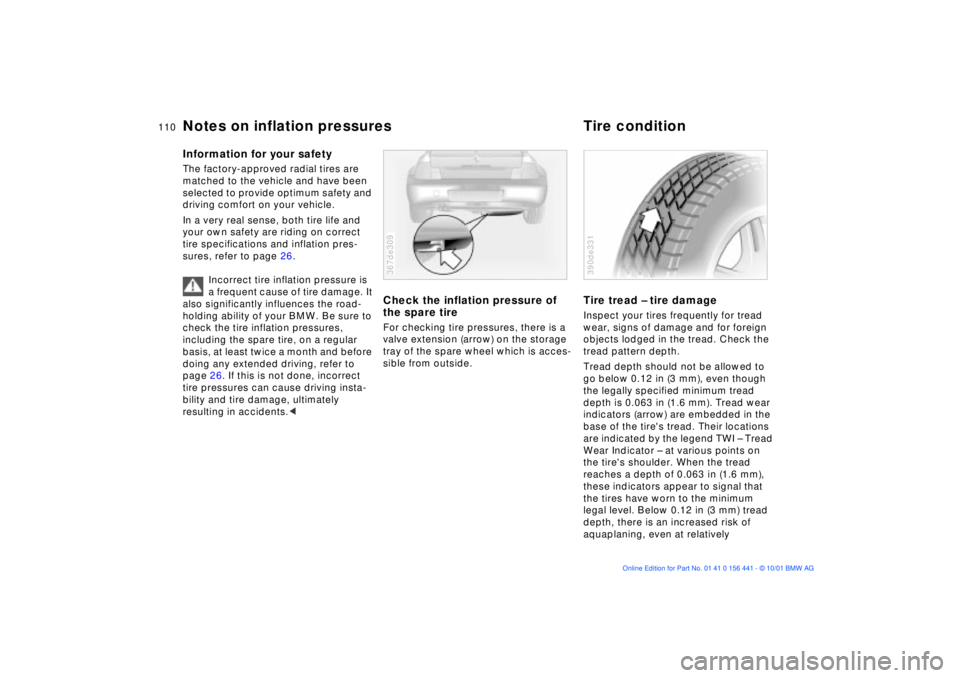
the spare tire For checking tire pressures, there is a
valve extension (arrow) on the storage
tray of the spare wheel which is acces-
sible from outside.367de309
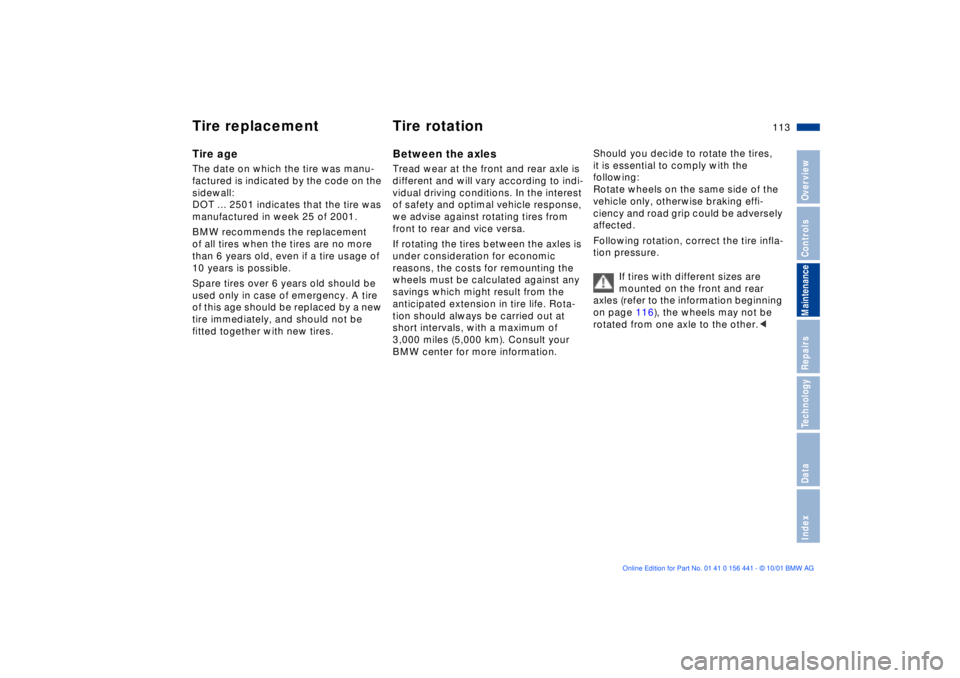
Tire tread Ð tire damageInspect your tires frequently for tread
wear, signs of damage and for foreign
objects lodged in the tread. Check the
tread pattern depth.
Tread depth should not be allowed to
go below 0.12 in (3 mm), even though
the legally specified minimum tread
depth is 0.063 in (1.6 mm). Tread wear
indicators (arrow) are embedded in the
base of the tire's tread. Their locations
are indicated by the legend TWI Ð Tread
Wear Indicator Ð at various points on
the tire's shoulder. When the tread
reaches a depth of 0.063 in (1.6 mm),
these indicators appear to signal that
the tires have worn to the minimum
legal level. Below 0.12 in (3 mm) tread
depth, there is an increased risk of
aquaplaning, even at relatively 390de331
Notes on inflation pressures Tire condition
Page 113 of 187

113n
IndexDataTechnologyRepairsMaintenanceControlsOverview
Tire replacement Tire rotationTire ageThe date on which the tire was manu-
factured is indicated by the code on the
sidewall:
DOT ... 2501 indicates that the tire was
manufactured in week 25 of 2001.
BMW recommends the replacement
of all tires when the tires are no more
than 6 years old, even if a tire usage of
10 years is possible.
Spare tires over 6 years old should be
used only in case of emergency. A tire
of this age should be replaced by a new
tire immediately, and should not be
fitted together with new tires.
Between the axlesTread wear at the front and rear axle is
different and will vary according to indi-
vidual driving conditions. In the interest
of safety and optimal vehicle response,
we advise against rotating tires from
front to rear and vice versa.
If rotating the tires between the axles is
under consideration for economic
reasons, the costs for remounting the
wheels must be calculated against any
savings which might result from the
anticipated extension in tire life. Rota-
tion should always be carried out at
short intervals, with a maximum of
3,000 miles (5,000 km). Consult your
BMW center for more information.Should you decide to rotate the tires,
it is essential to comply with the
following:
Rotate wheels on the same side of the
vehicle only, otherwise braking effi-
ciency and road grip could be adversely
affected.
Following rotation, correct the tire infla-
tion pressure.
If tires with different sizes are
mounted on the front and rear
axles (refer to the information beginning
on page 116), the wheels may not be
rotated from one axle to the other.<
Page 116 of 187

116n
Approved wheel and tire specificationsBMW tests certain tire brands for each tire size, classifies them as road-safe and
approves them. Consult your BMW center for more information.
Observe any regulations applicable in the country of use, e.g. requiring entry in
the vehicle documents.
Tire specifications Suitable for
snow chainsSteel wheel
(rim)Light-alloy
wheel
Z3 roadster 2.5i
Summer
225/50 R 16 92 V
225/50 ZR 16[Ð 7Jx16
Front: 225/45 ZR 17
Rear: 245/40 ZR 17Ð
ÐÐ
Ð7.5Jx17
8.5Jx17
Winter (M+S)
205/60 R 15 91 Q/T/H[ 6.5Jx15 7Jx15
205/55 R 16 91 Q/T/H
225/50 R 16 92 Q/T/H[7Jx16 7Jx16
225/45 R 17 91 Q/T/H[Ð
Ð7.5Jx17
8Jx17
Spare tire
T 115/90 R 16 92 M Ð 3.00Bx16 Ð
Use the spare wheel only for short
distances (to reach the nearest BMW
center, for instance). Due to the altered
handling characteristics, do not exceed
a maximum speed of 50 mph (80 km/h).
Mounting snow chains on the spare tire
is not possible. Be sure that all tires are
properly inflated, refer to page 27.
The use of rims and lug bolts that
do not meet the specifications of
the original factory-installed equipment
will affect the safe operation of your
vehicle and may cause an accident and
personal injury.
Never mix tires of different design, such
as steel-belted radials with bias-belted
or bias-ply tires etc. Mixing tire types
will adversely affect road-holding and
can lead to loss of vehicle control.<
Page 117 of 187

117n
IndexDataTechnologyRepairsMaintenanceControlsOverview
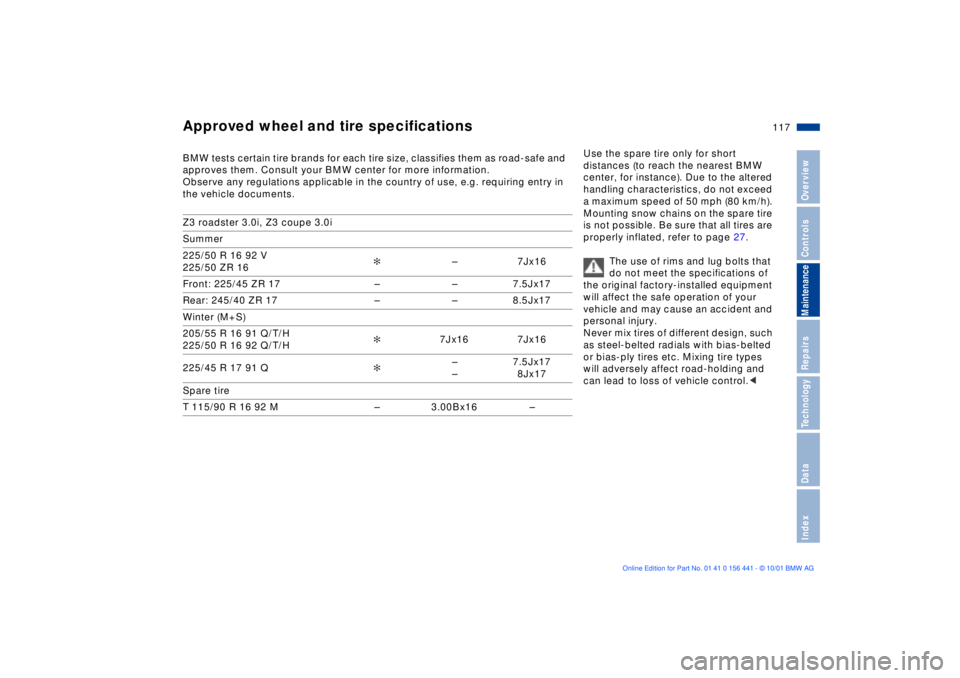
Approved wheel and tire specificationsBMW tests certain tire brands for each tire size, classifies them as road-safe and
approves them. Consult your BMW center for more information.
Observe any regulations applicable in the country of use, e.g. requiring entry in
the vehicle documents.
Z3 roadster 3.0i, Z3 coupe 3.0i
Summer
225/50 R 16 92 V
225/50 ZR 16[Ð 7Jx16
Front: 225/45 ZR 17 Ð Ð 7.5Jx17
Rear: 245/40 ZR 17 Ð Ð 8.5Jx17
Winter (M+S)
205/55 R 16 91 Q/T/H
225/50 R 16 92 Q/T/H[7Jx16 7Jx16
225/45 R 17 91 Q[Ð
Ð7.5Jx17
8Jx17
Spare tire
T 115/90 R 16 92 M Ð 3.00Bx16 Ð
Use the spare tire only for short
distances (to reach the nearest BMW
center, for instance). Due to the altered
handling characteristics, do not exceed
a maximum speed of 50 mph (80 km/h).
Mounting snow chains on the spare tire
is not possible. Be sure that all tires are
properly inflated, refer to page 27.
The use of rims and lug bolts that
do not meet the specifications of
the original factory-installed equipment
will affect the safe operation of your
vehicle and may cause an accident and
personal injury.
Never mix tires of different design, such
as steel-belted radials with bias-belted
or bias-ply tires etc. Mixing tire types
will adversely affect road-holding and
can lead to loss of vehicle control.<
Page 150 of 187

150n
Wheel change
The wheel with the flat tire cannot
be placed in the spare wheel
bracket in the place of the spare
wheel.<
There is a plastic bag in the onboard
tool kit. Put the flat tire and the storage
tray into this bag.
Do not reposition the storage tray
in the spare wheel bracket without
the spare wheel.<
Using the lifting handle, pull the spare
wheel bracket upward until the spring
retainer catches. Secure the bracket
with the hexagon nut Ð ensure that it is
tightened down correctly.
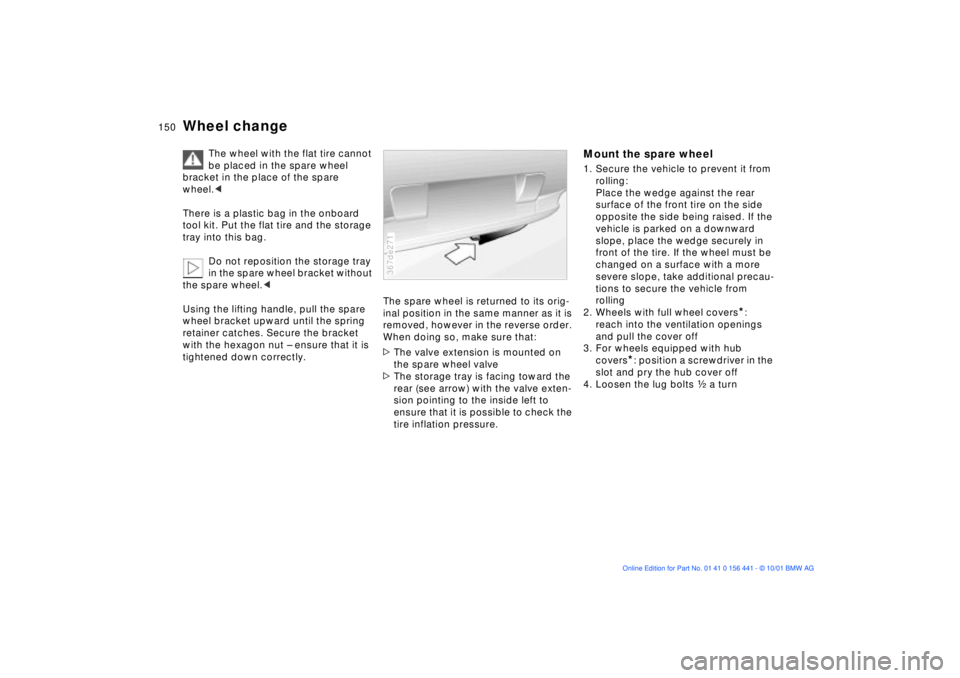
The spare wheel is returned to its orig-
inal position in the same manner as it is
removed, however in the reverse order.
When doing so, make sure that:
>The valve extension is mounted on
the spare wheel valve
>The storage tray is facing toward the
rear (see arrow) with the valve exten-
sion pointing to the inside left to
ensure that it is possible to check the
tire inflation pressure.367de271
Mount the spare wheel1. Secure the vehicle to prevent it from
rolling:
Place the wedge against the rear
surface of the front tire on the side
opposite the side being raised. If the
vehicle is parked on a downward
slope, place the wedge securely in
front of the tire. If the wheel must be
changed on a surface with a more
severe slope, take additional precau-
tions to secure the vehicle from
rolling
2. Wheels with full wheel covers
*:
reach into the ventilation openings
and pull the cover off
3. For wheels equipped with hub
covers
*: position a screwdriver in the
slot and pry the hub cover off
4. Loosen the lug bolts g a turn
Page 151 of 187

151n
IndexDataTechnologyRepairsMaintenanceControlsOverview
Wheel change5. Position the jack on the vehicle:
>Plastic elements are mounted on
the vehicle floorpan for positioning
the jack. These positions (refer to
the arrows) are located approx.
16 in (40 cm) from the front wheel
opening and
10 in (25 cm) from the rear wheel
opening
>If necessary, remove snow, ice or
mud from the plastic elements
>Screw the jack arm up until the
jack just fits under the vehicle367de382
>Position the jack at the jacking
point closest to the flat tire so that
the jack base is vertically below
the jacking point and the entire
surface of the head of the jack will
move squarely into the recess of
the plastic element when the jack
is cranked
>Crank the jack until the wheel you
are changing is off of the ground.
6. Unscrew the lug bolts and remove
the wheel
7. Remove accumulations of mud or
dirt from the mounting surfaces of
the wheel and hub. Clean the lug
bolts367de065
8. Take the centering pin from the
vehicle tool kit. Insert the centering
pin together with the plastic cap
into one of the bolt sockets
9. Position the spare wheel and screw
at least two lug bolts into opposite
bolt sockets. Remove the centering
pin
10. Screw in the remaining lug bolts.
Tighten all the bolts down correctly
11. Lower the jack and remove it from
beneath the vehicle
12. Tighten the lug bolts in a diagonal
pattern367de066