Page 89 of 177

22-07-2002
YOUR 307 SW IN DETAIL87
Manual operation
If you wish, you can make a different
choice from that offered by the sys-
tem by changing a setting. The otherfunctions will still be controlled auto-
matically. Pressing the "AUTO" but-ton returns the system to completelyautomatic operation.
4. Air conditioning Press this button to switch
off the air conditioning. Thesymbol "ECO" is displayed.Automatic operation of the
air conditioning is resumed when the
button is pressed again. The symbol"A/C" is displayed. Note It is quite normal that the condensa- tion created by the air conditioningresults in a flow of water under the
vehicle when it is stationary.
5. Air distribution
Pressing this button several times in successionenables the air flow to bedirected in turn towards:
Ð the windscreen (de-icing or demis- ting), Ð the windscreen and the footwells,
Ð the footwells,
Ð the centre and side vents and the
footwells,
Ð the centre and side vents.
6. Air flow
The flow of air can be increased or reducedby pressing buttons +
or - respectively.
7. Air intake Press this button for recir-
culation of the interior air.Recirculation, shown on
the display, enables the
passenger compartment to be insu-lated from exterior odours andsmoke.
Avoid prolonged recirculation of
interior air. To do this, press the but-ton again to resume intake of exte-
rior air. 8. Switching the system off
The "OFF" button enablesthe entire system to be swit-
ched off.
9. Demisting the rear screen and the mirrors
Press this button to demistthe rear screen and the mir-rors. Demisting switches
off automatically. It is pos-sible to stop operation of
the demisting before it is switched offautomatically by pressing the buttonagain.
Important precaution Operate the air conditioning for 5 to 10 minutes, once or twice a month,
to keep it in good working order. If the system does not produce cold
air, do not use it and contact your
PEUGEOT dealer. Note: to optimise the operation of
the air conditioning, leave the vents open.
Page 90 of 177
FRONT SEATS
1. Forwards-backwards adjustment Lift the control and slide the seat forwards or backwards.
2. Seat back angle adjustment Push the handle towards the rear.
3. Driver's or passenger's seat height adjustment Pull the handle upwards or push it downwards as many times asnecessary to obtain the requiredposition.
4. Heated seats control Press the switch. The temperatu-
re is controlled automatically. Pressing the switch again stops operation. Note: the command for activa-
tion of the heating of the seat(s) remains memorised for twominutes after the ignition has
been switched off.
YOUR 307 SW IN DETAIL
88
22-07-2002
Page 91 of 177

22-07-2002
Never drive with the head restraints removed; theymust be in place and cor-rectly adjusted.
5. ArmrestsThese can be folded down and are removable.
To remove them, press the but- ton located between the armrestand the side of the seat and pull.
6. Head restraint height and angle adjustment
To raise or lower the restraint, pull it forwards, sliding it at thesame time.
To remove the head restraint, place it in the top position, lift thelug using a coin and pull it for-wards and upwards at the sametime.
To put it back in position, locate the stems of the restraint in theholes, taking care to keep themin line with the seat back. Active seat back
(front seat)
This possesses a device to prevent"whiplash". When there is an impact from the
rear, the action of the body on theseat back forces the head restraintforwards and upwards, preventingthe head being thrown backwards.
7. Storage drawers There is a storage drawer under each front seat.
Ð To open it, lift it and pull.
Ð To take it out, open it to its full extent, press the ends of the slides
and lift it, then remove it completely.
Do not place heavy objects in thedrawers. Under the front passenger seat, the layout of the floor allows for storageof a first aid kit and a warning triangle(small version).
8. Aviation style table There is an aviation style table, fitted
with a can holder, on the back ofeach front seat. REAR HEAD RESTRAINTS These have a high position for when they are in use and a low position forwhen they are stored. The head restraints are also remo- vable.
To remove them, pull upwards as far as the stop then press the lug (sideseat) or the two lugs (centre seat).
YOUR 307 SW IN DETAIL
89
The adjustment is correct when the upper edge of thehead restraint is level withthe top of the head.
Page 92 of 177

22-07-2002
Never drive with the head restraints removed; theymust be in place and cor-rectly adjusted.
5. ArmrestsThese can be folded down and are removable.
To remove them, press the but- ton located between the armrestand the side of the seat and pull.
6. Head restraint height and angle adjustment
To raise or lower the restraint, pull it forwards, sliding it at thesame time.
To remove the head restraint, place it in the top position, lift thelug using a coin and pull it for-wards and upwards at the sametime.
To put it back in position, locate the stems of the restraint in theholes, taking care to keep themin line with the seat back. Active seat back
(front seat)
This possesses a device to prevent"whiplash". When there is an impact from the
rear, the action of the body on theseat back forces the head restraintforwards and upwards, preventingthe head being thrown backwards.
7. Storage drawers There is a storage drawer under each front seat.
Ð To open it, lift it and pull.
Ð To take it out, open it to its full extent, press the ends of the slides
and lift it, then remove it completely.
Do not place heavy objects in thedrawers. Under the front passenger seat, the layout of the floor allows for storageof a first aid kit and a warning triangle(small version).
8. Aviation style table There is an aviation style table, fitted
with a can holder, on the back ofeach front seat. REAR HEAD RESTRAINTS These have a high position for when they are in use and a low position forwhen they are stored. The head restraints are also remo- vable.
To remove them, pull upwards as far as the stop then press the lug (sideseat) or the two lugs (centre seat).
YOUR 307 SW IN DETAIL
89
The adjustment is correct when the upper edge of thehead restraint is level withthe top of the head.
Page 93 of 177

REAR SEATS Forwards-backwards adjustment* Lift the bar Aand slide the seat for-
wards or backwards.
From the 3rd row, you can pull thestrap Band slide the seat forwards
or backwards.This manoeuvre makes it easier for
passengers to exit the 3rd row, whenthe 2nd row seat is folded.
Seat back angle adjustment Pull one strap C(two straps for each
side seat, one for the centre seat) and adjust to the required angle. Release the strap to lock.
To adjust the angle of the seat from the 3rd row or the boot, pull onestrap Cat the rear of the seat.
Note: the additional seat can be
angled and folded by means of asingle strap Cat the rear of the seat
on the right or on the left. Folding a side seat: access to the 3rd row: Place the head restraint in the low position. Push the seat back fully
using bar A.
Fold the seat back onto the cushion using the strap C.
Note: you can lock the seat back in
this position (e.g. for removal) bypressing down on it. Push control Dupwards to release
the rear feet.Place the seat in the "folded" posi- tion. exit from the 3rd row or folding from the boot: Place the head restraint in the low posi- tion. Push the seat back fully
using the
strap B.
Fold the seat back onto the cushion using the strap C.
Note: you can lock the seat back in this
position (for removal) by pressing downon it. Push the control Dupwards to release
the rear feet.Place the seat in the folded position.
YOUR 307 SW IN DETAIL
90
While driving attach the retaining strap (contained in the storage pocket of the corresponding front seat): - on the 2nd row: on one side, to the carrying handle G and on the other
side, to the grab handle,
- on the 3rd row: on one side, to the carrying handle G and on the other side, to the rear armrest grab handle. * Excluding additional seat.
22-07-2002
Page 94 of 177

22-07-2002
YOUR 307 SW IN DETAIL91
Centre seat table position Place the head restraint in the low position. Fold the seat back onto the cushion using the strap C.
You now have a small table with fourcan holders, two pen holders and a
document holder.
Folding the centre seat Place the head restraint in the low position. Push the seat back full y using the
bar Aor the strap B.
Fold the seat back onto the cushion using the strap C.
Note: you can lock the seat back in
this position (for removal) by pres-sing down on it. Push control Dupwards to release
the rear feet.Place the seat in the folded position. While driving, attach the retaining strap (contained in the storagepocket of one of the front seats)on one side to the carrying handleG and on the other side, to thegrab handle. Folding an additional seat Place the head restraint in the low position. Slide the strap
C(at the rear of the
seat to the right or to the left) down- wards, while pulling it backwards andpress on the seat back at the sametime to release it. Fold the seat back onto the seat cushion. Note: you can lock the seat back in
this position (for removal) by pres- sing down on it. Push the two levers Eupwards to
unlock the rear feet.Place the seat in the folded position. While driving, attach the retaining strap (contained in the storagepocket of the additional seat) onone side to the carrying handle Gand on the other side, to the reararmrest grab handle.
Page 95 of 177

22-07-2002
Removing a seat Fold the corresponding seat.
Tilt the two red levers Funder the
seat to release the front feet.Lift it and carry it using the carrying handle G.
In the 3rd row, position the fixingpoint closers to obtain a flat boot
floor. Refitting a seat
In the 3rd row, first remove the floor fixing point closers using a screwdri-ver or a coin. Before positioning the 3rd row seats, move those of the 2nd row forward. Check that nothing is obstructing the floor fixing points thus pre-venting correct locking of the seatfeet. Carry the seat using the carrying handle
G.
Position the front feet in the securingpoints.
Locked Free Push control Dupwards to check
that the rear feet are free.
Tilt the folded seat backwards. The rear feet lock automatically, as do the two red levers
F.
Check that the seat is locked cor-
rectly. Lift the seat back, first releasing it by pulling the strap C.
To lock the additional seats, pressthe two levers E.
YOUR 307 SW IN DETAIL
92
Only lock the seat back on the cushion occasio-
nally, to avoid undue wearof the seat covers.
Avoid placing luggage on foldedseats. Never use the adjusting straps to remove, refit or carry a seat.
Page 96 of 177

22-07-2002
''Isofix'' mountings
Available on the two side rear seats, the Isofix mountings allow for fittingof a special child seat for
PEUGEOT vehicles and sold by
PEUGEOT dealers. The locks incorporated in the child seat fit onto the Isofix mountings andensure safe, reliable and fast assem-
bly. The special approved child seat is
the Isofix KIDDY seat. It can be usedin the "rear facing" position when theside seats are recentred from birth to13 kg and in the "forwards facing"position from 9 to 18 kg. In the "forwards facing" position, the front seat must be in the mid-wayposition on the slide, with the seatback upright. The combined use of the Isofix mounting, the restraining cushion
and the seat belt is then compulsory.
The Isofix KIDDY seat can also be installed on a side seat in the 2nd
row, positioned in the 3rd row. In this
case, the Isofix KIDDY seat must bein the "rear facing" position, the bodysupported on the seat back of thecorresponding 2nd row seat.
YOUR 307 SW IN DETAIL
93
This seat can also be used on seats not fitted with Isofix mountings: inthis case it is compulsory to attach itto the vehicle's seat by means of thethree-point seat belt.
When the Isofix KIDDY seat is fit- ted in the "rear facing" positionon the front passenger seat, it isimperative that that passenger airbag be disarmed. Otherwise there is a risk the child could be seriously injured or evenkilled due to deployment of the airbag. Follow the instructions for fitting the child seat in the manufactu-rer's instruction booklet.
 1
1 2
2 3
3 4
4 5
5 6
6 7
7 8
8 9
9 10
10 11
11 12
12 13
13 14
14 15
15 16
16 17
17 18
18 19
19 20
20 21
21 22
22 23
23 24
24 25
25 26
26 27
27 28
28 29
29 30
30 31
31 32
32 33
33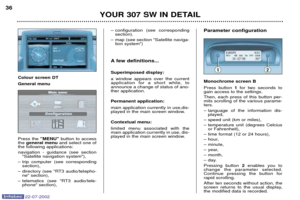 34
34 35
35 36
36 37
37 38
38 39
39 40
40 41
41 42
42 43
43 44
44 45
45 46
46 47
47 48
48 49
49 50
50 51
51 52
52 53
53 54
54 55
55 56
56 57
57 58
58 59
59 60
60 61
61 62
62 63
63 64
64 65
65 66
66 67
67 68
68 69
69 70
70 71
71 72
72 73
73 74
74 75
75 76
76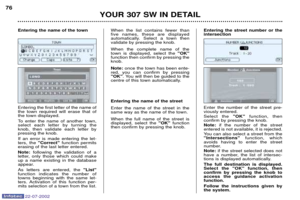 77
77 78
78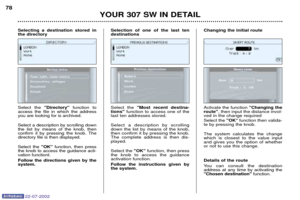 79
79 80
80 81
81 82
82 83
83 84
84 85
85 86
86 87
87 88
88 89
89 90
90 91
91 92
92 93
93 94
94 95
95 96
96 97
97 98
98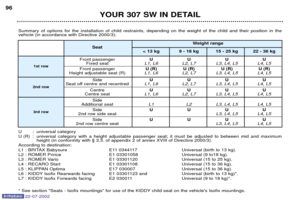 99
99 100
100 101
101 102
102 103
103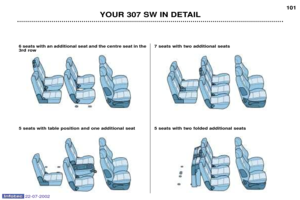 104
104 105
105 106
106 107
107 108
108 109
109 110
110 111
111 112
112 113
113 114
114 115
115 116
116 117
117 118
118 119
119 120
120 121
121 122
122 123
123 124
124 125
125 126
126 127
127 128
128 129
129 130
130 131
131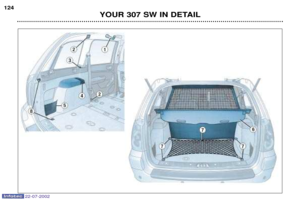 132
132 133
133 134
134 135
135 136
136 137
137 138
138 139
139 140
140 141
141 142
142 143
143 144
144 145
145 146
146 147
147 148
148 149
149 150
150 151
151 152
152 153
153 154
154 155
155 156
156 157
157 158
158 159
159 160
160 161
161 162
162 163
163 164
164 165
165 166
166 167
167 168
168 169
169 170
170 171
171 172
172 173
173 174
174 175
175 176
176