Page 1 of 177
2YOUR 307 SW AT A GLANCE
22-07-2002
Page 2 of 177

22-07-2002
3YOUR 307 SW AT A GLANCE
1 - Driver's air bag.
Horn.
2 - Lights and direction indicators stalk.
3 - Audio remote control stalk.
4 - Instrument dials.
5 - Windscreen wash-wipe stalk.
Trip computer stalk.
6 - Alarm button.
7 - Central locking button.
8 - Hazard warning lights switch.
9 - Multi-function display.
10 - Brightness sensor.
11 - Central adjustable ventilation and air flow regulation vents.
12 - Windscreen demisting vents. 13 - Speaker (tweeter)
location.
14 - Side window demisting vent.
15 - Side adjustable ventilation and air flow regulation vent.
16 - Passenger air bag.
17 - Glove box.
18 - RB3, RD3 or RT3 audio equipment.
19 - Heated seat switches.
20 - CD changer.
21 - Ventilation / air conditioning controls.
22 - Front ashtray.
23 - Rear footwell heating vent.
24 - 12 V accessories socket.
25 - Gear lever.
26 - Can holder.
27 - Handbrake. 28 - Rubbish container.
29 - Passenger air bag
disarming switch*.
30 - Panoramic roof concealing flap control.
31 - Steering lock and ignition.
32 - Bonnet opening control.
33 - Steering wheel adjust- ment control.
34 - Fuse box.
35 - Electric mirror controls. Window controls. Rear window lockingcontrol.
36 - Headlamp height adjustment.
37 - Cruise control.
* According to destination.
Page 3 of 177

4YOUR 307 SW AT A GLANCE
22-07-2002
THE KEYS The keys allow you to switch on the ignition and to independentlyoperate the front doors, the fuelfiller cap, the glove box and thepassenger air bag disarmingswitch. Central locking
From the driver's door, the keys allow you to lock, deadlock orunlock the doors and the tailgateand to fold back the exterior mir-rors. If one of the doors or the boot is open, it is impossible to operatethe central locking; an audiblesignal indicates locking by remo-te control. The remote control performs the same functions at a distance. The remote control key Locking ➜
Press button Ato lock the
vehicle. This is confirmed by fixed lighting of the direction indi-cators for approximately twoseconds.
Note: a long press on button A,
in addition to deadlocking, auto-matically closes the windows.
Vehicles fitted with deadlocking
Deadlocking renders theinternal and external doorlocking controls inoperative.
➜ Press button Ato deadlock
the vehicle.
This is confirmed by fixed lighting of the direction indicators forapproximately two seconds. Note: a long press on button A
permits automatic closing of the windows, in addition to deadloc-king.
A second press on button Ain
the five seconds following dead- locking, changes deadlocking tonormal locking. This is confirmed by fixed lighting of the direction indicators forapproximately two seconds.
Unlocking Press button Bto unlock the
vehicle. This is confirmed by rapid fla- shing of the direction indicators. Note: If the vehicle is locked
and unlocking is activated inad- vertently without the doors being opened within 30 seconds, the vehicle
will re-lock automatically.
STARTING
STOP position:
the ignition is off.
1st notch, Accessories position:
the ignition is off but the acces-sories can be used. 2nd notch, Running position: the ignition is on. Starting position:
operates the starter.
102
Page 4 of 177

STEERING WHEEL
STALKS LIGHTING
Front and rear lights (ring A)Lights off Side lightsDipped / main beam headlamps Automatic switching on of lights
Automatic switching on of lights
To activate or disarm the func- tion, place the key in the acces-sories position, the lights stalk inposition 0 and press the end ofthe lights stalk for more than twoseconds.
5YOUR 307 SW AT A GLANCE
Vehicles fitted with a rear fog lamp (ring B)
Rear fog lamp (rotationof the ring forwards)
Vehicles fitted with front foglamps and a rear fog lamp(ring C) Front fog lamps (firstrotation of the ring for-wards)Front fog lampsand rear fog lamp(second rotation ofthe ring forwards)
Switching off: rotation ofthe ring rearwards.WINDSCREEN WIPERS Front 2 Rapid wipe.
1 Normal wipe.
I Intermittent wipe.
or
AUTO Automatic wipe.
0 Off.
Single wipe.
Wash-wipe: pull the stalk towards you. Automatic wipe In the AUTO position,
the wiper operates auto- matically and adjusts its
speed to the intensityof the rainfall .
Rear
Off Intermittent Wash wipe wipe
109
111
22-07-2002
Page 5 of 177
22-07-2002
6YOUR 307 SW AT A GLANCE
FRONT SEATS 1. Forwards-backwards
adjustment.
2 . Seat back angle adjustment.
3 . Driver or passenger seat
height adjustment.
4 . Heated seats switch.
5 . Front removable armrest.
6 . Head restraint height and
angle adjustment
To raise or lower the head restraint, pull it forwards, sliding it at the same time.
Never drive with the
head restraints removed.
7. Storage drawer.
8 . "Aircraft" type table.
88
Page 6 of 177
22-07-2002
Manoeuvring an additional seat: ➜seat back angle adjustment (1),
➜ head restraint height adjustment (2),
➜ folding (3),
➜ removal/refitting (4).
7YOUR 307 SW AT A GLANCE
REAR SEATS Manoeuvring a side seat: ➜forwards-backwards adjustment (1),
➜ seat back angle adjustment (2),
➜ head restraint height adjustment (3),
➜ folding (4),
➜ removal/refitting (5). Manoeuvring a centre seat: ➜
forwards-backwards adjustment (1),
➜ seat back angle adjustment,table position (2),
➜ head restraint height adjustment (3),
➜ folding (4),
➜ removal/refitting (5).
90
Page 7 of 177
8YOUR 307 SW AT A GLANCE
22-07-2002
SEAT MODULARITY AND CONFIGURATIONS
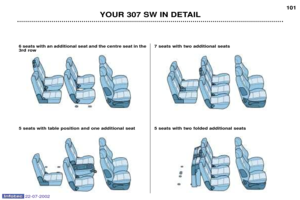
99
5 seats 5 seats with centre seat in row 3
6 seats with one additional seat 7 seats with two additional seats
Transportation of long objects with table position Loading of a large volume
Page 8 of 177

22-07-2002
9YOUR 307 SW AT A GLANCE
AIR BAGS The air bag system has been desi- gned to maximise the safety of theoccupants in the event of seriouscollisions. It works in conjunctionwith the force limiting seat belts. Front air bags These are folded in the centre of the steering wheel for the driverand in the fascia for the front
passenger. They are deployed simulta-
neously, except in cases wherethe passenger air bag is disarmed. Precautions regarding the pas- senger air bag ➜disarm the air bag if you ins-
tall a rear facing child seat,
➜ activate the air bag for an
adult passenger. Disarming the passenger air bag* ➜
with the ignition off, insert the
key into slot 1and turn the
passenger air bag switch to the "OFF" position.
As soon as you remove the childseat, turn the air bag switch to the"ON" position, to activate the air
bag again.
Operating check
With the ignition switched on (2nd notch), illumina-tion of the warning light,accompanied by an
audible signal and the message"Passenger air bag disarmed"
on the multi-function display, indi-cates that the passenger air bag isdisarmed (switch in the "OFF"
position). The warning light remains on throughout the disarming process. Side air bags* and curtain air bags* Side air bags are incorporated into the front seat back frame, on thedoor side. Curtain air bags are incorporated into the door pillars and the top ofthe passenger compartment. They are deployed independently
of each other, depending on whichside the collision occurs.
* According to country.
133134