Page 3565 of 4323
BO0HY±04
BO±4
± BODYSRS AIRBAG
3557 Author�: Date�:
2005 SEQUOIA (RM1146U)
SRS AIRBAG
PRECAUTION
The SEQUOIA is equipped with an SRS (Supplemental Restraint System) such as the driver airbag, front
passenger airbag and side airbag. Failure to carry out service operation in the correct sequence could cause
the SRS to unexpectedly deploy during servicing, possibly leading to a serious accident. Before servicing
(including removal or installation of parts, inspection or replacement), be sure to read the precautionary no-
tices in the RS section.
Page 3646 of 4323
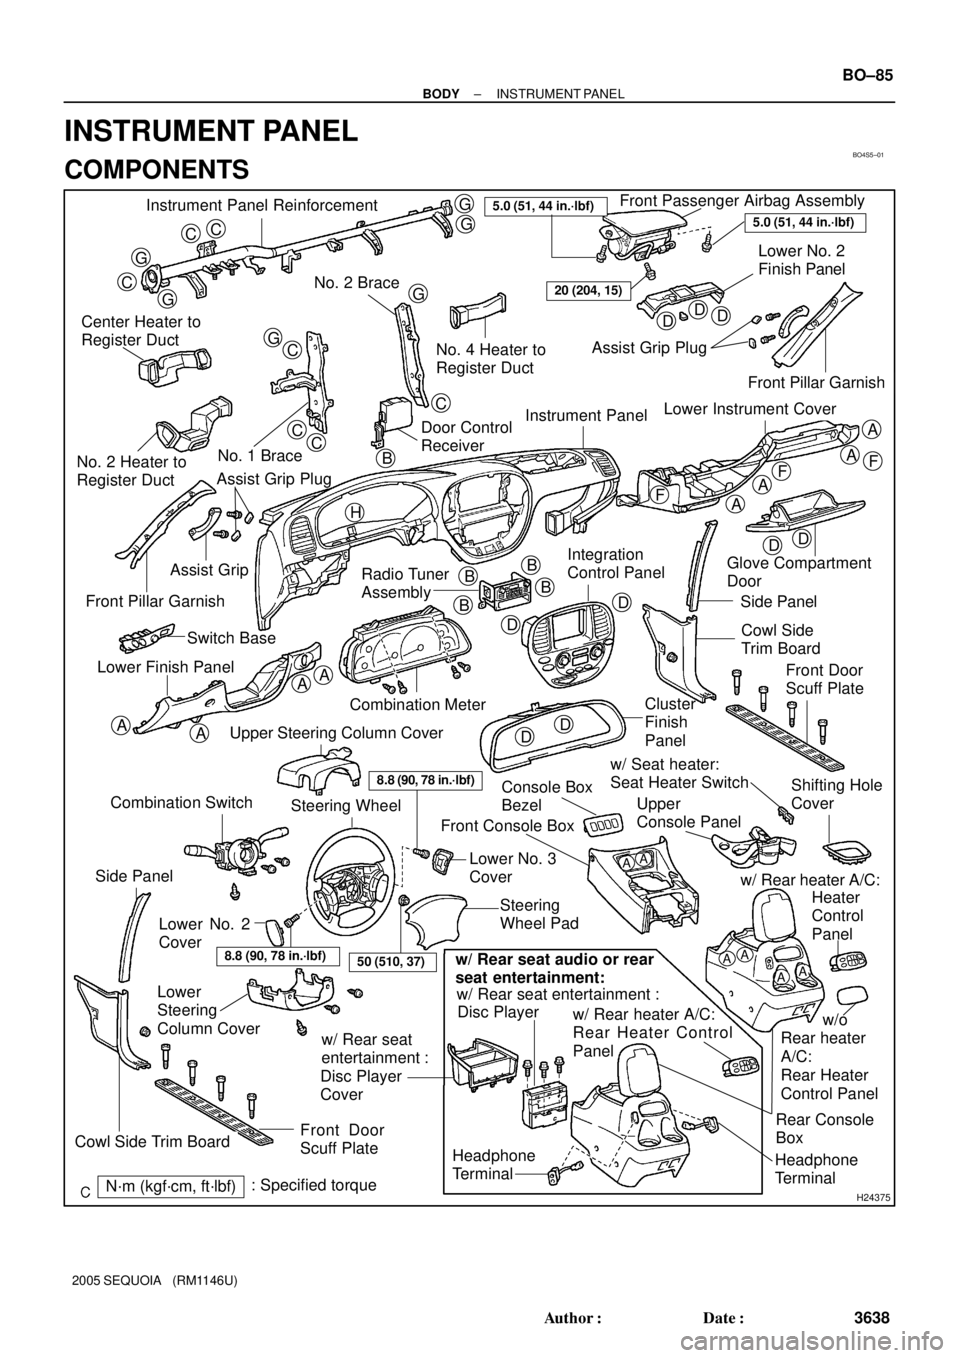
BO4S5±01
H24375
Instrument Panel ReinforcementFront Passenger Airbag Assembly
Lower No. 2
Finish Panel
No. 2 Brace
Center Heater to
Register Duct
No. 1 Brace
No. 2 Heater to
Register DuctNo. 4 Heater to
Register DuctAssist Grip Plug
Instrument Panel
Radio Tuner
Assembly Assist Grip
Front Pillar Garnish
Combination Meter Switch Base
Lower Finish PanelGlove Compartment
Door
Side Panel
Cowl Side
Trim Board
Cluster
Finish
Panel
Console Box
BezelUpper
Console Panel w/ Seat heater:
Seat Heater Switch
Steering
Wheel Pad Front Console Box
Lower
Steering
Column Cover
Front Door
Scuff Plate
N´m (kgf´cm, ft´lbf): Specified torque
CC
G
G
C
G
G
G
GC
CC
C
DDD
DD
A
A
A
A
AA
AA
F
FF
DD
D
DB
BB
B
5.0 (51, 44 in.´lbf)
20 (204, 15)
A
A
Headphone
Terminal
8.8 (90, 78 in.´lbf)
Lower No. 2
CoverLower No. 3
Cover
AAAA
Headphone
TerminalRear Console
Box w/ Rear seat entertainment :
w/ Rear heater A/C:
Rear Heater Control
Panel
w/ Rear seat
entertainment :
Disc Player
Coverw/ Rear heater A/C:
Disc Player
w/o
Rear heater
A/C:
Rear Heater
Control PanelHeater
Control
Panel
w/ Rear seat audio or rear
seat entertainment:
8.8 (90, 78 in.´lbf)
Steering Wheel
Upper Steering Column Cover
Front Door
Scuff Plate
Side Panel
Cowl Side Trim Board
5.0 (51, 44 in.´lbf)
Integration
Control Panel
Combination Switch
50 (510, 37)
Front Pillar Garnish
Lower Instrument Cover
Shifting Hole
Cover
Door Control
Receiver
Assist Grip Plug
H
B
± BODYINSTRUMENT PANEL
BO±85
3638 Author�: Date�:
2005 SEQUOIA (RM1146U)
INSTRUMENT PANEL
COMPONENTS
Page 3650 of 4323
BO4HL±02
H24383Claw
H16716
2 Clips
H16717
Clip
± BODYINSTRUMENT PANEL
BO±89
3642 Author�: Date�:
2005 SEQUOIA (RM1146U)
REMOVAL
1. DISCONNECT CABLE FROM NEGATIVE BATTERY
TERMINAL
Wait for 90 seconds after disconnecting the cable to prevent the
airbag working.
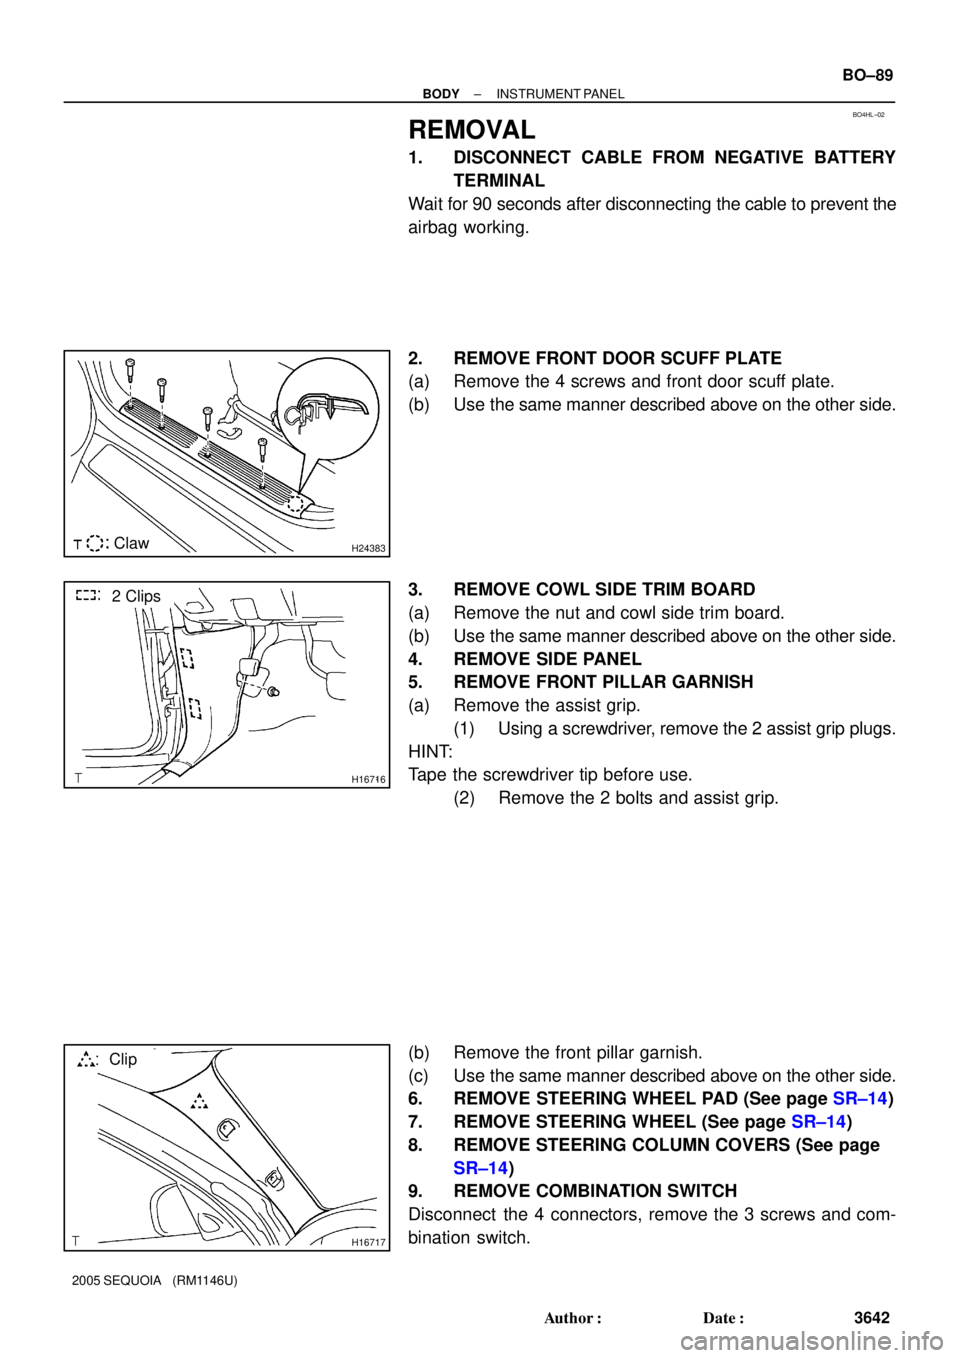
2. REMOVE FRONT DOOR SCUFF PLATE
(a) Remove the 4 screws and front door scuff plate.
(b) Use the same manner described above on the other side.
3. REMOVE COWL SIDE TRIM BOARD
(a) Remove the nut and cowl side trim board.
(b) Use the same manner described above on the other side.
4. REMOVE SIDE PANEL
5. REMOVE FRONT PILLAR GARNISH
(a) Remove the assist grip.
(1) Using a screwdriver, remove the 2 assist grip plugs.
HINT:
Tape the screwdriver tip before use.
(2) Remove the 2 bolts and assist grip.
(b) Remove the front pillar garnish.
(c) Use the same manner described above on the other side.
6. REMOVE STEERING WHEEL PAD (See page SR±14)
7. REMOVE STEERING WHEEL (See page SR±14)
8. REMOVE STEERING COLUMN COVERS (See page
SR±14)
9. REMOVE COMBINATION SWITCH
Disconnect the 4 connectors, remove the 3 screws and com-
bination switch.
Page 3652 of 4323
H16202
H11371
H24860
4 Clips
H16748
6 Clips
± BODYINSTRUMENT PANEL
BO±91
3644 Author�: Date�:
2005 SEQUOIA (RM1146U)
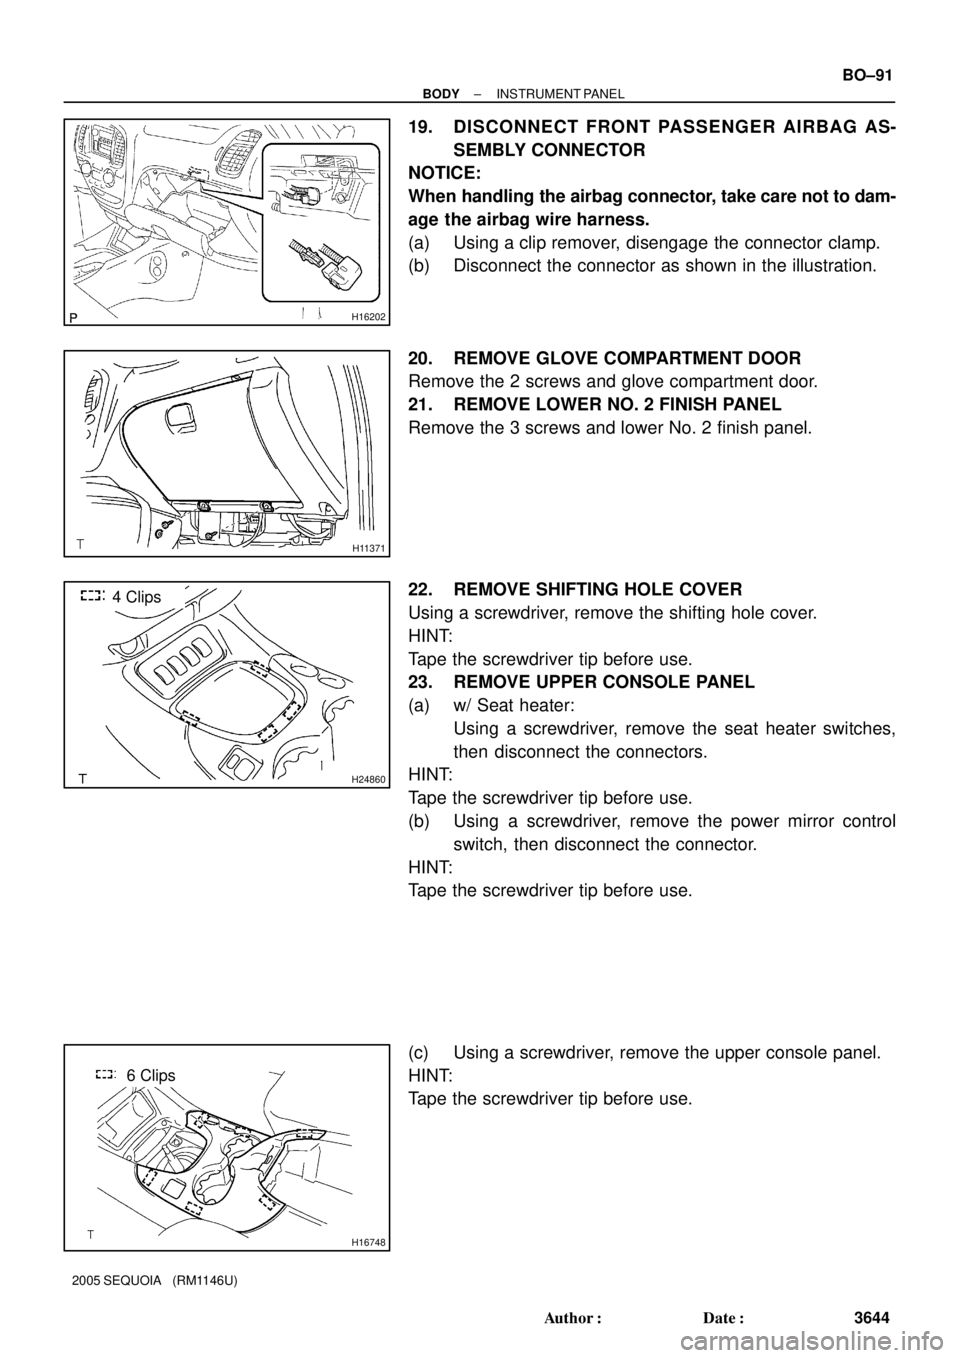
19. DISCONNECT FRONT PASSENGER AIRBAG AS-
SEMBLY CONNECTOR
NOTICE:
When handling the airbag connector, take care not to dam-
age the airbag wire harness.
(a) Using a clip remover, disengage the connector clamp.
(b) Disconnect the connector as shown in the illustration.
20. REMOVE GLOVE COMPARTMENT DOOR
Remove the 2 screws and glove compartment door.
21. REMOVE LOWER NO. 2 FINISH PANEL
Remove the 3 screws and lower No. 2 finish panel.
22. REMOVE SHIFTING HOLE COVER
Using a screwdriver, remove the shifting hole cover.
HINT:
Tape the screwdriver tip before use.
23. REMOVE UPPER CONSOLE PANEL
(a) w/ Seat heater:
Using a screwdriver, remove the seat heater switches,
then disconnect the connectors.
HINT:
Tape the screwdriver tip before use.
(b) Using a screwdriver, remove the power mirror control
switch, then disconnect the connector.
HINT:
Tape the screwdriver tip before use.
(c) Using a screwdriver, remove the upper console panel.
HINT:
Tape the screwdriver tip before use.
Page 3653 of 4323

H16749
H18899
H243734 Claws
H16751
2 Clips
H21029
BO±92
± BODYINSTRUMENT PANEL
3645 Author�: Date�:
2005 SEQUOIA (RM1146U)
24. REMOVE REAR CONSOLE BOX
(a) w/ Rear heater A/C:
Using a screwdriver, remove the rear heater control pan-
el, then disconnect the connector.
HINT:
Tape the screwdriver tip before use.
(b) w/ Headphone terminal.
Using a screwdriver, remove the headphone terminal and
the connector.
(c) w/ Rear seat entertainment:
(1) Remove the disc bracket.
(2) Remove the 3 bolts and disc player.
(3) Disconnect the connector.
(d) Remove the 4 bolts and rear console box.
25. REMOVE CONSOLE BOX BEZEL
(a) Using a screwdriver, remove the console box bezel.
HINT:
Tape the screwdriver tip before use.
(b) Disconnect the connectors.
26. REMOVE FRONT CONSOLE BOX
Remove the 2 bolts, 2 clips and front console box.
27. REMOVE LOWER INSTRUMENT COVER
(a) Remove the 4 bolts and 3 screws.
(b) Using a screwdriver, remove the lower instrument cover.
HINT:
Tape the screwdriver tip before use.
28. REMOVE PASSENGER AIRBAG ASSEMBLY
(a) Remove the 2 bolts holding the front passenger airbag
assembly and instrument panel.
Torque: 5.0 N´m (51 kgf´cm, 44 in.´lbf)
Page 3654 of 4323
H11181
± BODYINSTRUMENT PANEL
BO±93
3646 Author�: Date�:
2005 SEQUOIA (RM1146U)
(b) Remove the bolt holding the front passenger airbag as-
sembly and instrument panel reinforcement.
Torque: 20 N´m (204 kgf´cm, 15 ft.´lbf)
CAUTION:
�Do not store the front passenger airbag assembly
with the airbag deployment side facing down.
�Never disassemble the front passenger airbag as-
sembly.
29. REMOVE NO. 4 HEATER TO REGISTER DUCT
30. REMOVE INSTRUMENT PANEL
(a) Remove the nut.
(b) Disconnect the connectors and remove the instrument
panel.
Page 3661 of 4323
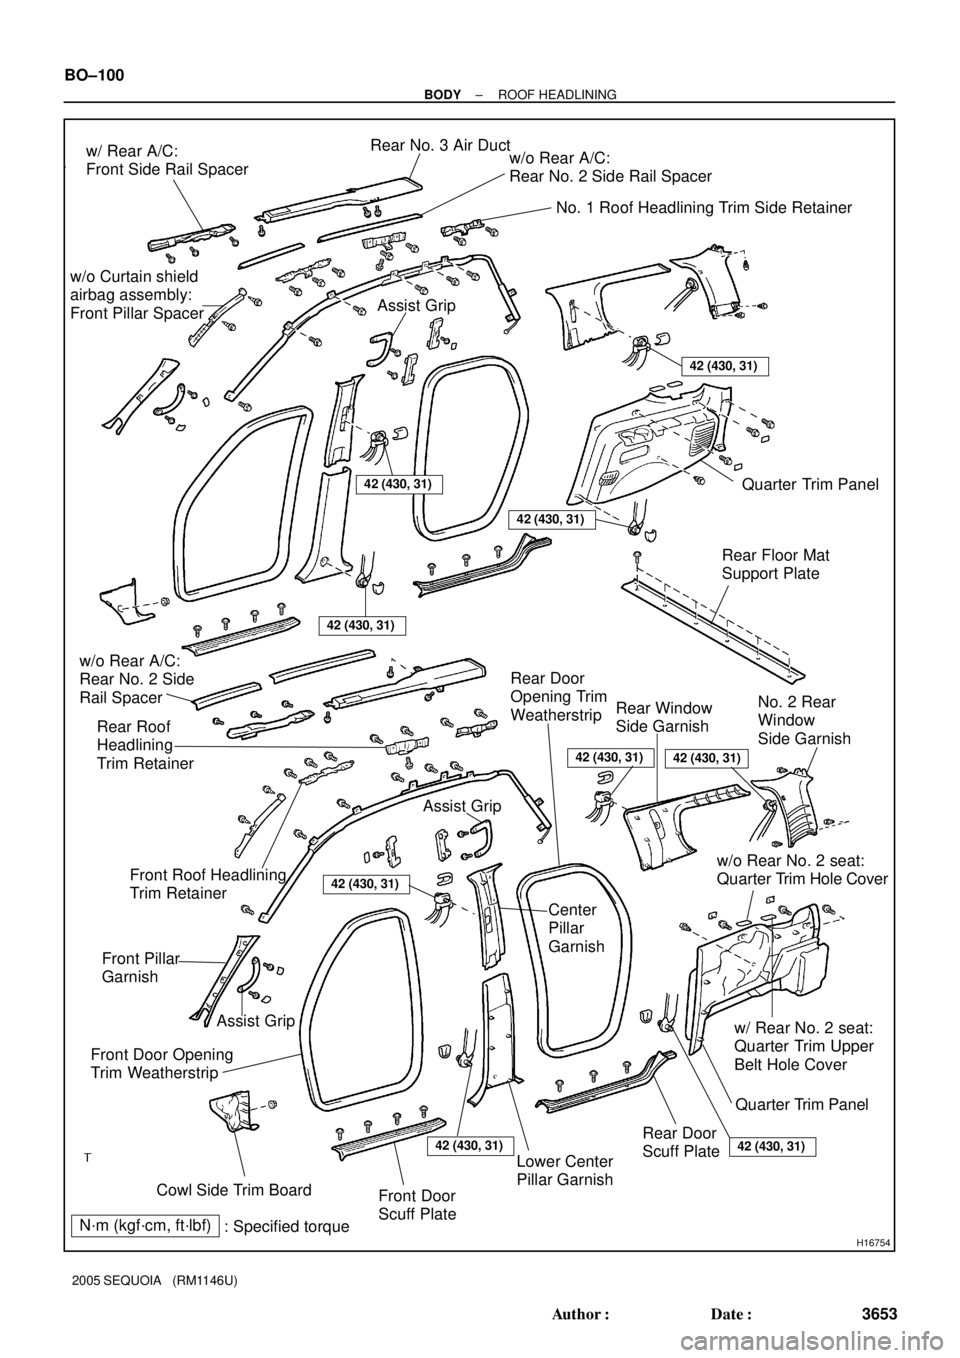
H16754
Rear No. 3 Air Duct
w/o Rear A/C:
Rear No. 2 Side Rail Spacer
No. 1 Roof Headlining Trim Side Retainer w/ Rear A/C:
Front Side Rail Spacer
w/o Curtain shield
airbag assembly:
Front Pillar Spacer
Quarter Trim Panel
Front Door
Scuff PlateLower Center
Pillar GarnishQuarter Trim Panel w/ Rear No. 2 seat:
Quarter Trim Upper
Belt Hole Cover
Rear Door
Scuff Plate Center
Pillar
Garnish Assist Grip
Assist Grip
Front Door Opening
Trim Weatherstrip
Cowl Side Trim Board Front Pillar
GarnishFront Roof Headlining
Trim Retainer
Rear Roof
Headlining
Trim Retainer w/o Rear A/C:
Rear No. 2 Side
Rail Spacer
Rear Window
Side GarnishNo. 2 Rear
Window
Side Garnish
Rear Door
Opening Trim
Weatherstrip
w/o Rear No. 2 seat:
Quarter Trim Hole Cover
Rear Floor Mat
Support Plate
42 (430, 31)
42 (430, 31)
42 (430, 31)
42 (430, 31)
N´m (kgf´cm, ft´lbf)
: Specified torque
42 (430, 31)
42 (430, 31)
42 (430, 31)
42 (430, 31)42 (430, 31)
Assist Grip
BO±100
± BODYROOF HEADLINING
3653 Author�: Date�:
2005 SEQUOIA (RM1146U)
Page 3663 of 4323
H16718
Clip
H16719
4 Clips
H10441
H17900
4 Claws BO±102
± BODYROOF HEADLINING
3655 Author�: Date�:
2005 SEQUOIA (RM1146U)
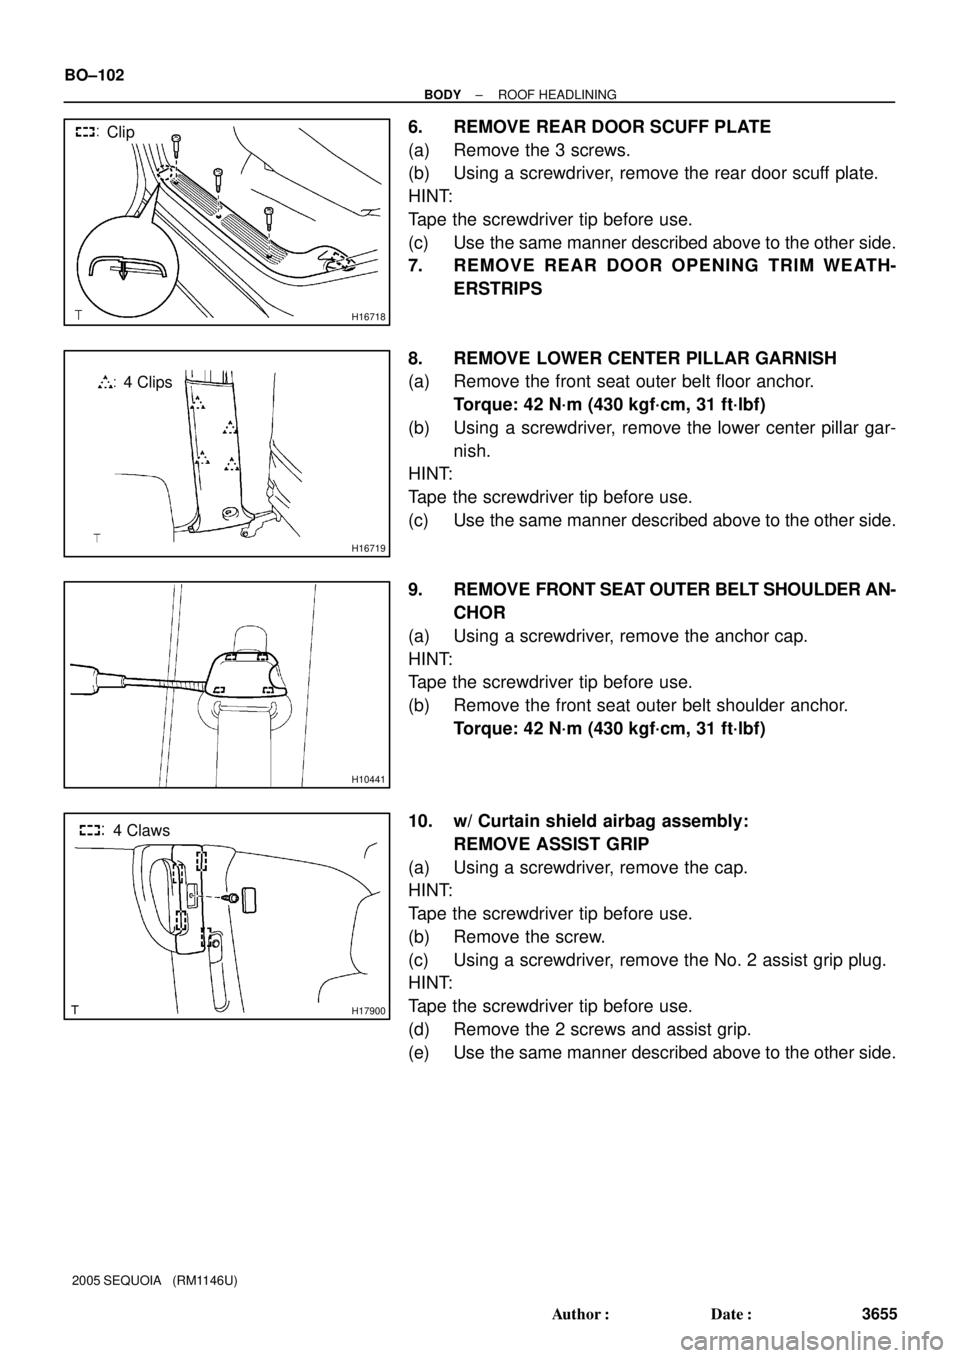
6. REMOVE REAR DOOR SCUFF PLATE
(a) Remove the 3 screws.
(b) Using a screwdriver, remove the rear door scuff plate.
HINT:
Tape the screwdriver tip before use.
(c) Use the same manner described above to the other side.
7. REMOVE REAR DOOR OPENING TRIM WEATH-
ERSTRIPS
8. REMOVE LOWER CENTER PILLAR GARNISH
(a) Remove the front seat outer belt floor anchor.
Torque: 42 N´m (430 kgf´cm, 31 ft´lbf)
(b) Using a screwdriver, remove the lower center pillar gar-
nish.
HINT:
Tape the screwdriver tip before use.
(c) Use the same manner described above to the other side.
9. REMOVE FRONT SEAT OUTER BELT SHOULDER AN-
CHOR
(a) Using a screwdriver, remove the anchor cap.
HINT:
Tape the screwdriver tip before use.
(b) Remove the front seat outer belt shoulder anchor.
Torque: 42 N´m (430 kgf´cm, 31 ft´lbf)
10. w/ Curtain shield airbag assembly:
REMOVE ASSIST GRIP
(a) Using a screwdriver, remove the cap.
HINT:
Tape the screwdriver tip before use.
(b) Remove the screw.
(c) Using a screwdriver, remove the No. 2 assist grip plug.
HINT:
Tape the screwdriver tip before use.
(d) Remove the 2 screws and assist grip.
(e) Use the same manner described above to the other side.