Page 3112 of 4323
FA1083
SST
FA1084
R13337
Less than
5 mm (0.20 in.) SA±108
± SUSPENSION AND AXLEREAR DIFFERENTIAL FRONT OIL SEAL
3104 Author�: Date�:
2005 SEQUOIA (RM1146U)
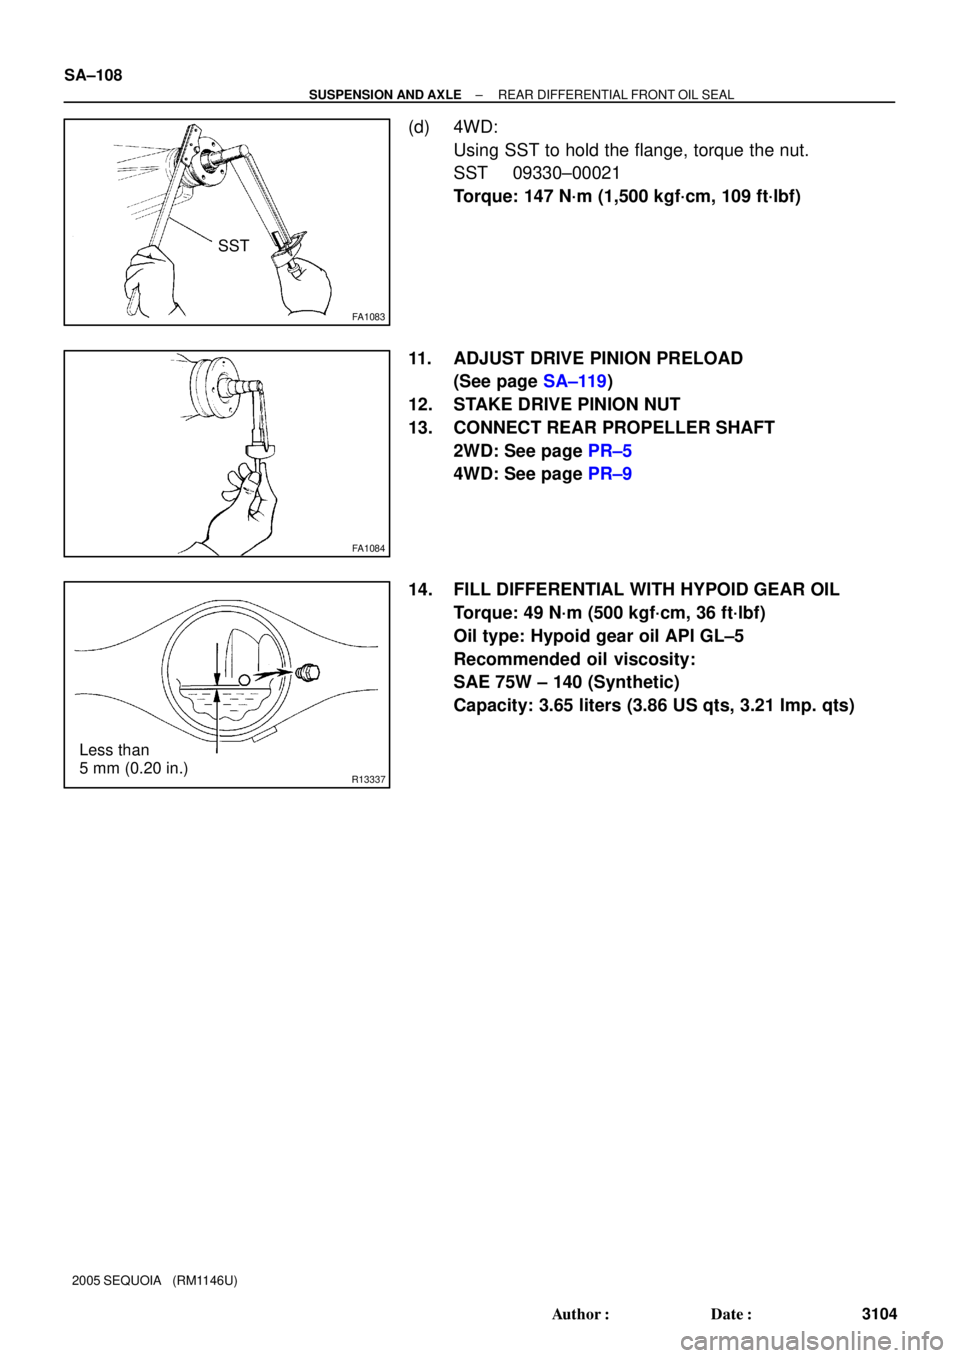
(d) 4WD:
Using SST to hold the flange, torque the nut.
SST 09330±00021
Torque: 147 N´m (1,500 kgf´cm, 109 ft´lbf)
11. ADJUST DRIVE PINION PRELOAD
(See page SA±119)
12. STAKE DRIVE PINION NUT
13. CONNECT REAR PROPELLER SHAFT
2WD: See page PR±5
4WD: See page PR±9
14. FILL DIFFERENTIAL WITH HYPOID GEAR OIL
Torque: 49 N´m (500 kgf´cm, 36 ft´lbf)
Oil type: Hypoid gear oil API GL±5
Recommended oil viscosity:
SAE 75W ± 140 (Synthetic)
Capacity: 3.65 liters (3.86 US qts, 3.21 Imp. qts)
Page 3139 of 4323
SA2BG±02
F14308
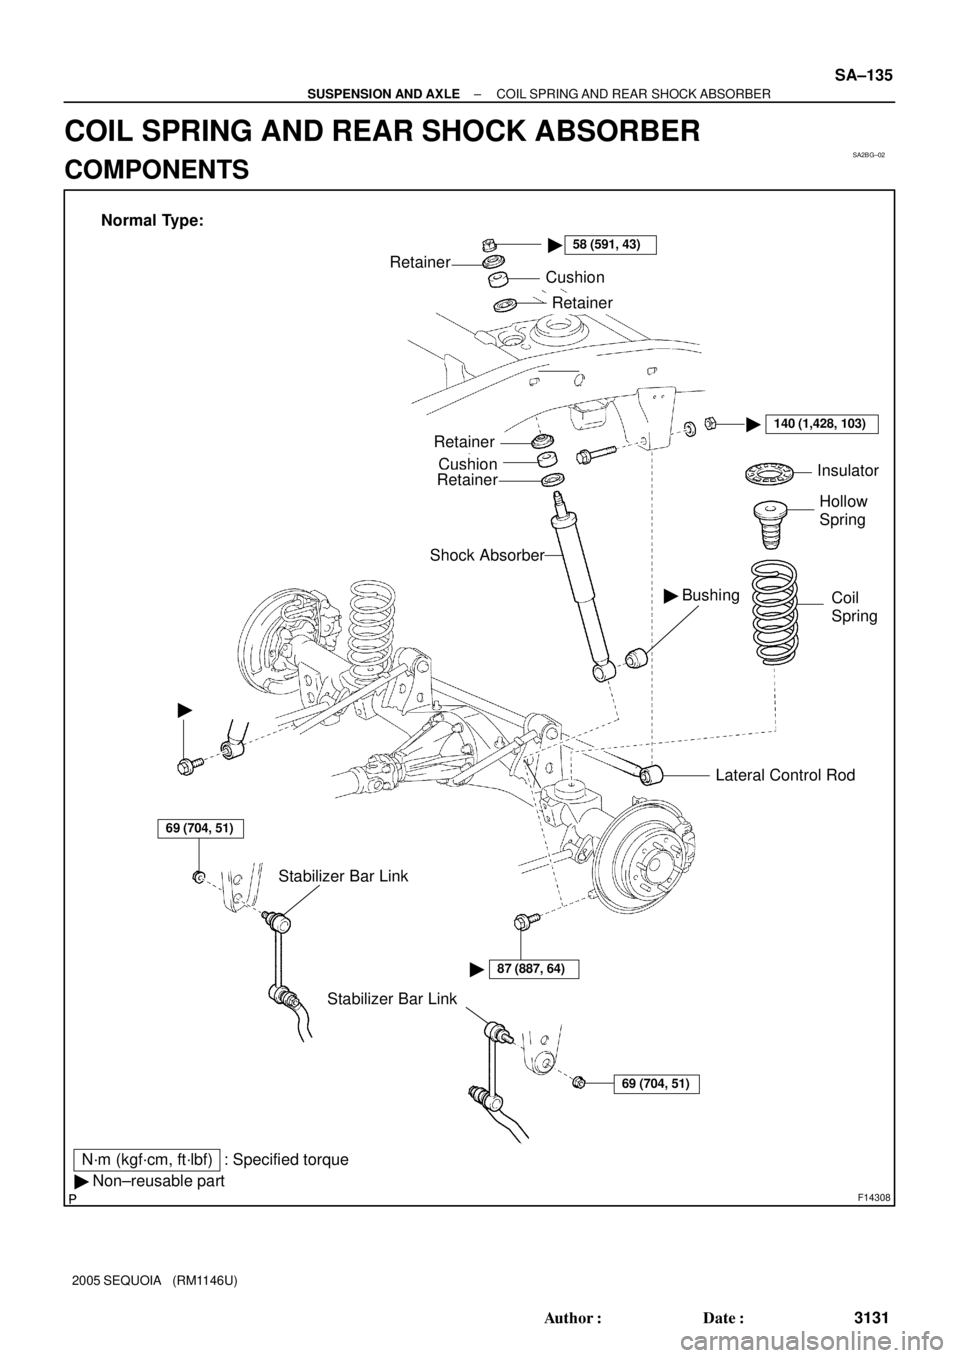
58 (591, 43)
Cushion
Retainer
Insulator
Hollow
Spring
Shock Absorber
� Bushing
N´m (kgf´cm, ft´lbf) : Specified torque
� Non±reusable part
Coil
Spring
�
�
140 (1,428, 103)
�
RetainerCushion
Retainer
Retainer
Lateral Control Rod
�
Stabilizer Bar Link
87 (887, 64)
69 (704, 51)
Stabilizer Bar Link
69 (704, 51)
Normal Type:
± SUSPENSION AND AXLECOIL SPRING AND REAR SHOCK ABSORBER
SA±135
3131 Author�: Date�:
2005 SEQUOIA (RM1146U)
COIL SPRING AND REAR SHOCK ABSORBER
COMPONENTS
Page 3140 of 4323
F16917
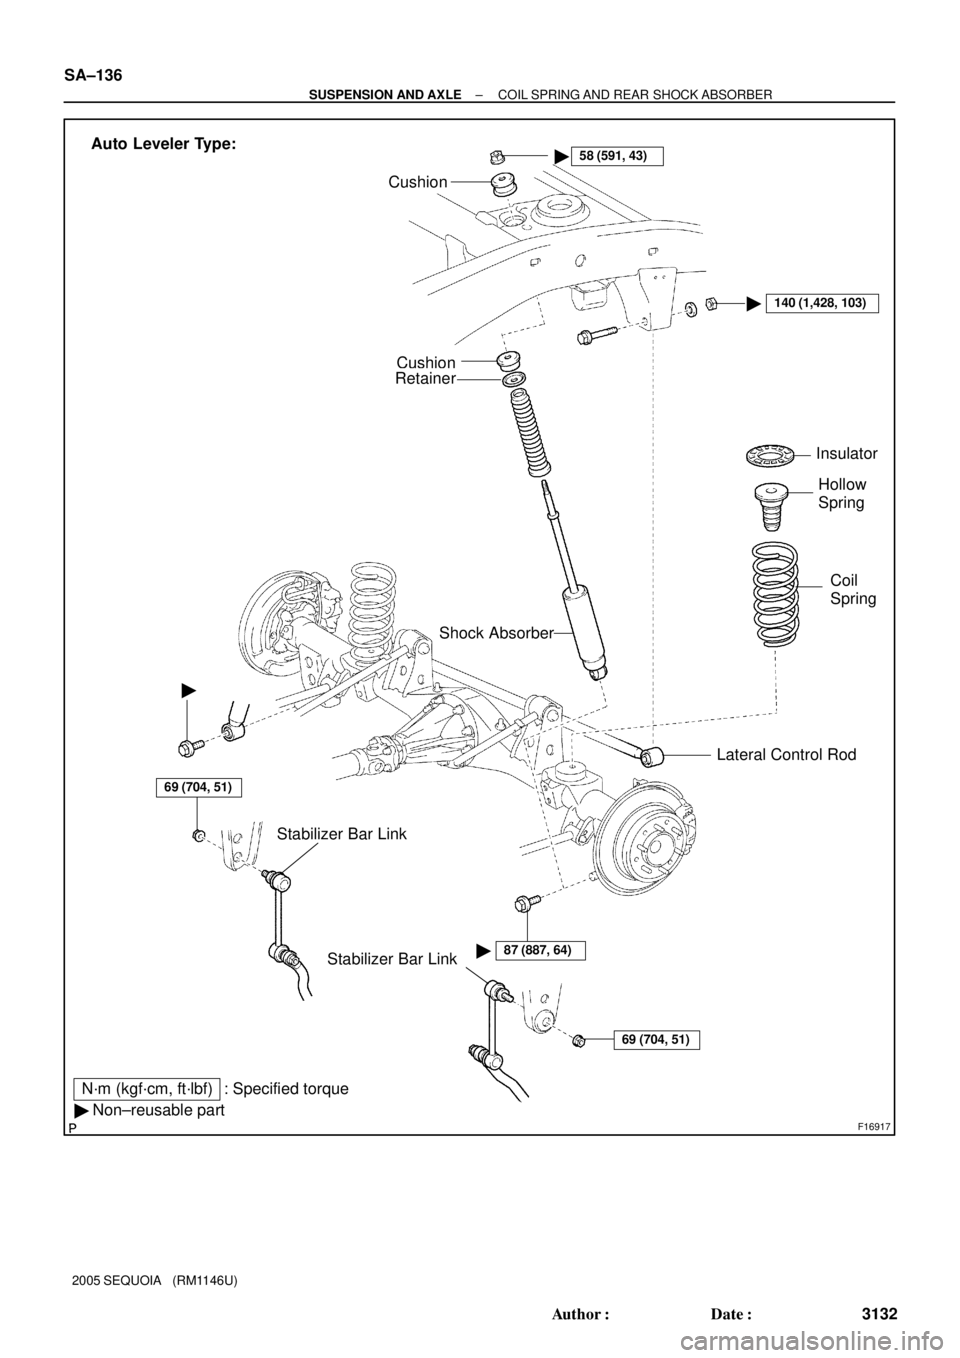
58 (591, 43)
Cushion
Insulator
Hollow
Spring
Shock Absorber
N´m (kgf´cm, ft´lbf) : Specified torque
� Non±reusable part
Coil
Spring
�
�
140 (1,428, 103)
�
Retainer
Lateral Control Rod
�
Stabilizer Bar Link
87 (887, 64)
69 (704, 51)
Stabilizer Bar Link
69 (704, 51)
Cushion
Auto Leveler Type: SA±136
± SUSPENSION AND AXLECOIL SPRING AND REAR SHOCK ABSORBER
3132 Author�: Date�:
2005 SEQUOIA (RM1146U)
Page 3141 of 4323

REMOVAL
1. REMOVE REAR WHEELS
Torque: 110 N´m (1,150 kgf")
SA2BH±02
F14305
F14306
F16918
± SUSPENSION AND AXLECOIL SPRING AND REAR SHOCK ABSORBER
SA±137
3133 Author�: Date�:
2005 SEQUOIA (RM1146U)
REMOVAL
1. REMOVE REAR WHEELS
Torque: 110 N´m (1,150 kgf´cm, 83 ft´lbf)
2. SUPPORT REAR AXLE HOUSING WITH JACK
3. Normal Type:
REMOVE SHOCK ABSORBER
(a) Remove the bolt and disconnect the shock absorber from
the axle housing.
Torque: 87 N´m (887 kgf´cm, 64 ft´lbf)
(b) Use the same procedure described above to the other
side.
(c) While holding the piston rod, remove the nut, 2 retainers,
cushion and shock absorber.
Torque: 58 N´m (591 kgf´cm, 43 ft´lbf)
(d) Remove the 2 retainers and cushion from the shock ab-
sorber.
4. Auto Leveler Type:
REMOVE SHOCK ABSORBER
NOTICE:
When removing and installing of the shock absorber, per-
form the procedure with the shock absorber stretched
completely. The primary rod reaction force of the shock ab-
sorber is apploximately 1,000 N.
(a) Remove the bolt and disconnect the shock absorber from
the axle housing.
Torque: 87 N´m (887 kgf´cm, 64 ft´lbf)
(b) Use the same procedure described above to the other
side.
Page 3143 of 4323
SA174±05
SA0627
± SUSPENSION AND AXLECOIL SPRING AND REAR SHOCK ABSORBER
SA±139
3135 Author�: Date�:
2005 SEQUOIA (RM1146U)
INSPECTION
Normal Type:
INSPECT SHOCK ABSORBER
Compress and extend the shock absorber rod and check that
there is no abnormal resistance or unusual operation sounds.
If there is any abnormality, replace the shock absorber with a
new one.
Page 3144 of 4323
30 mm
(1.18 in.)
F17130
50 mm (1.97 in.) High Pressure
Chamber Side:130 mm (5.12 in.)
F17131
Low Pressure
Chamber Side:50 mm (1.97 in.)
40 mm (1.57 in.) SA±140")
SA2BI±02
W03120F07370
50 mm
(1.97 in.)30 mm
(1.18 in.)
F17130
50 mm (1.97 in.) High Pressure
Chamber Side:130 mm (5.12 in.)
F17131
Low Pressure
Chamber Side:50 mm (1.97 in.)
40 mm (1.57 in.) SA±140
± SUSPENSION AND AXLECOIL SPRING AND REAR SHOCK ABSORBER
3136 Author�: Date�:
2005 SEQUOIA (RM1146U)
DISPOSAL
1. FULLY EXTEND SHOCK ABSORBER ROD
2. Normal Type:
DRILL HOLE TO REMOVE GAS FROM CYLINDER
Using a drill, make a hole in the cylinder, as shown in the illustra-
tion to discharge the gas inside.
CAUTION:
The discharged gas is harmless, but be careful of chips
which may fly out when drilling.
3. Auto Leveler Type:
DRILL HOLE TO REMOVE GAS FROM CYLINDER
Using a drill, make a hole on the shaded area of the cylinder,
as shown in the illustration to discharge the gas inside.
CAUTION:
�Be sure to perform the procedure in the order, the
high pressure chamber and the low pressure cham-
ber.
�Wear protective goggles and cover the absorber with
a plastic bag or like when boring.
�The discharged gas is harmless, but be careful of
chips which may fly out when drilling.
Page 3145 of 4323
SA175±05
F05063
SST
SST
F14312
SST
SST
± SUSPENSION AND AXLECOIL SPRING AND REAR SHOCK ABSORBER
SA±141
3137 Author�: Date�:
2005 SEQUOIA (RM1146U)
REPLACEMENT
1. Normal Type:
REMOVE BUSHING
Using SST and a press, remove the bushing.
SST 09710±14013 (09710±00061),
09710±28012 (09710±07031),
09950±70010 (09951±07100)
2. Normal Type:
INSTALL BUSHING
Using SST and a press, install a new bushing.
SST 09710±14013 (09710±00061),
09710±28012 (09710±07031),
09950±70010 (09951±07100)
Page 4068 of 4323

209
2005 SEQUOIA from Aug. 04 Prod. (OM34424U)
TONE AND BALANCE
For details about your systems tone and
balance controls, see the description of
your own system.
Tone
How go")
05_SEQUOIA_U (L/O 0408)
209
2005 SEQUOIA from Aug. '04 Prod. (OM34424U)
TONE AND BALANCE
For details about your system's tone and
balance controls, see the description of
your own system.
Tone
How good an audio program sounds to
you is largely determined by the mix of
the treble, midrange, and bass levels. In
fact, different kinds of music and vocal
programs usually sound better with differ-
ent mixes of treble, midrange, and bass.
Balance
A good balance of the left and right stereo
channels and of the front and rear sound
levels is also important.
Keep in mind that if you are listening to
a stereo recording or broadcast, changing
the right/left balance will increase the vol-
ume of one group of sounds while de-
creasing the volume of another.YOUR RADIO ANTENNA
Your vehicle has an antenna printed on
the inside of the rear quarter window.
NOTICE
Attaching the film (especially conduc-
tive or metallic type) on the rear
quarter glass will noticeably reduce
the sensitivity of the radio.
YOUR CASSETTE PLAYER
When you insert a cassette, the exposed
tape should face to the right.
NOTICE
Do not oil any part of the player and
do not insert anything other than cas-
sette tapes into the slot, or the tape
player may be damaged.
YOUR COMPACT DISC PLAYER (type 1)
When you insert a disc, gently push it in
with the label side up. (The player will
automatically eject a disc if the label side
is down.) The player will play from track
1 through the end of the disc. Then it will
play from track 1 again.
NOTICE
Never try to disassemble or oil any
part of the compact disc player. Do
not insert anything other than com-
pact discs into the slot.
The player is intended for use with 12 cm
(4.7 in.) discs only.