Page 3759 of 4323

AC3GV±02
I21372
I21373
AC±24
± AIR CONDITIONINGCOOLING UNIT
3751 Author�: Date�:
2005 SEQUOIA (RM1146U)
COOLING UNIT
ON±VEHICLE INSPECTION
1. INSPECT FOR LEAKAGE OF REFRIGERANT
(a) Remove the console box assembly.
(b) Remove the glove compartment door.
(c) Remove the lower No. 2 finish panel.
(d) Remove the heater to register duct No. 4.
(e) Remove the lower LH finish panel.
(f) Remove the lower cover (See page BO±89).
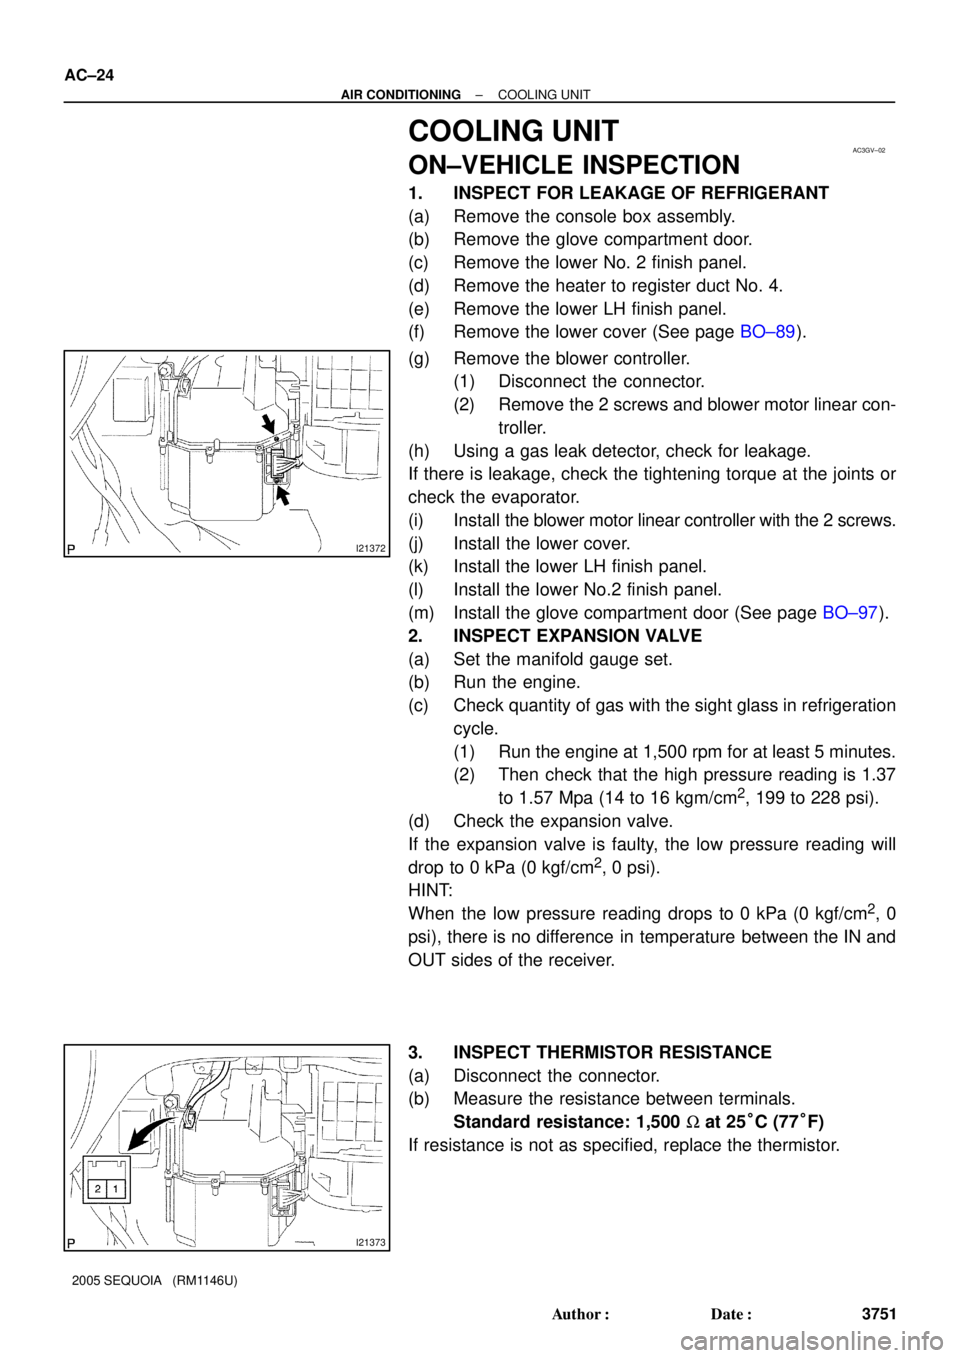
(g) Remove the blower controller.
(1) Disconnect the connector.
(2) Remove the 2 screws and blower motor linear con-
troller.
(h) Using a gas leak detector, check for leakage.
If there is leakage, check the tightening torque at the joints or
check the evaporator.
(i) Install the blower motor linear controller with the 2 screws.
(j) Install the lower cover.
(k) Install the lower LH finish panel.
(l) Install the lower No.2 finish panel.
(m) Install the glove compartment door (See page BO±97).
2. INSPECT EXPANSION VALVE
(a) Set the manifold gauge set.
(b) Run the engine.
(c) Check quantity of gas with the sight glass in refrigeration
cycle.
(1) Run the engine at 1,500 rpm for at least 5 minutes.
(2) Then check that the high pressure reading is 1.37
to 1.57 Mpa (14 to 16 kgm/cm
2, 199 to 228 psi).
(d) Check the expansion valve.
If the expansion valve is faulty, the low pressure reading will
drop to 0 kPa (0 kgf/cm
2, 0 psi).
HINT:
When the low pressure reading drops to 0 kPa (0 kgf/cm
2, 0
psi), there is no difference in temperature between the IN and
OUT sides of the receiver.
3. INSPECT THERMISTOR RESISTANCE
(a) Disconnect the connector.
(b) Measure the resistance between terminals.
Standard resistance: 1,500 W at 25°C (77°F)
If resistance is not as specified, replace the thermistor.
Page 3760 of 4323
AC3GW±02
I21420
Lower LH
Finish Panel
Lower Cover
� O±Ring
Suction
Tube
Liquid Tube
� O±Ring
Clamp
Cooling Unit
Heater to Register
Duct No. 4
Cowl Side Trim RH
Front Door Scuff Plate RH
Lower No. 2
Finish Panel
Glove Compartment Door
Upper Unit Case
Evaporator
Thermistor
Lower Unit Case
� Packing� O±Ring
Grommet
Drain Hose� Packing
Blower Controller
N´m (kgf´cm, in.´lbf) : Specified torque � Non±reusable part
3.5 (36, 31)
Liquid and Suction Tube
Expansion
Valve
Clamp
GrommetInsulator
Front
Console
Box Console
Upper
Panel
Rear
Console
Box
± AIR CONDITIONINGCOOLING UNIT
AC±25
3752 Author�: Date�:
2005 SEQUOIA (RM1146U)
COMPONENTS
Page 3762 of 4323
I06919
Disconnect the tube
by hand
Screwdriver
Tube
I06878
Connect Wrong
Gap
I21374
± AIR CONDITIONINGCOOLING UNIT
AC±27
3754 Author�: Date�:
2005 SEQUOIA (RM1146U)
NOTICE:
�Do not use tools like a screwdriver to remove the
tube.
�Cap the openings immediately to keep moisture or
dirt out of the system.
HINT:
At the time of reassembly, refer to the following:
�Lubricate 4 new O±rings with compressor oil and install
them to the tubes.
�After connection, check the claw of the piping clamp is se-
curely engaged.
3. REMOVE CONSOLE UPPER PANEL
4. REMOVE REAR CONSOLE BOX
5. REMOVE FRONT CONSOLE BOX
6. REMOVE GLOVE COMPARTMENT PARTS
7. REMOVE LOWER NO. 2 FINISH PANEL
8. REMOVE LOWER LH FINISH PANEL
9. REMOVE LOWER COVER (See page BO±89)
10. REMOVE NO. 4 HEATER TO REGISTER DUCT
11. REMOVE COOLING UNIT
(a) Disconnect the connectors.
(b) Remove the 3 screws and the bolt, then the cooling unit.
Page 3783 of 4323
AC1KT±05
I21425
Lower LH
Finish Panel
Cooling Unit
Blower Unit
Air Inlet Servomotor
Blower Motor
Heater to Register
Duct No. 4
Front Door Scuff Plate RH
Blower Unit Case
Lower Cover
Lower No. 2
Finish Panel
Glove Compartment Door
Cowl Side
Trim RH
Front
Console
Box
Console
Upper Panel
Rear
Console Box AC±48
± AIR CONDITIONINGBLOWER UNIT
3775 Author�: Date�:
2005 SEQUOIA (RM1146U)
BLOWER UNIT
COMPONENTS
Page 3784 of 4323
AC1KU±06
I21448
± AIR CONDITIONINGBLOWER UNIT
AC±49
3776 Author�: Date�:
2005 SEQUOIA (RM1146U)
REMOVAL
1. REMOVE CONSOLE UPPER PANEL
2. REMOVE REAR CONSOLE BOX
3. REMOVE FRONT CONSOLE BOX
4. REMOVE LOWER LH FINISH PANEL
5. REMOVE GLOVE COMPARTMENT DOOR
6. REMOVE LOWER NO. 2 FINISH PANEL
7. REMOVE LOWER COVER
8. REMOVE COOLING UNIT (See page AC±26)
9. REMOVE BLOWER UNIT
(a) Disconnect the connector from the blower motor.
(b) Disconnect the connector from the air inlet servomotor.
(c) Remove the nut, bolt and blower unit.
Page 3861 of 4323
05_SEQUOIA_U (L/O 0408)
2
2005 SEQUOIA from Aug. '04 Prod. (OM34424U)
1. Side vents
2. Instrument cluster
3. Center vents
4. Multi±information display
5. Personal lights
6. Garage door opener box or auxiliary
box
7. Electric moon roof switches
8. Side defroster outlet
9. Glove box
10. Power door lock switches
11. Power window switches
12. Power outlets
13. Seat heater switches
14. Rear console box
15. Rear air conditioning controls
16. Headphone input jacks and headphone
volume control dials
17. Input terminal adapter
18. Cup holders
19. Power rear view mirror control switches
20. Lower vent
Instrument panel overview
�View A
Page 3873 of 4323

05_SEQUOIA_U (L/O 0408)
14
2005 SEQUOIA from Aug. '04 Prod. (OM34424U)
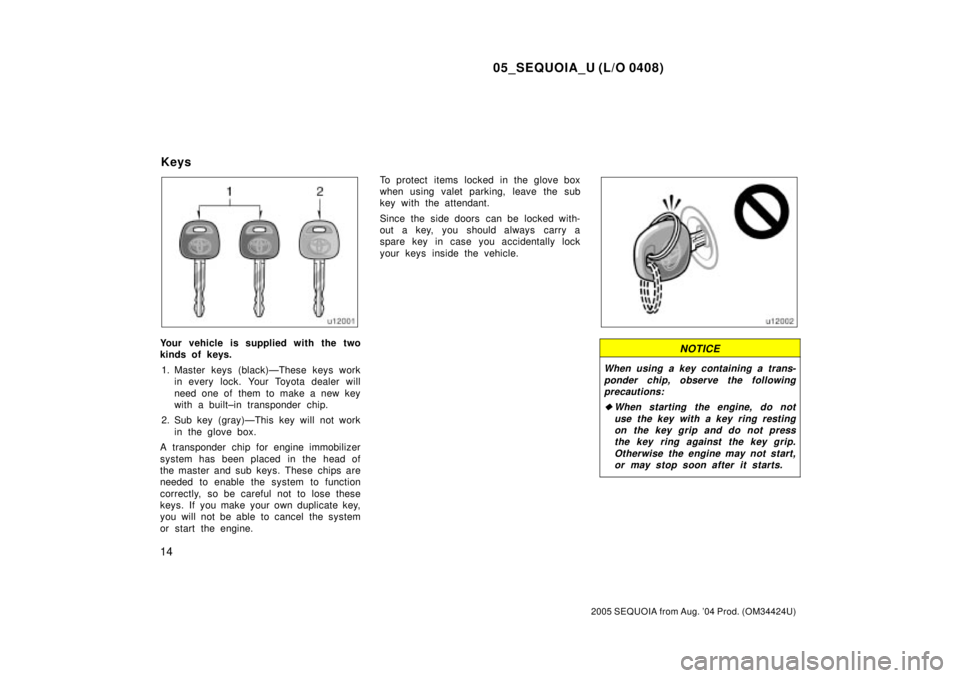
Your vehicle is supplied with the two
kinds of keys.
1. Master keys (black)ÐThese keys work
in every lock. Your Toyota dealer will
need one of them to make a new key
with a built±in transponder chip.
2. Sub key (gray)ÐThis key will not work
in the glove box.
A transponder chip for engine immobilizer
system has been placed in the head of
the master and sub keys. These chips are
needed to enable the system to function
correctly, so be careful not to lose these
keys. If you make your own duplicate key,
you will not be able to cancel the system
or start the engine.To protect items locked in the glove box
when using valet parking, leave the sub
key with the attendant.
Since the side doors can be locked with-
out a key, you should always carry a
spare key in case you accidentally lock
your keys inside the vehicle.NOTICE
When using a key containing a trans-
ponder chip, observe the following
precautions:
�When starting the engine, do not
use the key with a key ring resting
on the key grip and do not press
the key ring against the key grip.
Otherwise the engine may not start,
or may stop soon after it starts.
Keys
Page 4160 of 4323

05_SEQUOIA_U (L/O 0408)
301
2005 SEQUOIA from Aug. '04 Prod. (OM34424U)
OPERATION OF INSTRUMENTS AND
CONTROLS
Other equipment
Multi±information display302 . . . . . . . . . . . . . . . . . . . . . . . . . . . . . . . . . . . .
Clock313 . . . . . . . . . . . . . . . . . . . . . . . . . . . . . . . . . . . . . . . . . . . . . . . . . . . . . .
Cigarette lighter and ashtrays313 . . . . . . . . . . . . . . . . . . . . . . . . . . . . . . . .
Power outlets314 . . . . . . . . . . . . . . . . . . . . . . . . . . . . . . . . . . . . . . . . . . . . . .
Power outlet315 . . . . . . . . . . . . . . . . . . . . . . . . . . . . . . . . . . . . . . . . . . . . . . .
Glove box316 . . . . . . . . . . . . . . . . . . . . . . . . . . . . . . . . . . . . . . . . . . . . . . . . . .
Garage door opener box317 . . . . . . . . . . . . . . . . . . . . . . . . . . . . . . . . . . . .
Auxiliary boxes319 . . . . . . . . . . . . . . . . . . . . . . . . . . . . . . . . . . . . . . . . . . . . .
Rear console box322 . . . . . . . . . . . . . . . . . . . . . . . . . . . . . . . . . . . . . . . . . . .
Note pad holder323 . . . . . . . . . . . . . . . . . . . . . . . . . . . . . . . . . . . . . . . . . . . .
Coin holder324 . . . . . . . . . . . . . . . . . . . . . . . . . . . . . . . . . . . . . . . . . . . . . . . .
Compact disc and cassette tape holder325 . . . . . . . . . . . . . . . . . . . . . . .
Removable console box326 . . . . . . . . . . . . . . . . . . . . . . . . . . . . . . . . . . . . .
Cup holders328 . . . . . . . . . . . . . . . . . . . . . . . . . . . . . . . . . . . . . . . . . . . . . . . .
Tie±down hooks329 . . . . . . . . . . . . . . . . . . . . . . . . . . . . . . . . . . . . . . . . . . . .
Grocery bag hooks330 . . . . . . . . . . . . . . . . . . . . . . . . . . . . . . . . . . . . . . . . .
Cargo net hooks330 . . . . . . . . . . . . . . . . . . . . . . . . . . . . . . . . . . . . . . . . . . . .
Roof luggage carrier330 . . . . . . . . . . . . . . . . . . . . . . . . . . . . . . . . . . . . . . . .
Floor mat331 . . . . . . . . . . . . . . . . . . . . . . . . . . . . . . . . . . . . . . . . . . . . . . . . . .
SECTION 1± 10