Page 3363 of 4323

INSPECTION
1. VEHICLE NOT INVOLVED IN COLLISION
(a) Perform")
H23919
RS0N4±12
H23898
RS±72
± SUPPLEMENTAL RESTRAINT SYSTEMCURTAIN SHIELD AIRBAG ASSEMBLY
3355 Author�: Date�:
2005 SEQUOIA (RM1146U)
INSPECTION
1. VEHICLE NOT INVOLVED IN COLLISION
(a) Perform a diagnostic system check (see page DI±1147).
(b) With the curtain shield airbag assembly installed on the
vehicle, perform a visual check. If there are any defects
as mentioned below, replace the front pillar garnish or roof
headlining assy with a new one:
Cuts, minute cracks or marked discoloration on the front
pillar garnish or roof headlining assy around the curtain
shield airbag assembly.
2. VEHICLE INVOLVED IN A COLLISION AND AIRBAG IS
NOT DEPLOYED
(a) Perform a diagnostic system check (see page DI±1147).
(b) With the curtain shield airbag assembly removed from the
vehicle, perform a visual check. If there are any defects
as mentioned below, replace the curtain shield airbag as-
sembly with a new one:
�Cuts, tears and cracks, or marked discoloration on
the curtain shield airbag assembly.
�Cracks or other damage to connector.
CAUTION:
For removal and installation of the curtain shield airbag as-
sembly, see page RS±71 and RS±80. Be sure to follow the
correct procedure.
Page 3365 of 4323
 or more
SSTBattery RS±74
± SUPPLEMENTAL RESTRAINT SYSTEMCURTAIN SHIELD AIRBAG ASSEMBLY
3357 Author�: Date�:
2005 SEQUOIA (RM1146U)
1. AIRBAG DEPLO")
AB0158
Battery
SST
H23899
SST
R13455
10 m (33 ft) or more
SSTBattery RS±74
± SUPPLEMENTAL RESTRAINT SYSTEMCURTAIN SHIELD AIRBAG ASSEMBLY
3357 Author�: Date�:
2005 SEQUOIA (RM1146U)
1. AIRBAG DEPLOYMENT WHEN SCRAPPING VE-
HICLE
(a) Check the function of the SST (see step 1±(a) on page
RS±23).
SST 09082±00700
(b) Precaution (see page RS±1 and RS±3).
(c) Disconnect the cable from the negative battery terminal.
Wait for 90 seconds after disconnecting the cable to prevent the
airbag working.
(d) Remove the roof headlining (see page BO±101).
(e) Disconnect the curtain shield airbag connector.
NOTICE:
When handling the airbag connector, be careful not to dam-
age the airbag wire harness.
(f) Install the SST.
(1) Connect the connectors of the SST to the curtain
shield airbag assembly.
SST 09082±00700, 09082±00802 (09082±10801,
09082±20801)
NOTICE:
To avoid damaging the SST connector and wire harness,
do not lock the secondary lock of the twin lock.
(2) Move the SST at least 10 m (33 ft) away from the ve-
hicle rear side window.
(3) Maintaining enough clearance for the SST wire har-
ness in the rear side window, close all doors and
windows of the vehicle.
NOTICE:
Take care not to damage the SST wire harness.
(4) Connect the red clip of the SST to the battery posi-
tive (+) terminal and the black clip of the SST to the
negative (±) terminal.
Page 3366 of 4323

(g) Deploy the airbag.
(1) Check that no one is inside the vehicl")
AB0158
Battery
SST
± SUPPLEMENTAL RESTRAINT SYSTEMCURTAIN SHIELD AIRBAG ASSEMBLY
RS±75
3358 Author�: Date�:
2005 SEQUOIA (RM1146U)
(g) Deploy the airbag.
(1) Check that no one is inside the vehicle or within a
10 m (33 ft) radius of the vehicle.
(2) Press the SST activation switch and deploy the air-
bag.
CAUTION:
�When deploying the airbag, make sure that no one is
near the vehicle.
�The curtain shield airbag assembly becomes ex-
tremely hot when the airbag is deployed, so do not
touch it for at least 30 minutes after deployment.
�Use gloves and safety glasses when handling a cur-
tain shield airbag assembly with a deployed airbag.
�Do not apply water, etc. to a curtain shield airbag as-
sembly with a deployed airbag.
�Always wash your hands with water after completing
the operation.
HINT:
The airbag deploys as the LED of the SST activation switch
comes on.
2. DEPLOYMENT WHEN DISPOSING OF CURTAIN
SHIELD AIRBAG ASSEMBLY
NOTICE:
�When disposing of the curtain shield airbag assem-
bly, never use the customer's vehicle to deploy the
airbag.
�Be sure to follow the procedure given below when de-
ploying the airbag.
HINT:
Prepare a battery as the power source to deploy the airbag.
(a) Check the function of the SST (see step 1±(a) on page
RS±23).
(b) Remove the curtain shield airbag assembly (see page
RS±97).
�When removing the front passenger airbag assembly,
work must be started 90 seconds after the ignition
switch is turned to the ºLOCKº position and the nega-
tive (±) terminal cable is disconnected from the bat-
tery.
�When storing the front passenger airbag assembly,
keep the airbag deployment side facing upward.
Page 3370 of 4323

REPLACEMENT
REPLACEMENT REQUIREMENTS
In the following cases, replace the c")
RS0N6±10
± SUPPLEMENTAL RESTRAINT SYSTEMCURTAIN SHIELD AIRBAG ASSEMBLY
RS±79
3362 Author�: Date�:
2005 SEQUOIA (RM1146U)
REPLACEMENT
REPLACEMENT REQUIREMENTS
In the following cases, replace the curtain shield airbag assembly or curtain shield airbag cover with a new
one.
CaseReplacing part
The curtain shield airbag has been deployed.Curtain shield airbag assembly
The curtain shield airbag assembly has been found to be faulty in trouble-
shooting.Curtain shield airbag assembly
The curtain shield airbag assembly has been found to be faulty while check-
ing items
(See page RS±72).
Curtain shield airbag assembly
The front pillar garnish has been found to be faulty while checking items
(See page RS±72).Front pillar garnish
The roof headlining has been found to be faulty while checking items
(See page RS±72).Roof headlining
The curtain shield airbag assembly has been dropped.Curtain shield airbag assembly
CAUTION:
For removal and installation of the curtain shield airbag assembly, see page RS±71 and RS±80. Be
sure to follow the correct procedure.
Page 3371 of 4323

INSTALLATION
HINT:
�Use the same procedures for the RH side and LH")
RS0TH±07
H23897
RS±80
± SUPPLEMENTAL RESTRAINT SYSTEMCURTAIN SHIELD AIRBAG ASSEMBLY
3363 Author�: Date�:
2005 SEQUOIA (RM1146U)
INSTALLATION
HINT:
�Use the same procedures for the RH side and LH side.
�The procedures listed below are for the LH side.
1. INSTALL CURTAIN SHIELD AIRBAG ASSEMBLY
(a) Install the curtain shield airbag assembly with the 13
bolts.
Torque: 9.8 N´m (100 kgf´cm, 7 ft´lbf)
CAUTION:
Pay attention not to twist the deployment section of the cur-
tain shield airbag assembly.
NOTICE:
�If the curtain shield airbag assembly has been
dropped, or there are cracks, dents or other defects
in the case or connector, replace the curtain shield
airbag assembly with a new one.
�When installing the curtain shield airbag assembly,
take care it is not pinched between other parts.
�Never use airbag parts from another vehicle. When
replacing parts, replace them with new ones.
(b) Connect the connector of the curtain shield airbag as-
sembly.
2. INSTALL ROOF HEADLINING (SEE PAGE BO±108)
3. CONNECT CABLE TO NEGATIVE BATTERY TERMI-
NAL
4. PERFORM INITIALIZATION (SEE PAGE BE±77)
Some system need initialization when disconnecting the cable
from the negative battery terminal.
5. INSPECT SRS WARNING LIGHT (SEE PAGE DI±1137)
Page 3373 of 4323
RS0BL±11
H23231
RS±82
± SUPPLEMENTAL RESTRAINT SYSTEMAIRBAG SENSOR ASSEMBLY
3365 Author�: Date�:
2005 SEQUOIA (RM1146U)
REMOVAL
NOTICE:
�If the wiring connector of the SRS is disconnected
with the ignition switch in the ON position, DTCs will
be recorded.
�Never use airbag parts from another vehicle. When
replacing parts, replace them with new ones.
1. PRECAUTION (SEE PAGE RS±1 and RS±3)
2. DISCONNECT CABLE FROM NEGATIVE BATTERY
TERMINAL
Wait for 90 seconds after disconnecting the cable to prevent the
airbag working.
�Never reuse an airbag sensor assembly if the airbag
has previously deployed in a collision.
3. REMOVE SHIFTING HOLE COVER (SEE PAGE
BO±89)
4. REMOVE UPPER CONSOLE PANEL (SEE PAGE
BO±89)
5. REMOVE REAR CONSOLE BOX (SEE PAGE
BO±89)
6. REMOVE FRONT CONSOLE BOX (SEE PAGE
BO±89)
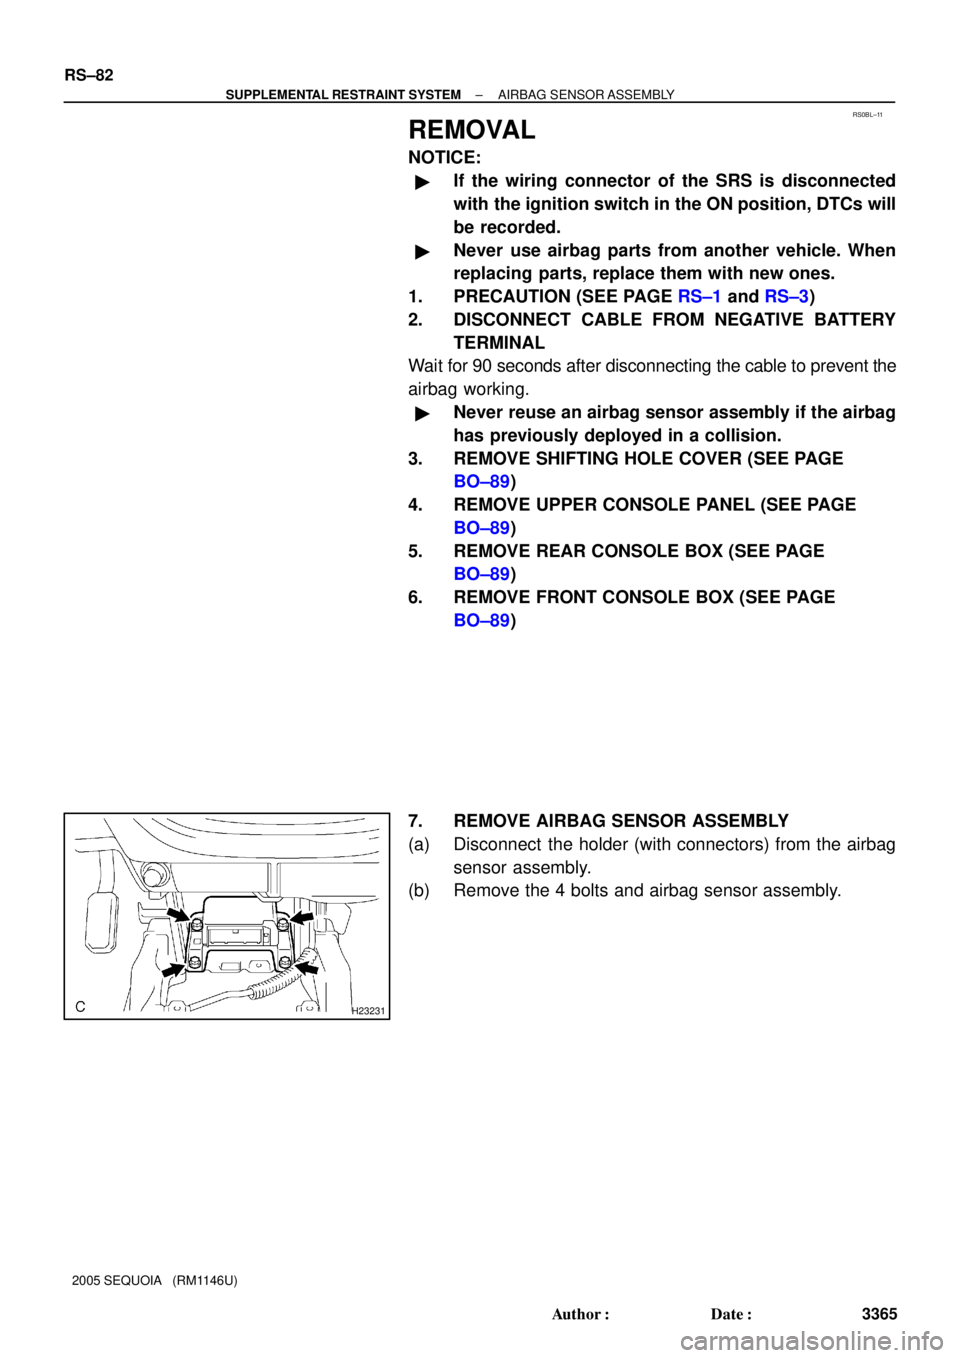
7. REMOVE AIRBAG SENSOR ASSEMBLY
(a) Disconnect the holder (with connectors) from the airbag
sensor assembly.
(b) Remove the 4 bolts and airbag sensor assembly.
Page 3374 of 4323
RS0BM±06
± SUPPLEMENTAL RESTRAINT SYSTEMAIRBAG SENSOR ASSEMBLY
RS±83
3366 Author�: Date�:
2005 SEQUOIA (RM1146U)
INSPECTION
1. VEHICLE NOT INVOLVED IN COLLISION
Perform a diagnostic system check (see page DI±1147).
2. VEHICLE INVOLVED IN COLLISION AND AIRBAG IS NOT DEPLOYED
Perform a diagnostic system check (see page DI±1147).
3. VEHICLE INVOLVED IN COLLISION AND AIRBAG IS DEPLOYED
Replace the airbag sensor assembly (see page DI±1147).
Page 3375 of 4323
RS0BN±05
RS±84
± SUPPLEMENTAL RESTRAINT SYSTEMAIRBAG SENSOR ASSEMBLY
3367 Author�: Date�:
2005 SEQUOIA (RM1146U)
REPLACEMENT
REPLACEMENT REQUIREMENTS
In the following cases, replace the airbag sensor assembly with a new one.
�The SRS has been deployed in a collision.
�The airbag sensor assembly has been found to be faulty in troubleshooting.
�The airbag sensor assembly has been dropped.
CAUTION:
For removal and installation of the airbag sensor assembly, see page RS±82 and RS±85. Be sure to
follow the correct procedure.