Page 1219 of 1943

Flashing pattern No.1
Flashing pattern No.2
0.6 sec. 0.6 sec.
0.3 sec. 0.3 sec. 1.2 sec. ON
OFF ON
OFF
0.3 sec.
DI±670
± DIAGNOSTICSCOMBINATION METER SYSTEM
2001 PRIUS (RM778U)
2. FUEL GAUGE DIAGNOSIS CHECK
(a) Fuel emergency display
HINT:
If FR voltage input to the fuel sender gauge is abnormal (4.8 V or more, or 0.06 V or less) due to any error,
an emergency will be displayed.
(b) Display:
Immediately after the ignition switch is ON, all of the segments flash.
Diagnosis displayTrouble ItemPlausible Cause
All segments flashing
(Flashing pattern No. 1)
Cycle: 1.2 sec
Duty: 50 %Multiple communication errorCommunication is cut off.
4. Body ECU faulty
5. Engine ECU faulty
6. Open or short in wire harness for communica-
tion
HINT:
Referring to the attached reference material 1 or
2, specify the main cause
All segments flashing
(Flashing pattern No. 2)
(300 msec. ON, 300 msec OFF) x 2 + 1.2
sec. OFFSender gauge related trouble1. Sender gauge faulty
2. Open or short in wire harness
Display segments and ºEº flashing.
(Flashing pattern No. 1)
Cycle: 1.2 sec
Duty: 50 %Temperature sensor (located in the tank) related
trouble1. Temperature sensor faulty
2. Open or short in wire harness
Display segments and ºEº flashing.
(Flashing pattern No. 2)
(300 msec. ON, 300 msec. OFF) x 2 + 1.2
sec. OFFIndication sensor (located in the meter ) trouble1. Combination meter faulty
Segment No. 1 flashing
(Flashing pattern No. 1)
Cycle: 1.2 sec
Duty: 50 %This does not mean any failure.
When a battery is connected, it continues flash-
ing until the volume is confirmed.This occurs when the battery is turned ON.
HINT:
Low fuel warning: Cycle: 0.6 sec.;
Duty: 50 %
Page 1230 of 1943
DI6QW±04
I15489
Body ECU
B B9
B8
1 5
8 11
159
8
8
2
13 5 3 1
6
24
1 1BDR F
FJ27
J/C
W±B
W±B
B±GB±Y
W±G W±GWR±G
2C
2D
2K 2B2H
2D10A GAUGE IG1 Relay30A DOOR7.5A ECU±B
5A AM1
J11
J/C
ID Battery F13 F11100A DC/DC FL Block No. 1I15 Ignition Switch
AM1 IG1
F18
FL Block No. 2
120A MAINB9 E Instrument Panel J/B
B
IG
A 7.5A OBDII
9
2DR±G
D
D
J26
J/CW±L W±L
W DI±690
± DIAGNOSTICSBODY CONTROL SYSTEM
2001 PRIUS (RM778U)
CIRCUIT INSPECTION
Power Source Circuit
CIRCUIT DESCRIPTION
This circuit provides power to operate the Body ECU.
WIRING DIAGRAM
Page 1231 of 1943
± DIAGNOSTICSBODY CONTROL SYSTEM
DI±691
2001 PRIUS (RM778U)
INSPECTION PROCEDURE
1 Check ECU±B, DC/DC, GAUGE and DOOR fuse.
CHECK:
Check continuity of ECU±B, DC/DC, GAUGE and DOOR fuse.
OK:
Continuity
NG Replace the failure fuse.
OK
2 Check voltage between terminals B, BDR and E of body ECU connector.
PREPARATION:
(a) Turn ignition switch OFF.
(b) Disconnect the Body ECU connector.
CHECK:
Measure voltage between terminals B, BDR and E.
OK:
Voltage: 10 ± 14V
OK Proceed to next circuit inspection shown on
problem symptoms table (See page DI±683).
NG
3 Check wireharness and connector between body ECU and body ground (See
page IN±41).
NG Repair or replace wireharness or connector.
OK
Check and repair wireharness and connector
between Body ECU and battery.
Page 1232 of 1943
I15489
Body ECU
B B9
B8
1 5
8 11
159
8
8
2
13 5 3 1
6
24
1 1BDR F
FJ27
J/C
W±B
W±B
B±GB±Y
W±G W±GWR±G
2C
2D
2K 2B2H
2D10A GAUGE IG1 Relay30A DOOR7.5A ECU±B
5A AM1
J11
J/C
ID Battery F13 F11100A DC/DC FL Block No. 1I15 Ignition Switch
AM1 IG1
F18
FL Block No. 2
120A MAINB9 E Instrument Panel J/B
B
IG
A 7.5A OBDII
9
2DR±G
D
D
J26
J/CW±L W±L
W DI±692
± DIAGNOSTICSBODY CONTROL SYSTEM
2001 PRIUS (RM778U)
Ignition Switch Power Source Circuit
CIRCUIT DESCRIPTION
When the ignition switch is turned to the ACC position, battery voltage is applied to the terminal ACC of the
ECU and when the ignition switch is turned to the ON position, battery voltage is applied to the terminal IG
of the ECU.
WIRING DIAGRAM
DI7NO±01
Page 1233 of 1943
± DIAGNOSTICSBODY CONTROL SYSTEM
DI±693
2001 PRIUS (RM778U)
INSPECTION PROCEDURE
1 Check AM1 fuse.
CHECK:
Check continuity of AM1 fuse.
OK:
Continuity
NG Replace the failure fuse.
OK
2 Check voltage between terminals 8, 15 and E of body ECU connector.
PREPARATION:
Turn ignition switch ON.
CHECK:
Measure voltage between terminals 8, 15 and E.
OK:
Voltage: 10 ± 14V
OK Proceed to next circuit inspection shown on
problem symptoms table (See page DI±683).
NG
3 Check wireharness and connector between body ECU and body ground (See
page IN±41).
NG Repair or replace wireharness or connector.
OK
Check and repair wireharness and connector
between body ECU and battery.
Page 1236 of 1943

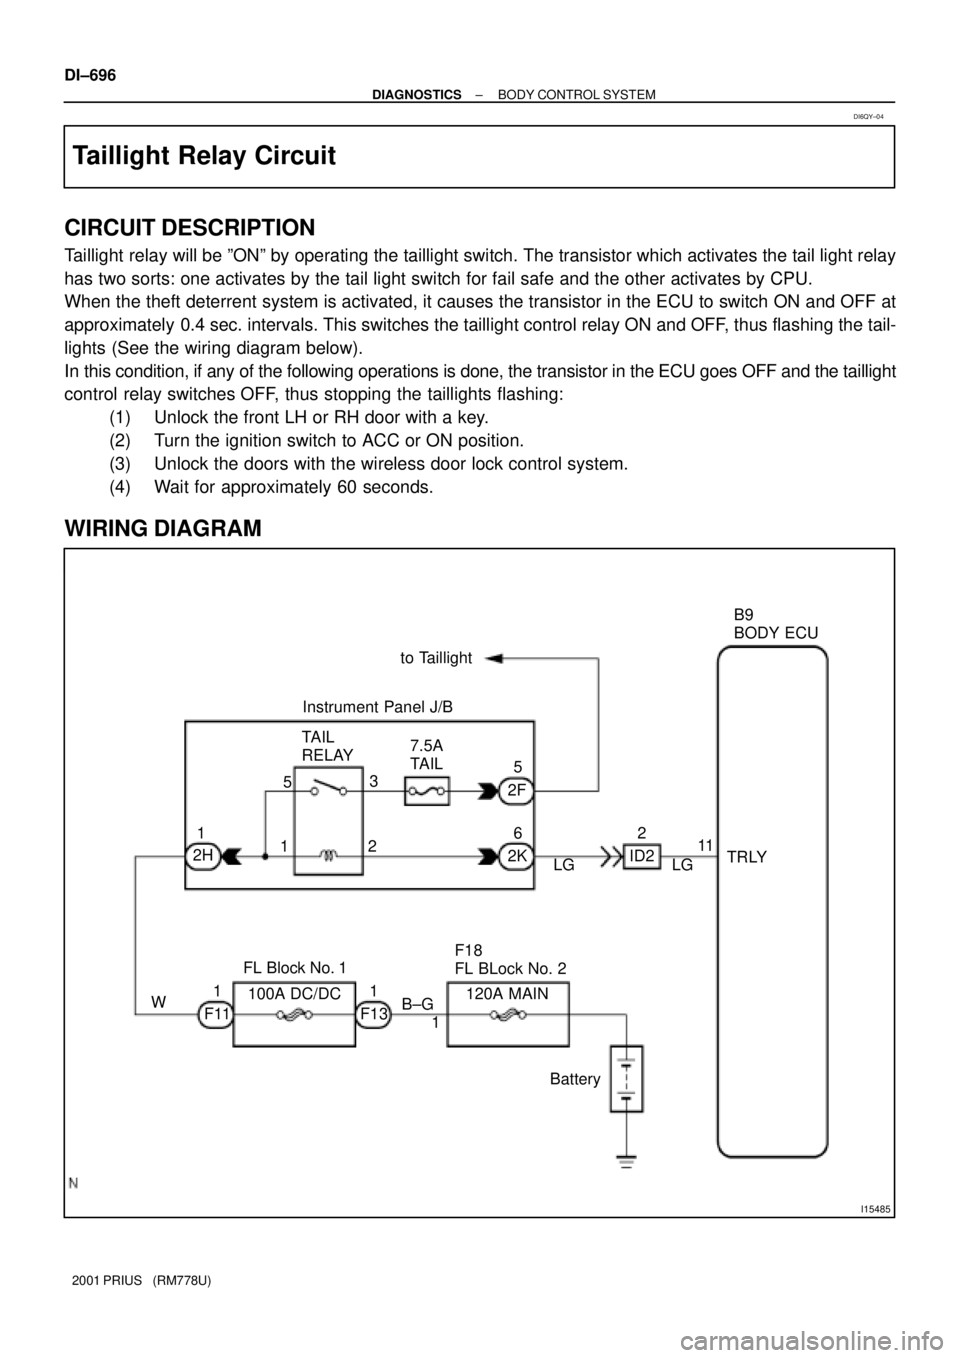
I15485
BatteryB9
BODY ECU
11
F112 5
6 3
2 15
1
11
1 WID2 2F
2K 2HTAIL
RELAY7.5A
TAIL Instrument Panel J/Bto Taillight
F18
FL BLock No. 2 FL Block No. 1LG LG
F13B±GTRLY
100A DC/DC 120A MAIN DI±696
± DIAGNOSTICSBODY CONTROL SYSTEM
2001 PRIUS (RM778U)
Taillight Relay Circuit
CIRCUIT DESCRIPTION
Taillight relay will be ºONº by operating the taillight switch. The transistor which activates the tail light relay
has two sorts: one activates by the tail light switch for fail safe and the other activates by CPU.
When the theft deterrent system is activated, it causes the transistor in the ECU to switch ON and OFF at
approximately 0.4 sec. intervals. This switches the taillight control relay ON and OFF, thus flashing the tail-
lights (See the wiring diagram below).
In this condition, if any of the following operations is done, the transistor in the ECU goes OFF and the taillight
control relay switches OFF, thus stopping the taillights flashing:
(1) Unlock the front LH or RH door with a key.
(2) Turn the ignition switch to ACC or ON position.
(3) Unlock the doors with the wireless door lock control system.
(4) Wait for approximately 60 seconds.
WIRING DIAGRAM
DI6QY±04
Page 1237 of 1943
± DIAGNOSTICSBODY CONTROL SYSTEM
DI±697
2001 PRIUS (RM778U)
INSPECTION PROCEDURE
1 Check taillight relay (See page DI±691).
NG Replace the taillight relay.
OK
2 Check wireharness and connector between taillight relay and body ECU, battery
and taillight relay (See page IN±41).
NG Repair or replace wireharness or connector.
OK
Proceed to next circuit inspection shown on
problem symptoms table (See page
DI±683).
Page 1238 of 1943

I15484
2 3 66
8 7
1 4 2
1
4
3 2 1 1
11
1
710
883
A L D
FE
E
E
LE
ER±L
R±G
R±W
R±G R±W R±W R±W
R±G
R±G B±G
R±G B
F13 F12
2I
2A 1B1F
1F
1F3
ID2 IA2J20
J/C
IA1
J4J5
ID 2K 2A
15
17
BatteryC10 High Beam
Indicator Light
(Comb. meter) F18
FL Block No. 2
J11
J/CJ4 H2
Headlight RH
10A HEAD (LH) 10A HEAD (RH)
Short Pin HEAD RelayEngine Room J/BB9
Body ECU
Short Pin
120A MAIN
Instrument
Panel J/BJ12 J13
W±B
H1
Headlight
LH
1
FL Block No. 13
1
HRLY
Instrument
Panel J/B DI±698
± DIAGNOSTICSBODY CONTROL SYSTEM
2001 PRIUS (RM778U)
Headlight Relay Circuit
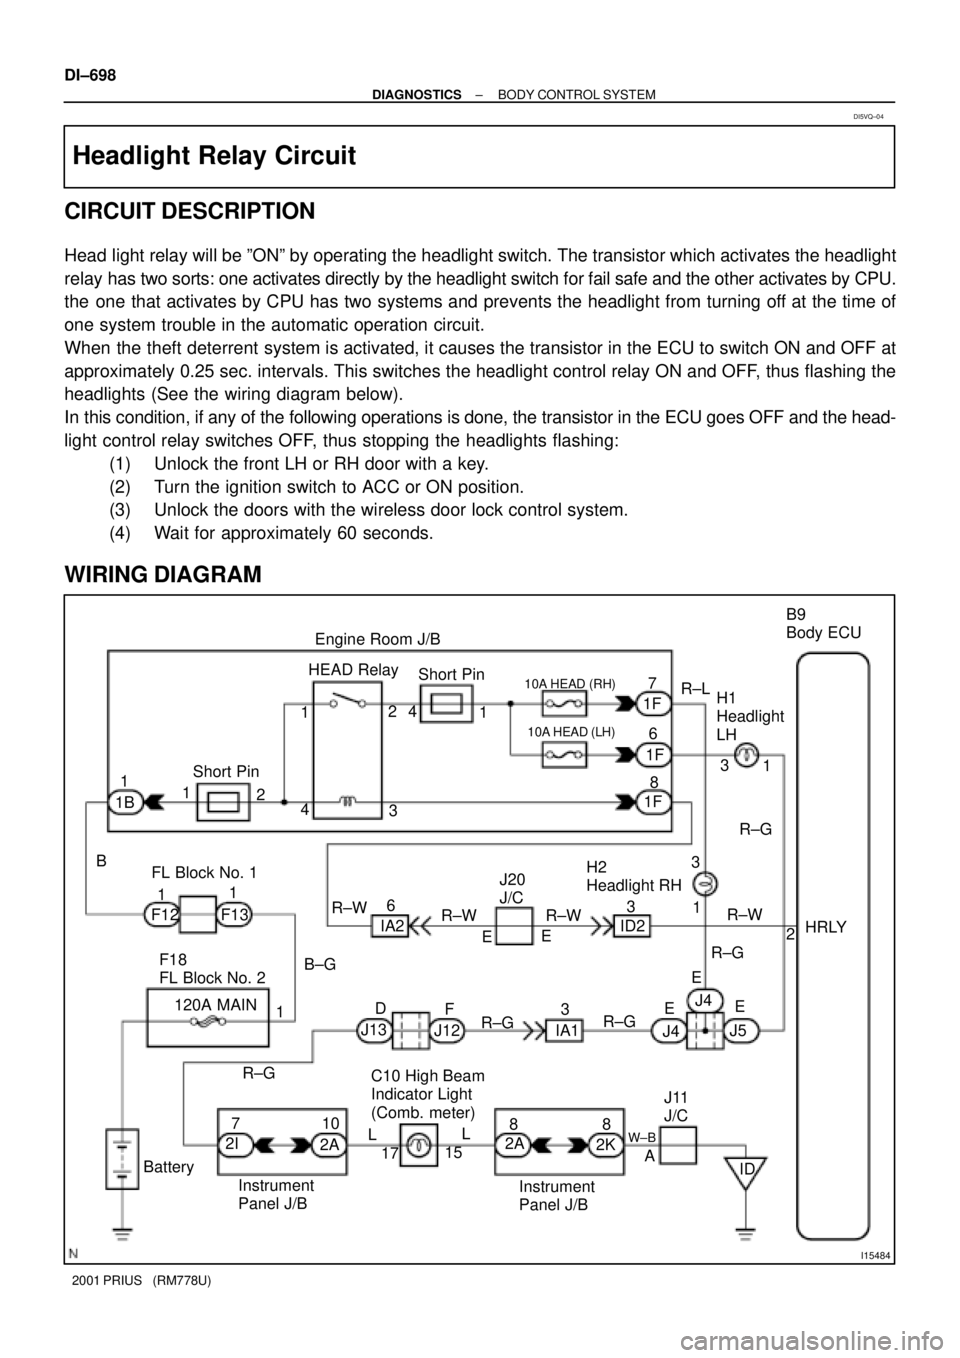
CIRCUIT DESCRIPTION
Head light relay will be ºONº by operating the headlight switch. The transistor which activates the headlight
relay has two sorts: one activates directly by the headlight switch for fail safe and the other activates by CPU.
the one that activates by CPU has two systems and prevents the headlight from turning off at the time of
one system trouble in the automatic operation circuit.
When the theft deterrent system is activated, it causes the transistor in the ECU to switch ON and OFF at
approximately 0.25 sec. intervals. This switches the headlight control relay ON and OFF, thus flashing the
headlights (See the wiring diagram below).
In this condition, if any of the following operations is done, the transistor in the ECU goes OFF and the head-
light control relay switches OFF, thus stopping the headlights flashing:
(1) Unlock the front LH or RH door with a key.
(2) Turn the ignition switch to ACC or ON position.
(3) Unlock the doors with the wireless door lock control system.
(4) Wait for approximately 60 seconds.
WIRING DIAGRAM
DI5VQ±04