Page 1201 of 1943
N14677
Fuse
AB0119H01300
H01301
Airbag Sensor Assembly
ON
LA
(+)
(±)
± DIAGNOSTICSSUPPLEMENTAL RESTRAINT SYSTEM
DI±639
2001 PRIUS (RM778U)
Does not light up, when ignition switch is turned to ON
1 Check AM2 Fuse.
PREPARATION:
Remove the AM2 fuse.
CHECK:
Check continuity of the AM2 fuse.
OK:
Continuity
HINT:
�Fuse may be burnt out even if it appears to be OK during
visual inspection.
�If fuse is OK, install it.
NG Go to step 4.
OK
2 Prepare for inspection (See step 1 on page DI±629).
3 Check SRS warning light circuit.
PREPARATION:
(a) Disconnect the airbag sensor assembly connector.
(b) Connect negative (±) terminal cable to the battery.
(c) Turn the ignition switch to ON.
CHECK:
Measure the voltage between body ground and LA terminal of
the harness side connector of the airbag sensor assembly.
OK:
Voltage: 10 ± 14 V
NG Check combination meter or repair SRS warn-
ing light circuit.
OK
Replace airbag sensor assembly.
Page 1205 of 1943

AB0119H10689H10656
ON
Tc
(+) (±)
AB0117 AB0119H01302H12918
LOCK
ON
Airbag Sensor Assembly
Tc
± DIAGNOSTICSSUPPLEMENTAL RESTRAINT SYSTEM
DI±643
2001 PRIUS (RM778U)
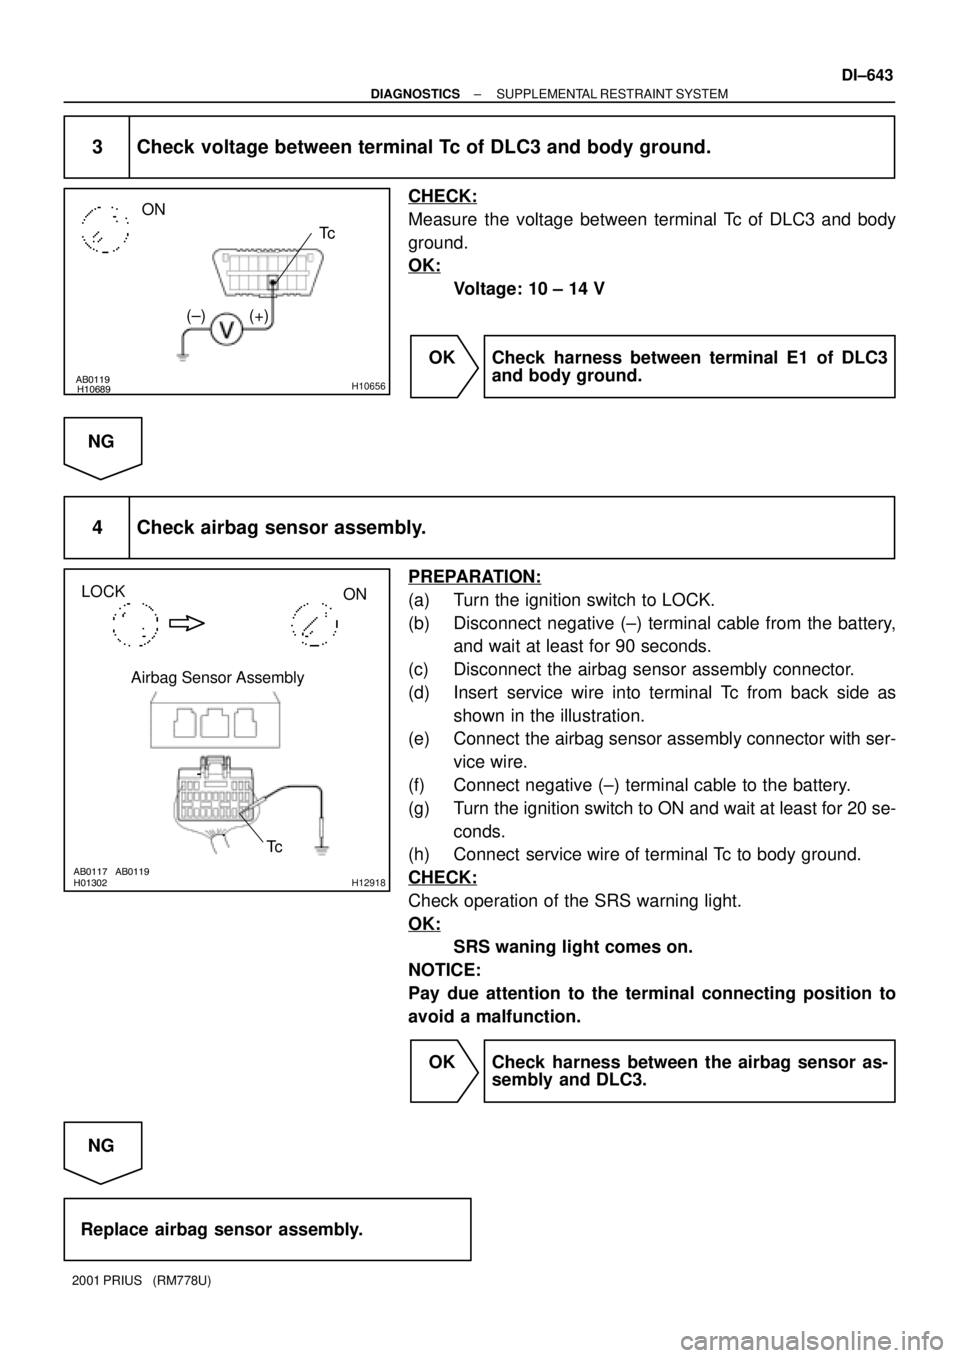
3 Check voltage between terminal Tc of DLC3 and body ground.
CHECK:
Measure the voltage between terminal Tc of DLC3 and body
ground.
OK:
Voltage: 10 ± 14 V
OK Check harness between terminal E1 of DLC3
and body ground.
NG
4 Check airbag sensor assembly.
PREPARATION:
(a) Turn the ignition switch to LOCK.
(b) Disconnect negative (±) terminal cable from the battery,
and wait at least for 90 seconds.
(c) Disconnect the airbag sensor assembly connector.
(d) Insert service wire into terminal Tc from back side as
shown in the illustration.
(e) Connect the airbag sensor assembly connector with ser-
vice wire.
(f) Connect negative (±) terminal cable to the battery.
(g) Turn the ignition switch to ON and wait at least for 20 se-
conds.
(h) Connect service wire of terminal Tc to body ground.
CHECK:
Check operation of the SRS warning light.
OK:
SRS waning light comes on.
NOTICE:
Pay due attention to the terminal connecting position to
avoid a malfunction.
OK Check harness between the airbag sensor as-
sembly and DLC3.
NG
Replace airbag sensor assembly.
Page 1206 of 1943
AB0119H01304H01305
LOCKAirbag Sensor Assembly
Tc
(+)
(±)
DI±644
± DIAGNOSTICSSUPPLEMENTAL RESTRAINT SYSTEM
2001 PRIUS (RM778U)
If the DTC is displayed without a DTC check procedure, perform the following
troubleshooting.
1 Check resistance between terminal Tc of airbag sensor assembly and body
ground.
PREPARATION:
(a) Turn the ignition switch to LOCK.
(b) Disconnect negative (±) terminal cable from the battery,
and wait at least for 90 seconds.
(c) Disconnect the airbag sensor assembly connector.
CHECK:
Check resistance between terminal Tc of the airbag sensor as-
sembly connector and body ground.
OK:
Resistance: 1 MW or Higher
NG Repair or replace harness or connector.
OK
Replace airbag sensor assembly.
Page 1207 of 1943

DI7NG±01
N09348
Hand±held tester
Break±out±box
F12396DLC3
N17520
± DIAGNOSTICSCRUISE CONTROL SYSTEM
DI±647
2001 PRIUS (RM778U)
PRE±CHECK
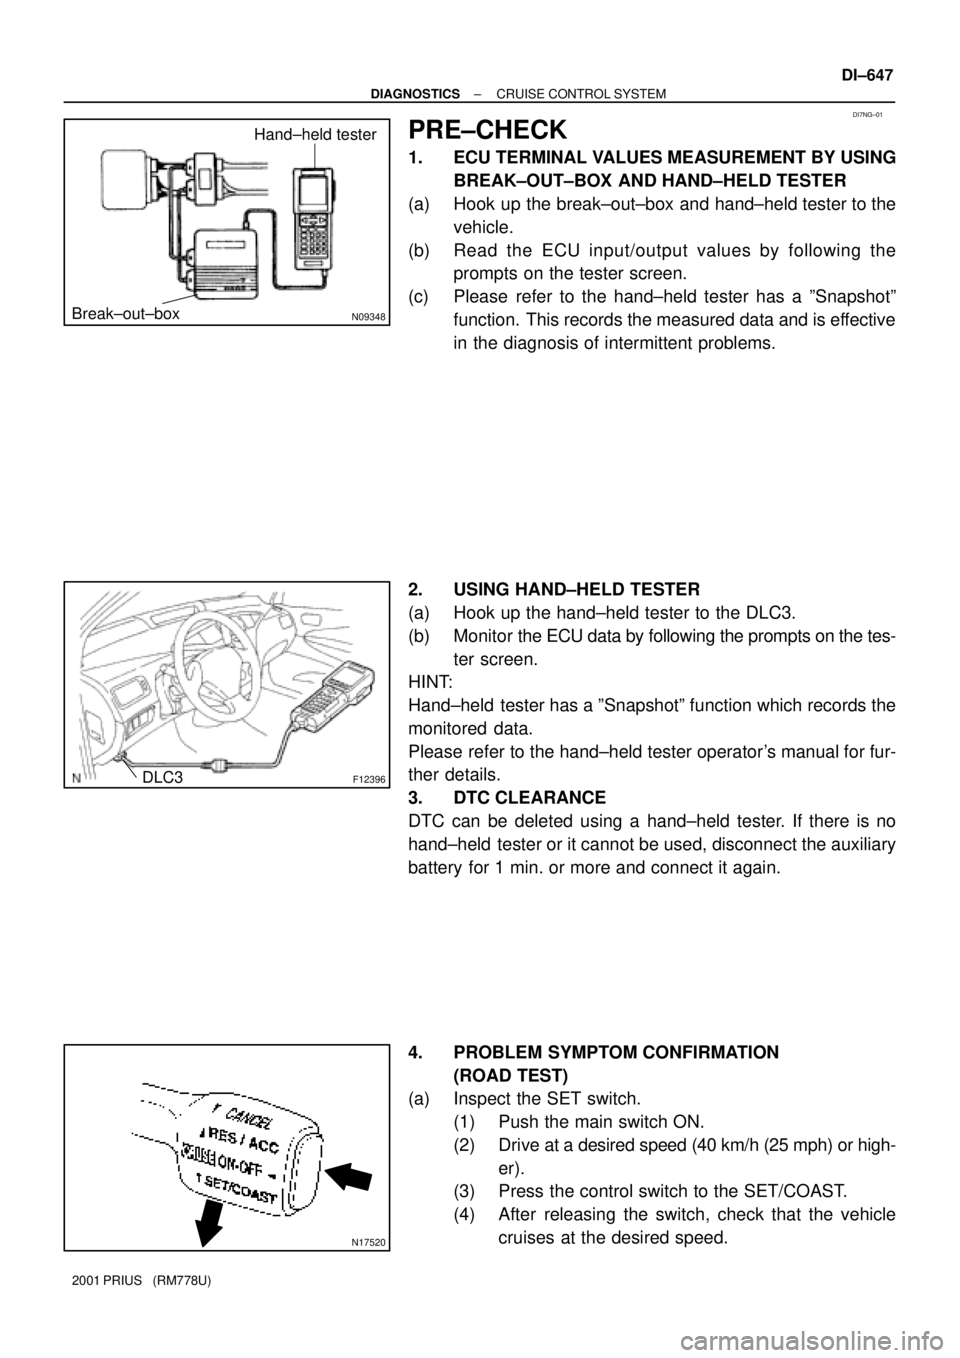
1. ECU TERMINAL VALUES MEASUREMENT BY USING
BREAK±OUT±BOX AND HAND±HELD TESTER
(a) Hook up the break±out±box and hand±held tester to the
vehicle.
(b) Read the ECU input/output values by following the
prompts on the tester screen.
(c) Please refer to the hand±held tester has a ºSnapshotº
function. This records the measured data and is effective
in the diagnosis of intermittent problems.
2. USING HAND±HELD TESTER
(a) Hook up the hand±held tester to the DLC3.
(b) Monitor the ECU data by following the prompts on the tes-
ter screen.
HINT:
Hand±held tester has a ºSnapshotº function which records the
monitored data.
Please refer to the hand±held tester operator's manual for fur-
ther details.
3. DTC CLEARANCE
DTC can be deleted using a hand±held tester. If there is no
hand±held tester or it cannot be used, disconnect the auxiliary
battery for 1 min. or more and connect it again.
4. PROBLEM SYMPTOM CONFIRMATION
(ROAD TEST)
(a) Inspect the SET switch.
(1) Push the main switch ON.
(2) Drive at a desired speed (40 km/h (25 mph) or high-
er).
(3) Press the control switch to the SET/COAST.
(4) After releasing the switch, check that the vehicle
cruises at the desired speed.
Page 1210 of 1943

DI±654
± DIAGNOSTICSCRUISE CONTROL SYSTEM
2001 PRIUS (RM778U)
CIRCUIT INSPECTION
DTC P1520 Stop light switch circuit
CIRCUIT DESCRIPTION
When the brake pedal is depressed, the stop light switch sends a signal to the hybrid vehicle control ECU.
When the hybrid vehicle control ECU receives this signal, it cancels the cruise control.
A fail±safe function is provided so that the cancel functions normally, even if there is a malfunction in the stop
light signal circuit.
The cancel condition is that battery voltage is supplied to terminal STP.
When the brake is on, battery voltage is normally applied through the STOP fuse and stop light switch to
terminal STP of the hybrid vehicle control ECU, and the hybrid vehicle control ECU turns the cruise control
OFF.
If the harness connected to terminal STP has an open circuit, terminal STP will have battery voltage and
the cruise control will be turned OFF.
DTC No.Detection ItemTrouble Area
P1520Stop light switch circuit.
�Stop light switch
�Harness or connector between hybrid vehicle control ECU
and stop light switch circuit
�Hybrid vehicle control ECU
DI7NI±01
Page 1211 of 1943
I15477
Instrument Panel J/B
FL Block No. 2S3
Stop Light SW I15
Ignition SW
Engine Room J/BHybrid Vehicle
Control ECU
J25 ID1B±Y
ST1± IG2 AM2
1G±W
2
R±B2
H14
STP 1
H14 B±W
34
6 B±W
J24
B C B±W W±R
7
6
2
2C
15A AM21
2GW±R
9
1J 2
1B B
1
F12B±G
120A MAIN
Battery1
F13
1
F18J15
D J14
E G±W
Instrument Panel J/B
9
2K15A STOP
W
100A DC/DC
F11 1
2H
FL Block No. 1
1
F131
B±GS3
Stop Light SW J/C
J/C
FL Block No. 1
± DIAGNOSTICSCRUISE CONTROL SYSTEM
DI±655
2001 PRIUS (RM778U)
WIRING DIAGRAM
Page 1216 of 1943
I15479
Combination Meter
FL Block No. 1Instrument Panel J/B
to Body ECU 5A AM1IG1
Relay
3
GR±B14
C10
2A
CRUISE 8
W±B
B±G22
C10 L
2K8
2
C11
W±B I15 Ignition SW
AM1
IG1
F11
Battery
ID 10A GAUGE
5
AJ11
J/C 2 1 2B6
2B3
2D6 W
W±G
B±Y
24
B±Y
1F13
1F18
1FL Block No. 2
120A MAIN
100A DC/DC7
2A
1
2H
IH BR
± DIAGNOSTICSCRUISE CONTROL SYSTEM
DI±665
2001 PRIUS (RM778U)
CRUISE MAIN Indicator Light Circuit
CIRCUIT DESCRIPTION
When the cruise control main switch is turned ON, CRUISE MAIN indicator light lights up.
WIRING DIAGRAM
DI7NL±01
Page 1218 of 1943
DI7XP±01
± DIAGNOSTICSCOMBINATION METER SYSTEM
DI±669
2001 PRIUS (RM778U)
PRE±CHECK
1. BEFORE CHECK
Since a trouble symptom may result from multiple causes, check not only the part where a user complains
of but also the following items in order to be sure no other trouble is identified.
�Fuse related parts
�Wire harness related parts
�Valve related parts
NOTICE:
�Setting the ignition switch to START temporarily stops all meter operation, however, this is not
an error.
�When replacing the combination meter ECU, carefully avoid any contact with the IC.
�Removing a battery terminal during engine operation may cause a reversed current and lead
to malfunction.
�When disconnecting any connector or terminal, be sure to disconnect the battery terminal.