Page 507 of 1943

MA02E±02
± MAINTENANCEOUTSIDE VEHICLE
MA±1
54 Author�: Date�:
2001 PRIUS (RM778U)
OUTSIDE VEHICLE
GENERAL MAINTENANCE
These are maintenance and inspection items which are considered to be the owner's responsibility.
They can be done by the owner or they can have them done at a service shop.
These items include those which should be checked on a daily basis, those which, in most cases, do not
require (special) tools and those which are considered to be reasonable for the owner to do.
Items and procedures for general maintenance are as follows.
1. GENERAL NOTES
�Maintenance items may vary from country to country. Check the owner's manual supplement in which
the maintenance schedule is shown.
�Every service item in the periodic maintenance schedule must be performed.
�Periodic maintenance service must be performed according to whichever interval in the periodic main-
tenance schedule occurs first, the odometer reading (miles) or the time interval (months).
�Maintenance service after the last period should be performed at the same interval as before unless
otherwise noted.
�Failure to do even one item an cause the engine to run poorly and increase exhaust emissions.
2. TIRES
(a) Check the pressure with a gauge. If necessary, adjust.
(b) Check for cuts, damage or excessive wear.
3. WHEEL NUTS
When checking the tires, check the nuts for looseness or for missing nuts. If necessary, tighten them.
4. TIRE ROTATION
Check the owner's manual supplement in which the maintenance schedule is shown.
5. WINDSHIELD WIPER BLADES
Check for wear or cracks whenever they do not wipe clean. If necessary, replace.
6. FLUID LEAKS
Check underneath for leaking fuel, oil, water or other fluid.
7. DOORS AND ENGINE HOOD
(a) Check that all doors including the trunk lid operate smoothly, and that all latches lock securely.
(b) Check that the engine hood secondary latch secures the hood from opening when the primary latch
is released.
Page 510 of 1943

MA02G±02
MA±4
± MAINTENANCEUNDER HOOD
57 Author�: Date�:
2001 PRIUS (RM778U)
UNDER HOOD
GENERAL MAINTENANCE
1. GENERAL NOTES
�Maintenance items may vary from country to country. Check the owner's manual supplement in which
the maintenance schedule is shown.
�Every serice item in the periodic maintenance schedule must be performed.
�Periodic maintenance service must be performed according to whichever interval in the periodic main-
tenance schedule occurs first, the odometer reading (miles) or the time interval (months).
�Maintenance service after the last period should be performed at the same interval as before unless
otherwise noted.
2. WINDSHIELD WASHER FLUID
Check that there is sufficient fluid in the tank.
3. ENGINE COOLANT LEVEL
Check that the coolant level is between the ºFULLº and ºLOWº lines on the see±through reservoir.
4. RADIATOR AND HOSES
(a) Check that the front of the radiator is clean and not blocked with leaves, dirt or bugs.
(b) Check the hoses for cracks, kinks, rot or loose connections.
5. BRAKE FLUID LEVELS
Check that the brake fluid levels are near the upper level line on the see±through reservoirs.
6. CHECK TRANSAXLE OIL (FLUID)
�Visually check the transaxle for oil (fluid) leakage.
�If leakage is found, check for the cause and repair.
HINT:
Wait until the engine and motor cools down (approx. 30 min.) before checking the fluid level after extended
driving at high speeds, in hot weather, in heavy traffic or pulling a trailer.
Page 1557 of 1943

A13909
B11793
7
3Ohmmeter
B11794
7
3
Battery
SF±8
± SFIFUEL PUMP
1222 Author�: Date�:
2001 PRIUS (RM778U)
Fuel pressure:
147 kPa (1.5 kgf/cm
2, 21 psi) or more
If pressure is not as specified, check the fuel pump and/or injec-
tors.
(o) After checking fuel pressure, disconnect the negative (±)
terminal cable from the battery and carefully, remove the
SST and fuel tube connector to prevent gasoline from
splashing.
SST 09268±41047 (95336±08070), 09268±45014
(09268±41200, 09268±41220, 09268±41250)
(p) Reconnect the fuel tube (fuel tube connector).
CAUTION:
Perform connecting operations of the fuel tube connector
(quick type) after observing the precautions.
(q) Reconnect the negative (±) terminal cable to the battery.
(r) Check for fuel leakage.
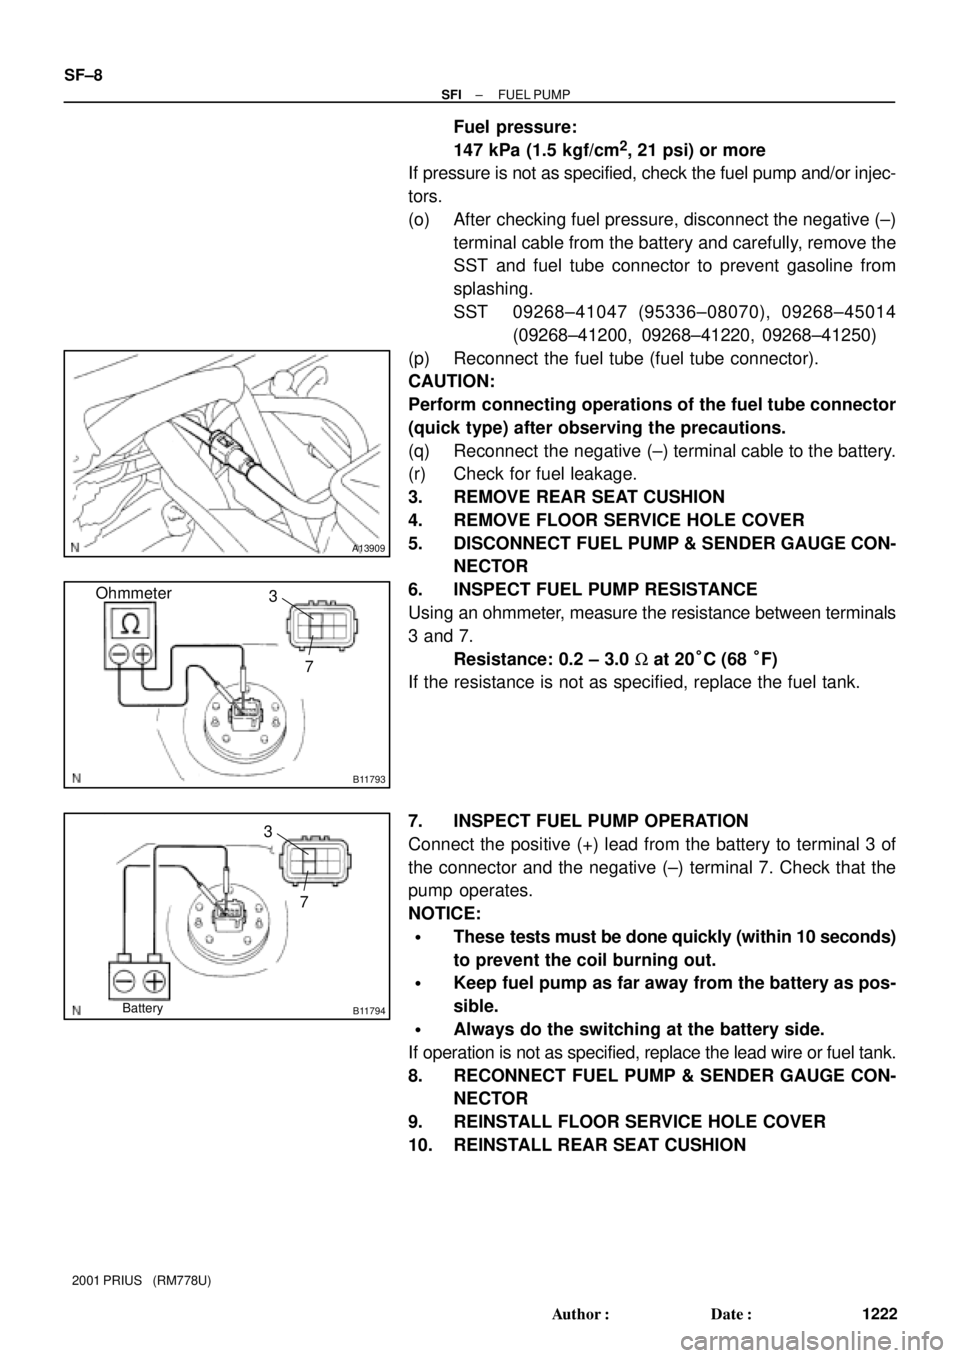
3. REMOVE REAR SEAT CUSHION
4. REMOVE FLOOR SERVICE HOLE COVER
5. DISCONNECT FUEL PUMP & SENDER GAUGE CON-
NECTOR
6. INSPECT FUEL PUMP RESISTANCE
Using an ohmmeter, measure the resistance between terminals
3 and 7.
Resistance: 0.2 ± 3.0 W at 20°C (68 °F)
If the resistance is not as specified, replace the fuel tank.
7. INSPECT FUEL PUMP OPERATION
Connect the positive (+) lead from the battery to terminal 3 of
the connector and the negative (±) terminal 7. Check that the
pump operates.
NOTICE:
�These tests must be done quickly (within 10 seconds)
to prevent the coil burning out.
�Keep fuel pump as far away from the battery as pos-
sible.
�Always do the switching at the battery side.
If operation is not as specified, replace the lead wire or fuel tank.
8. RECONNECT FUEL PUMP & SENDER GAUGE CON-
NECTOR
9. REINSTALL FLOOR SERVICE HOLE COVER
10. REINSTALL REAR SEAT CUSHION