Page 118 of 1897
AX0KC-01
D07218
AX-22
- AUTOMATIC TRANSAXLEFLOOR SHIFT ASSEMBLY
1312 Author�: Date�:
2001 AVALON (RM808U)
REMOVAL
1. REMOVE UPPER REAR CONSOLE PANEL SUB-AS-
SEMBLY (See page BO-90)
2. REMOVE FRONT ASH RECEPTACLE ASSEMBLY
(See page BO-90)
3. REMOVE UPPER CONSOLE PANEL SUB- AS-
SEMBLY (See page BO-90)
4. REMOVE CONSOLE BOX PLATE (See page BO-90)
5. REMOVE REAR CONSOLE BOX ASSEMBLY
(See page BO-90)
6. REMOVE LH AND RH SCUFF PLATES
(See page BO-90)
7. REMOVE LH AND RH COWL SIDE TRIMS
(See page BO-90)
8. REMOVE LOWER NO.4 INSTRUMENT PANEL SUB-
ASSEMBLY (See page BO-90)
9. REMOVE NO.2 INSTRUMENT PANEL UNDER COVER
SUB-ASSEMBL Y (See page BO-90)
10. REMOVE LOWER INSTRUMENT PANEL SUB- AS-
SEMBLY (See page BO-90)
11. Taiwan Spec.:
REMOVE CENTER INSTRUMENT CLUSTER FINISH
PANEL SUB-ASSEMBLY (See page BO-90)
12. Taiwan Spec.:
REMOVE RADIO TUNER OPENING COVERS WITH
HEATER CONSOLE & ACCESSORY ASSEMBLY
(See page BO-90)
13. Except Taiwan spec.:
REMOVE RADIO ASSEMBLY WITH HEATER CON-
SOLE & ACCESSORY ASSEMBLY
(See page BO-90)
14. REMOVE FRONT CONSOLE BOX ASSEMBLY
(See page BO-90)
15. w/ Rear Heater:
REMOVE REAR CONSOLE NO.1 BOX ASSEMBLY
CONSOLE BOX DUCT
Remove the clip and duct.
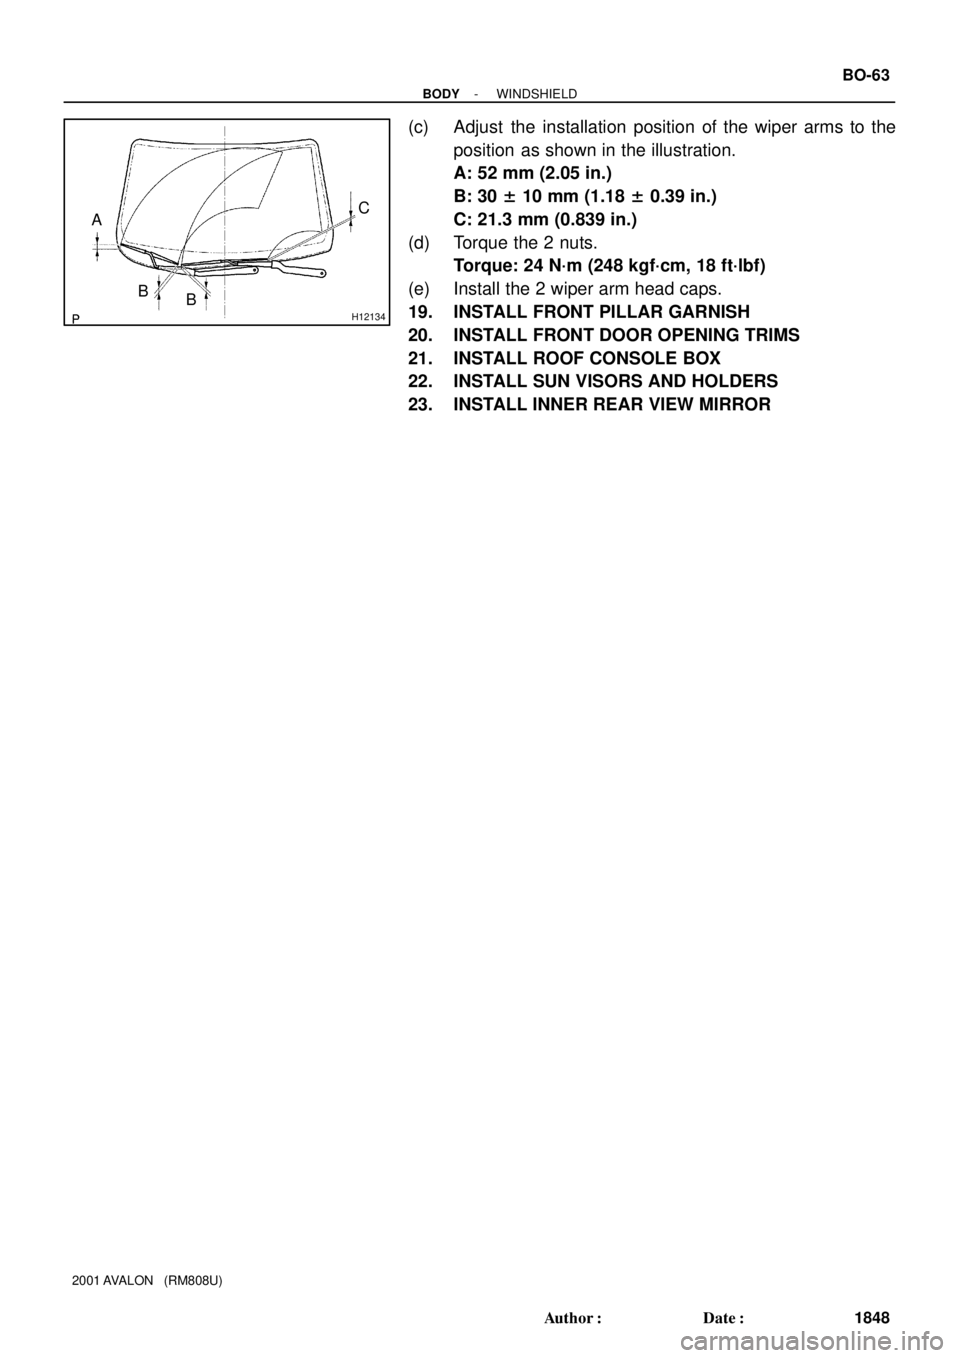
16. REMOVE FLOOR SHIFT LEVER ASSEMBLY
(a) Remove the clip and disconnect the shift cable from the
floor shift assembly.
(b) Disconnect the wire harness from the wire harness clamp.
Page 131 of 1897
AX0KC-01
D07218
AX-22
- AUTOMATIC TRANSAXLEFLOOR SHIFT ASSEMBLY
1312 Author�: Date�:
2001 AVALON (RM808U)
REMOVAL
1. REMOVE UPPER REAR CONSOLE PANEL SUB-AS-
SEMBLY (See page BO-90)
2. REMOVE FRONT ASH RECEPTACLE ASSEMBLY
(See page BO-90)
3. REMOVE UPPER CONSOLE PANEL SUB- AS-
SEMBLY (See page BO-90)
4. REMOVE CONSOLE BOX PLATE (See page BO-90)
5. REMOVE REAR CONSOLE BOX ASSEMBLY
(See page BO-90)
6. REMOVE LH AND RH SCUFF PLATES
(See page BO-90)
7. REMOVE LH AND RH COWL SIDE TRIMS
(See page BO-90)
8. REMOVE LOWER NO.4 INSTRUMENT PANEL SUB-
ASSEMBLY (See page BO-90)
9. REMOVE NO.2 INSTRUMENT PANEL UNDER COVER
SUB-ASSEMBL Y (See page BO-90)
10. REMOVE LOWER INSTRUMENT PANEL SUB- AS-
SEMBLY (See page BO-90)
11. Taiwan Spec.:
REMOVE CENTER INSTRUMENT CLUSTER FINISH
PANEL SUB-ASSEMBLY (See page BO-90)
12. Taiwan Spec.:
REMOVE RADIO TUNER OPENING COVERS WITH
HEATER CONSOLE & ACCESSORY ASSEMBLY
(See page BO-90)
13. Except Taiwan spec.:
REMOVE RADIO ASSEMBLY WITH HEATER CON-
SOLE & ACCESSORY ASSEMBLY
(See page BO-90)
14. REMOVE FRONT CONSOLE BOX ASSEMBLY
(See page BO-90)
15. w/ Rear Heater:
REMOVE REAR CONSOLE NO.1 BOX ASSEMBLY
CONSOLE BOX DUCT
Remove the clip and duct.
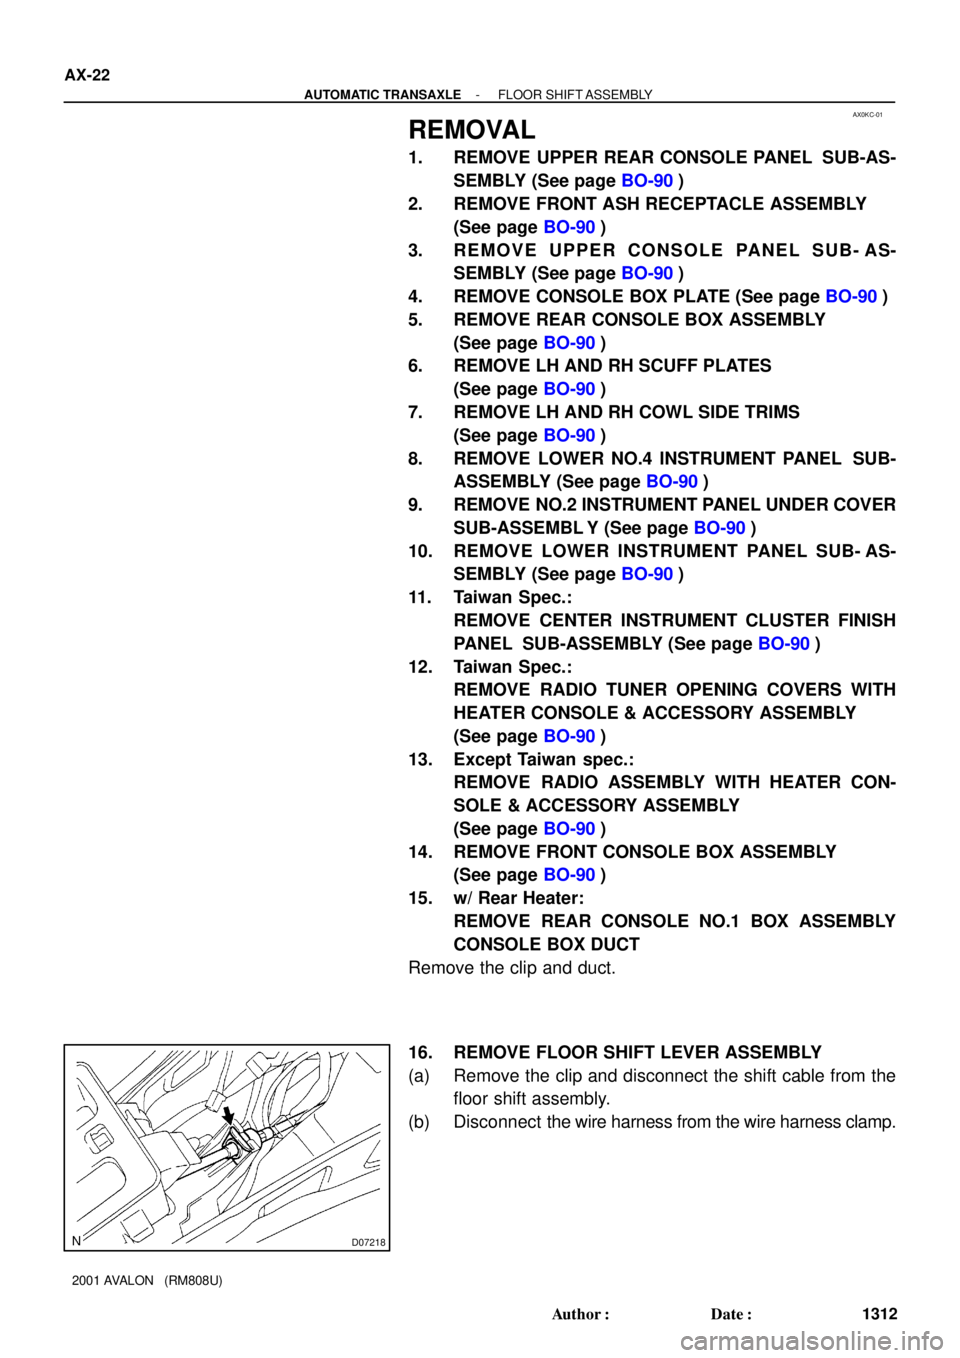
16. REMOVE FLOOR SHIFT LEVER ASSEMBLY
(a) Remove the clip and disconnect the shift cable from the
floor shift assembly.
(b) Disconnect the wire harness from the wire harness clamp.
Page 446 of 1897
BO2Q0-01
H12197
H12128
: 7 Clips
H12161
Claw
Claw
- BODYROOF HEADLINING
BO-99
1884 Author�: Date�:
2001 AVALON (RM808U)
REMOVAL
1. REMOVE REAR SEAT (See page BO-120)
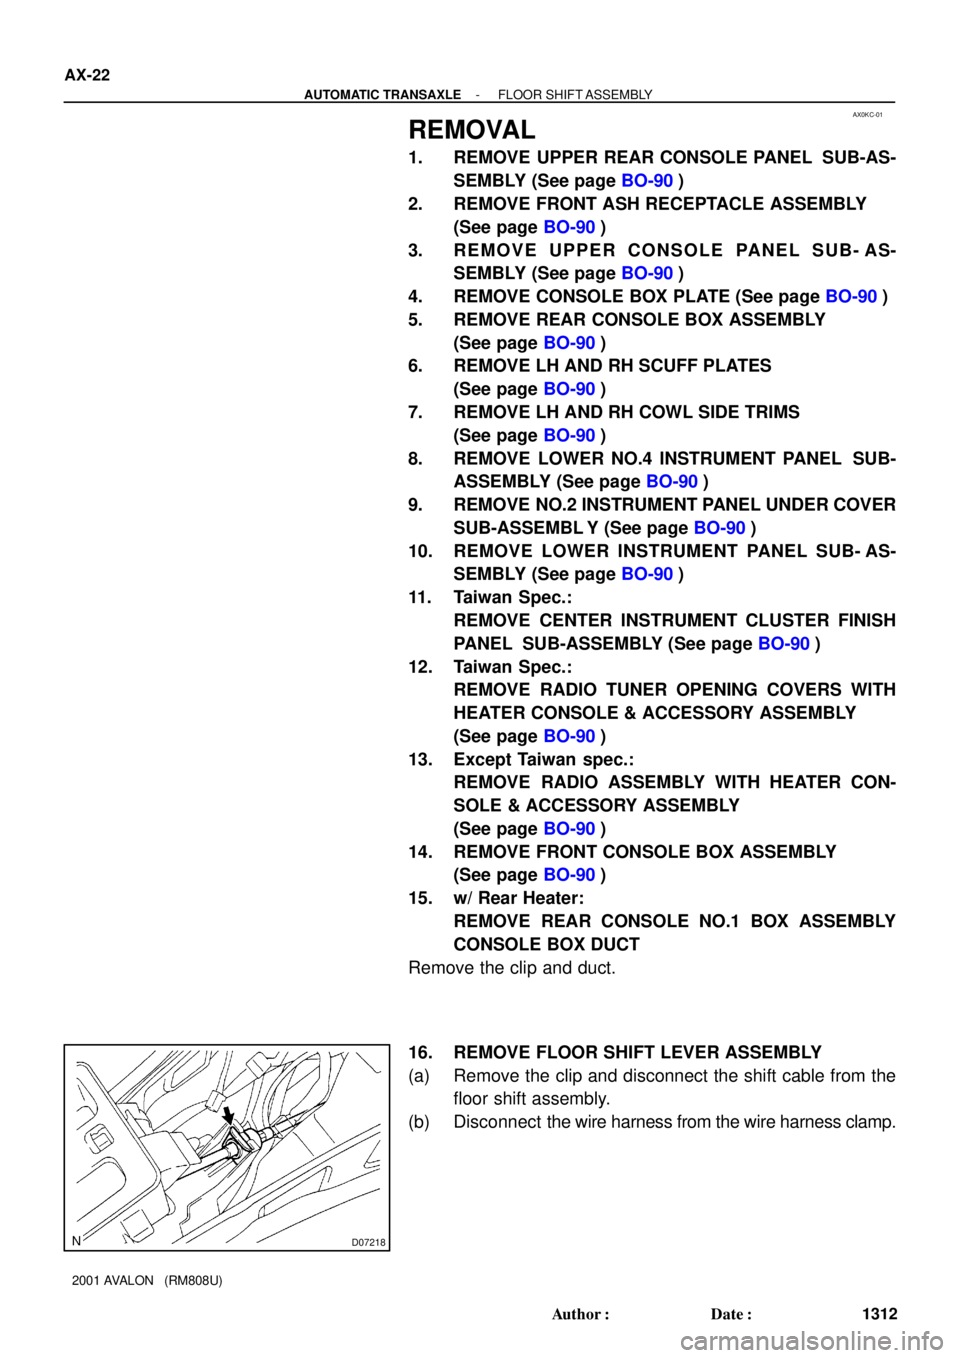
2. REMOVE INSIDE REAR DOOR SCUFF PLATE
(a) Remove the clip.
(b) Remove the inside rear door scuff plate as shown in the
illustration.
(c) Employ the same manner described above to the other
side.
3. REMOVE REAR DOOR OPENING TRIMS
4. REMOVE ROOF SIDE INNER GARNISH
(a) Using a screwdriver, remove the roof side inner garnish.
HINT:
Tape the screwdriver tip before use.
(b) Employ the same manner described above to the other
side.
5. REMOVE ASSIST GRIPS
(a) Using a screwdriver, remove the cover.
HINT:
Tape the screwdriver tip before use.
(b) Loosen bolts until assist grip detaches from the vehicle.
(c) Repeat at 4 positions.
6. w/ Rear personal light:
REMOVE REAR PERSONAL LIGHT
(a) Using a screwdriver, remove the rear personal light, then
disconnect the connector.
HINT:
Tape the screwdriver tip before use.
(b) Employ the same manner described above to the other
side.
Page 447 of 1897
H12175
H12198
H12199
:5 Clips
H12200Clip
H121452 Clips BO-100
- BODYROOF HEADLINING
1885 Author�: Date�:
2001 AVALON (RM808U)
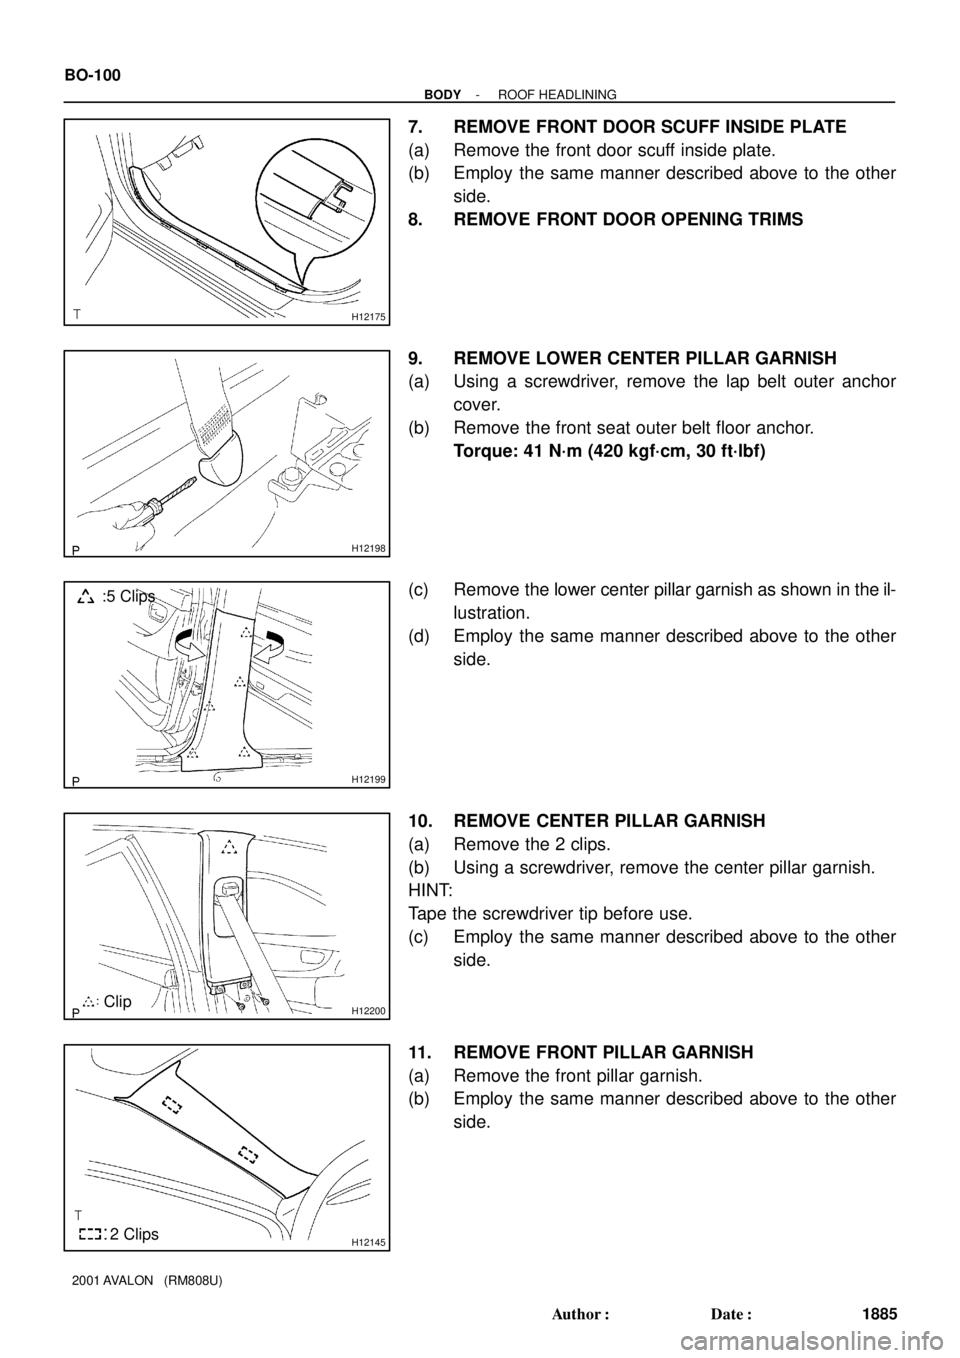
7. REMOVE FRONT DOOR SCUFF INSIDE PLATE
(a) Remove the front door scuff inside plate.
(b) Employ the same manner described above to the other
side.
8. REMOVE FRONT DOOR OPENING TRIMS
9. REMOVE LOWER CENTER PILLAR GARNISH
(a) Using a screwdriver, remove the lap belt outer anchor
cover.
(b) Remove the front seat outer belt floor anchor.
Torque: 41 N´m (420 kgf´cm, 30 ft´lbf)
(c) Remove the lower center pillar garnish as shown in the il-
lustration.
(d) Employ the same manner described above to the other
side.
10. REMOVE CENTER PILLAR GARNISH
(a) Remove the 2 clips.
(b) Using a screwdriver, remove the center pillar garnish.
HINT:
Tape the screwdriver tip before use.
(c) Employ the same manner described above to the other
side.
11. REMOVE FRONT PILLAR GARNISH
(a) Remove the front pillar garnish.
(b) Employ the same manner described above to the other
side.
Page 481 of 1897
H12134
A
BC
B
- BODYWINDSHIELD
BO-63
1848 Author�: Date�:
2001 AVALON (RM808U)
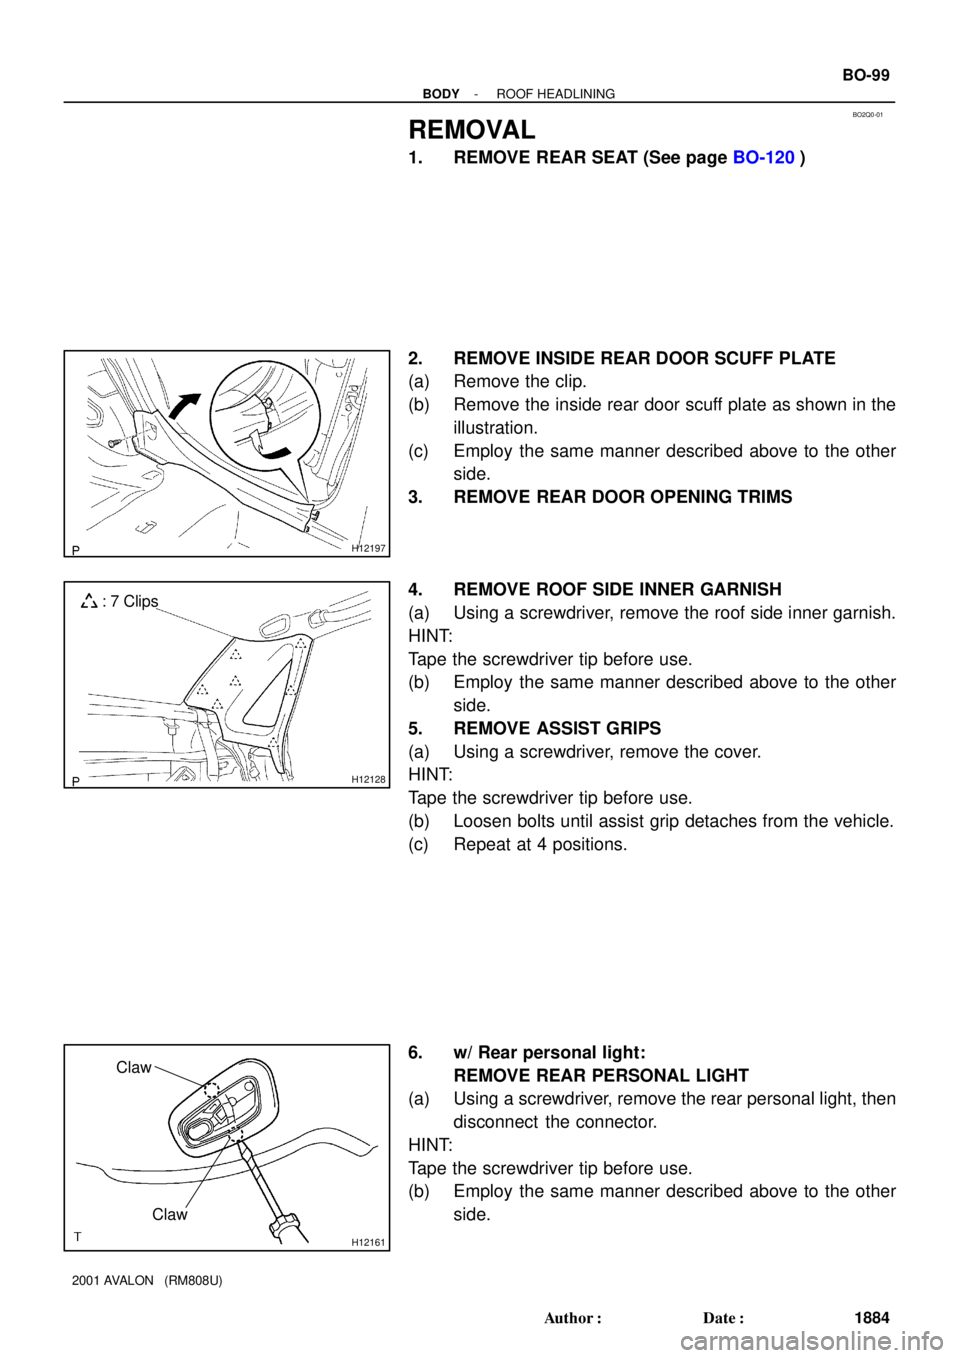
(c) Adjust the installation position of the wiper arms to the
position as shown in the illustration.
A: 52 mm (2.05 in.)
B: 30 ± 10 mm (1.18 ± 0.39 in.)
C: 21.3 mm (0.839 in.)
(d) Torque the 2 nuts.
Torque: 24 N´m (248 kgf´cm, 18 ft´lbf)
(e) Install the 2 wiper arm head caps.
19. INSTALL FRONT PILLAR GARNISH
20. INSTALL FRONT DOOR OPENING TRIMS
21. INSTALL ROOF CONSOLE BOX
22. INSTALL SUN VISORS AND HOLDERS
23. INSTALL INNER REAR VIEW MIRROR
Page 482 of 1897
BO2PF-01
H12143
H12144
H121452 Clips
H12129
BO-56
- BODYWINDSHIELD
1841 Author�: Date�:
2001 AVALON (RM808U)
REMOVAL
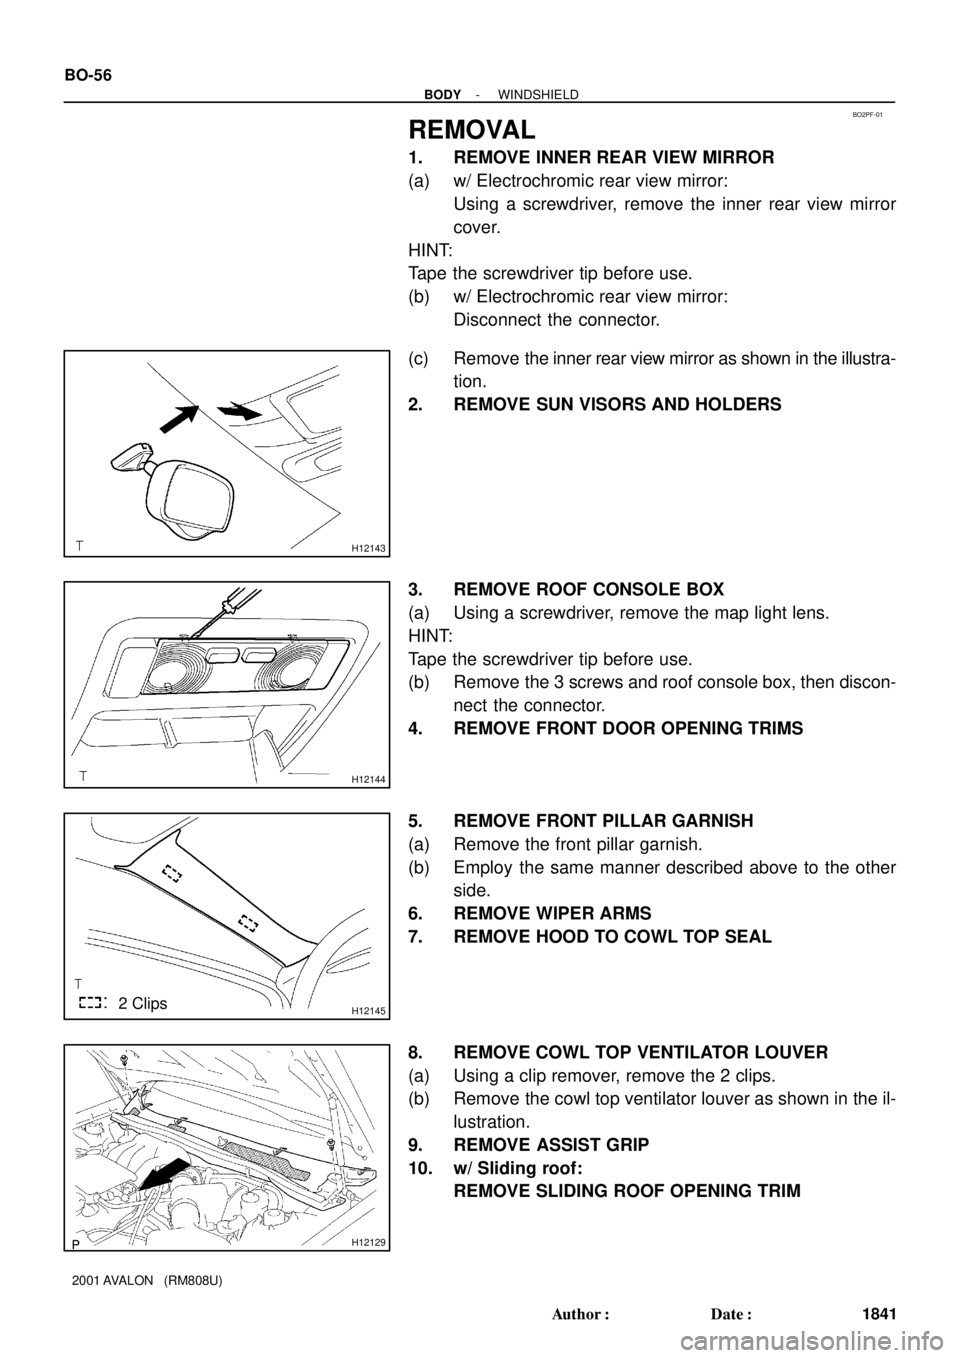
1. REMOVE INNER REAR VIEW MIRROR
(a) w/ Electrochromic rear view mirror:
Using a screwdriver, remove the inner rear view mirror
cover.
HINT:
Tape the screwdriver tip before use.
(b) w/ Electrochromic rear view mirror:
Disconnect the connector.
(c) Remove the inner rear view mirror as shown in the illustra-
tion.
2. REMOVE SUN VISORS AND HOLDERS
3. REMOVE ROOF CONSOLE BOX
(a) Using a screwdriver, remove the map light lens.
HINT:
Tape the screwdriver tip before use.
(b) Remove the 3 screws and roof console box, then discon-
nect the connector.
4. REMOVE FRONT DOOR OPENING TRIMS
5. REMOVE FRONT PILLAR GARNISH
(a) Remove the front pillar garnish.
(b) Employ the same manner described above to the other
side.
6. REMOVE WIPER ARMS
7. REMOVE HOOD TO COWL TOP SEAL
8. REMOVE COWL TOP VENTILATOR LOUVER
(a) Using a clip remover, remove the 2 clips.
(b) Remove the cowl top ventilator louver as shown in the il-
lustration.
9. REMOVE ASSIST GRIP
10. w/ Sliding roof:
REMOVE SLIDING ROOF OPENING TRIM