Page 107 of 1897
AX0KB-01
D07772
Radio Assembly with Heater Control & Accessory Assembly Except Taiwan Spec.:
Lower Instrument Panel
Sub-assembly
Lower No. 4 Instrument
Panel Sub-assembly
Hood Lock
Release Lever
Radio Tuner Opening
Covers with Heater
Console & Accessory
Assembly Taiwan Spec.:Taiwan Spec.:
Center Instrument Cluster Finish Panel
Sub-assemblyNo. 2 Instrument Panel
Under Cover Sub-assembly
Front Ash Receptacle Assembly
Upper Console Panel
Sub-assembly
Console Box Plate
Front Console Box
Assembly
Upper Rear Console
Panel Sub-assembly
Clip
Shift Control
Cable
Floor Shift Lever Assembly
12 (120,9)
Rear Console Box Assembly
RH Cowl Side Trim
RH Scuff Plate
N´m (kgf´cm, ft´lbf) : Specified torqueRH Cowl Side Trim
RH Scuff Plate
AX-20
- AUTOMATIC TRANSAXLEFLOOR SHIFT ASSEMBLY
1310 Author�: Date�:
2001 AVALON (RM808U)
FLOOR SHIFT ASSEMBLY
COMPONENTS
Page 118 of 1897

AX0KC-01
D07218
AX-22
- AUTOMATIC TRANSAXLEFLOOR SHIFT ASSEMBLY
1312 Author�: Date�:
2001 AVALON (RM808U)
REMOVAL
1. REMOVE UPPER REAR CONSOLE PANEL SUB-AS-
SEMBLY (See page BO-90)
2. REMOVE FRONT ASH RECEPTACLE ASSEMBLY
(See page BO-90)
3. REMOVE UPPER CONSOLE PANEL SUB- AS-
SEMBLY (See page BO-90)
4. REMOVE CONSOLE BOX PLATE (See page BO-90)
5. REMOVE REAR CONSOLE BOX ASSEMBLY
(See page BO-90)
6. REMOVE LH AND RH SCUFF PLATES
(See page BO-90)
7. REMOVE LH AND RH COWL SIDE TRIMS
(See page BO-90)
8. REMOVE LOWER NO.4 INSTRUMENT PANEL SUB-
ASSEMBLY (See page BO-90)
9. REMOVE NO.2 INSTRUMENT PANEL UNDER COVER
SUB-ASSEMBL Y (See page BO-90)
10. REMOVE LOWER INSTRUMENT PANEL SUB- AS-
SEMBLY (See page BO-90)
11. Taiwan Spec.:
REMOVE CENTER INSTRUMENT CLUSTER FINISH
PANEL SUB-ASSEMBLY (See page BO-90)
12. Taiwan Spec.:
REMOVE RADIO TUNER OPENING COVERS WITH
HEATER CONSOLE & ACCESSORY ASSEMBLY
(See page BO-90)
13. Except Taiwan spec.:
REMOVE RADIO ASSEMBLY WITH HEATER CON-
SOLE & ACCESSORY ASSEMBLY
(See page BO-90)
14. REMOVE FRONT CONSOLE BOX ASSEMBLY
(See page BO-90)
15. w/ Rear Heater:
REMOVE REAR CONSOLE NO.1 BOX ASSEMBLY
CONSOLE BOX DUCT
Remove the clip and duct.
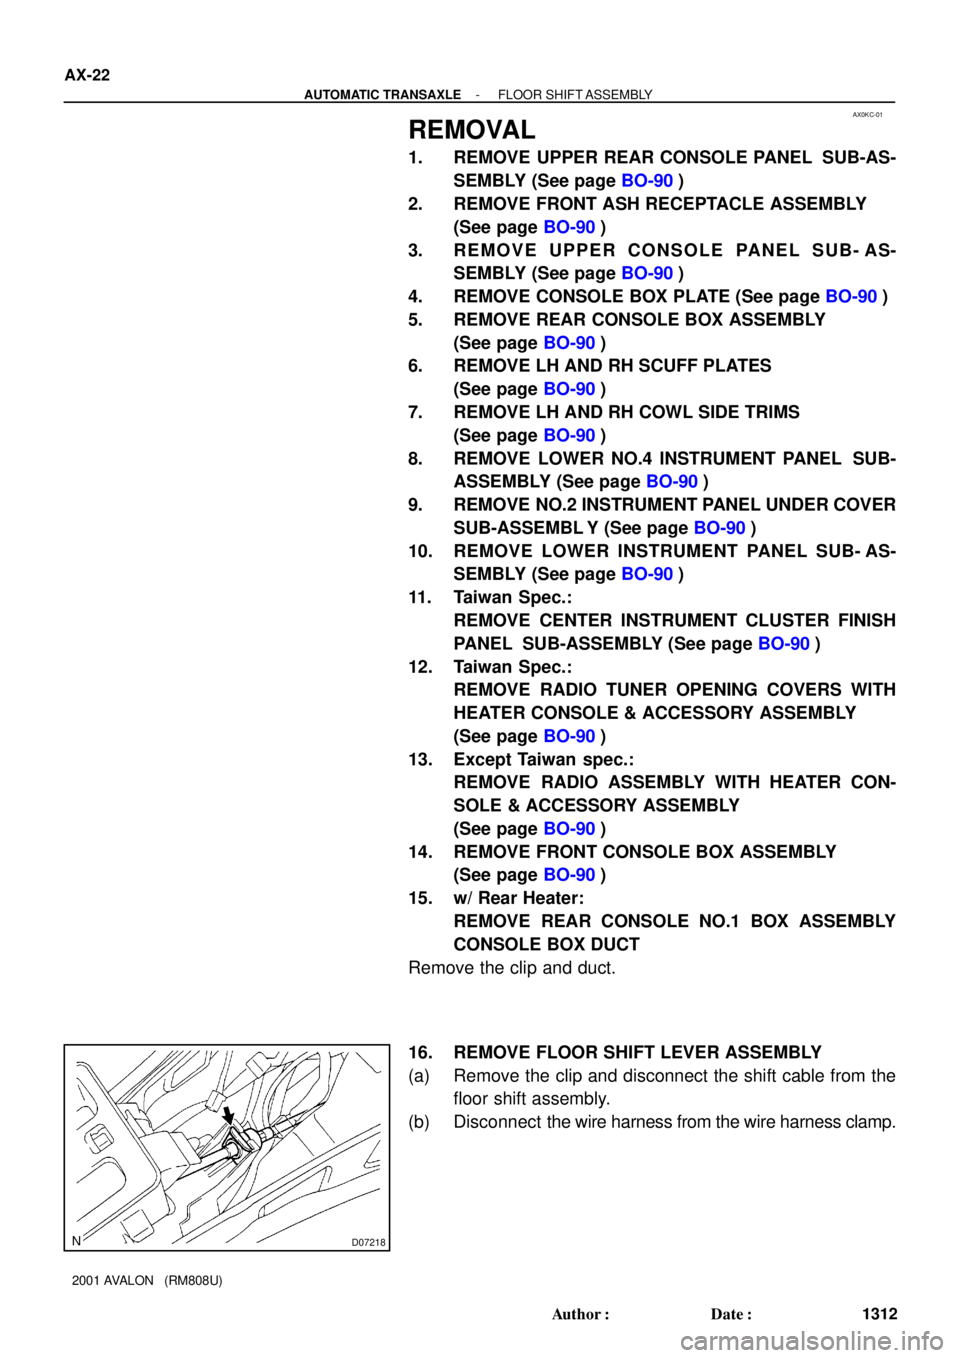
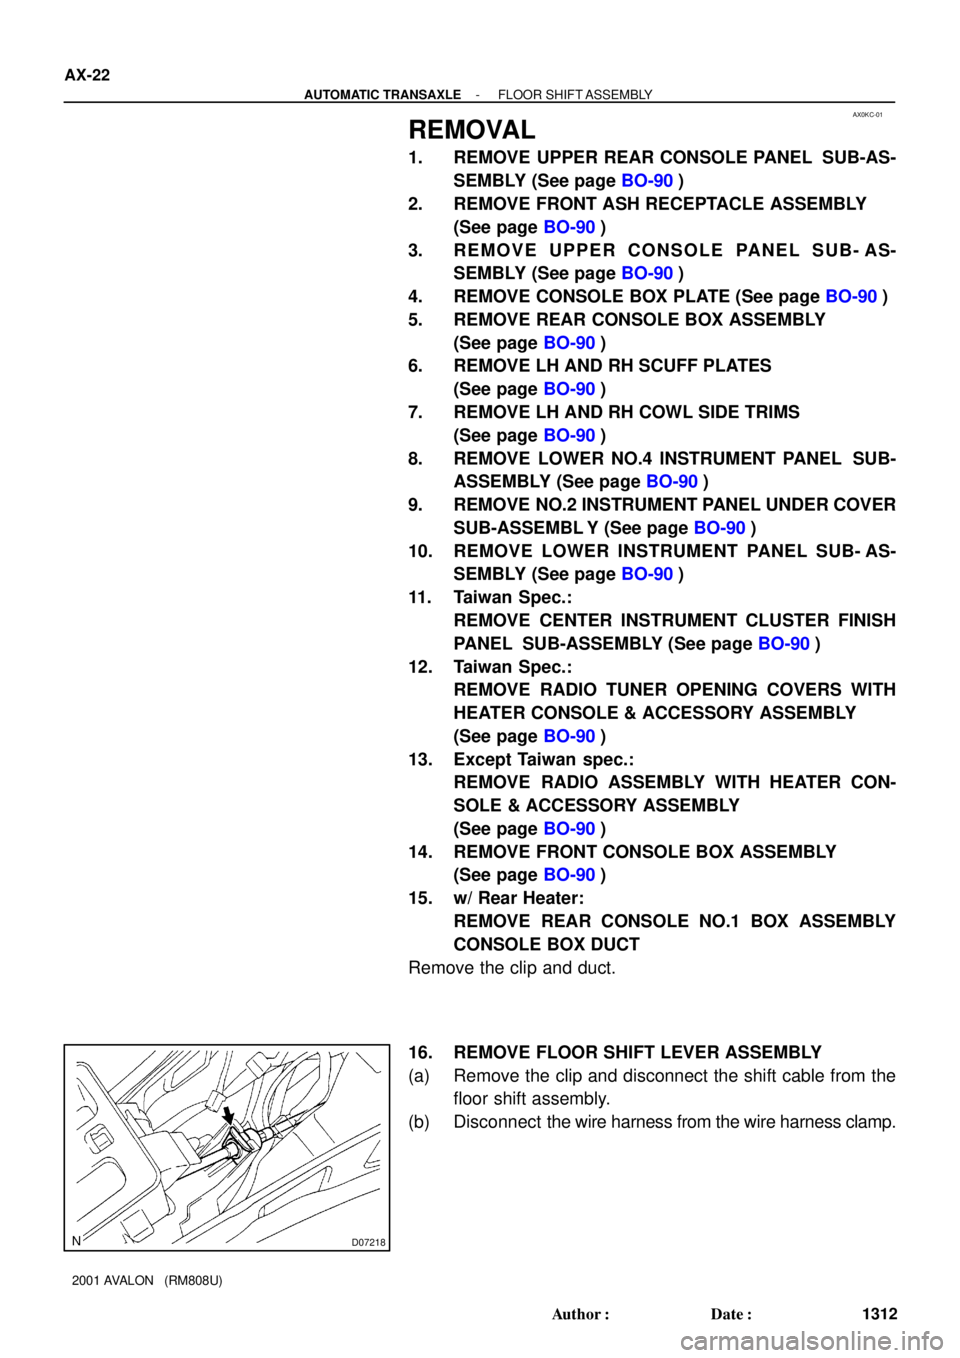
16. REMOVE FLOOR SHIFT LEVER ASSEMBLY
(a) Remove the clip and disconnect the shift cable from the
floor shift assembly.
(b) Disconnect the wire harness from the wire harness clamp.
Page 120 of 1897
AX0KB-01
D07772
Radio Assembly with Heater Control & Accessory Assembly Except Taiwan Spec.:
Lower Instrument Panel
Sub-assembly
Lower No. 4 Instrument
Panel Sub-assembly
Hood Lock
Release Lever
Radio Tuner Opening
Covers with Heater
Console & Accessory
Assembly Taiwan Spec.:Taiwan Spec.:
Center Instrument Cluster Finish Panel
Sub-assemblyNo. 2 Instrument Panel
Under Cover Sub-assembly
Front Ash Receptacle Assembly
Upper Console Panel
Sub-assembly
Console Box Plate
Front Console Box
Assembly
Upper Rear Console
Panel Sub-assembly
Clip
Shift Control
Cable
Floor Shift Lever Assembly
12 (120,9)
Rear Console Box Assembly
RH Cowl Side Trim
RH Scuff Plate
N´m (kgf´cm, ft´lbf) : Specified torqueRH Cowl Side Trim
RH Scuff Plate
AX-20
- AUTOMATIC TRANSAXLEFLOOR SHIFT ASSEMBLY
1310 Author�: Date�:
2001 AVALON (RM808U)
FLOOR SHIFT ASSEMBLY
COMPONENTS
Page 131 of 1897

AX0KC-01
D07218
AX-22
- AUTOMATIC TRANSAXLEFLOOR SHIFT ASSEMBLY
1312 Author�: Date�:
2001 AVALON (RM808U)
REMOVAL
1. REMOVE UPPER REAR CONSOLE PANEL SUB-AS-
SEMBLY (See page BO-90)
2. REMOVE FRONT ASH RECEPTACLE ASSEMBLY
(See page BO-90)
3. REMOVE UPPER CONSOLE PANEL SUB- AS-
SEMBLY (See page BO-90)
4. REMOVE CONSOLE BOX PLATE (See page BO-90)
5. REMOVE REAR CONSOLE BOX ASSEMBLY
(See page BO-90)
6. REMOVE LH AND RH SCUFF PLATES
(See page BO-90)
7. REMOVE LH AND RH COWL SIDE TRIMS
(See page BO-90)
8. REMOVE LOWER NO.4 INSTRUMENT PANEL SUB-
ASSEMBLY (See page BO-90)
9. REMOVE NO.2 INSTRUMENT PANEL UNDER COVER
SUB-ASSEMBL Y (See page BO-90)
10. REMOVE LOWER INSTRUMENT PANEL SUB- AS-
SEMBLY (See page BO-90)
11. Taiwan Spec.:
REMOVE CENTER INSTRUMENT CLUSTER FINISH
PANEL SUB-ASSEMBLY (See page BO-90)
12. Taiwan Spec.:
REMOVE RADIO TUNER OPENING COVERS WITH
HEATER CONSOLE & ACCESSORY ASSEMBLY
(See page BO-90)
13. Except Taiwan spec.:
REMOVE RADIO ASSEMBLY WITH HEATER CON-
SOLE & ACCESSORY ASSEMBLY
(See page BO-90)
14. REMOVE FRONT CONSOLE BOX ASSEMBLY
(See page BO-90)
15. w/ Rear Heater:
REMOVE REAR CONSOLE NO.1 BOX ASSEMBLY
CONSOLE BOX DUCT
Remove the clip and duct.
16. REMOVE FLOOR SHIFT LEVER ASSEMBLY
(a) Remove the clip and disconnect the shift cable from the
floor shift assembly.
(b) Disconnect the wire harness from the wire harness clamp.
Page 377 of 1897

BO2PU-02
H12194: Specified torqueN´m (kgf´cm, ft´lbf)
AA
KK
K
K
K
K
K
K
B
L
E
G
GG
G
GG
G
GGI
C
C
C
C
K
K
KKB Instrument Panel Reinforcement
No. 2 Instrument
Panel to Cowl BraceFront Pillar Garnish
Upper Cluster Finish Panel
Instrument Panel
Safety Pad Front Pillar GarnishNo. 1 Heater to
Register Duct
Instrument Panel
to Cowl BraceSpeaker Opening
Cover Assembly
H
H
H
H
H
H
III
G
D EDD
Steering Wheel
Floor shift:
Rear Console Box Floor shift:
Front Console Box
Combination Switch No. 1 Lower PanelLH Lower Insert
Column shift:
Finish Panel Hood Lock
Release LeverNo. 2 Under Cover
Floor shift:
Console Box
Plate
Steering Wheel Pad Steering Column
Cover
Floor shift:
Front Ash Receptacle
Floor shift:
Upper Console PanelLower Finish
Panel Column shift:
Lower Cover LH Register
TAIWAN:
Center Cluster
Finish Panel
TAIWAN:
Opening Covers with
Heater Control Assembly Radio Assembly with Heater
Control AssemblyLower Panel
Cluster Finish Panel
End Finish Panel Combination Meter Lower Cluster
Finish PanelGlove Compartment
Door Finish Plate
Speaker Opening
Cover Assembly
No. 2 Heater to
Register Duct
No. 1 Register
Floor shift:
Cup Holder
Multi Information
Display
Floor shift:
Under Rear
Console Panel
I
HH
50 (510, 37)
20 (204, 15)
N
JJJJConsole Box Hole Cover
Column shift:
Front Ash Receptacle
- BODYINSTRUMENT PANEL
BO-87
1872 Author�: Date�:
2001 AVALON (RM808U)
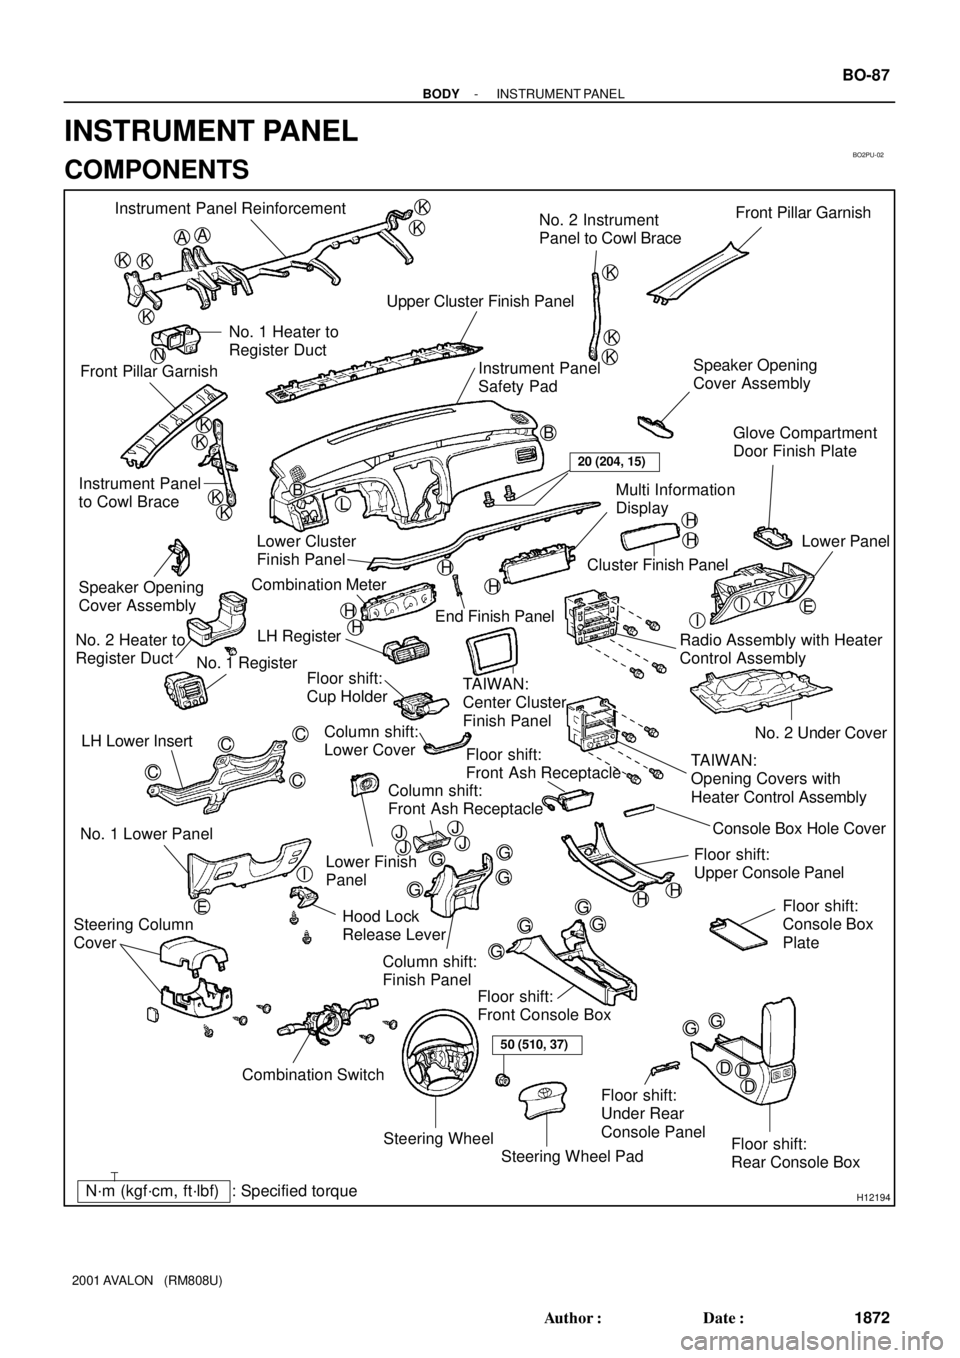
INSTRUMENT PANEL
COMPONENTS
Page 385 of 1897

H12700
H12184
4 Clips
H121852 Clips BO-92
- BODYINSTRUMENT PANEL
1877 Author�: Date�:
2001 AVALON (RM808U)
19. Floor shift:
REMOVE CUP HOLDER
20. Floor shift:
REMOVE REAR CONSOLE BOX
(a) Remove the console box plate.
(b) Remove the 2 screws, 3 bolts and rear console box, then
disconnect the connector.
21. Floor shift:
REMOVE CONSOLE BOX HOLE COVER
Using a screwdriver, remove the console box hole cover.
HINT:
Tape the screwdriver tip before use.
22. Floor shift:
REMOVE RADIO ASSEMBLY WITH HEATER CON-
TROL ASSEMBLY
(a) Except TAIWAN:
Remove the 4 bolts and radio assembly with heater con-
trol assembly, then disconnect the connectors.
(b) TAIWAN:
Using a screwdriver, remove the center cluster finish pan-
el.
HINT:
Tape the screwdriver tip before use.
(c) TAIWAN:
Remove the 4 bolts and opening covers with heater con-
trol assembly, then disconnect the connectors.
23. Floor shift:
REMOVE FRONT CONSOLE BOX
(a) Remove the 6 screws.
(b) Using a screwdriver, remove the front console box.
HINT:
Tape the screwdriver tip before use.
Page 386 of 1897

H12186
2 Clips
H12187
4 Clips
H12188
2 Clips
H12189
- BODYINSTRUMENT PANEL
BO-93
1878 Author�: Date�:
2001 AVALON (RM808U)
24. Column shift:
REMOVE LOWER COVER
Using a screwdriver, remove the lower cover.
HINT:
Tape the screwdriver tip before use.
25. Column shift:
REMOVE FINISH PANEL
(a) Remove the 4 screws and 2 clips.
(b) Using a screwdriver, remove the finish panel, then discon-
nect the connector.
HINT:
Tape the screwdriver tip before use.
(c) Remove the 4 screws and front ash receptacle.
26. Column shift:
REMOVE RADIO ASSEMBLY WITH HEATER CON-
TROL ASSEMBLY
Remove the 4 bolts and radio assembly with heater control as-
sembly.
27. REMOVE SPEAKER OPENING COVER ASSEMBLY
(a) Using a screwdriver, remove the speaker opening cover
assembly, then disconnect the connector.
HINT:
Tape the screwdriver tip before use.
(b) Employ the same manner described above to the other
side.
28. REMOVE UPPER CLUSTER FINISH PANEL
Using a screwdriver, remove the upper cluster finish panel.
HINT:
Tape the screwdriver tip before use.
Page 387 of 1897
H121907 Clips
H12192
2 Clips
H12193
BO-94
- BODYINSTRUMENT PANEL
1879 Author�: Date�:
2001 AVALON (RM808U)
29. REMOVE LOWER CLUSTER FINISH PANEL
Using a screwdriver, remove the lower cluster finish panel.
HINT:
Tape the screwdriver tip before use.
30. REMOVE CLUSTER FINISH PANEL
(a) Remove the 2 screws.
(b) Using a screwdriver, remove the cluster finish panel.
HINT:
Tape the screwdriver tip before use.
31. REMOVE END FINISH PANEL
32. REMOVE MULTI INFORMATION DISPLAY
33. REMOVE COMBINATION METER
34. REMOVE INSTRUMENT PANEL SAFETY PAD
(a) Remove the 2 bolts from the passenger airbag assembly.
Torque: 20 N´m (204 kgf´cm, 15 ft´lbf)
(b) Remove the 6 bolts and nut.
(c) Disconnect the connectors.
(d) Remove the bolts and ground terminals.
(e) Remove the instrument panel safety pad.
35. REMOVE INSTRUMENT PANEL TO COWL BRACE
36. RE MO V E NO . 2 INS TRUME NT PANE L TO CO WL
BRACE
37. REMOVE NO. 1 HEATER TO REGISTER DUCT
38. REMOVE INSTRUMENT PANEL REINFORCEMENT