Page 3217 of 3833
SUNROOF
RF-9
C
D
E
F
G
H
J
K
L
MA
B
RF
SUNROOF UNIT
Removal
CAUTION:
●Removal and installation of sunroof unit require 2 workers.
●When taking sunroof unit out, use shop cloths to protect seats and trim from damage.
●After installing sunroof unit and glass lid, be sure to carry out the leak test to confirm there is no
more leakage.
1. Remove headlining. Refer to EI-29, "
HEADLINING"
2. Disconnect drain hoses.
3. Disconnect interior lamp harness.
4. Remove both unit-side and body-side front bracket mounting
bolts.
5. Remove both unit-side and body-side center and rear bracket
mounting bolts.
6. Remove motor bracket mounting bolt.
7. Remove mounting bolts on the front end and side rails, and
remove sunroof unit from the roof panel.
8. Remove the sunroof unit out of the passenger compartment
while being careful not to damage the seats and trim.
SIIA0130E
SIIA0184E
SIIA0121E
SIIA0183E
Page 3218 of 3833

RF-10
SUNROOF
Installation
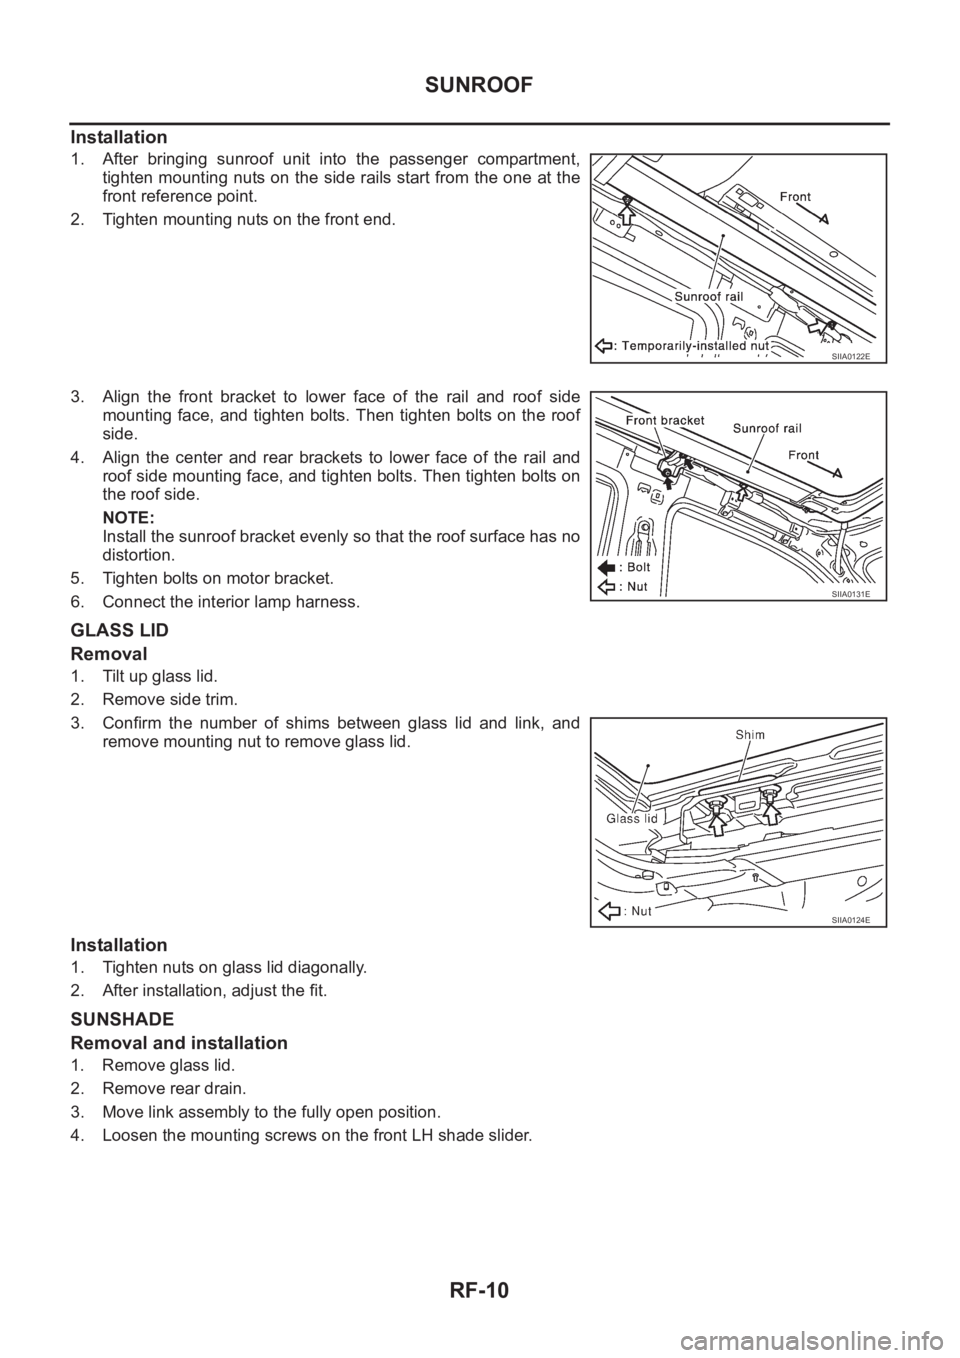
1. After bringing sunroof unit into the passenger compartment,
tighten mounting nuts on the side rails start from the one at the
front reference point.
2. Tighten mounting nuts on the front end.
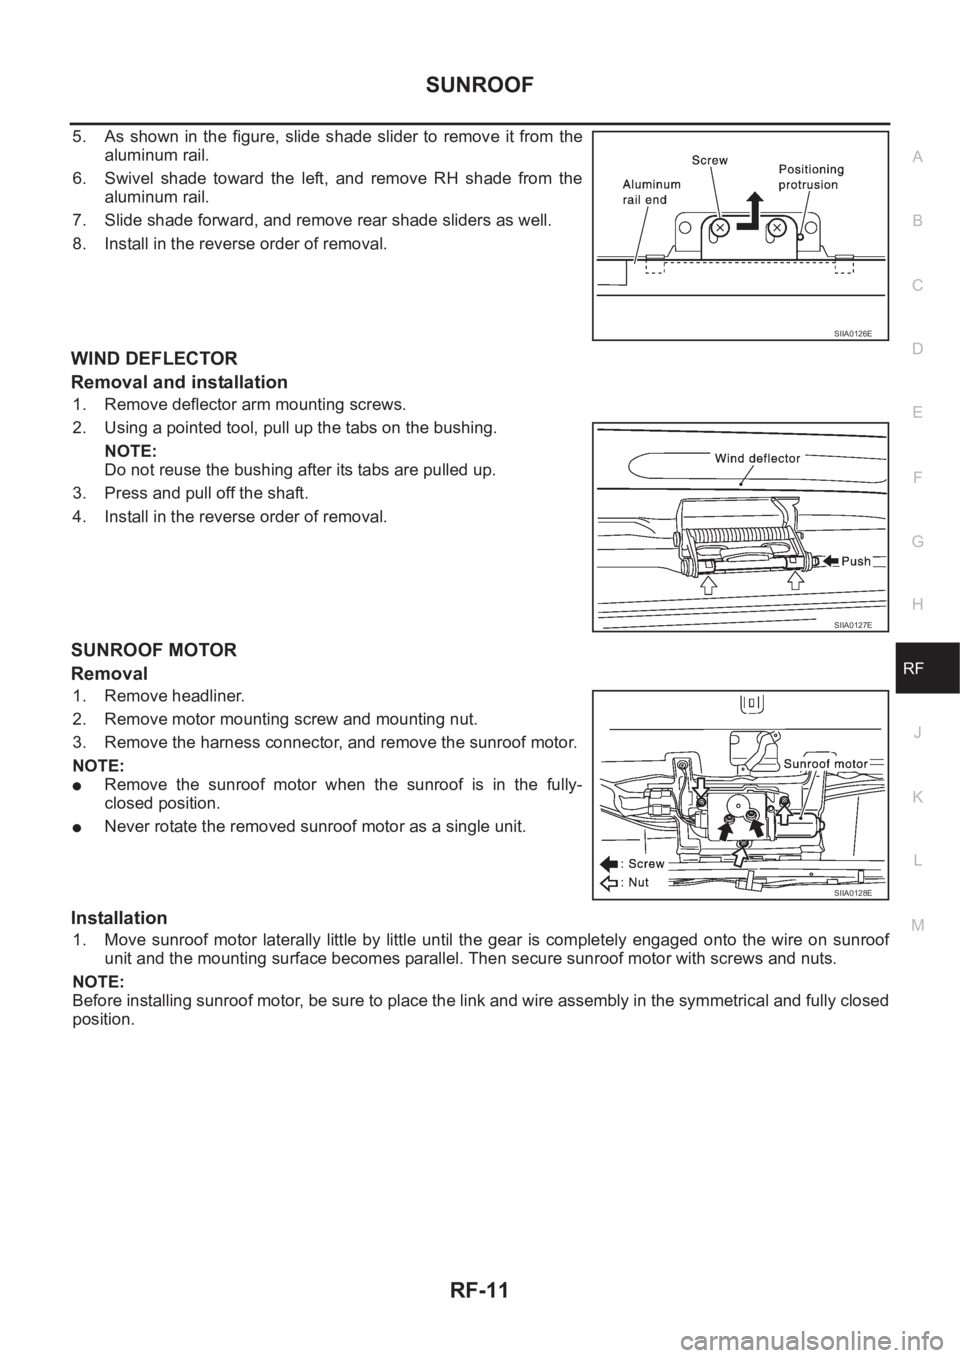
3. Align the front bracket to lower face of the rail and roof side
mounting face, and tighten bolts. Then tighten bolts on the roof
side.
4. Align the center and rear brackets to lower face of the rail and
roof side mounting face, and tighten bolts. Then tighten bolts on
the roof side.
NOTE:
Install the sunroof bracket evenly so that the roof surface has no
distortion.
5. Tighten bolts on motor bracket.
6. Connect the interior lamp harness.
GLASS LID
Removal
1. Tilt up glass lid.
2. Remove side trim.
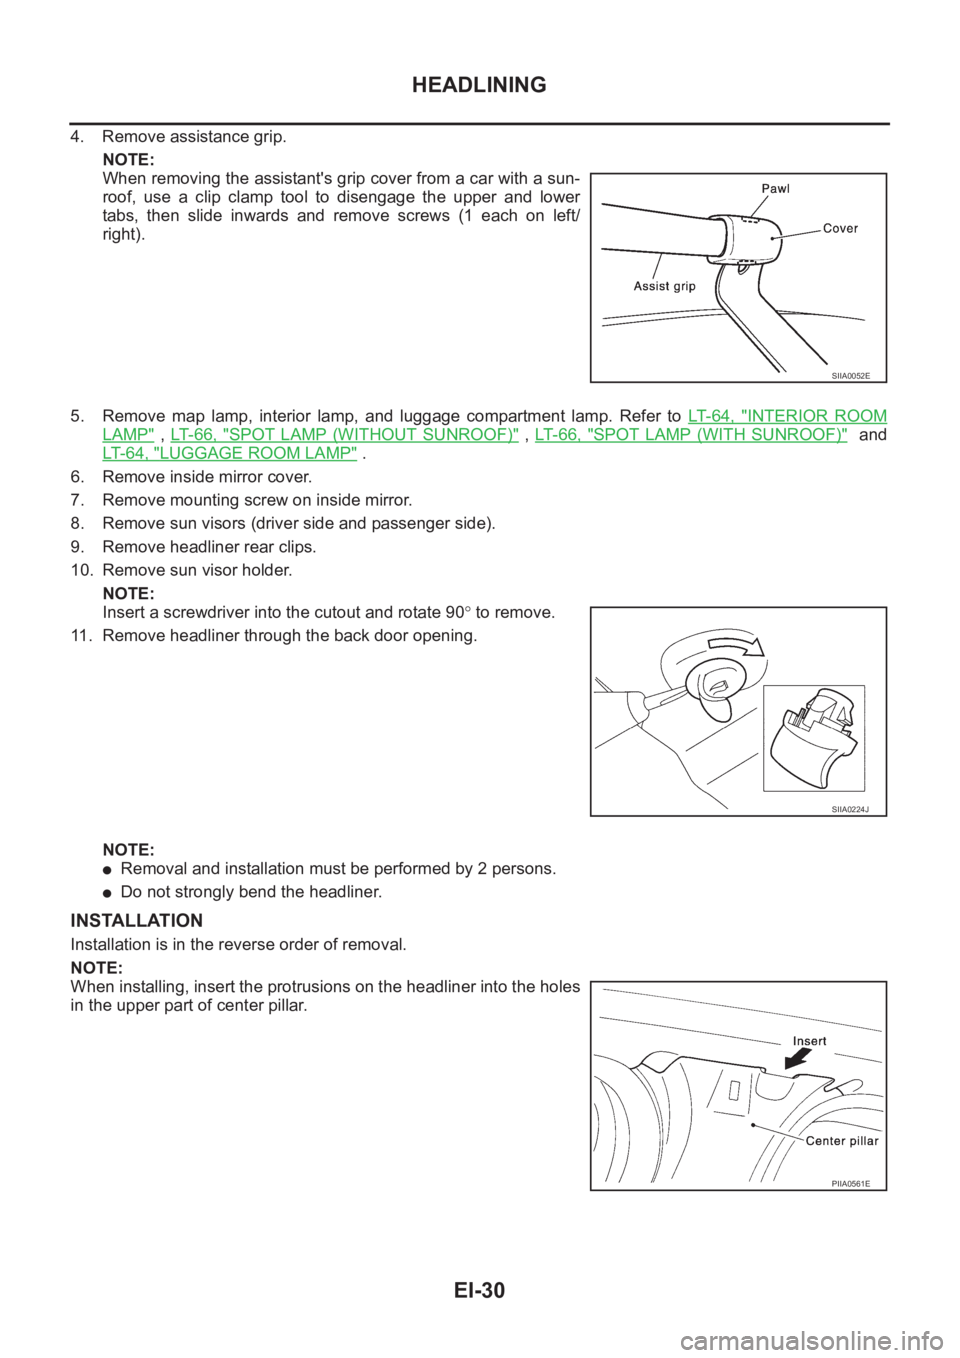
3. Confirm the number of shims between glass lid and link, and
remove mounting nut to remove glass lid.
Installation
1. Tighten nuts on glass lid diagonally.
2. After installation, adjust the fit.
SUNSHADE
Removal and installation
1. Remove glass lid.
2. Remove rear drain.
3. Move link assembly to the fully open position.
4. Loosen the mounting screws on the front LH shade slider.
SIIA0122E
SIIA0131E
SIIA0124E
Page 3219 of 3833

SUNROOF
RF-11
C
D
E
F
G
H
J
K
L
MA
B
RF
5. As shown in the figure, slide shade slider to remove it from the
aluminum rail.
6. Swivel shade toward the left, and remove RH shade from the
aluminum rail.
7. Slide shade forward, and remove rear shade sliders as well.
8. Install in the reverse order of removal.
WIND DEFLECTOR
Removal and installation
1. Remove deflector arm mounting screws.
2. Using a pointed tool, pull up the tabs on the bushing.
NOTE:
Do not reuse the bushing after its tabs are pulled up.
3. Press and pull off the shaft.
4. Install in the reverse order of removal.
SUNROOF MOTOR
Removal
1. Remove headliner.
2. Remove motor mounting screw and mounting nut.
3. Remove the harness connector, and remove the sunroof motor.
NOTE:
●Remove the sunroof motor when the sunroof is in the fully-
closed position.
●Never rotate the removed sunroof motor as a single unit.
Installation
1. Move sunroof motor laterally little by little until the gear is completely engaged onto the wire on sunroof
unit and the mounting surface becomes parallel. Then secure sunroof motor with screws and nuts.
NOTE:
Before installing sunroof motor, be sure to place the link and wire assembly in the symmetrical and fully closed
position.
SIIA0126E
SIIA0127E
SIIA0128E
Page 3220 of 3833
Page 3249 of 3833
HEADLINING
EI-29
C
D
E
F
G
H
J
K
L
MA
B
EI
HEADLININGPFP:73910
Removal and InstallationEIS000ND
REMOVAL
1. Remove front pillar and center pillar garnishes. Refer to EI-26, "Removal and Installation" .
2. Remove body side welt. Refer to EI-26, "
Removal and Installation" .
3. Remove rear pillar finisher. Refer toEI-26, "
Removal and Installation" .
SIIA0223E
1. Headliner (standard) 2. Sun visor (left) 3. Sun visor (right)
4. Sun visor holder 5. Inside mirror 6. Inside mirror cover
7. Map lamp 8. Interior lamp 9. Assistance grip (fixed type)
10. Luggage compartment lamp 11. Headliner (sunroof) 12. Sunroof switch and map lamp
13.Assistance grip (retractable
type)14. Sunroof welt
Page 3250 of 3833

EI-30
HEADLINING
4. Remove assistance grip.
NOTE:
When removing the assistant's grip cover from a car with a sun-
roof, use a clip clamp tool to disengage the upper and lower
tabs, then slide inwards and remove screws (1 each on left/
right).
5. Remove map lamp, interior lamp, and luggage compartment lamp. Refer to LT- 6 4 , "
INTERIOR ROOM
LAMP" , LT- 6 6 , "SPOT LAMP (WITHOUT SUNROOF)" , LT- 6 6 , "SPOT LAMP (WITH SUNROOF)" and
LT- 6 4 , "
LUGGAGE ROOM LAMP" .
6. Remove inside mirror cover.
7. Remove mounting screw on inside mirror.
8. Remove sun visors (driver side and passenger side).
9. Remove headliner rear clips.
10. Remove sun visor holder.
NOTE:
Insert a screwdriver into the cutout and rotate 90° to remove.
11. Remove headliner through the back door opening.
NOTE:
●Removal and installation must be performed by 2 persons.
●Do not strongly bend the headliner.
INSTALLATION
Installation is in the reverse order of removal.
NOTE:
When installing, insert the protrusions on the headliner into the holes
in the upper part of center pillar.
SIIA0052E
SIIA0224J
PIIA0561E
Page 3492 of 3833

LT-2
LICENSE PLATE LAMP ...................................... 32
Removal and Installation ........................................ 32
PARKING AND TAIL LAMPS ............................... 32
LICENSE PLATE LAMP ...................................... 32
FRONT FOG LAMP .................................................. 33
System Description ................................................. 33
DESCRIPTION .................................................... 33
FOG LAMP OPERATION .................................... 33
Wiring Diagram — F/FOG — .................................. 34
Aiming Adjustment .................................................. 35
Bulb Replacement .................................................. 36
Removal and Installation ........................................ 36
REMOVAL ........................................................... 36
INSTALLATION .................................................... 36
REAR FOG LAMP .................................................. ... 37
Wiring Diagram -R/FOG-/Without Front Fog Lamp ... 37
Wiring Diagram -R/FOG-/With Front Fog Lamp ..... 38
Bulb Replacement .................................................. 39
Removal and Installation ........................................ 39
REMOVAL ........................................................... 39
INSTALLATION .................................................... 39
CLEARANCE LAMP/TAIL LAMP ............................. 40
Bulb Replacement (Clearance Lamp) .................... 40
Bulb Replacement (Taillamp) .................................. 40
Removal and Installation of Clearance Lamp ......... 40
Removal and Installation of Taillamp ...................... 40
HIGH-MOUNTED STOP LAMP ................................ 41
Bulb Replacement .................................................. 41
Removal and Installation ........................................ 41
REAR COMBINATION LAMP ................................... 42
Wiring Diagram —STOP/L— .................................. 42
Bulb Replacement .................................................. 43
Removal and Installation ........................................ 43
REMOVAL ........................................................... 43
INSTALLATION .................................................... 43COMBINATION SWITCH .......................................... 44
Removal and Installation ......................................... 44
Switch Circuit Inspection ...................................... ... 44
ILLUMINATION .......................................................... 45
System Description ................................................. 45
Schematic ............................................................... 46
Wiring Diagram -ILL-/LHD MODELS ...................... 47
Wiring Diagram -ILL-/RHD MODELS ...................... 51
INTERIOR ROOM LAMP .......................................
... 55
System Description ................................................. 55
POWER SUPPLY AND GROUND ....................... 55
SWITCH OPERATION ......................................... 55
INTERIOR ROOM LAMP TIMER OPERATION ... 56
ON-OFF CONTROL ............................................. 56
Wiring Diagram -ROOM/L- ...................................... 57
Interior Room Lamp Timer Does Not Operate ........ 59
Interior Room Lamp Timer Does Not Cancel .......... 62
Bulb Replacement ................................................... 64
INTERIOR ROOM LAMP ..................................... 64
LUGGAGE ROOM LAMP .................................... 64
Removal and Installation ......................................... 64
INTERIOR ROOM LAMP ..................................... 64
LUGGAGE ROOM LAMP .................................... 64
SPOT LAMPS ............................................................ 65
Wiring Diagram -INT/L- ........................................... 65
Bulb Replacement ................................................... 66
SPOT LAMP (WITHOUT SUNROOF) ................. 66
SPOT LAMP (WITH SUNROOF) ......................... 66
Removal and Installation ......................................... 66
SPOT LAMP (WITHOUT SUNROOF) ................. 66
SPOT LAMP (WITH SUNROOF) ......................... 66
BULB SPECIFICATIONS .......................................... 67
Headlamp ................................................................ 67
Exterior Lamp .......................................................... 67
Interior Lamp/Illumination ........................................ 67
Page 3556 of 3833
LT-66
SPOT LAMPS
Bulb Replacement
EKS003DD
SPOT LAMP (WITHOUT SUNROOF)
1. Remove the lens using a clip driver or a suitable tool.
2. Remove the shade mounting screw and remove the shade from
the spot lamp.
3. Remove the bulb.
SPOT LAMP (WITH SUNROOF)
1. Remove the lens using a clip driver or a suitable tool.
2. Remove the bulb.
Removal and InstallationEKS003DE
SPOT LAMP (WITHOUT SUNROOF)
1. Using a clips driver or a suitable tool, press and remove the
metal clip of the spot lamp.
2. Disconnect the spot lamp connector.
SPOT LAMP (WITH SUNROOF)
1. Using a clips driver or a suitable tool, press and remove the
metal clip of the spot lamp.
2. Disconnect the spot lamp connector and sunroof connector.Spot lamp (Without sunroof) : 12V 8W
SKIA0064E
Spot lamp (With sunroof) : 12V 10W
SKIA0065E
PKIA0472E
SKIA0066E