Page 387 of 3051
ADJUSTMENTNLBT0022S03
NBT150
If any height difference between glass lid and roof is found, check
glass lid fit and adjust as follows:
Height Difference AdjustmentNLBT0022S03021. Tilt glass lid up and down.
2. Check height difference between roof panel and glass lid to
see if it is as ªA-Aº as shown in the figure above.
3. If necessary, adjust it by using one of following procedures.
+Adjust by adding or removing adjustment shim(s) between
glass lid and link assembly.
+If glass lid protrudes above roof panel, add shim(s) or plain
washer(s) at sunroof mounting bracket or stud bolt locations to
adjust sunroof installation as required.
SUNROOF
Trouble Diagnoses (Cont'd)
BT-56
Page 388 of 3051

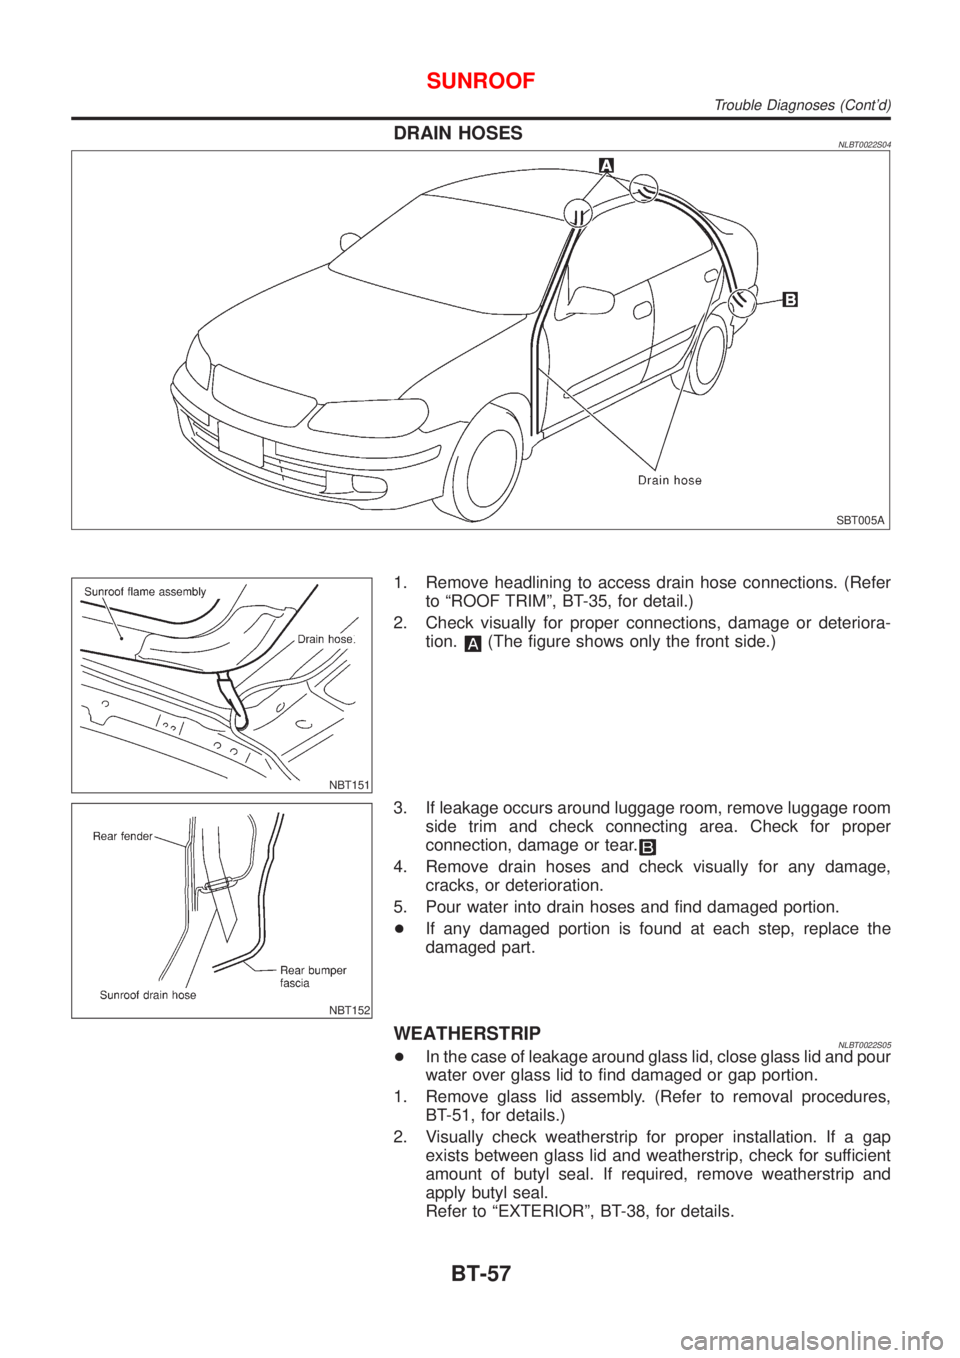
DRAIN HOSESNLBT0022S04
SBT005A
NBT151
1. Remove headlining to access drain hose connections. (Refer
to ªROOF TRIMº, BT-35, for detail.)
2. Check visually for proper connections, damage or deteriora-
tion.
(The figure shows only the front side.)
NBT152
3. If leakage occurs around luggage room, remove luggage room
side trim and check connecting area. Check for proper
connection, damage or tear.
4. Remove drain hoses and check visually for any damage,
cracks, or deterioration.
5. Pour water into drain hoses and find damaged portion.
+If any damaged portion is found at each step, replace the
damaged part.
WEATHERSTRIPNLBT0022S05+In the case of leakage around glass lid, close glass lid and pour
water over glass lid to find damaged or gap portion.
1. Remove glass lid assembly. (Refer to removal procedures,
BT-51, for details.)
2. Visually check weatherstrip for proper installation. If a gap
exists between glass lid and weatherstrip, check for sufficient
amount of butyl seal. If required, remove weatherstrip and
apply butyl seal.
Refer to ªEXTERIORº, BT-38, for details.
SUNROOF
Trouble Diagnoses (Cont'd)
BT-57
Page 2901 of 3051
REMOVAL AND INSTALLATION (MODELS WITH ROOF SEAT BELT)=NLRS00631. Remove the outer rear seats. Refer to BT-49,“REAR SEAT”for details.
2. Remove lower seat trim.
3. Remove the special bolts, using the TAMPER RESISTANT TORX (Size T50) and seat belt buckles can
be removed.
4. Remove the center seat. Refer to BT-49,“REAR SEAT”for details.
5. Remove lower seat trim.
6. Remove the special bolts, using the TAMPER RESISTANT TORX (Size T50) and the seat belt - bracket,
and - buckle can be removed.
7. Remove cover garnish at headlining. Refer to BT-28,“SIDE AND FLOOR TRIM”for details. Then remove
seat belt retractor.
8. Remove rear side garnish. Refer to BT-28,“SIDE AND FLOOR TRIM”for details.
9. Remove bolts securing rear seat belt retractor, then remove seat belt and seat belt retractor.
NRS128
SEAT BELTS
Rear Seat Belt (Cont’d)
RS-10