2001 NISSAN ALMERA N16 ignition
[x] Cancel search: ignitionPage 1195 of 2493
parts. Apply petroleum jelly to protect O-rings and seals, or
hold bearings and washers in place during assembly. Do not
use grease.
+Extreme care should be taken to avoid damage to O-rings,
seals and gaskets when assembling.
+After overhaul, refill the transaxle with new ATF.
+When the A/T drain plug is removed, only some of the fluid is
drained. Old A/T fluid will remain in torque converter and ATF
cooling system.
Always follow the procedures under ªChanging A/T Fluidº in the
AT section when changing A/T fluid. Refer to ªChanging A/T
Fluidº, AT-15.
Service Notice or PrecautionsNJAT0247FAIL-SAFENJAT0247S01The TCM has an electronic Fail-Safe (limp home mode). This allows the vehicle to be driven even if a major
electrical input/output device circuit is damaged.
Under Fail-Safe, the vehicle always runs in third gear, even with a shift lever position of ª1º, ª2º or ªDº. The
customer may complain of sluggish or poor acceleration.
When the ignition key is turned ªONº following Fail-Safe operation, O/D OFF indicator lamp blinks for about
8 seconds. (For EXCEPT FOR EURO-OBD; ªSELF-DIAGNOSTIC PROCEDURE (WITHOUT CONSULT-II)º,
refer to AT-42 and for EURO-OBD; ªTCM SELF-DIAGNOSTIC PROCEDURE (No Tools)º, refer to AT-61.)
Fail-Safe may occur without electrical circuit damage if the vehicle is driven under extreme conditions (such
as excessive wheel spin followed by sudden braking). To recover normal shift pattern, turn the ignition key
ªOFFº for 5 seconds, then ªONº.
The blinking of the O/D OFF indicator lamp for about 8 seconds will appear only once and be cleared. The
customer may resume normal driving conditions.
Always follow the ªWORK FLOWº [Refer to AT-71 (Except for Euro-OBD), AT-76 (EURO-OBD).]
The SELF-DIAGNOSIS results will be as follows:
The first SELF-DIAGNOSIS will indicate damage to the vehicle speed sensor or the revolution sensor.
During the next SELF-DIAGNOSIS, performed after checking the sensor, no damages will be indicated.
TORQUE CONVERTER SERVICENJAT0247S02The torque converter should be replaced under any of the following conditions:
+External leaks in the hub weld area.
+Converter hub is scored or damaged.
+Converter pilot is broken, damaged or fits poorly into crankshaft.
+Steel particles are found after flushing the cooler and cooler lines.
+Pump is damaged or steel particles are found in the converter.
+Vehicle has TCC shudder and/or no TCC apply. Replace only after all hydraulic and electrical diagnoses
have been made. (Converter clutch material may be glazed.)
+Converter is contaminated with engine coolant containing antifreeze.
+Internal failure of stator roller clutch.
+Heavy clutch debris due to overheating (blue converter).
+Steel particles or clutch lining material found in fluid filter or on magnet when no internal parts in unit are
worn or damaged Ð indicates that lining material came from converter.
The torque converter should not be replaced if:
PRECAUTIONS
Precautions (Cont'd)
AT-9
Page 1227 of 2493
![NISSAN ALMERA N16 2001 Electronic Repair Manual Item DisplayMonitor item
Description Remarks
ECU input
signalsMain sig-
nals
Shift solenoid valve A SHIFT S/V A
[ON/OFF]
ÐX+Control value of shift
solenoid valve A, com-
puted by TCM from
each input NISSAN ALMERA N16 2001 Electronic Repair Manual Item DisplayMonitor item
Description Remarks
ECU input
signalsMain sig-
nals
Shift solenoid valve A SHIFT S/V A
[ON/OFF]
ÐX+Control value of shift
solenoid valve A, com-
puted by TCM from
each input](/manual-img/5/57351/w960_57351-1226.png)
Item DisplayMonitor item
Description Remarks
ECU input
signalsMain sig-
nals
Shift solenoid valve A SHIFT S/V A
[ON/OFF]
ÐX+Control value of shift
solenoid valve A, com-
puted by TCM from
each input signal, is dis-
played.Control value of solenoid
is displayed even if sole-
noid circuit is discon-
nected.
The ªOFFº signal is dis-
played if solenoid circuit is
shorted. Shift solenoid valve B SHIFT S/V B
[ON/OFF]
ÐX+Control value of shift
solenoid valve B, com-
puted by TCM from
each input signal, is dis-
played.
Overrun clutch solenoid
valveOVERRUN/C S/V
[ON/OFF]
ÐX+Control value of overrun
clutch solenoid valve
computed by TCM from
each input signal is dis-
played.
Self-diagnosis display
lamp
(O/D OFF indicator lamp)SELF-D DP LMP
[ON/OFF] Ð X+Control status of O/D
OFF indicator lamp is
displayed.
X: Applicable
Ð: Not applicable
SAT580J
HOW TO ERASE SELF-DIAGNOSTIC RESULTS
(
WITH CONSULT-II)NJAT0022S081. If the ignition switch stays ªONº after repair work, be sure to
turn ignition switch ªOFFº once. Wait for at least 3 seconds and
then turn it ªONº again.
2. Turn CONSULT-II ªONº, and touch ªA/Tº.
SAT971J
3. Touch ªSELF-DIAG RESULTSº.
ON BOARD DIAGNOSTIC SYSTEM
DESCRIPTION
EXCEPT FOR EURO-OBD
CONSULT-II (Cont'd)
AT-41
Page 1228 of 2493
SAT970J
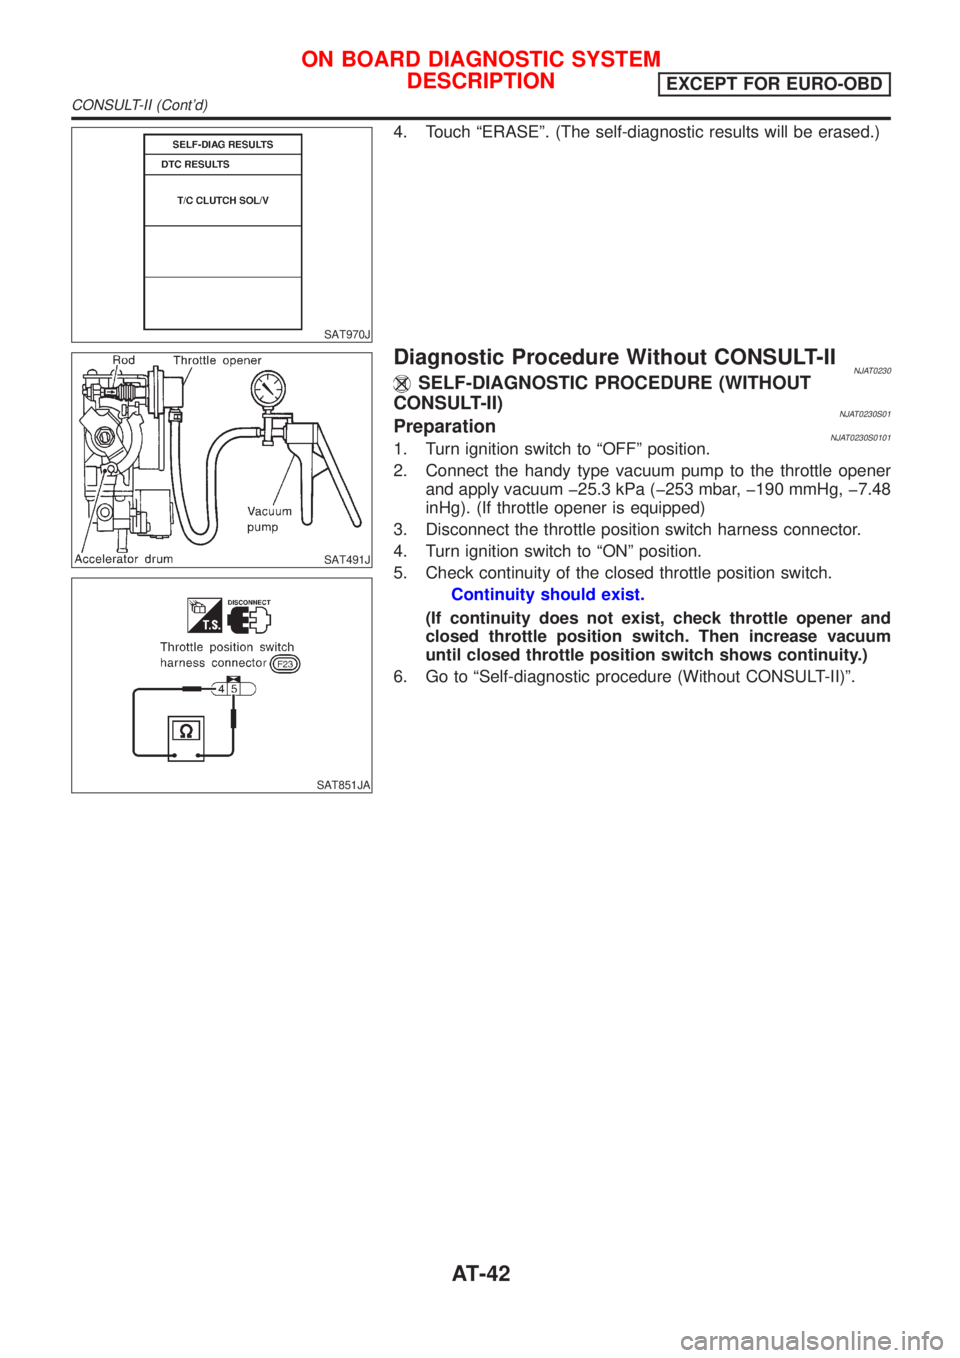
4. Touch ªERASEº. (The self-diagnostic results will be erased.)
SAT491J
SAT851JA
Diagnostic Procedure Without CONSULT-IINJAT0230SELF-DIAGNOSTIC PROCEDURE (WITHOUT
CONSULT-II)
NJAT0230S01PreparationNJAT0230S01011. Turn ignition switch to ªOFFº position.
2. Connect the handy type vacuum pump to the throttle opener
and apply vacuum þ25.3 kPa (þ253 mbar, þ190 mmHg, þ7.48
inHg). (If throttle opener is equipped)
3. Disconnect the throttle position switch harness connector.
4. Turn ignition switch to ªONº position.
5. Check continuity of the closed throttle position switch.
Continuity should exist.
(If continuity does not exist, check throttle opener and
closed throttle position switch. Then increase vacuum
until closed throttle position switch shows continuity.)
6. Go to ªSelf-diagnostic procedure (Without CONSULT-II)º.
ON BOARD DIAGNOSTIC SYSTEM
DESCRIPTION
EXCEPT FOR EURO-OBD
CONSULT-II (Cont'd)
AT-42
Page 1229 of 2493
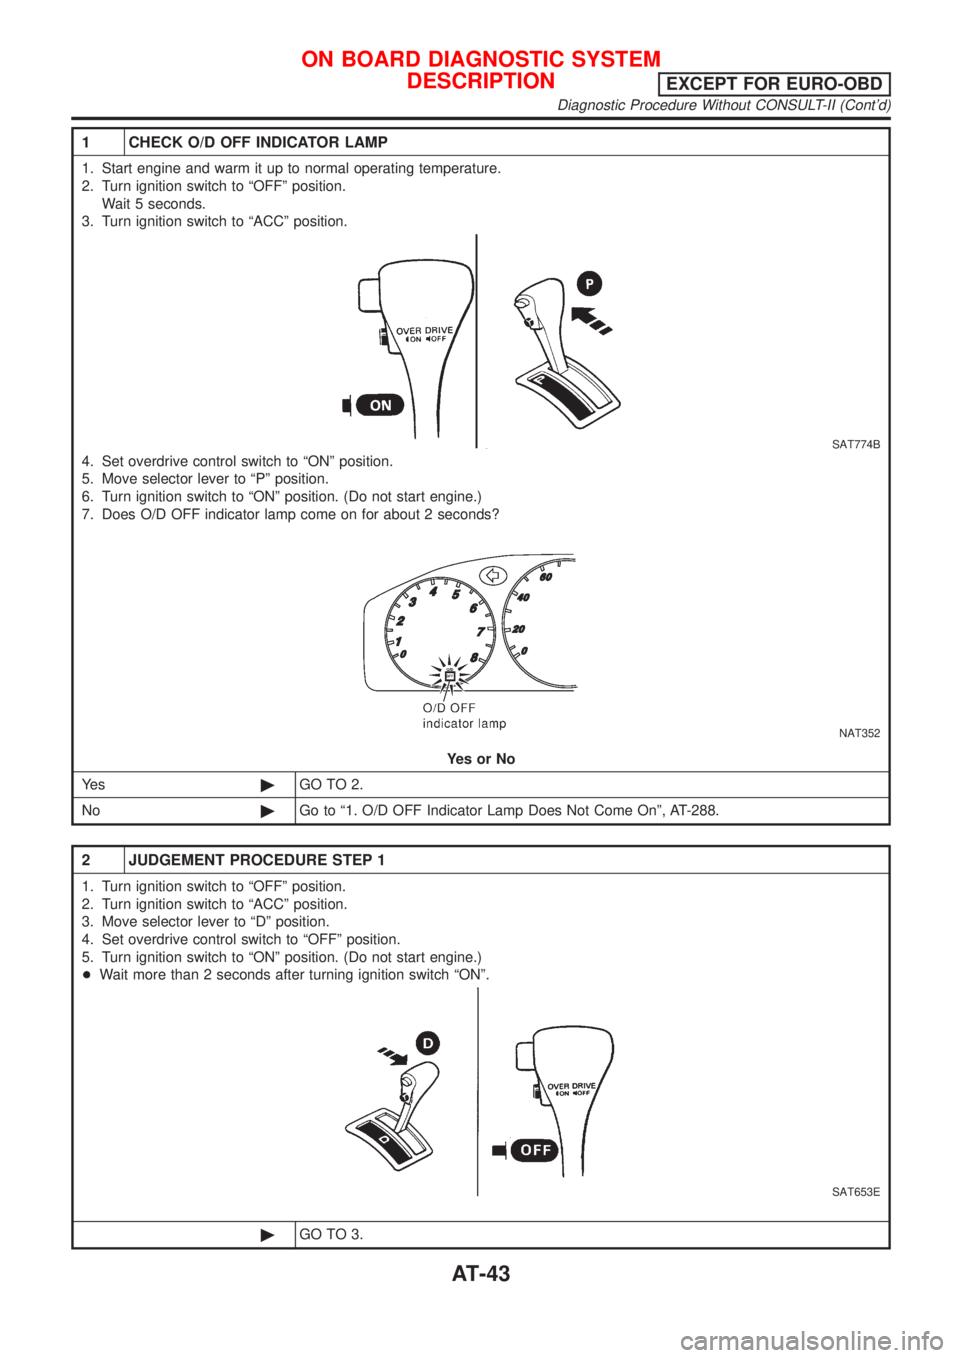
1 CHECK O/D OFF INDICATOR LAMP
1. Start engine and warm it up to normal operating temperature.
2. Turn ignition switch to ªOFFº position.
Wait 5 seconds.
3. Turn ignition switch to ªACCº position.
SAT774B
4. Set overdrive control switch to ªONº position.
5. Move selector lever to ªPº position.
6. Turn ignition switch to ªONº position. (Do not start engine.)
7. Does O/D OFF indicator lamp come on for about 2 seconds?
NAT352
YesorNo
Ye s©GO TO 2.
No©Go to ª1. O/D OFF Indicator Lamp Does Not Come Onº, AT-288.
2 JUDGEMENT PROCEDURE STEP 1
1. Turn ignition switch to ªOFFº position.
2. Turn ignition switch to ªACCº position.
3. Move selector lever to ªDº position.
4. Set overdrive control switch to ªOFFº position.
5. Turn ignition switch to ªONº position. (Do not start engine.)
+Wait more than 2 seconds after turning ignition switch ªONº.
SAT653E
©GO TO 3.
ON BOARD DIAGNOSTIC SYSTEM
DESCRIPTION
EXCEPT FOR EURO-OBD
Diagnostic Procedure Without CONSULT-II (Cont'd)
AT-43
Page 1233 of 2493
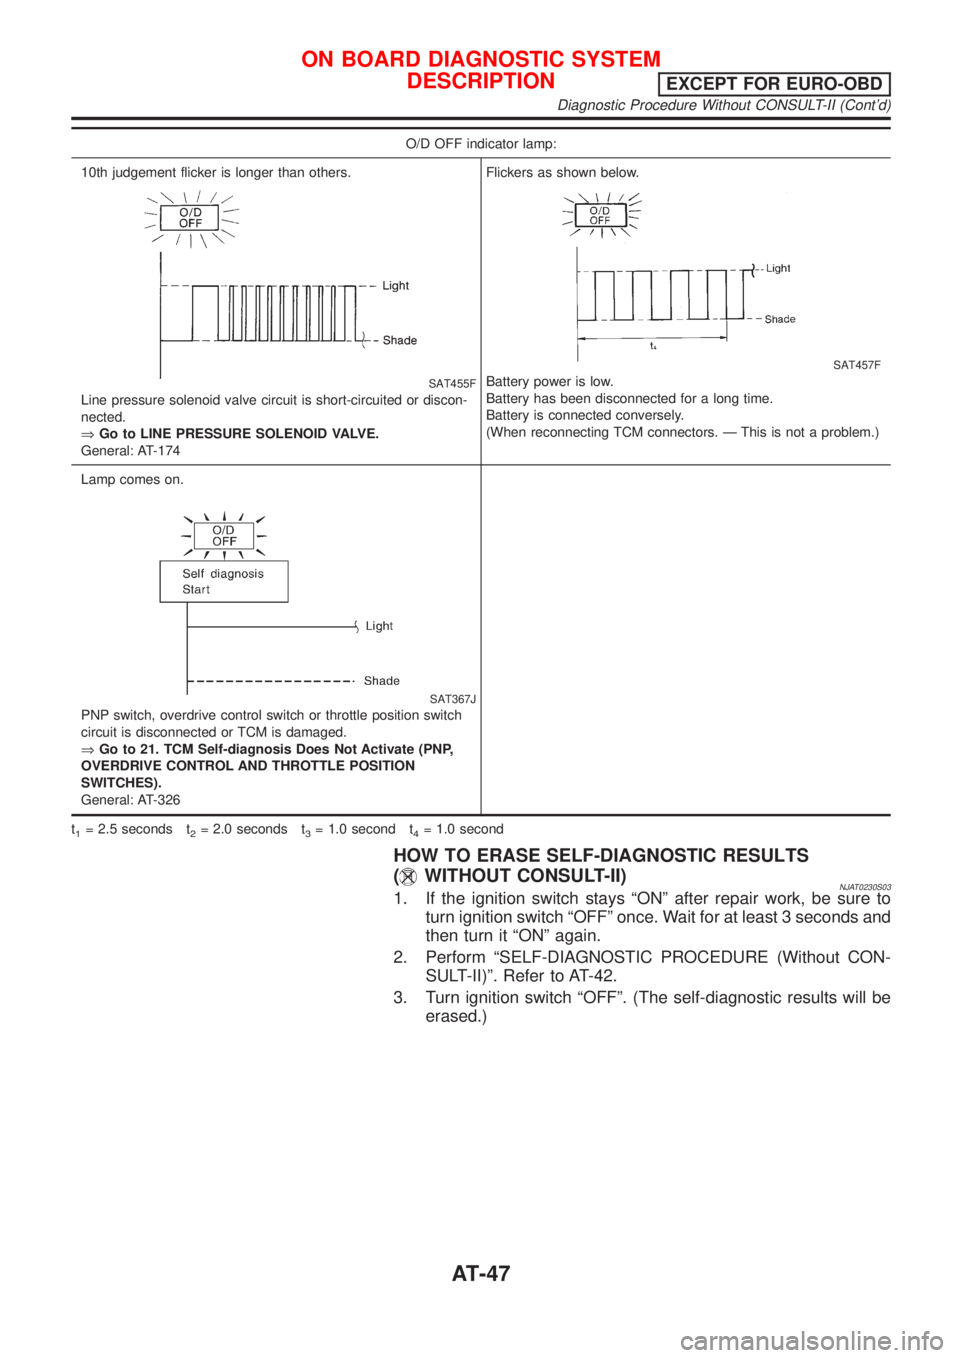
O/D OFF indicator lamp:
10th judgement flicker is longer than others.
SAT455F
Line pressure solenoid valve circuit is short-circuited or discon-
nected.
ÞGo to LINE PRESSURE SOLENOID VALVE.
General: AT-174Flickers as shown below.
SAT457F
Battery power is low.
Battery has been disconnected for a long time.
Battery is connected conversely.
(When reconnecting TCM connectors. Ð This is not a problem.)
Lamp comes on.
SAT367J
PNP switch, overdrive control switch or throttle position switch
circuit is disconnected or TCM is damaged.
ÞGo to 21. TCM Self-diagnosis Does Not Activate (PNP,
OVERDRIVE CONTROL AND THROTTLE POSITION
SWITCHES).
General: AT-326
t
1= 2.5 seconds t2= 2.0 seconds t3= 1.0 second t4= 1.0 second
HOW TO ERASE SELF-DIAGNOSTIC RESULTS
(
WITHOUT CONSULT-II)NJAT0230S031. If the ignition switch stays ªONº after repair work, be sure to
turn ignition switch ªOFFº once. Wait for at least 3 seconds and
then turn it ªONº again.
2. Perform ªSELF-DIAGNOSTIC PROCEDURE (Without CON-
SULT-II)º. Refer to AT-42.
3. Turn ignition switch ªOFFº. (The self-diagnostic results will be
erased.)
ON BOARD DIAGNOSTIC SYSTEM
DESCRIPTION
EXCEPT FOR EURO-OBD
Diagnostic Procedure Without CONSULT-II (Cont'd)
AT-47
Page 1236 of 2493
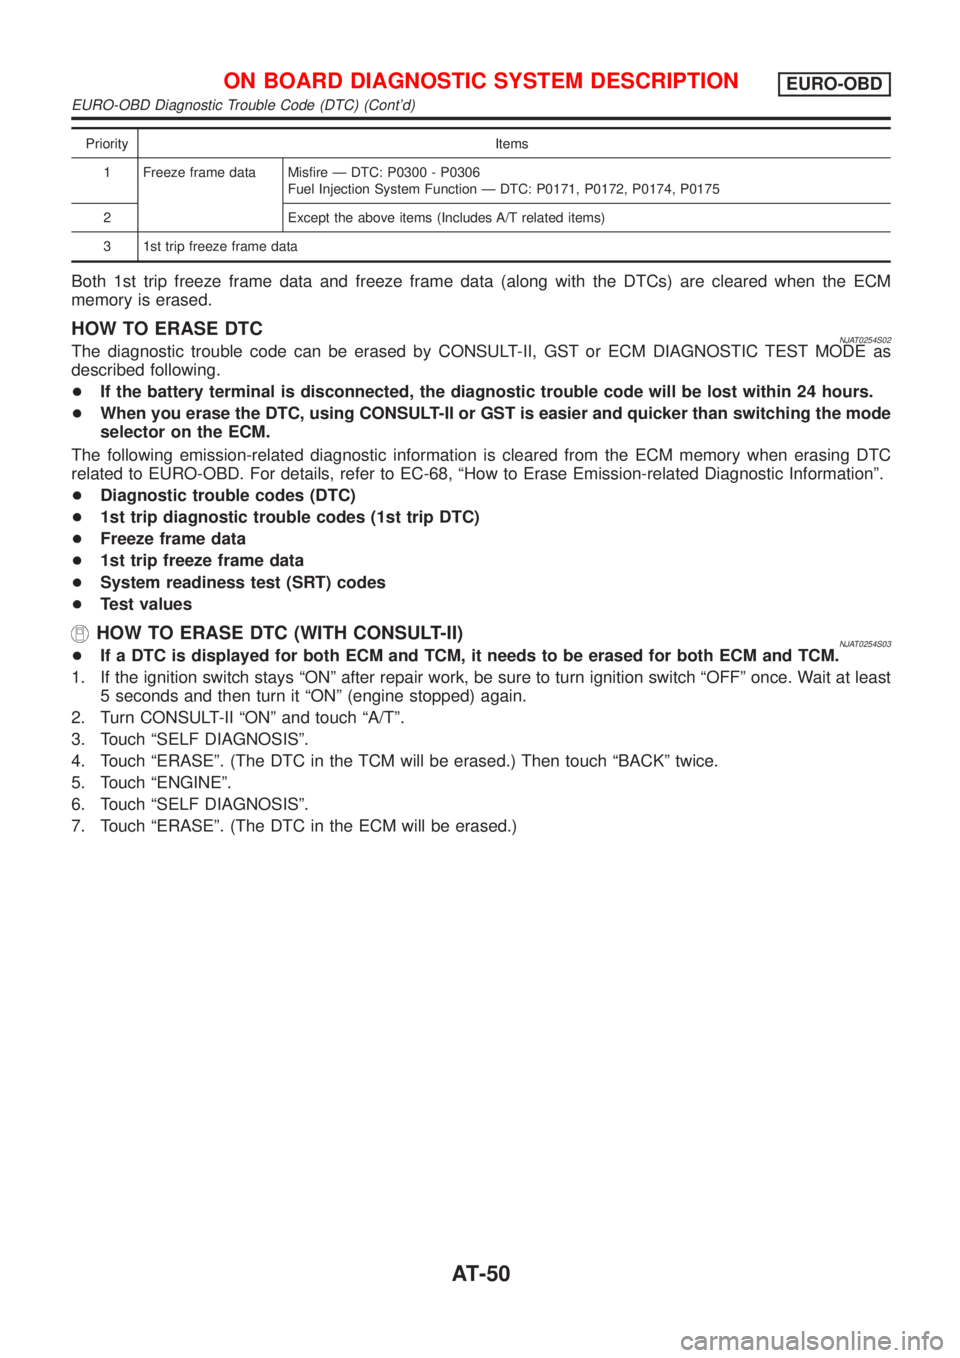
Priority Items
1 Freeze frame data Misfire Ð DTC: P0300 - P0306
Fuel Injection System Function Ð DTC: P0171, P0172, P0174, P0175
2 Except the above items (Includes A/T related items)
3 1st trip freeze frame data
Both 1st trip freeze frame data and freeze frame data (along with the DTCs) are cleared when the ECM
memory is erased.
HOW TO ERASE DTCNJAT0254S02The diagnostic trouble code can be erased by CONSULT-II, GST or ECM DIAGNOSTIC TEST MODE as
described following.
+If the battery terminal is disconnected, the diagnostic trouble code will be lost within 24 hours.
+When you erase the DTC, using CONSULT-II or GST is easier and quicker than switching the mode
selector on the ECM.
The following emission-related diagnostic information is cleared from the ECM memory when erasing DTC
related to EURO-OBD. For details, refer to EC-68, ªHow to Erase Emission-related Diagnostic Informationº.
+Diagnostic trouble codes (DTC)
+1st trip diagnostic trouble codes (1st trip DTC)
+Freeze frame data
+1st trip freeze frame data
+System readiness test (SRT) codes
+Test values
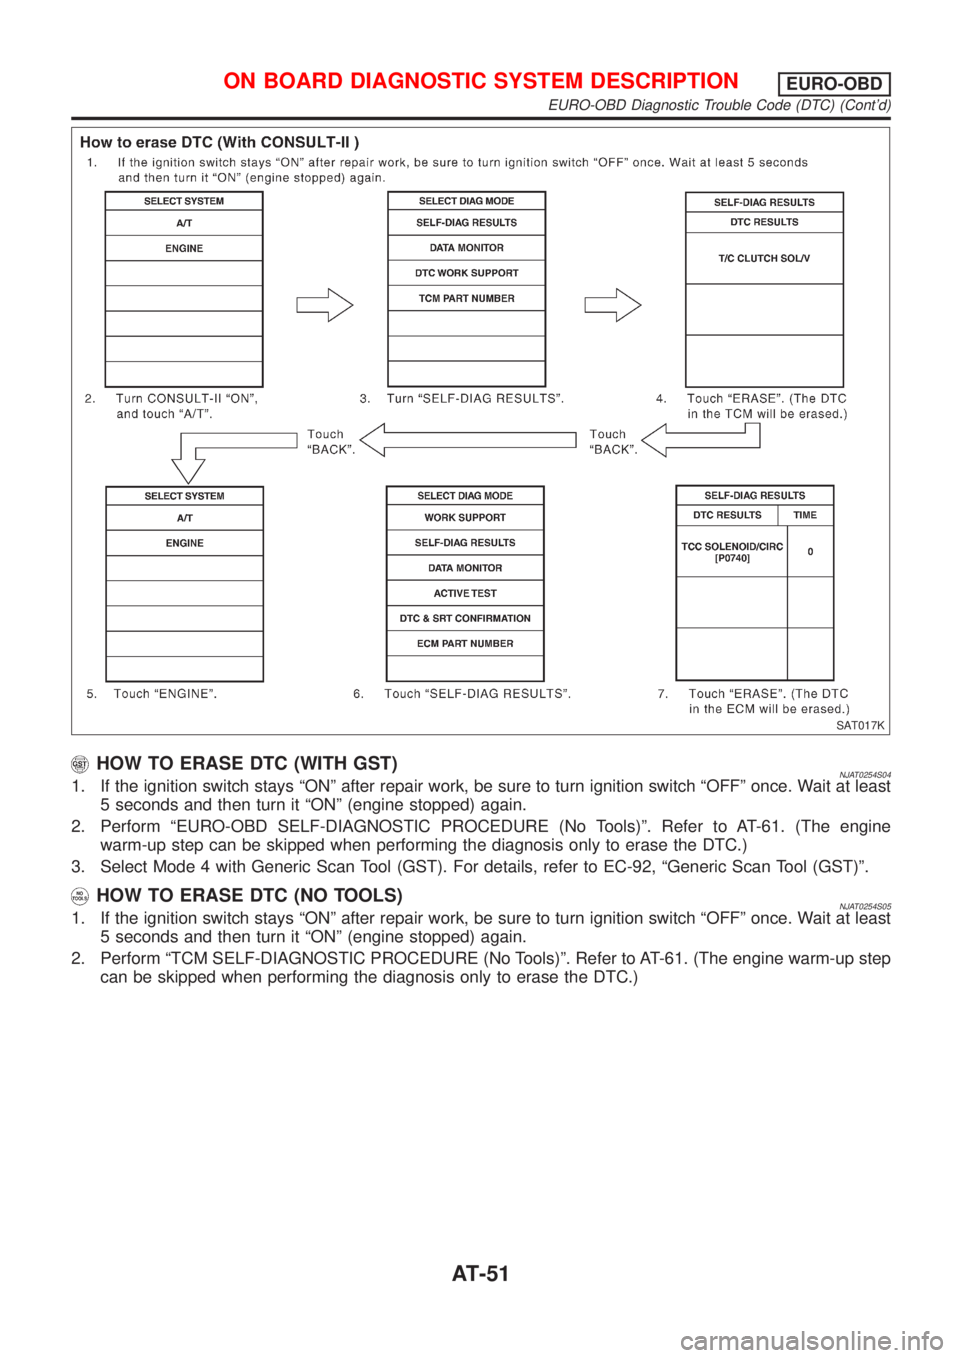
HOW TO ERASE DTC (WITH CONSULT-II)NJAT0254S03+If a DTC is displayed for both ECM and TCM, it needs to be erased for both ECM and TCM.
1. If the ignition switch stays ªONº after repair work, be sure to turn ignition switch ªOFFº once. Wait at least
5 seconds and then turn it ªONº (engine stopped) again.
2. Turn CONSULT-II ªONº and touch ªA/Tº.
3. Touch ªSELF DIAGNOSISº.
4. Touch ªERASEº. (The DTC in the TCM will be erased.) Then touch ªBACKº twice.
5. Touch ªENGINEº.
6. Touch ªSELF DIAGNOSISº.
7. Touch ªERASEº. (The DTC in the ECM will be erased.)
ON BOARD DIAGNOSTIC SYSTEM DESCRIPTIONEURO-OBD
EURO-OBD Diagnostic Trouble Code (DTC) (Cont'd)
AT-50
Page 1237 of 2493
SAT017K
HOW TO ERASE DTC (WITH GST)NJAT0254S041. If the ignition switch stays ªONº after repair work, be sure to turn ignition switch ªOFFº once. Wait at least
5 seconds and then turn it ªONº (engine stopped) again.
2. Perform ªEURO-OBD SELF-DIAGNOSTIC PROCEDURE (No Tools)º. Refer to AT-61. (The engine
warm-up step can be skipped when performing the diagnosis only to erase the DTC.)
3. Select Mode 4 with Generic Scan Tool (GST). For details, refer to EC-92, ªGeneric Scan Tool (GST)º.
HOW TO ERASE DTC (NO TOOLS)NJAT0254S051. If the ignition switch stays ªONº after repair work, be sure to turn ignition switch ªOFFº once. Wait at least
5 seconds and then turn it ªONº (engine stopped) again.
2. Perform ªTCM SELF-DIAGNOSTIC PROCEDURE (No Tools)º. Refer to AT-61. (The engine warm-up step
can be skipped when performing the diagnosis only to erase the DTC.)
ON BOARD DIAGNOSTIC SYSTEM DESCRIPTIONEURO-OBD
EURO-OBD Diagnostic Trouble Code (DTC) (Cont'd)
AT-51
Page 1238 of 2493
SAT964I
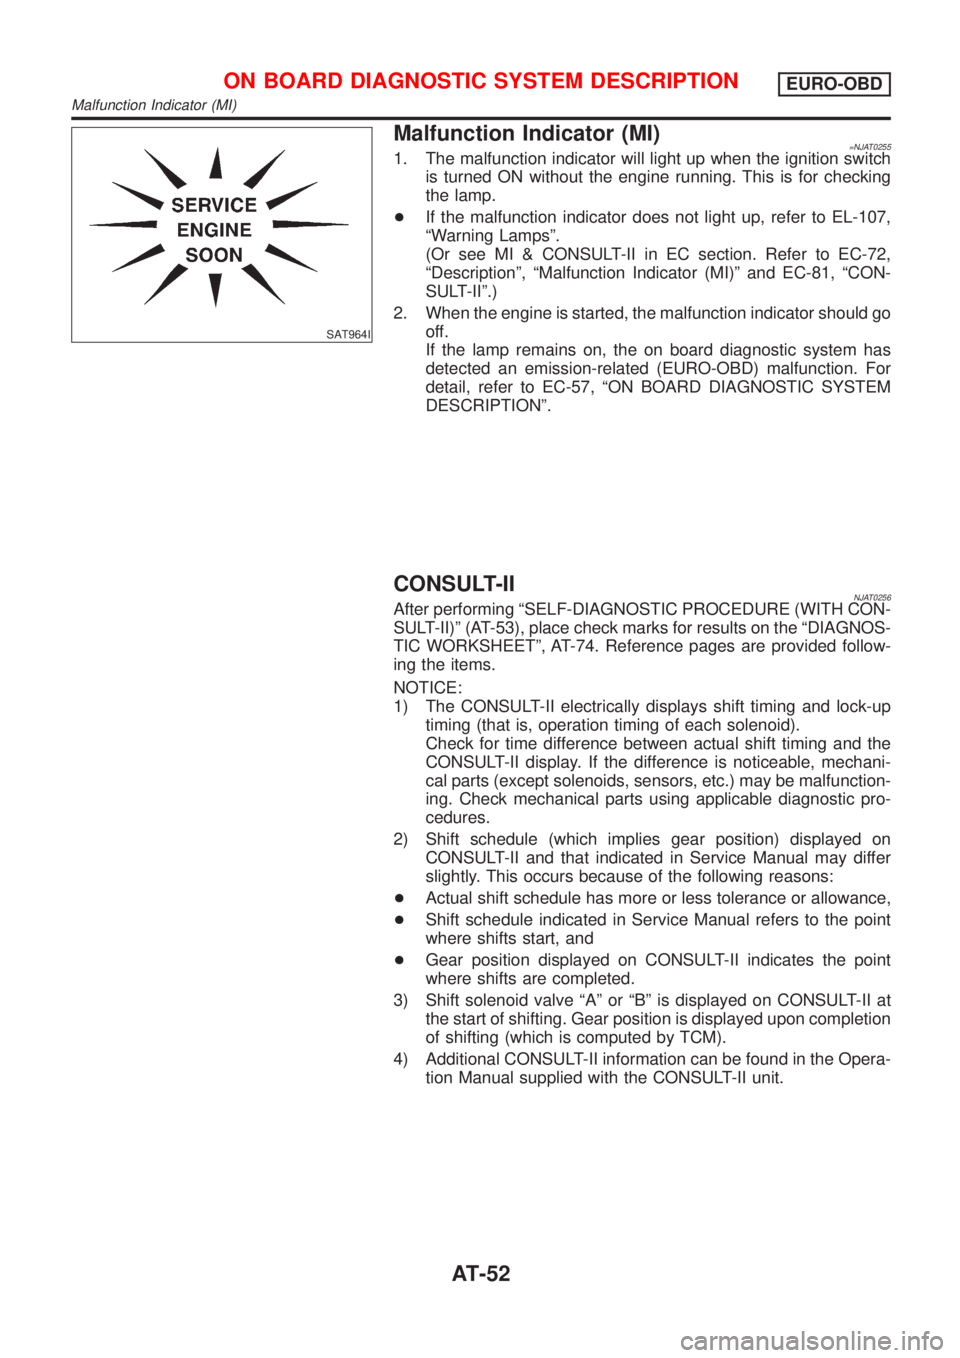
Malfunction Indicator (MI)=NJAT02551. The malfunction indicator will light up when the ignition switch
is turned ON without the engine running. This is for checking
the lamp.
+If the malfunction indicator does not light up, refer to EL-107,
ªWarning Lampsº.
(Or see MI & CONSULT-II in EC section. Refer to EC-72,
ªDescriptionº, ªMalfunction Indicator (MI)º and EC-81, ªCON-
SULT-IIº.)
2. When the engine is started, the malfunction indicator should go
off.
If the lamp remains on, the on board diagnostic system has
detected an emission-related (EURO-OBD) malfunction. For
detail, refer to EC-57, ªON BOARD DIAGNOSTIC SYSTEM
DESCRIPTIONº.
CONSULT-IINJAT0256After performing ªSELF-DIAGNOSTIC PROCEDURE (WITH CON-
SULT-II)º (AT-53), place check marks for results on the ªDIAGNOS-
TIC WORKSHEETº, AT-74. Reference pages are provided follow-
ing the items.
NOTICE:
1) The CONSULT-II electrically displays shift timing and lock-up
timing (that is, operation timing of each solenoid).
Check for time difference between actual shift timing and the
CONSULT-II display. If the difference is noticeable, mechani-
cal parts (except solenoids, sensors, etc.) may be malfunction-
ing. Check mechanical parts using applicable diagnostic pro-
cedures.
2) Shift schedule (which implies gear position) displayed on
CONSULT-II and that indicated in Service Manual may differ
slightly. This occurs because of the following reasons:
+Actual shift schedule has more or less tolerance or allowance,
+Shift schedule indicated in Service Manual refers to the point
where shifts start, and
+Gear position displayed on CONSULT-II indicates the point
where shifts are completed.
3) Shift solenoid valve ªAº or ªBº is displayed on CONSULT-II at
the start of shifting. Gear position is displayed upon completion
of shifting (which is computed by TCM).
4) Additional CONSULT-II information can be found in the Opera-
tion Manual supplied with the CONSULT-II unit.
ON BOARD DIAGNOSTIC SYSTEM DESCRIPTIONEURO-OBD
Malfunction Indicator (MI)
AT-52