Page 1662 of 2395
SEM159F
4. Apply a continuous bead of liquid gasket to mating surface of
aluminum oil pan.
IUse Genuine RTV silicone sealant Part No. 999MP-A7007
or equivalent.
SEM467G
5. Apply liquid gasket to inner sealing surface as shown in figure.
IBe sure liquid gasket is 4.0 to 5.0 mm (0.157 to 0.197 in)
or 4.5 to 5.5 mm (0.177 to 0.217 in) wide.
IAttaching should be done within 5 minutes after coating.
SEM464G
6. Install O-rings, cylinder block and oil pump body.
SEM468G
7. Install aluminum oil pan.
ITighten bolts in numerical order.
IWait at least 30 minutes before refilling engine oil.
SEM469G
8. Install the four engine-to-transmission bolts. For tightening
torque, refer to AT-278, ªInstallationº.
9. Reinstall in the revrse order of removal.
GI
MA
LC
EC
FE
AT
TF
PD
AX
SU
BR
ST
RS
BT
HA
SC
EL
IDX
OIL PAN
Installation (Cont'd)
EM-19
Page 1664 of 2395
POSITION FOR APPLYING LIQUID GASKET=NBEM0011S01Refer to ªInstallationº in ªOIL PANº, EM-18.
IBefore installation, wipe off the protruding sealant.
GI
MA
LC
EC
FE
AT
TF
PD
AX
SU
BR
ST
RS
BT
HA
SC
EL
IDX
TIMING CHAIN
Components (Cont'd)
EM-21
Page 1666 of 2395

CAUTION:
IAfter removing timing chain, do not turn crankshaft and
camshaft separately, or valves will strike piston heads.
IWhen installing camshafts, chain tensioners, oil seals, or
other sliding parts, lubricate contacting surfaces with new
engine oil.
IApply new engine oil to bolt threads and seat surfaces
when installing camshaft sprockets and crankshaft pulley.
IBefore disconnecting fuel hose, release fuel pressure.
Refer to EC-39, ªFuel Pressure Releaseº.
IBe careful not to damage sensor edges.
IDo not spill engine coolant on drive belts.
RemovalNBEM00121. Release fuel pressure.
Refer to EC-39, ªFuel Pressure Releaseº.
2. Remove battery.
3. Remove radiator.
Refer to LC-19, ªREMOVAL AND INSTALLATIONº.
4. Drain engine oil.
5. Remove drive belts and idler pulley with brackets.
6. Remove cooling fan with bracket.
7. Remove engine cover.
8. Remove air duct with air cleaner case, collector, blow-by hose,
vacuum hoses, fuel hoses, water hoses, wires, harnesses,
connectors and so on.
9. Remove the air compressor, and tie it down using rope or the
like to keep it from interfering.
10. Remove the power steering oil pump and reservoir tank. Tie
them down using rope or the like to keep them from interfer-
ing.
11. Remove alternator.
12. Remove the following.
IVacuum gallery
IWater bypass pipe
IBrackets
GI
MA
LC
EC
FE
AT
TF
PD
AX
SU
BR
ST
RS
BT
HA
SC
EL
IDX
TIMING CHAIN
Components (Cont'd)
EM-23
Page 1667 of 2395
SEM421G
SEM422G
13. Remove camshaft position sensor (PHASE), CVTC sensors
and crankshaft position sensor (REF).
IAvoid impact such as dropping.
IDo not disassemble the components.
IDo not place them on areas where iron powder may adhere.
IKeep away from the objects susceptible to magnetism.
SEM412G
14. Remove upper intake manifold collector in reverse order of
installation. Refer to EM-12, ªUpper Intake Manifold Collectorº.
SEM413G
15. Remove intake manifold collector support bolts.
SEM414G
16. Remove lower intake manifold collector in reverse order of
installation. Refer to EM-13, ªLower Intake Manifold Collectorº.
TIMING CHAIN
Removal (Cont'd)
EM-24
Page 1668 of 2395
SEM415G
17. Disconnect injector harness connectors.
18. Remove fuel tube assembly in reverse order of installation.
Refer to EM-12, ªFuel Tubeº.
SEM416G
19. Remove ignition coils.
20. Remove RH and LH rocker covers from cylinder head.
SEM417G
21. Set No. 1 piston at TDC on the compression stroke by rotat-
ing crankshaft.
IAlign pointer with TDC mark on crankshaft pulley.
SEM418G
ICheck that intake and exhaust cam nose on No. 1 cylinder are
installed as shown left.
If not, turn the crankshaft one revolution (360É) and align as
above.
SEM485G
22. Remove starter motor, and set ring gear stopper using the
mounting bolt hole.
IBe careful not to damage the signal plate teeth.
GI
MA
LC
EC
FE
AT
TF
PD
AX
SU
BR
ST
RS
BT
HA
SC
EL
IDX
TIMING CHAIN
Removal (Cont'd)
EM-25
Page 1670 of 2395
SEM919EA
30. Remove internal chain guide.
31. Remove upper tension guide.
32. Remove timing chain tensioner and slack guide.
SEM966F
IRemove timing chain tensioner. (Push piston and insert a suit-
able pin into pinhole.)
SEM425G
33. Attach a suitable stopper pin to RH and LH camshaft chain
tensioners.
SEM426G
34. Remove intake and exhaust camshaft sprocket bolts.
IApply paint to timing chain and camshaft sprockets for
alignment during installation.
ISecure the hexagonal head of the camshaft using a span-
ner to loosen mounting bolts.
GI
MA
LC
EC
FE
AT
TF
PD
AX
SU
BR
ST
RS
BT
HA
SC
EL
IDX
TIMING CHAIN
Removal (Cont'd)
EM-27
Page 1672 of 2395
SEM928E
InspectionNBEM0013Check for cracks and excessive wear at roller links. Replace
chain if necessary.
SEM930E
InstallationNBEM00141. Position crankshaft so that No. 1 piston is set at TDC on com-
pression stroke.
SEM929E
2. Install crankshaft sprocket on crankshaft.
IMake sure that mating marks on crankshaft sprocket face
front of engine.
SEM931E
3. Install lower chain guide on dowel pin, with front mark on the
guide facing upside.
SEM430G
4. Press and shrink the secondary chain tensioner sleeve, and fix
it using stopper pins.
ILubricate threads and seat surfaces of camshaft sprocket bolts
with new engine oil.
GI
MA
LC
EC
FE
AT
TF
PD
AX
SU
BR
ST
RS
BT
HA
SC
EL
IDX
TIMING CHAIN
Inspection
EM-29
Page 1673 of 2395

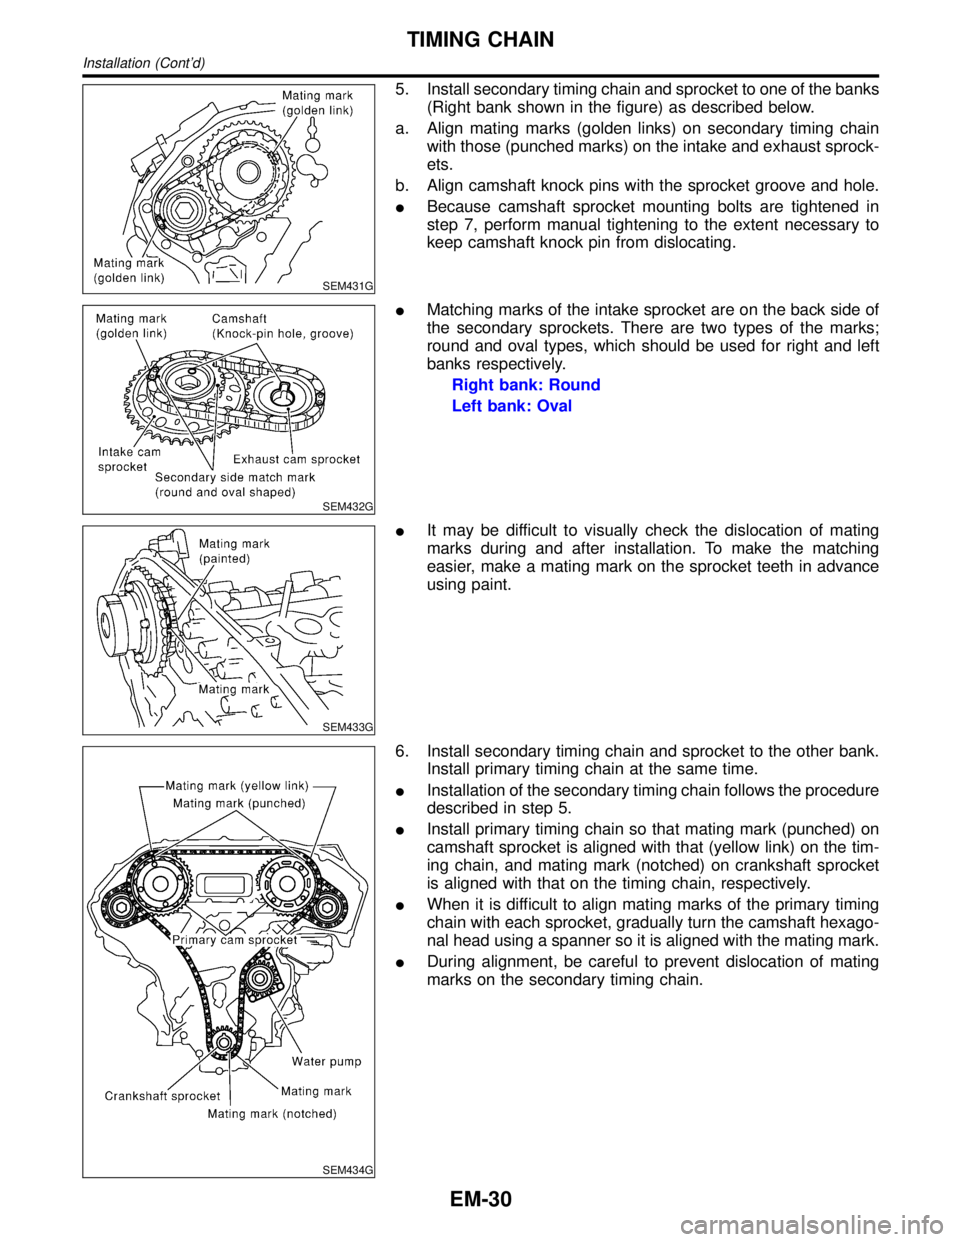
SEM431G
5. Install secondary timing chain and sprocket to one of the banks
(Right bank shown in the figure) as described below.
a. Align mating marks (golden links) on secondary timing chain
with those (punched marks) on the intake and exhaust sprock-
ets.
b. Align camshaft knock pins with the sprocket groove and hole.
IBecause camshaft sprocket mounting bolts are tightened in
step 7, perform manual tightening to the extent necessary to
keep camshaft knock pin from dislocating.
SEM432G
IMatching marks of the intake sprocket are on the back side of
the secondary sprockets. There are two types of the marks;
round and oval types, which should be used for right and left
banks respectively.
Right bank: Round
Left bank: Oval
SEM433G
IIt may be difficult to visually check the dislocation of mating
marks during and after installation. To make the matching
easier, make a mating mark on the sprocket teeth in advance
using paint.
SEM434G
6. Install secondary timing chain and sprocket to the other bank.
Install primary timing chain at the same time.
IInstallation of the secondary timing chain follows the procedure
described in step 5.
IInstall primary timing chain so that mating mark (punched) on
camshaft sprocket is aligned with that (yellow link) on the tim-
ing chain, and mating mark (notched) on crankshaft sprocket
is aligned with that on the timing chain, respectively.
IWhen it is difficult to align mating marks of the primary timing
chain with each sprocket, gradually turn the camshaft hexago-
nal head using a spanner so it is aligned with the mating mark.
IDuring alignment, be careful to prevent dislocation of mating
marks on the secondary timing chain.
TIMING CHAIN
Installation (Cont'd)
EM-30