2001 INFINITI QX4 INSTALLATION
[x] Cancel search: INSTALLATIONPage 1024 of 2395
7 CHECK IMPROPER INSTALLATION
1. Loosen and retighten the fixing bolt of the intake valve timing control position sensor.
2. Reconnect harness connector disconnected.
3. Perform ªDTC Confirmation Procedureº, EC-483 again.
Is a 1st trip DTC P1140 (RIGHT, -B1), P1145 (LEFT, -B2) detected?
Ye s©GO TO 8.
No©INSPECTION END
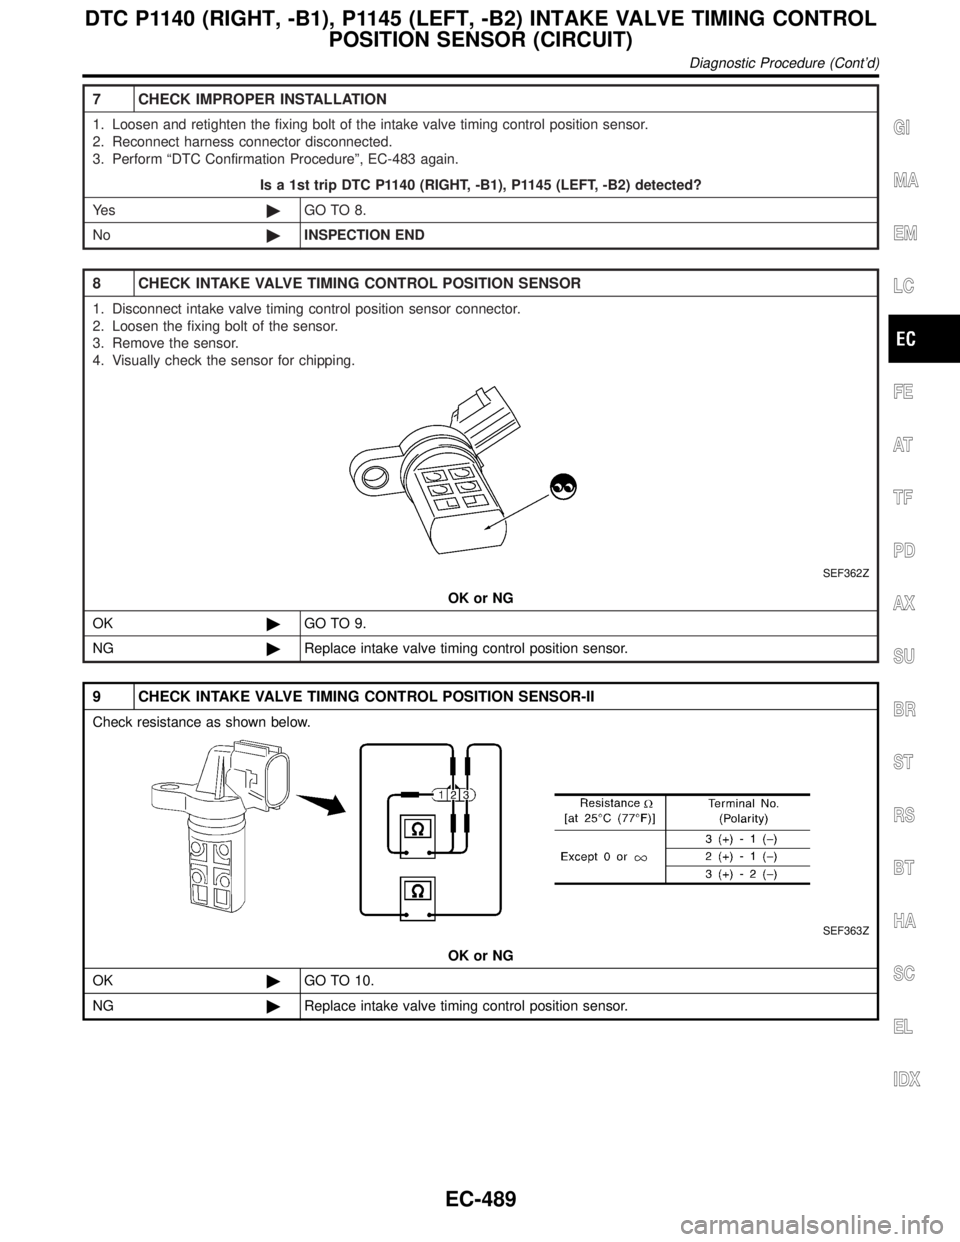
8 CHECK INTAKE VALVE TIMING CONTROL POSITION SENSOR
1. Disconnect intake valve timing control position sensor connector.
2. Loosen the fixing bolt of the sensor.
3. Remove the sensor.
4. Visually check the sensor for chipping.
SEF362Z
OK or NG
OK©GO TO 9.
NG©Replace intake valve timing control position sensor.
9 CHECK INTAKE VALVE TIMING CONTROL POSITION SENSOR-II
Check resistance as shown below.
SEF363Z
OK or NG
OK©GO TO 10.
NG©Replace intake valve timing control position sensor.
GI
MA
EM
LC
FE
AT
TF
PD
AX
SU
BR
ST
RS
BT
HA
SC
EL
IDX
DTC P1140 (RIGHT, -B1), P1145 (LEFT, -B2) INTAKE VALVE TIMING CONTROL
POSITION SENSOR (CIRCUIT)
Diagnostic Procedure (Cont'd)
EC-489
Page 1058 of 2395
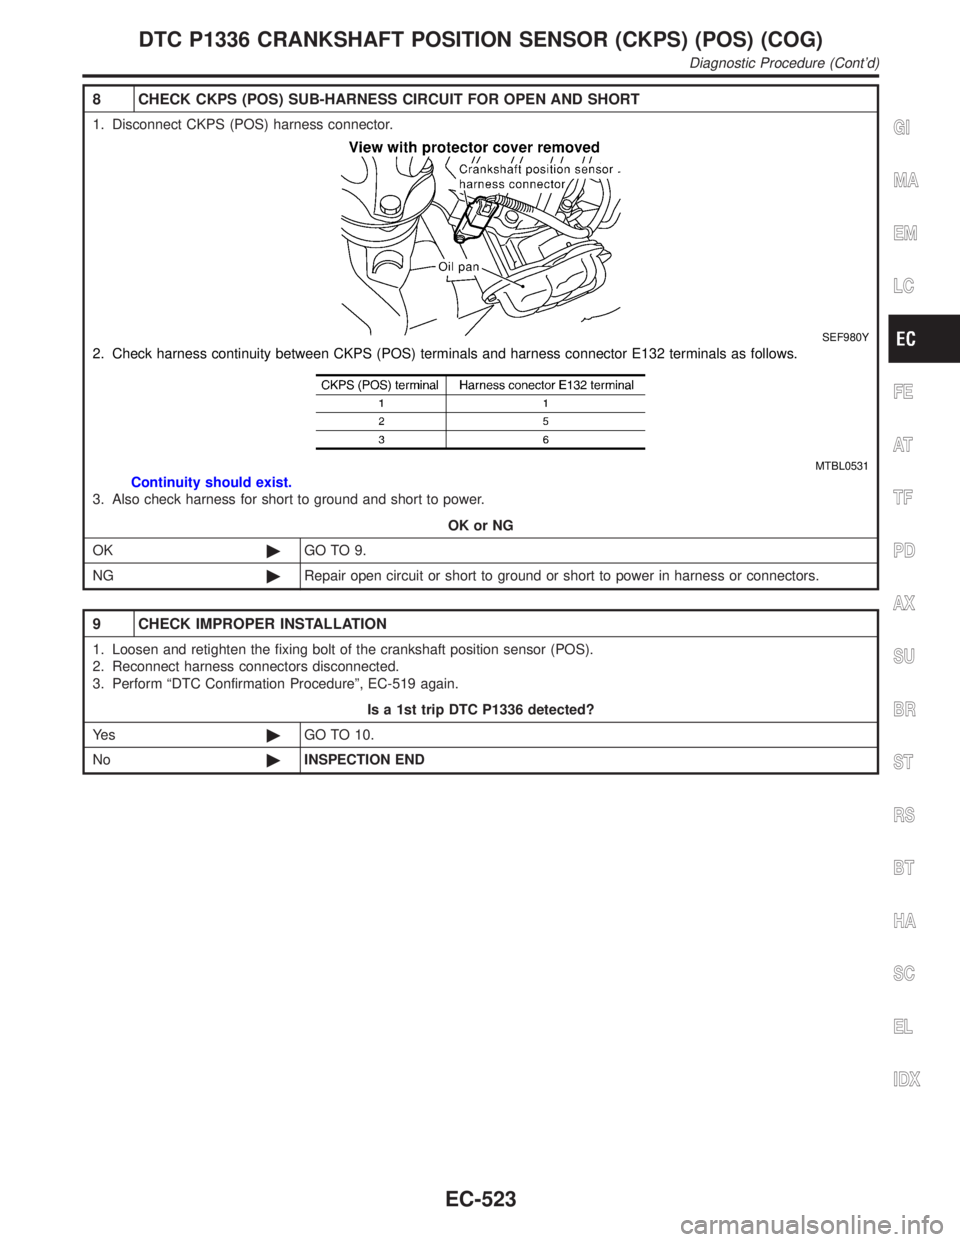
8 CHECK CKPS (POS) SUB-HARNESS CIRCUIT FOR OPEN AND SHORT
1. Disconnect CKPS (POS) harness connector.
SEF980Y
2. Check harness continuity between CKPS (POS) terminals and harness connector E132 terminals as follows.
MTBL0531
Continuity should exist.
3. Also check harness for short to ground and short to power.
OK or NG
OK©GO TO 9.
NG©Repair open circuit or short to ground or short to power in harness or connectors.
9 CHECK IMPROPER INSTALLATION
1. Loosen and retighten the fixing bolt of the crankshaft position sensor (POS).
2. Reconnect harness connectors disconnected.
3. Perform ªDTC Confirmation Procedureº, EC-519 again.
Is a 1st trip DTC P1336 detected?
Ye s©GO TO 10.
No©INSPECTION END
GI
MA
EM
LC
FE
AT
TF
PD
AX
SU
BR
ST
RS
BT
HA
SC
EL
IDX
DTC P1336 CRANKSHAFT POSITION SENSOR (CKPS) (POS) (COG)
Diagnostic Procedure (Cont'd)
EC-523
Page 1064 of 2395
Diagnostic ProcedureNBEC0643
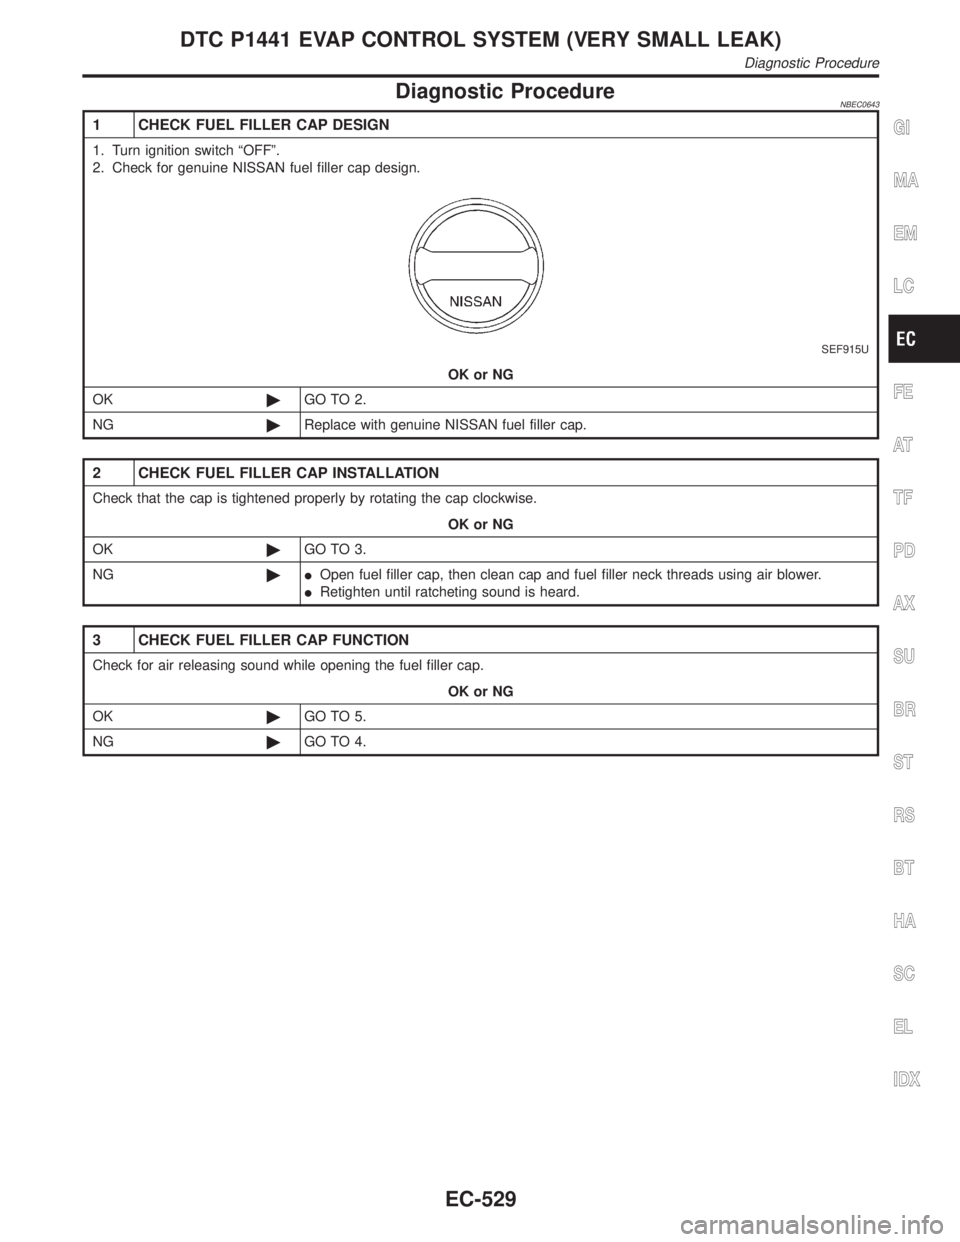
1 CHECK FUEL FILLER CAP DESIGN
1. Turn ignition switch ªOFFº.
2. Check for genuine NISSAN fuel filler cap design.
SEF915U
OK or NG
OK©GO TO 2.
NG©Replace with genuine NISSAN fuel filler cap.
2 CHECK FUEL FILLER CAP INSTALLATION
Check that the cap is tightened properly by rotating the cap clockwise.
OK or NG
OK©GO TO 3.
NG©IOpen fuel filler cap, then clean cap and fuel filler neck threads using air blower.
IRetighten until ratcheting sound is heard.
3 CHECK FUEL FILLER CAP FUNCTION
Check for air releasing sound while opening the fuel filler cap.
OK or NG
OK©GO TO 5.
NG©GO TO 4.
GI
MA
EM
LC
FE
AT
TF
PD
AX
SU
BR
ST
RS
BT
HA
SC
EL
IDX
DTC P1441 EVAP CONTROL SYSTEM (VERY SMALL LEAK)
Diagnostic Procedure
EC-529
Page 1066 of 2395
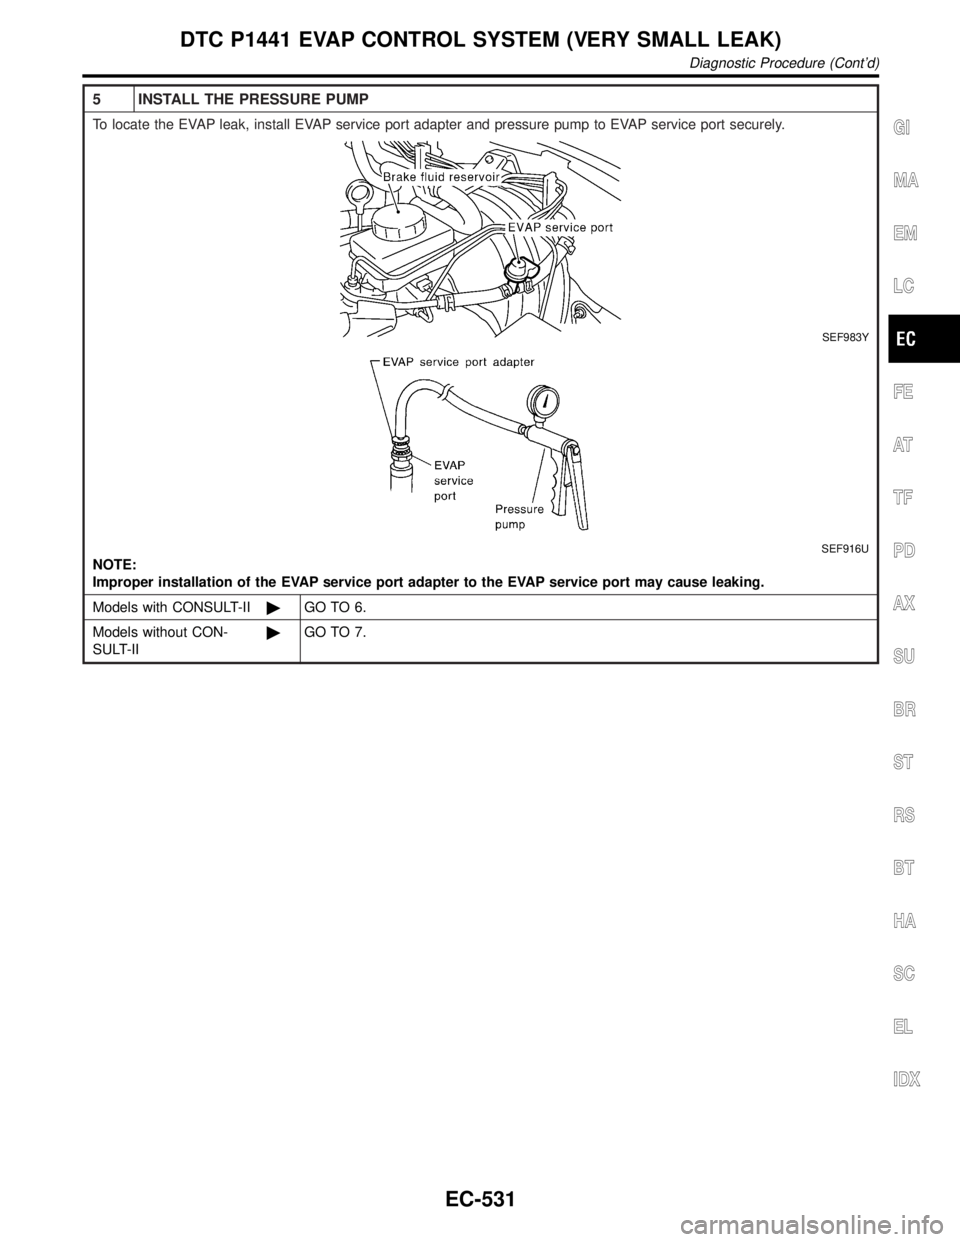
5 INSTALL THE PRESSURE PUMP
To locate the EVAP leak, install EVAP service port adapter and pressure pump to EVAP service port securely.
SEF983Y
SEF916U
NOTE:
Improper installation of the EVAP service port adapter to the EVAP service port may cause leaking.
Models with CONSULT-II©GO TO 6.
Models without CON-
SULT-II©GO TO 7.
GI
MA
EM
LC
FE
AT
TF
PD
AX
SU
BR
ST
RS
BT
HA
SC
EL
IDX
DTC P1441 EVAP CONTROL SYSTEM (VERY SMALL LEAK)
Diagnostic Procedure (Cont'd)
EC-531
Page 1187 of 2395
Electrical Components Inspection ...........................108
COMPASS AND THERMOMETER............................. 110
System Description .................................................. 110
Wiring Diagram - COMPAS -................................... 111
Trouble Diagnoses................................................... 112
Calibration Procedure for Compass ........................ 113
WARNING LAMPS...................................................... 114
Schematic ................................................................ 114
Wiring Diagram - WARN - ....................................... 115
Fuel Warning Lamp Sensor Check .........................122
Electrical Components Inspection ...........................122
A/T INDICATOR...........................................................123
Wiring Diagram - AT/IND -.......................................123
WARNING CHIME.......................................................125
Component Parts and Harness Connector
Location ...................................................................125
System Description ..................................................125
Wiring Diagram - CHIME - ......................................127
Trouble Diagnoses...................................................129
FRONT WIPER AND WASHER..................................136
System Description ..................................................136
Wiring Diagram - WIPER - ......................................138
Removal and Installation .........................................139
Washer Nozzle Adjustment .....................................140
Washer Tube Layout ...............................................140
REAR WIPER AND WASHER....................................141
System Description ..................................................141
Wiring Diagram - WIP/R -........................................143
Trouble Diagnoses...................................................145
Removal and Installation .........................................145
Washer Nozzle Adjustment .....................................146
Washer Tube Layout ...............................................146
Check Valve .............................................................146
HORN...........................................................................147
Wiring Diagram - HORN - .......................................147
CIGARETTE LIGHTER................................................148
Wiring Diagram - CIGAR -.......................................148
CLOCK.........................................................................150
Wiring Diagram - CLOCK -......................................150
REAR WINDOW DEFOGGER.....................................151
Component Parts and Harness Connector
Location ...................................................................151
System Description ..................................................151
Wiring Diagram - DEF - ...........................................153
Trouble Diagnoses...................................................155
Electrical Components Inspection ...........................157
Filament Check ........................................................157
Filament Repair .......................................................158
AUDIO..........................................................................160
System Description ..................................................160
Schematic ................................................................161
Wiring Diagram - AUDIO - .......................................162Trouble Diagnoses...................................................166
Inspection.................................................................167
Wiring Diagram - REMOTE -...................................168
AUDIO ANTENNA.......................................................169
System Description ..................................................169
Wiring Diagram - P/ANT - .......................................170
Trouble Diagnoses...................................................171
Location of Antenna .................................................171
Antenna Rod Replacement .....................................171
POWER SUNROOF.....................................................173
System Description ..................................................173
Wiring Diagram - SROOF - .....................................174
Trouble Diagnoses...................................................176
DOOR MIRROR...........................................................177
Wiring Diagram - MIRROR - ...................................177
GLASS HATCH OPENER...........................................178
System Description ..................................................178
Wiring Diagram - TLID - ..........................................179
FUEL FILLER LID OPENER.......................................180
Wiring Diagram - F/LID - .........................................180
POWER SEAT.............................................................181
Wiring Diagram - SEAT - .........................................181
HEATED SEAT............................................................183
Wiring Diagram - HSEAT - ......................................183
Seatback Heating Unit .............................................185
AUTOMATIC DRIVE POSITIONER............................186
Component Parts and Harness Connector
Location ...................................................................186
System Description ..................................................187
Schematic ................................................................190
Wiring Diagram - AUT/DP - .....................................191
On Board Diagnosis ................................................196
Trouble Diagnoses...................................................198
AUTOMATIC SPEED CONTROL DEVICE (ASCD)...221
Component Parts and Harness Connector
Location ...................................................................221
System Description ..................................................222
Schematic ................................................................224
Wiring Diagram - ASCD - ........................................225
Fail-safe System ......................................................229
Trouble Diagnoses...................................................230
Electrical Component Inspection .............................239
ASCD Wire Adjustment ...........................................240
POWER WINDOW.......................................................241
System Description ..................................................241
Schematic ................................................................244
Wiring Diagram - WINDOW - ..................................245
Trouble Diagnoses...................................................250
POWER DOOR LOCK.................................................254
Component Parts and Harness Connector
Location ...................................................................254
System Description ..................................................254
CONTENTS(Cont'd)
EL-2
Page 1189 of 2395
Supplemental Restraint System (SRS) ªAIR
BAGº and ªSEAT BELT PRE-TENSIONERº
NBEL0001The Supplemental Restraint System such as ªAIR BAGº and ªSEAT BELT PRE-TENSIONERº used along with
a seat belt, helps to reduce the risk or severity of injury to the driver and front passenger for certain types of
collision. The SRS system composition which is available to INFINITI QX4 is as follows:
IFor a frontal collision
The Supplemental Restraint System consists of driver air bag module (located in the center of the steer-
ing wheel), front passenger air bag module (located on the instrument panel on passenger side), seat belt
pre-tensioners, a diagnosis sensor unit, warning lamp, wiring harness and spiral cable.
IFor a side collision
The Supplemental Restraint System consists of side air bag module (located in the outer side of front seat),
satellite sensor, diagnosis sensor unit (one of components of air bags for a frontal collision), wiring harness,
warning lamp (one of components of air bags for a frontal collision).
Information necessary to service the system safely is included in theRS sectionof this Service Manual.
WARNING:
ITo avoid rendering the SRS inoperative, which could increase the risk of personal injury or death
in the event of a collision which would result in air bag inflation, all maintenance must be performed
by an authorized INFINITI dealer.
IImproper maintenance, including incorrect removal and installation of the SRS, can lead to per-
sonal injury caused by unintentional activation of the system. For removal of Spiral Cable and Air
Bag Module, see the RS section.
IDo not use electrical test equipment on any circuit related to the SRS unless instructed to in this
Service Manual. Spiral cable and wiring harnesses covered with yellow insulation tape either just
before the harness connectors or for the complete harness are related to the SRS.
Wiring Diagrams and Trouble DiagnosisNBEL0002When you read wiring diagrams, refer to the following:
IGI-11, ªHOW TO READ WIRING DIAGRAMSº
IEL-9, ªPOWER SUPPLY ROUTINGº for power distribution circuit
When you perform trouble diagnosis, refer to the following:
IGI-35, ªHOW TO FOLLOW TEST GROUPS IN TROUBLE DIAGNOSESº
IGI-24, ªHOW TO PERFORM EFFICIENT DIAGNOSIS FOR AN ELECTRICAL INCIDENTº
Check for any Service bulletins before servicing the vehicle.
PRECAUTIONS
Supplemental Restraint System (SRS) ªAIR BAGº and ªSEAT BELT PRE-TENSIONERº
EL-4
Page 1214 of 2395
MEL304D
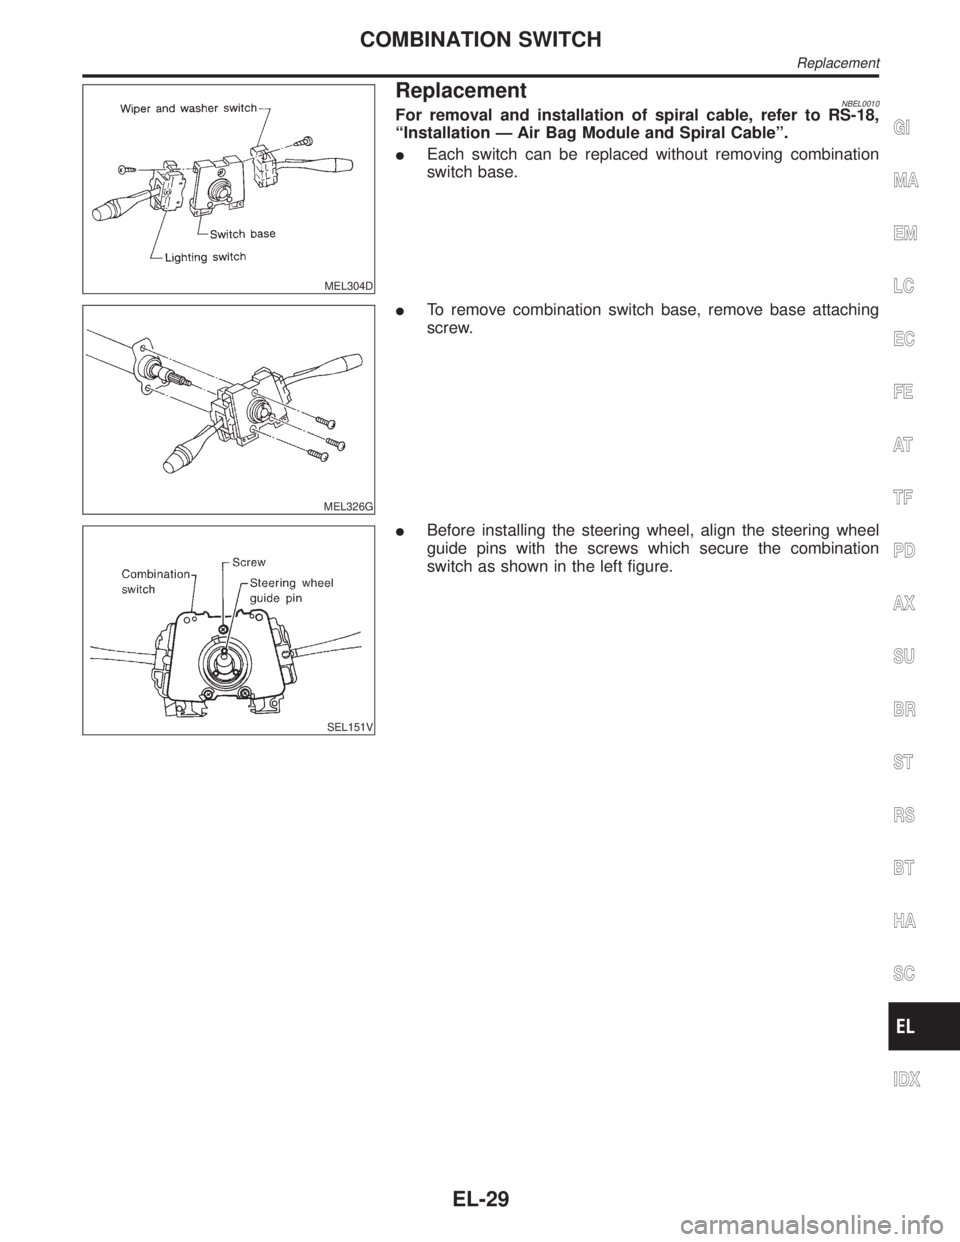
ReplacementNBEL0010For removal and installation of spiral cable, refer to RS-18,
ªInstallation Ð Air Bag Module and Spiral Cableº.
IEach switch can be replaced without removing combination
switch base.
MEL326G
ITo remove combination switch base, remove base attaching
screw.
SEL151V
IBefore installing the steering wheel, align the steering wheel
guide pins with the screws which secure the combination
switch as shown in the left figure.
GI
MA
EM
LC
EC
FE
AT
TF
PD
AX
SU
BR
ST
RS
BT
HA
SC
IDX
COMBINATION SWITCH
Replacement
EL-29
Page 1293 of 2395
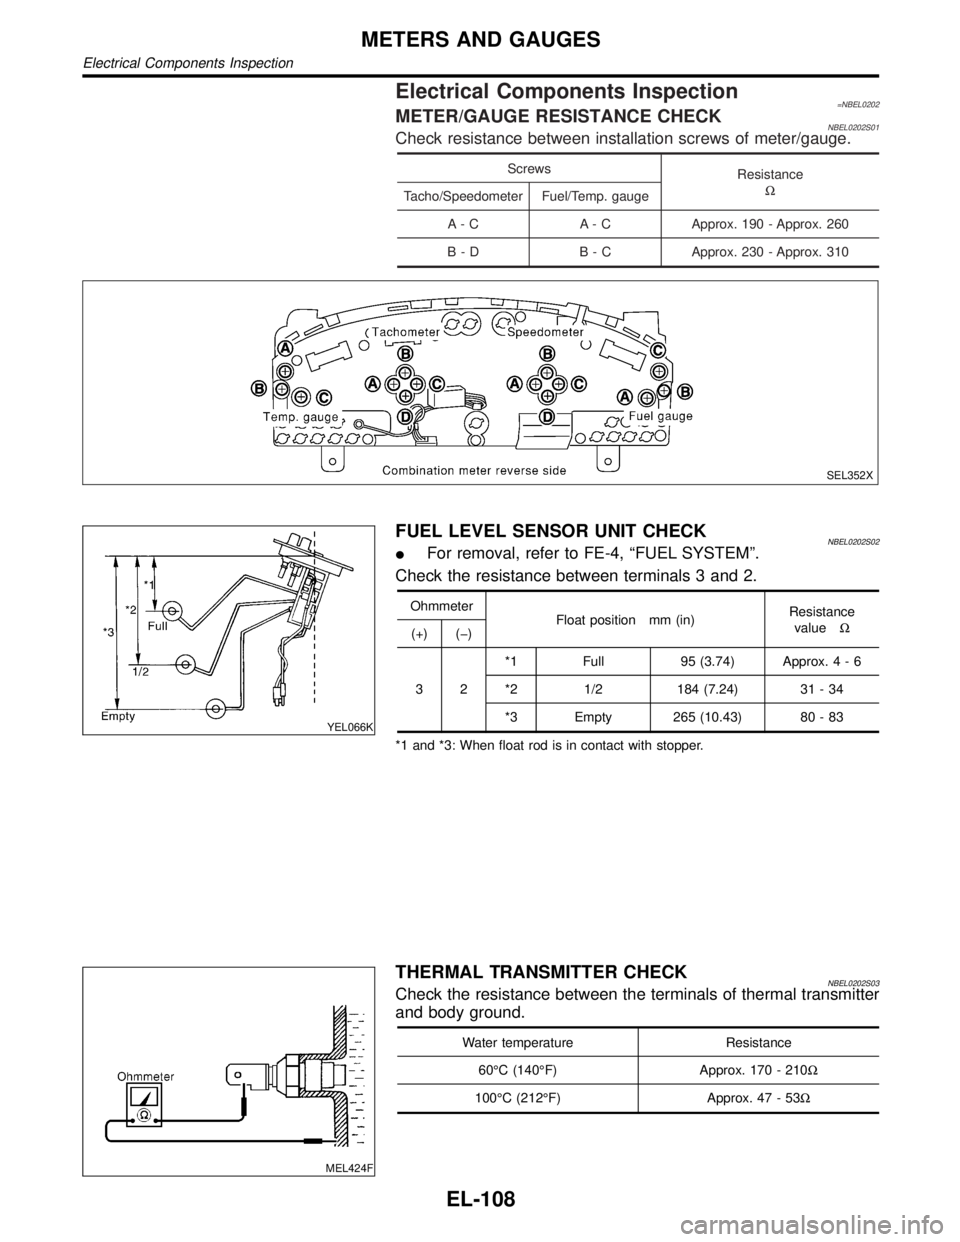
Electrical Components Inspection=NBEL0202METER/GAUGE RESISTANCE CHECKNBEL0202S01Check resistance between installation screws of meter/gauge.
Screws
Resistance
W
Tacho/Speedometer Fuel/Temp. gauge
A - C A - C Approx. 190 - Approx. 260
B - D B - C Approx. 230 - Approx. 310
SEL352X
YEL066K
FUEL LEVEL SENSOR UNIT CHECKNBEL0202S02IFor removal, refer to FE-4, ªFUEL SYSTEMº.
Check the resistance between terminals 3 and 2.
Ohmmeter
Float position mm (in)Resistance
valueW
(+) (þ)
32*1 Full 95 (3.74) Approx.4-6
*2 1/2 184 (7.24) 31 - 34
*3 Empty 265 (10.43) 80 - 83
*1 and *3: When float rod is in contact with stopper.
MEL424F
THERMAL TRANSMITTER CHECKNBEL0202S03Check the resistance between the terminals of thermal transmitter
and body ground.
Water temperature Resistance
60ÉC (140ÉF) Approx. 170 - 210W
100ÉC (212ÉF) Approx. 47 - 53W
METERS AND GAUGES
Electrical Components Inspection
EL-108