Page 577 of 2395
SEF939Y
10. Tighten fuel tube assembly mounting nuts in numerical
sequence (indicated in the figure at left) and in two stages.
: Tightening torque N´m (kg-m, ft-lb)
1st stage:
9.3 - 10.8 (1.0 - 1.1, 6.9 - 7.9)
2nd stage:
20.6 - 26.5 (2.1 - 2.7, 16 - 19)
11. Install all parts removed in reverse order of removal.
CAUTION:
After properly connecting fuel tube assembly to injector and
fuel hose, check connection for fuel leakage.
SEF058Y
How to Check Idle Speed and Ignition TimingNBEC0607IDLE SPEEDNBEC0607S01IUsing CONSULT-II
Check idle speed in ªDATA MONITORº mode with CONSULT-II.
SEF940Y
IGNITION TIMINGNBEC0607S02Any of following two methods may be used.
IMethod A
a) Attach timing light to loop wire as shown.
b) Check ignition timing.
SEF942Y
IMethod B
a) Remove No. 1 ignition coil.
BASIC SERVICE PROCEDURE
Injector (Cont'd)
EC-42
Page 740 of 2395
Diagnostic ProcedureNBEC0100
1 RETIGHTEN GROUND SCREWS
1. Turn ignition switch ªOFFº.
2. Loosen and retighten engine ground screws.
SEF959Y
©GO TO 2.
2 RETIGHTEN HEATED OXYGEN SENSOR 1 (FRONT)
Loosen and retighten corresponding heated oxygen sensor 1 (front).
Tightening torque:
40 - 60 N´m (4.1 - 6.1 kg-m, 30 - 44 ft-lb)
©GO TO 3.
GI
MA
EM
LC
FE
AT
TF
PD
AX
SU
BR
ST
RS
BT
HA
SC
EL
IDX
DTC P0131, P0151 HEATED OXYGEN SENSOR 1 (FRONT) (BANK 1)/(BANK 2)
(LEAN SHIFT MONITORING)
Diagnostic Procedure
EC-205
Page 748 of 2395
Diagnostic ProcedureNBEC0107
1 RETIGHTEN GROUND SCREWS
1. Turn ignition switch ªOFFº.
2. Loosen and retighten engine ground screws.
SEF959Y
©GO TO 2.
2 RETIGHTEN HEATED OXYGEN SENSOR 1 (FRONT)
Loosen and retighten corresponding heated oxygen sensor 1 (front).
Tightening torque:
40 - 60 N´m (4.1 - 6.1 kg-m, 30 - 44 ft-lb)
©GO TO 3.
GI
MA
EM
LC
FE
AT
TF
PD
AX
SU
BR
ST
RS
BT
HA
SC
EL
IDX
DTC P0132, P0152 HEATED OXYGEN SENSOR 1 (FRONT) (BANK 1)/(BANK 2)
(RICH SHIFT MONITORING)
Diagnostic Procedure
EC-213
Page 759 of 2395
Diagnostic ProcedureNBEC0115
1 RETIGHTEN GROUND SCREWS
1. Turn ignition switch ªOFFº.
2. Loosen and retighten engine ground screws.
SEF959Y
©GO TO 2.
2 RETIGHTEN HEATED OXYGEN SENSOR 1 (FRONT)
Loosen and retighten corresponding heated oxygen sensor 1 (front).
Tightening torque:
40 - 60 N´m (4.1 - 6.1 kg-m, 30 - 44 ft-lb)
©GO TO 3.
3 CHECK FOR EXHAUST AIR LEAK
1. Start engine and run it at idle.
2. Listen for an exhaust air leak before three way catalyst.
SEF099P
OK or NG
OK©GO TO 4.
NG©Repair or replace.
4 CHECK FOR INTAKE AIR LEAK
Listen for an intake air leak after the mass air flow sensor.
OK or NG
OK©GO TO 5.
NG©Repair or replace.
DTC P0133, P0153 HEATED OXYGEN SENSOR 1 (FRONT) (BANK 1)/(BANK 2)
(RESPONSE MONITORING)
Diagnostic Procedure
EC-224
Page 771 of 2395
Diagnostic ProcedureNBEC0122
1 INSPECTION START
1. Turn ignition switch ªOFFº.
2. Check heated oxygen sensor 1 (front) harness protector color.
SEF505Y
3. Disconnect corresponding heated oxygen sensor 1 (front) harness connector.
SEF965Y
SEF966Y
©GO TO 2.
2 RETIGHTEN HEATED OXYGEN SENSOR 1 (FRONT)
Loosen and retighten corresponding heated oxygen sensor 1 (front).
Tightening torque:
40 - 60 N´m (4.1 - 6.1 kg-m, 30 - 44 ft-lb)
©GO TO 3.
DTC P0134, P0154 HEATED OXYGEN SENSOR 1 (FRONT) (BANK 1)/(BANK 2)
(HIGH VOLTAGE)
Diagnostic Procedure
EC-236
Page 981 of 2395

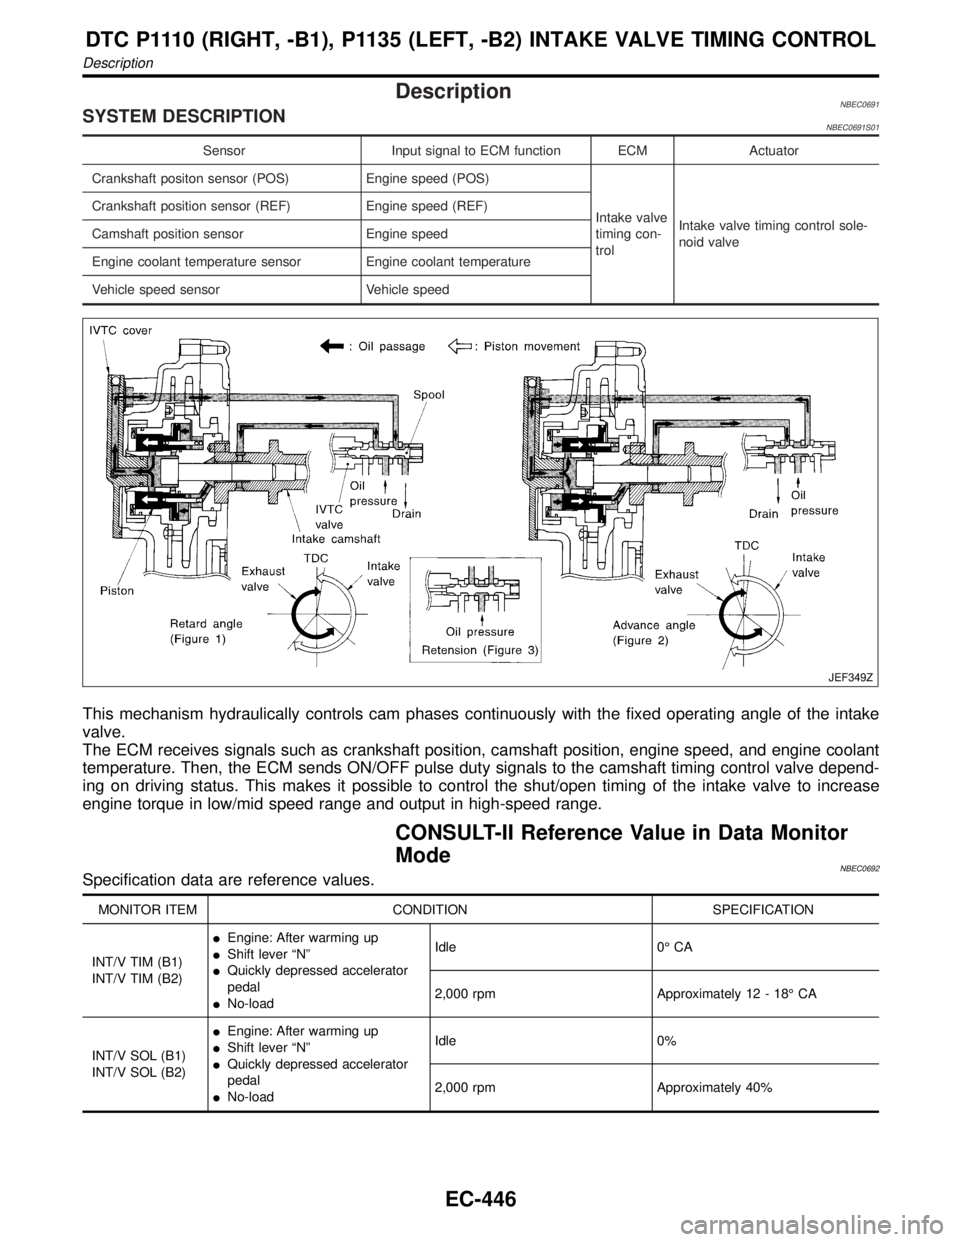
DescriptionNBEC0691SYSTEM DESCRIPTIONNBEC0691S01
Sensor Input signal to ECM function ECM Actuator
Crankshaft positon sensor (POS) Engine speed (POS)
Intake valve
timing con-
trolIntake valve timing control sole-
noid valve Crankshaft position sensor (REF) Engine speed (REF)
Camshaft position sensor Engine speed
Engine coolant temperature sensor Engine coolant temperature
Vehicle speed sensor Vehicle speed
JEF349Z
This mechanism hydraulically controls cam phases continuously with the fixed operating angle of the intake
valve.
The ECM receives signals such as crankshaft position, camshaft position, engine speed, and engine coolant
temperature. Then, the ECM sends ON/OFF pulse duty signals to the camshaft timing control valve depend-
ing on driving status. This makes it possible to control the shut/open timing of the intake valve to increase
engine torque in low/mid speed range and output in high-speed range.
CONSULT-II Reference Value in Data Monitor
Mode
NBEC0692Specification data are reference values.
MONITOR ITEM CONDITION SPECIFICATION
INT/V TIM (B1)
INT/V TIM (B2)IEngine: After warming up
IShift lever ªNº
IQuickly depressed accelerator
pedal
INo-loadIdle 0É CA
2,000 rpm Approximately 12 - 18É CA
INT/V SOL (B1)
INT/V SOL (B2)IEngine: After warming up
IShift lever ªNº
IQuickly depressed accelerator
pedal
INo-loadIdle 0%
2,000 rpm Approximately 40%
DTC P1110 (RIGHT, -B1), P1135 (LEFT, -B2) INTAKE VALVE TIMING CONTROL
Description
EC-446
Page 1145 of 2395

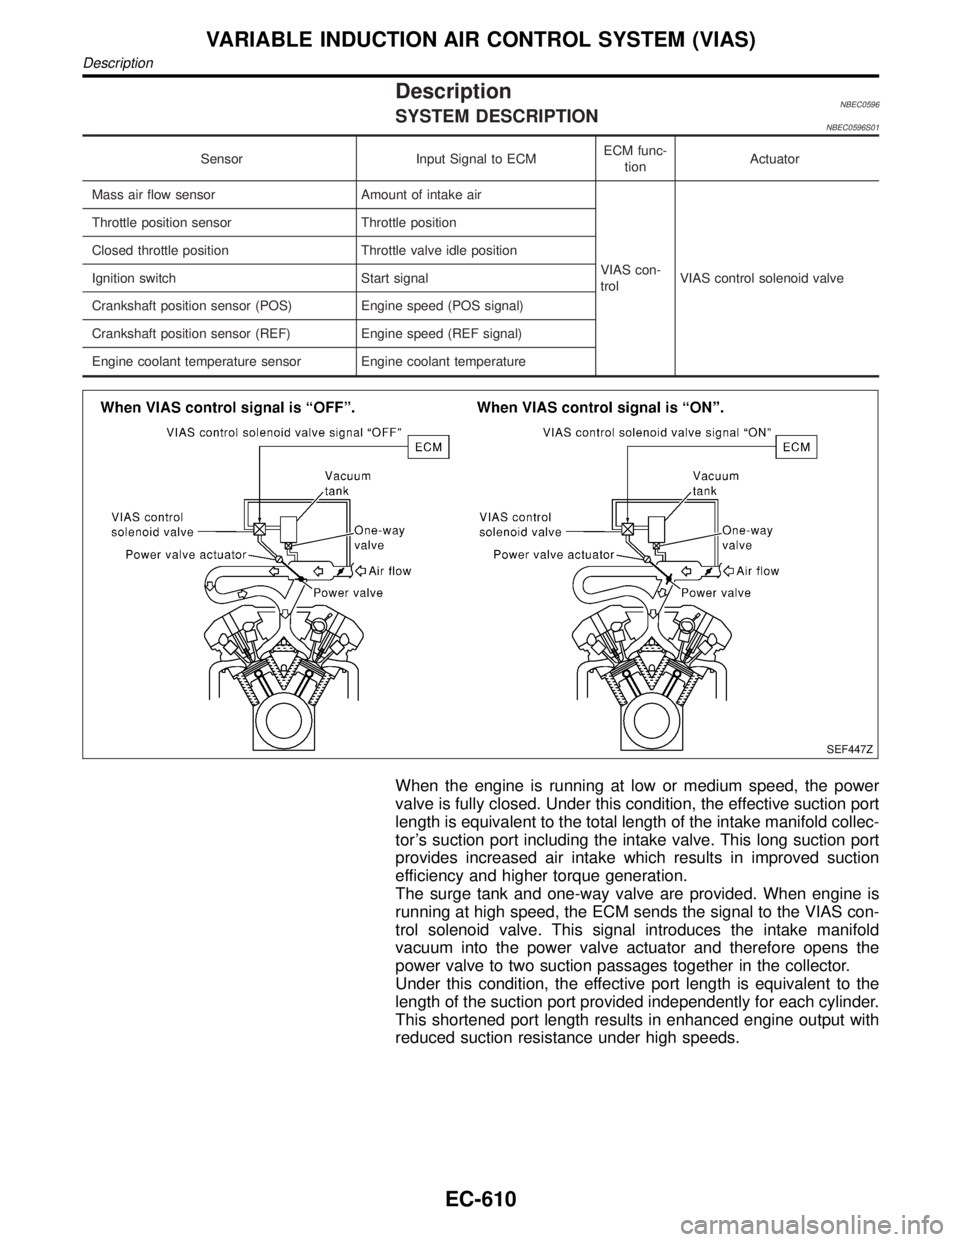
DescriptionNBEC0596SYSTEM DESCRIPTIONNBEC0596S01
Sensor Input Signal to ECMECM func-
tionActuator
Mass air flow sensor Amount of intake air
VIAS con-
trolVIAS control solenoid valve Throttle position sensor Throttle position
Closed throttle position Throttle valve idle position
Ignition switch Start signal
Crankshaft position sensor (POS) Engine speed (POS signal)
Crankshaft position sensor (REF) Engine speed (REF signal)
Engine coolant temperature sensor Engine coolant temperature
SEF447Z
When the engine is running at low or medium speed, the power
valve is fully closed. Under this condition, the effective suction port
length is equivalent to the total length of the intake manifold collec-
tor's suction port including the intake valve. This long suction port
provides increased air intake which results in improved suction
efficiency and higher torque generation.
The surge tank and one-way valve are provided. When engine is
running at high speed, the ECM sends the signal to the VIAS con-
trol solenoid valve. This signal introduces the intake manifold
vacuum into the power valve actuator and therefore opens the
power valve to two suction passages together in the collector.
Under this condition, the effective port length is equivalent to the
length of the suction port provided independently for each cylinder.
This shortened port length results in enhanced engine output with
reduced suction resistance under high speeds.
VARIABLE INDUCTION AIR CONTROL SYSTEM (VIAS)
Description
EC-610
Page 1324 of 2395
SEL543TA
Removal and InstallationNBEL0060WIPER ARMSNBEL0060S011. Prior to wiper arm installation, turn on wiper switch to operate
wiper motor and then turn it ªOFFº (Auto Stop).
2. Lift the blade up and then set it down onto glass surface to set
the blade center to clearance ªL
1º&ªL2º immediately before
tightening nut.
3. Eject washer fluid. Turn on wiper switch to operate wiper motor
and then turn it ªOFFº.
4. Ensure that wiper blades stop within clearance ªL
1º&ªL2º.
Clearance ªL
1º: 29 - 30 mm (1.14 - 1.18 in)
Clearance ªL
2º: 32 - 42 mm (1.26 - 1.65 in)
ITighten wiper arm nuts to specified torque.
Front wiper: 21 - 26 N´m (2.1 - 2.7 kg-m, 15 - 20 ft-lb)
SEL024J
IBefore reinstalling wiper arm, clean up the pivot area as
illustrated. This will reduce possibility of wiper arm loose-
ness.
WIPER LINKAGENBEL0060S02
MEL840F
GI
MA
EM
LC
EC
FE
AT
TF
PD
AX
SU
BR
ST
RS
BT
HA
SC
IDX
FRONT WIPER AND WASHER
Removal and Installation
EL-139