Page 283 of 363

Remove the socket from the
headlight assembly by turning it
one-quarter turn counterclockwise.
Remove the burned out bulb f rom
thesocketbypushingitinand
turning counterclockwise until it
unlocks.
Install the new bulb in the socket.
Turn it clockwise to lock it in place.
Insert the socket back into the
headlight assembly. Turn it
clockwise to lock it in place.
Testthelightstomakesurethe
new bulb is working.
Put the inner f ender in place.
Install the two holding clips. Lock
each clip in place by pushing on
the center.Determine which of the two bulbs
is burned out: stop/taillight/side
marker light or turn signal light.
Pull the taillight assembly out of
thebodybyslidingitbackward.
Use a Phillips-head screwdriver to
remove the taillight assembly
mounting screw under each cover.
Open the tailgate. Release the
covers by inserting a f lat-tip
screwdriver into the slot until the
cover bows slightly. Then pivot
the screwdriver 90° and pull it
straight out of the slot.
1. 2. 3. 4.
4. 5. 6. 7. 8. 9.
Lights
Maint enance Replacing Rear Bulbs
(in Fenders)
284
Page 284 of 363
Remove the socket by turning it
one-quarter turn counterclockwise.
Pull the bulb straight out of its
socket.
Push the new bulb straight into
the socket until it bottoms.
Reinstall the socket into the light
assembly by turning it clockwise
until it locks.
Testthelightstomakesurethe
new bulb is working.
When reinstalling the taillight
assembly, align and pop the snap
f asteners in place. Tighten the two
mounting screws and reinstall the
covers in place.Open the tailgate. Place a cloth on
the edge of the taillight cover.
Remove it by caref ully prying in
the notch on its edge with a small
f lat-tipped screwdriver.
Determine which of the two bulbs
is burned out: taillight or back-up
light.
Remove the socket by turning it
one-quarter turn counterclockwise.
2. 3.
5. 6. 7. 8. 9.
1.
CONT INUED
Lights
Maint enance
Replacing Rear Bulbs
(in Tailgate)
285
TTAAIILLLLIIGGHHTTCCOOVVEERR
Page 285 of 363
Pull the bulb straight out of its
socket.
Push the new bulb straight into
the socket until it bottoms.
Insert the socket back into the
light assembly. Turn it clockwise
to lock it in place.
Testthelightstomakesurethe
new bulb is working.
Reinstall the taillight cover.Place a cloth on the middle edge
of a part of the lens on the
passenger’s side. Remove a part of
the lens by caref ully prying on its
edge with a small f lat-tipped
screwdriver.
Use a Phillips-head screwdriver to
remove the screw under the lens.Pull the light assembly out of the
tailgate.
Remove the socket f rom the light
assembly by turning it one-quarter
turn counterclockwise.
Pull the bulb straight out of its
socket.
Push the new bulb straight into
the socket until it bottoms.
1. 2.
3.
4. 5. 6. 7.
4. 5.
Lights
Maint enanceReplacing a High-mount Brake
Light Bulb
286
SSCCRREEWW
Page 286 of 363
CONT INUED
Put the socket back into the light
assembly and turn it clockwise to
lock it in place.
Test the light to make sure the
new bulb is working.
Put the light assembly back into
the tailgate. Install the screw and
tighten it securely. Reinstall the
lens piece.Remove the license light assembly
by caref ully prying on the lef t
edge of the lens with a f lat-tip
screwdriver and pulling the
assembly out.Remove the lens f rom the bulb
holder by pulling the lens while
squeezing the tabs on both sides
of the holder.
Pull the bulb straight out of its
socket. Push the new bulb in until
it bottoms in the socket.
2. 3.
6. 7. 8.
1.
Lights
Maint enance
Replacing a Rear License Plate Bulb
287
Page 290 of 363
, there are several things you
should do to prepare it f or storage.
Proper preparation helps prevent
deterioration and m")
If you need to park your vehicle f or
an extended period (more than one
month), there are several things you
should do to prepare it f or storage.
Proper preparation helps prevent
deterioration and makes it easier to
get your vehicle back on the road. If
possible, store your vehicle indoors.Block the rear wheels.
If the vehicle is to be stored f or a
longer period, it should be
supported on jackstands so the
tires are of f the ground.
Leave one window open slightly (if
the vehicle is being stored
indoors).
Fill the f uel tank.
Change the engine oil and f ilter
(see page ).
Wash and dry the exterior
completely.
Cleantheinterior.Makesurethe
carpeting, floor mats, etc. are
completely dry.
Leave the parking brake off. Put
the transmission in Park. Support the f ront and rear wiper
blade arms with a f olded towel or
ragsotheydonottouchthe
windshield.
Disconnect the battery.
To minimize sticking, apply a
silicone spray lubricant to all door
and tailgate seals. Also, apply a
vehiclebodywaxtothepainted
surfaces that mate with the door
and tailgate seals. Cover the vehicle with a
‘‘breathable’’ cover, one made
f rom a porous material such as
cotton. Nonporous materials, such
as plastic sheeting, trap moisture,
which can damage the paint.
If possible, run the engine f or a
while periodically (pref erably once
amonth).
If you store your vehicle f or 12
months or longer, have your Honda
dealer perf orm the inspections called
f or in the 24 months/30,000 miles
(48,000 km) maintenance schedule
(Normal Conditions) as soon as you
take it out of storage (see page ).
The replacements called f or in the
maintenance schedule are not
needed unless the vehicle has
actually reached that time or mileage.
251
240
St oring Your Vehicle
Maint enance291
Page 302 of 363
If you have a f lat tire while driving,
stop in a saf e place to change it.
Stopping in traf f ic or on the shoulder
of a busy road is dangerous. Drive
slowly along the shoulder until you
gettoanexitoranareatostopthat
is far away from the traffic lanes.Turn on the hazard warning lights
andturntheignitionswitchto
LOCK (0). Have all the
passengers get out of the vehicle
while you change the tire.
Park the vehicle on f irm, level and
non-slippery ground away f rom
traf f ic. Put the transmission in
Park. Apply the parking brake.
2.
1.
CONT INUED
Changing a Flat T ire
T aking Care of t he Unexpect ed 303
SSPPAARREETTIIRREE
JJAACCKK
TTOOOOLLSS
VVIINNYYLLBBAAGG
The vehicle can easily roll off
the jack, seriously injuring
anyone underneath.
Follow the directions for
changing a tire exactly, and
never get under the vehicle
when it is supported only by thejack.
Page 303 of 363
Open the tailgate. Take the tools out of the storagecompartment.The spare tire is stored under the
f loor between the f irst and second
row of seats. If the f ront seats are
adjusted to the rear-most position,
move the seats f orward slightly
and adjust the seat-backs to an
upright position (see page ).
Lift up the center table (see page
).
Turn the jack’s end bracket
counterclockwise to loosen it, then
remove the jack.
Remove the cargo net.
Thetoolsandjackarebehinda
cover in the cargo area on the
driver’s side. Remove the cover by
turning the handle
counterclockwise, then pulling out
the cover.
3. 4.
5.6.7.
105
123
Changing a Flat T ire
T aking Care of t he Unexpect ed
304
CCOOVVEERR
Page 305 of 363
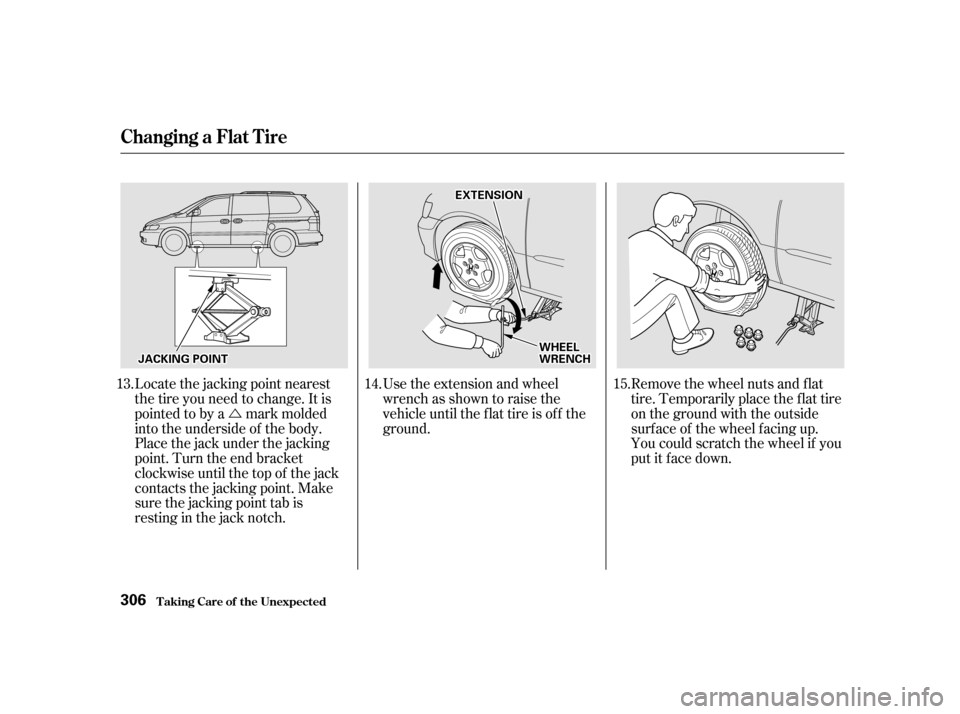
�ÚUse the extension and wheel
wrench as shown to raise the
vehicle until the f lat tire is of f the
ground. Remove the wheel nuts and f lat
tire. Temporarily place the f lat tire
on the ground with the outside
surf ace of the wheel f acing up.
You could scratch the wheel if you
putitfacedown.
Locate the jacking point nearest
thetireyouneedtochange.Itis
pointed to by a mark molded
into the underside of the body.
Place the jack under the jacking
point. Turn the end bracket
clockwise until the top of the jack
contacts the jacking point. Make
sure the jacking point tab is
restinginthejacknotch.
13. 14. 15.
Changing a Flat T ire
T aking Care of t he Unexpect ed
306
JJAACCKKIINNGGPPOOIINNTT
EEXXTTEENNSSIIOONN
WWHHEEEELLWWRREENNCCHH