Page 260 of 363
Always use Honda Power Steering
Fluid. If it is not available, you may
use another power steering f luid as
an emergency replacement.
However, continued use can cause
increased wear and poor steering in
cold weather. Have the power
steering system f lushed and ref illed
with Honda PSF as soon as possible.
A low power steering f luid level can
indicate a leak in the system. Check
the f luid level f requently and have
the system inspected as soon as
possible.
Check the level when the engine is
cold. Look at the side of the
reservoir. The f luid should be
between the UPPER LEVEL and
LOWER LEVEL. If it is below the
LOWER LEVEL, add power steering
f luid to the UPPER LEVEL.
Maint enance
Power Steering
261
UUPPPPEERRLLEEVVEELL
LLOOWWEERRLLEEVVEELLT urning the steering wheel to f ull lef t
or right lock and holding it there can
damage the power steering pump.
Page 262 of 363
Disconnect the clip f rom the bolt
on the air cleaner housing, then
remove the air cleaner housing
cover.Place the new air cleaner element
in the air cleaner housing.
Reinstall the air cleaner housing
cover. Reinstall the clip on the
bolt; make sure the clip is under
the washer. Tighten the f our bolts.
Reinstall the air intake cover.
Reinstall the two pins and secure
thembypushingontheheads
until they lock.
The coolant lines inside the air
cleaner housing may be warm.
Caref ully clean the inside of the
air cleaner housing with a damp
rag.
Remove the old air cleaner
element.
Do not open the hot air valve when
cleaning the inside of the air cleanerhousing.
3. 4. 6. 7.
5. 8.
A ir Cleaner Element
Maint enance263
CCLLIIPPAAIIRRCCLLEEAANNEERREELLEEMMEENNTTHHOOTTAAIIRRVVAALLVVEE
Page 263 of 363
The spark plugs in your vehicle are a
special platinum-tipped design f or
longer lif e. The spark plugs should
be replaced according to the time
and distance recommendations in
the maintenance schedule.
Clean the hood latch assembly with a
mild cleaner, then lubricate it with a
multipurpose grease. Lubricate all
the moving parts (pointed by arrows),
including the pivot. Follow the time
and distance recommendations in
the Maintenance Schedule. If you
are not sure how to clean and grease
the latch, contact your Honda dealer. Loosen the two holding clips by
turning the heads one-quarter turn
counterclockwise with a f lat-tipped
screwdriver. Remove the cover on
the f ront cylinder bank by pulling
it straight up.
Clean up any dirt and oil that have
collected around the ignition coils.
1. 2.
Maint enance
Hood L atch Spark Plugs
Replacement
Hood L at ch, Spark Plugs
264
LLAATTCCHHAASSSSEEMMBBLLYY
HHOOLLDDIINNGGCCLLIIPP
Page 264 of 363
CONT INUED
Disconnect the wire connector
f rom the ignition coil by pushing
on the lock tab and pulling on the
connector. Pull on the plastic
connector, not the wires.Remove the spark plug with
a f ive-eighths inch (16 mm) spark
plug socket.
Use a wrench to remove the
hexagonsocketheadcapbolt
holding the ignition coil. Remove
the ignition coil by pulling it
straight out.
Put the new spark plug into the
socket; then screw it into the hole.
Screw it in by hand so you do not
crossthread it.
3.
4. 5.6.
Spark Plugs
Maint enance
265
HHEEXXAAGGOONNSSOOCCKKEETTHHEEAADDCCAAPPBBOOLLTT
Page 265 of 363
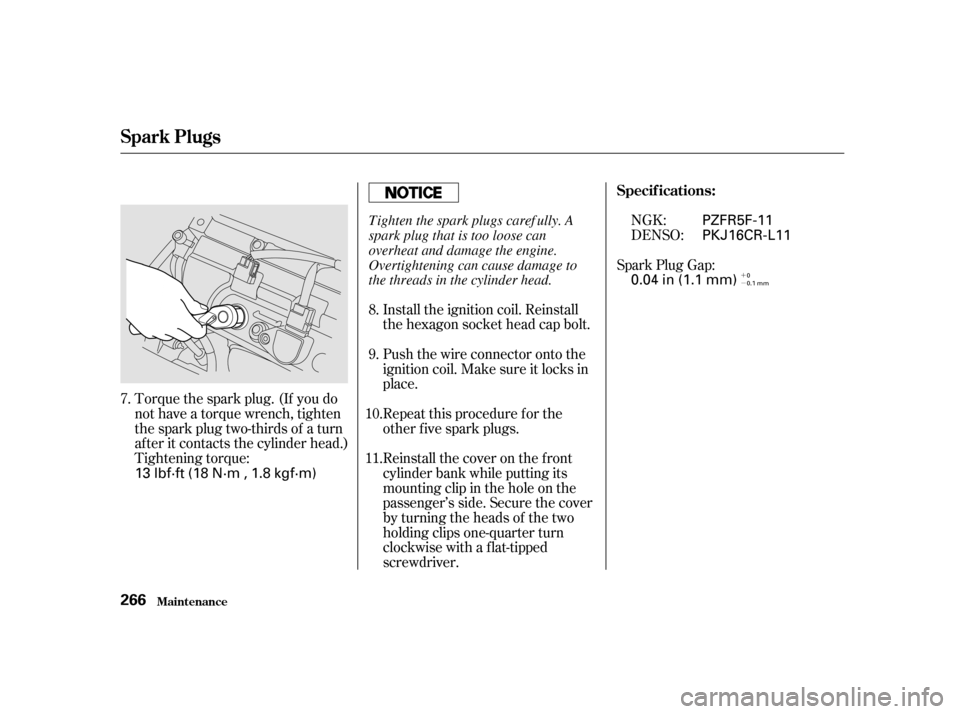
�´ �µ
Torque the spark plug. (If you do
not have a torque wrench, tighten
the spark plug two-thirds of a turn
af ter it contacts the cylinder head.)
Tightening torque: Spark Plug Gap:
Install the ignition coil. Reinstall
the hexagon socket head cap bolt.
Push the wire connector onto the
ignition coil. Make sure it locks in
place.
Repeat this procedure f or the
other f ive spark plugs.
Reinstall the cover on the front
cylinder bank while putting its
mounting clip in the hole on the
passenger’s side. Secure the cover
by turning the heads of the two
holding clips one-quarter turn
clockwise with a f lat-tipped
screwdriver. NGK:
DENSO:
7. 8. 9.
10. 11. Specif ications:
Spark Plugs
Maint enance
266 13 lbf·ft (18 N·m , 1.8 kgf·m) 0.04 in (1.1 mm)
PKJ16CR-L11
PZFR5F-11
0
0.1 mm
Tighten the spark plugs caref ully. A
spark plug that is too loose can
overheat and damage the engine.
Overtightening can cause damage to
the threads in the cylinder head.
Page 268 of 363
CONT INUED
Check the condition of the wiper
blades at least every six months.
Look f or signs of cracking in the
rubber, or areas that are getting
hard. Replace the blades if you f ind
these signs, or they leave streaks
and unwiped areas when used.Disconnect the blade assembly
fromthewiperarmbypushingin
the lock tab. Hold it in while you
push the blade assembly toward
thebaseof thearm.
Raise the wiper arm of f the
windshield.
To replace a wiper blade:
Front windshield: Raise the driver’s
side first, then the passenger’s
side. 2.
1.
Wiper Blades
Maint enance 269
WWIIPPEERRAARRMMSS
LLOOCCKKTTAABB
Page 269 of 363
Slide the new wiper blade into the
holder until the tabs lock.
Slide the wiper blade assembly
onto the wiper arm. Make sure it
locks in place.
Lower the wiper arm down against
the windshield.
Examine the new wiper blades. If
they have no plastic or metal rein-
f orcement along the back edge,
remove the metal reinf orcement
strips f rom the old wiper blade and
install them in the slots along the
edge of the new blade.
Remove the blade f rom its holder
by grasping the tabbed end of the
blade. Pull f irmly until the tabs
come out of the holder. Front windshield: Lower the
passenger’s side f irst, then the
driver’s side.
6. 7.
4. 5.
3.
Wiper Blades
Maint enance
270
BBLLAADDEE
RREEIINNFFOORRCCEEMMEENNTT
BBLLAADDEE
Page 270 of 363

Run the air conditioning at least once
a week during the cold weather
months. Run it f or at least ten
minutes while you are driving at a
steady speed with the engine at
normal operating temperature. This
circulates the lubricating oil con-
tained in the ref rigerant.If the air conditioning does not get as
cold as before, have your dealer
check the system. Recharge the
system with Ref rigerant HFC-134a
(R-134a). (See Specif ications on page
.)
Your vehicle’s air conditioning is a
sealed system. Any major mainte-
nance, such as recharging, should be
done by a qualif ied mechanic. You
can do a couple of things to make
sure the air conditioning works
ef f iciently.
Periodically check the engine’s
radiator and air conditioning
condenser f or leaves, insects, and
dirt stuck to the f ront surf ace. These
block the air f low and reduce cooling
ef f iciency. Use a light spray f rom a
hose or a sof t brush to remove them. 334
Maint enance
A ir Condit ioning Syst em
271
AAIIRRCCOONNDDIITTIIOONNIINNGGCCOONNDDEENNSSEERR Whenever you have the air conditioning
system serviced, make sure the service
f acility uses a ref rigerant recycling
system. This system captures the
ref rigerant f or reuse. Releasing
ref rigerant into the atmosphere can
damage the environment.
The condenser and radiator f ins bend
easily. Only use a low-pressure spray
or sof t-bristle brush to clean them.