2001 DODGE TOWN AND COUNTRY instrument panel
[x] Cancel search: instrument panelPage 502 of 2321
MESSAGE SYSTEMS
TABLE OF CONTENTS
page page
MESSAGE CENTER......................... 1OVERHEAD CONSOLE....................... 2
MESSAGE CENTER
TABLE OF CONTENTS
page page
MESSAGE CENTER
REMOVAL...............................1INSTALLATION............................1
MESSAGE CENTER
REMOVAL
(1) Disconnect and isolate the battery negative
cable.
(2) Using a trim stick (special tool #C-4755) or
equivalent, gently pry up on the front side of the
message center and lift out of instrument panel open-
ing.
(3) Disconnect the wire connector from the back of
message center.
(4) Remove message center from vehicle.NOTE: If the message center lamp needs replacing,
twist out defective bulb socket and replace with a
known good bulb and socket.
INSTALLATION
(1) Connect the wiring connector to message cen-
ter.
(2) Place message center in position on instrument
panel and firmly snap into place.
(3) Connect battery negative cable.
RSMESSAGE SYSTEMS8M-1
ProCarManuals.com
Page 556 of 2321
REMOTE KEYLESS ENTRY
MODULE
DESCRIPTION
The RKE module is capable of retaining up to four
different Vehicle Access Codes.
OPERATION
Whenever the vehicle battery power is interrupted
the RKE Module will retain all vehicle access codes
in its memory. When replacing or adding a key fob
transmitter (maximum 4) a DRB IIItscan tool is
required to program the RKE Module to accept the
new Vehicle Access Code if a customer owned trans-
mitter is not available. Refer to Electrical, Remote
Keyless Entry Module, Standard Procedure - Pro-
gramming RKE Module or the Proper Body Diagnos-
tic Procedures manual.
DIAGNOSIS AND TESTING - REMOTE KEYLESS
ENTRY
Refer to the appropriate wiring information. The
wiring information includes wiring diagrams, proper
wire and connector repair procedures, further details
on wire harness routing and retention, as well as
pin-out and location views for the various wire har-
ness connectors, splices and grounds. Refer to the
proper Body Diagnostic Procedures Manual for test-
ing the Remote Keyless Entry system using a DRB
IIItscan tool. Also refer to other interrelated sys-
tems groups within this manual:
²Vehicle Theft Security System
²Power Seats
²Power Mirrors
STANDARD PROCEDURE - PROGRAMMING
RKE MODULE
(1) Using a functional key fob transmitter, unlock
the vehicle and disarm the Vehicle Theft Security
System.
(2) Insert ignition key into the ignition switch.
(3) Turn the ignition switch to RUN position with-
out starting engine.
(4) Using a functional key fob transmitter, press
and hold the UNLOCK button for a minimum five
seconds (maximum ten seconds).
(5) While still holding UNLOCK button, and
before ten seconds passes, press the PANIC button
and release both at the same time. A single chime
will sound to verify that the RKE module is set to
receive the new Vehicle Access Code(s).
(6) Within 30 seconds of the chime, press and
release the ªLOCKº and ªUNLOCKº buttons on the
transmitter at the same time. Then press any one of
the buttons. The BCM will sound an abbreviatedchime to acknowledge that the programming of the
transmitter has been completed and was successful.
(7) Repeat step 6 for all transmitters that will be
used with this vehicle (up to 4 total).
(8) Programming mode will last for 30 seconds. To
get out of programming mode sooner, turn the igni-
tion OFF. A single chime will sound to verify that the
RKE module will no longer accept additional Vehicle
Access Code(s).
(9) When Vehicle Access Code(s) programming is
complete, turn the ignition switch to the OFF posi-
tion and verify RKE system operation using each key
fob.
NOTE:
Only the two key fob transmitters that have been
programmed to the memory seat and mirror system
will operate it. If any key fob is replaced, the mem-
ory seat and mirror module will require program-
ming. (Refer to 8 - ELECTRICAL/POWER SEATS -
DIAGNOSIS AND TESTING).
REMOVAL
(1) Disconnect and isolate the battery negative
cable.
(2) Remove instrument panel top cover (Refer to
23 - BODY/INSTRUMENT PANEL/INSTRUMENT
PANEL TOP PAD - REMOVAL).
(3) Remove screws holding RKE module to instru-
ment panel.
(4) Disconnect wire connector from RKE module
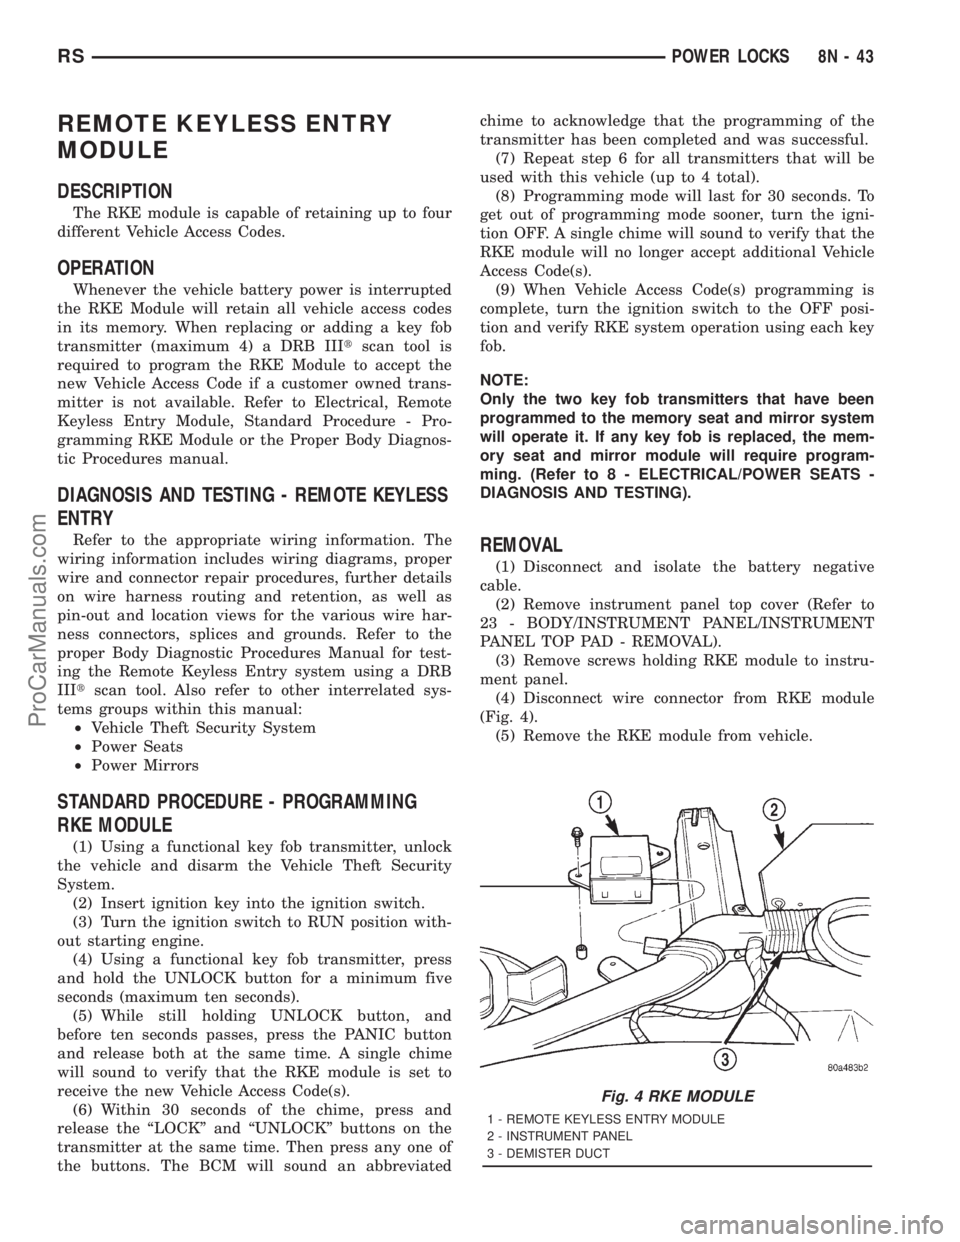
(Fig. 4).
(5) Remove the RKE module from vehicle.
Fig. 4 RKE MODULE
1 - REMOTE KEYLESS ENTRY MODULE
2 - INSTRUMENT PANEL
3 - DEMISTER DUCT
RSPOWER LOCKS8N-43
ProCarManuals.com
Page 557 of 2321
INSTALLATION
(1) Position the RKE module and install the
screws.
(2) Connect the wire connector to the RKE module
(Fig. 4).
(3) Install the instrument panel top pad.
(4) Connect the battery negative cable.
SLIDING DOOR LOCK MOTOR
REMOVAL
(1) Disconnect and isolate the negative battery
cable.
(2) Remove sliding door trim panel (Refer to 23 -
BODY/DOORS - SLIDING/TRIM PANEL - REMOV-
AL).
(3) Remove sound pad as necessary.
(4) Remove latch/lock control cover.
(5) Remove latch/lock control.
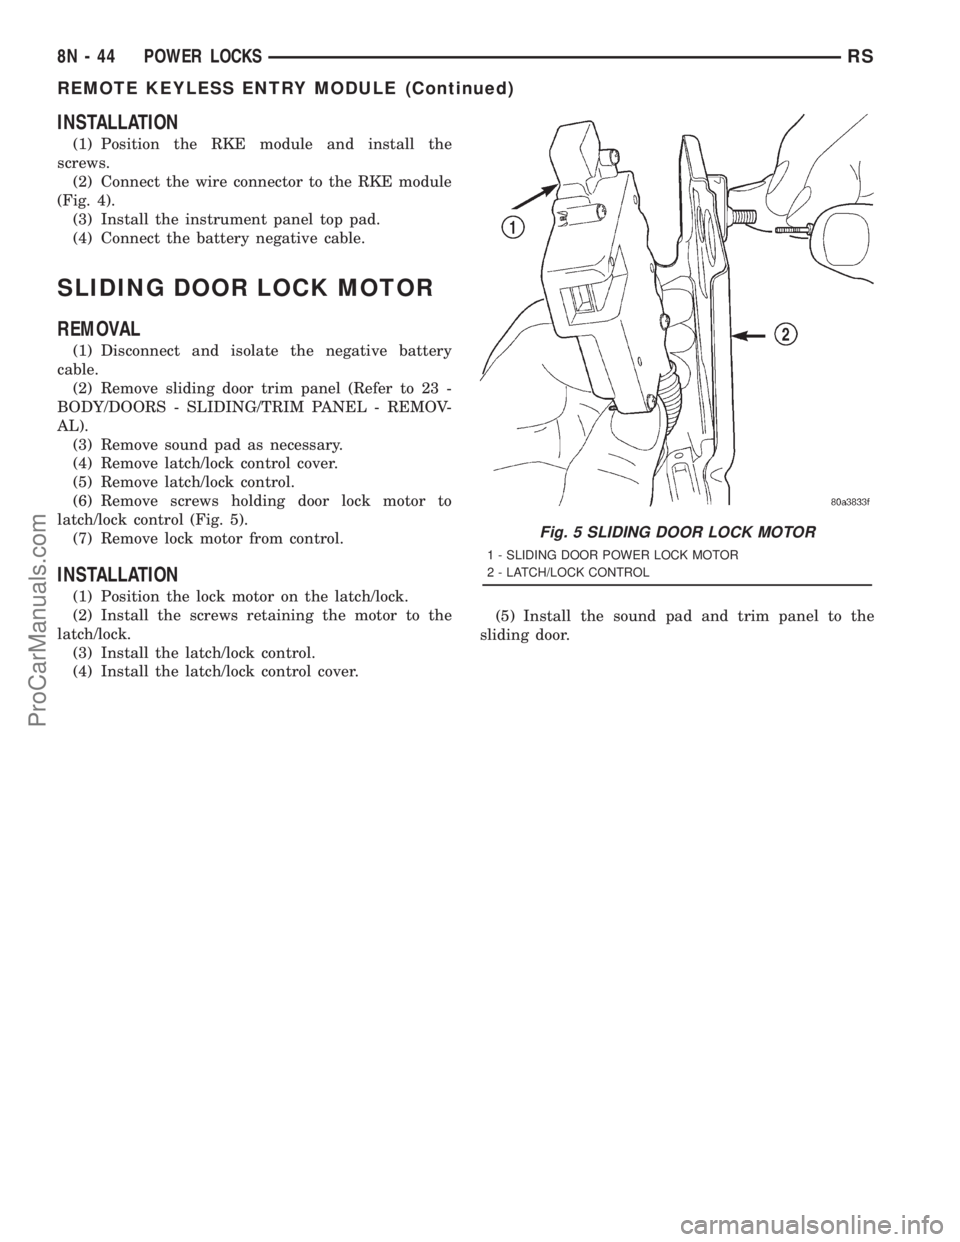
(6) Remove screws holding door lock motor to
latch/lock control (Fig. 5).
(7) Remove lock motor from control.
INSTALLATION
(1) Position the lock motor on the latch/lock.
(2) Install the screws retaining the motor to the
latch/lock.
(3) Install the latch/lock control.
(4) Install the latch/lock control cover.(5) Install the sound pad and trim panel to the
sliding door.
Fig. 5 SLIDING DOOR LOCK MOTOR
1 - SLIDING DOOR POWER LOCK MOTOR
2 - LATCH/LOCK CONTROL
8N - 44 POWER LOCKSRS
REMOTE KEYLESS ENTRY MODULE (Continued)
ProCarManuals.com
Page 558 of 2321

POWER MIRRORS
TABLE OF CONTENTS
page page
POWER MIRRORS
DESCRIPTION...........................45
OPERATION.............................45
DIAGNOSIS AND TESTING.................45
POWER MIRRORS......................45
AUTOMATIC DAY / NIGHT MIRROR
DESCRIPTION...........................46
OPERATION.............................46
DIAGNOSIS AND TESTING.................47AUTOMATIC DAY/NIGHT MIRROR..........47
REMOTE SWITCH
DIAGNOSIS AND TESTING.................48
REMOTE SWITCH......................48
REMOVAL..............................48
INSTALLATION...........................48
SIDEVIEW MIRROR
REMOVAL..............................48
POWER MIRRORS
DESCRIPTION
If equipped with power mirrors, the control switch
is located on the instrument panel to the left of the
headlamp switch.
OPERATION
The power mirrors are connected to battery feed at
all times. Each mirror head contains two electric
motors, two drive mechanisms, an electric heating
element, and the mirror glass. If the vehicle is
equipped with the optional memory system, each
mirror head also contains both a horizontal and a
vertical motor position sensor. One motor and drive
controls mirror up-and-down movement, and the
other controls right-and-left movement.
An optional driver side outside electrochromic mir-
ror is able to automatically change its reflectance
level. This mirror is controlled by the circuitry of the
automatic day/night inside rear view mirror. A thin
layer of electrochromic material between two pieces
of conductive glass make up the face of the mirror.
Two photocell sensors on the inside rear view mirror
are used to monitor light levels and adjust the reflec-tance of both the inside and driver side outside mir-
rors. This change in reflectance helps to reduce the
glare of headlamps approaching the vehicle from the
rear. (Refer to 8 - ELECTRICAL/POWER MIRRORS/
AUTOMATIC DAY / NIGHT MIRROR - DESCRIP-
TION) for more information on this system.
The motors which operate the mirrors are part of
the mirror assembly and cannot be serviced sepa-
rately.
DIAGNOSIS AND TESTING - POWER MIRRORS
(1) Remove Power Mirror Switch. (Refer to 8 -
ELECTRICAL/POWER MIRRORS/POWER MIRROR
SWITCH - REMOVAL).
(2) Disconnect wiring harness connector to the
power mirror switch and headlamp switch.
(3) Using two jumper wires:
²Connect one to a 12-volt source
²Connect the other to a good body ground
²Refer to the Mirror Test Chart for wire hookups
at the switch connector (Fig. 1).
(4) If results shown in table are not obtained,
check for broken or shorted circuit, or replace mirror
assembly as necessary.
RSPOWER MIRRORS8N-45
ProCarManuals.com
Page 561 of 2321
REMOTE SWITCH
DIAGNOSIS AND TESTING - REMOTE SWITCH
(1) Remove power mirror switch. (Refer to 8 -
ELECTRICAL/POWER MIRRORS/POWER MIRROR
SWITCH - REMOVAL).
(2) Disconnect wiring harness at switch connector.
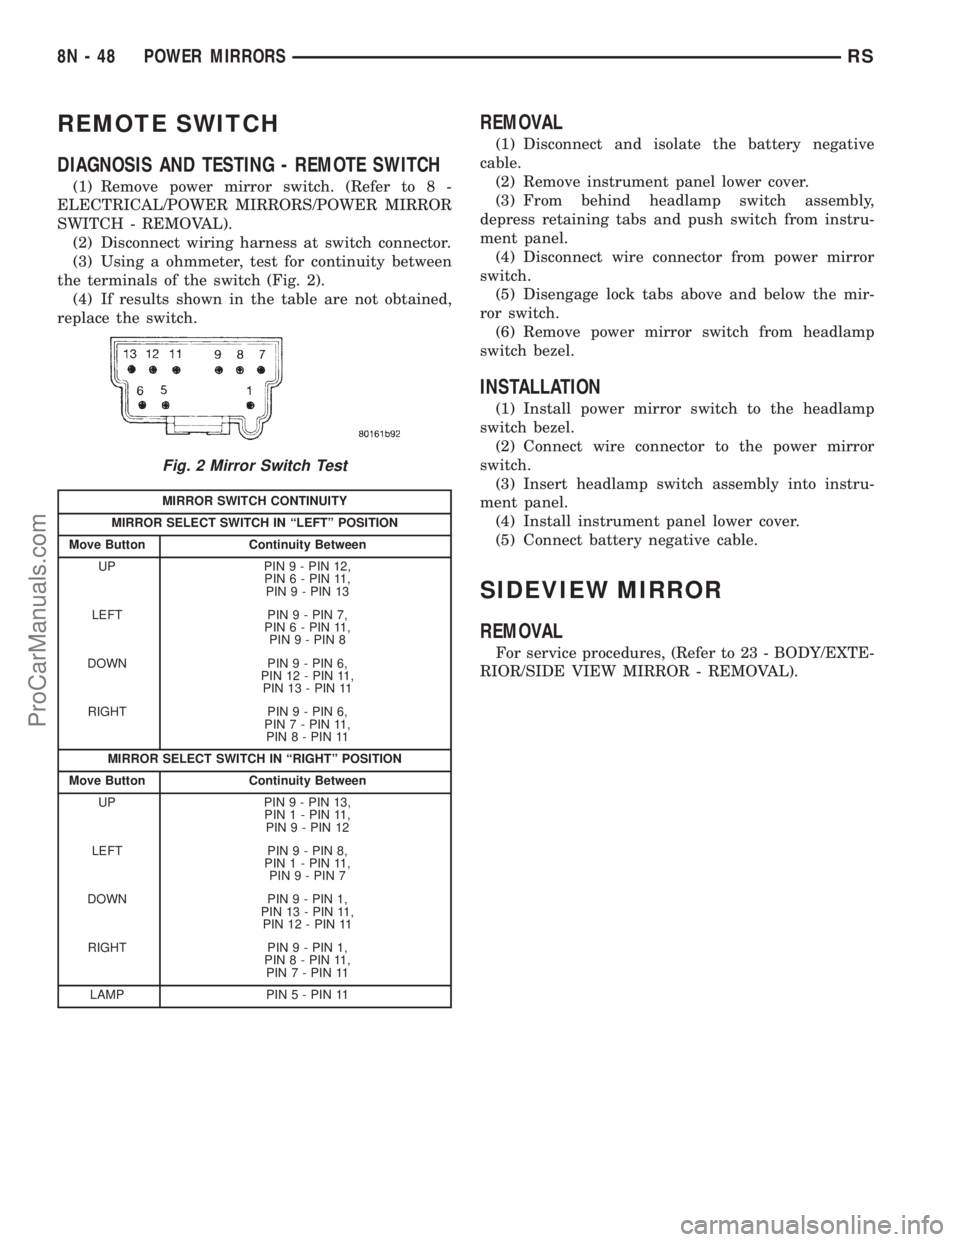
(3) Using a ohmmeter, test for continuity between
the terminals of the switch (Fig. 2).
(4) If results shown in the table are not obtained,
replace the switch.
REMOVAL
(1) Disconnect and isolate the battery negative
cable.
(2) Remove instrument panel lower cover.
(3) From behind headlamp switch assembly,
depress retaining tabs and push switch from instru-
ment panel.
(4) Disconnect wire connector from power mirror
switch.
(5) Disengage lock tabs above and below the mir-
ror switch.
(6) Remove power mirror switch from headlamp
switch bezel.
INSTALLATION
(1) Install power mirror switch to the headlamp
switch bezel.
(2) Connect wire connector to the power mirror
switch.
(3) Insert headlamp switch assembly into instru-
ment panel.
(4) Install instrument panel lower cover.
(5) Connect battery negative cable.
SIDEVIEW MIRROR
REMOVAL
For service procedures, (Refer to 23 - BODY/EXTE-
RIOR/SIDE VIEW MIRROR - REMOVAL).
Fig. 2 Mirror Switch Test
MIRROR SWITCH CONTINUITY
MIRROR SELECT SWITCH IN ªLEFTº POSITION
Move Button Continuity Between
UP PIN 9 - PIN 12,
PIN 6 - PIN 11,
PIN 9 - PIN 13
LEFT PIN 9 - PIN 7,
PIN 6 - PIN 11,
PIN 9 - PIN 8
DOWN PIN 9 - PIN 6,
PIN 12 - PIN 11,
PIN 13 - PIN 11
RIGHT PIN 9 - PIN 6,
PIN 7 - PIN 11,
PIN 8 - PIN 11
MIRROR SELECT SWITCH IN ªRIGHTº POSITION
Move Button Continuity Between
UP PIN 9 - PIN 13,
PIN 1 - PIN 11,
PIN 9 - PIN 12
LEFT PIN 9 - PIN 8,
PIN 1 - PIN 11,
PIN 9 - PIN 7
DOWN PIN 9 - PIN 1,
PIN 13 - PIN 11,
PIN 12 - PIN 11
RIGHT PIN 9 - PIN 1,
PIN 8 - PIN 11,
PIN 7 - PIN 11
LAMP PIN5-PIN11
8N - 48 POWER MIRRORSRS
ProCarManuals.com
Page 583 of 2321
(4) Remove steering wheel.
(5) Depress the two plastic locking pins to disen-
gage lock mechanism.
(6) With lock mechanism disengaged, rotate the
clock spring rotor clockwise until the rotor stops. Do
not apply excessive force.
(7) From the end of travel, rotate the rotor three
turns counterclockwise. The wires should end up at
the top. Release locking pins to engage clock spring
lock mechanism.
(8) Install steering wheel and airbag.
WARNING: DO NOT CONNECT THE BATTERY NEG-
ATIVE CABLE. REFER TO ELECTRICAL,
RESTRAINTS, DIAGNOSIS AND TESTING - AIRBAG
SYSTEM FIRST.
REMOVAL
(1) Position steering wheel and front wheels
straight ahead.
(2) Release hood latch and open hood. Disconnect
and isolate the battery negative cable.
(3) Remove driver airbag from steering wheel.
(4) Disconnect wire connectors from back of driver
airbag.
(5) Disconnect the 2±way connector from remote
radio control harness.
(6) Remove steering wheel.
(7) Remove steering column shrouds.
(8) Disconnect 2-way and 5-way connectors
between the clock spring and the instrument panel
wiring harness.
(9) Remove clock spring from housing assembly by
removing the two retaining screws retaining the
clock spring.
INSTALLATION
(1) Position the clock spring into the housing.
Install the two retaining screws to clock spring.
(2) Connect the two way and five way harness
between the clock spring and the instrument panel.
(3) Install the steering wheel. Refer to Steering,
Column, Steering Wheel, Installation.
(4) Connect the harness connector to the driver
airbag.
(5) Connect the remote radio control harness.
(6)
Install the driver airbag into the steering wheel.
(7) Install the steering column upper and lower
shrouds.
WARNING: DO NOT CONNECT THE BATTERY NEG-
ATIVE CABLE. REFER TO ELECTRICAL,
RESTRAINTS, DIAGNOSIS AND TESTING - AIRBAG
SYSTEM FIRST.
DRIVER AIRBAG
DESCRIPTION
The Driver Airbag is located in the center of the
steering wheel. The most visible part of the airbag is
the cover/horn switch.
OPERATION
The Driver Airbag cover contains the horn switch,
inflator device, and a fabric bag. The airbag cover/
horn switch is serviced separately from the inflator
and bag components.
WHEN THE FRONT AIRBAG SYSTEM IS
DEPLOYED BECAUSE OF A COLLISION, THE
FOLLOWING MUST BE REPLACED:
²COMPLETE STEERING COLUMN ASSEMBLY
²LOWER STEERING COUPLER
²STEERING WHEEL
²STEERING COLUMN CLOCK SPRING
²DRIVER AIRBAG
²PASSENGER AIRBAG
²UPPER INSTRUMENT PANEL WITH PAD
CARE OF UNDEPLOYED AIRBAGS
Airbags must be stored in their original special
container until used for service. At no time should a
source of electricity be permitted near the inflator on
the back of an airbag. When carrying or handling an
undeployed airbag, the trim side of the airbag should
be pointing away from the body to minimize possibil-
ity of injury if accidental deployment occurs. Do not
place undeployed airbag face down on a solid surface,
the airbag will propel into the air if accidental
deployment occurs.
STANDARD PROCEDURE - DEPLOYED DRIVER
AIRBAG CLEAN UP
Roll or fold the driver airbag towards the steering
wheel and then tape the bag to the steering wheel.
Use a vacuum cleaner to remove any residual pow-
der from the vehicle interior. Work from the outside
in to avoid kneeling or sitting in a contaminated
area. Vacuum the heater and A/C outlets as well. If
HVAC was in RECIRC mode at time of airbag
deployment, operate HVAC blower on low speed/heat
and vacuum powder residue expelled from the heat
outlets. Multiple vacuum cleaning may be necessary
to decontaminate the interior of the vehicle.
SERVICE OF DEPLOYED AIRBAG
If a Driver Airbag has been deployed, but not due
to a collision, replace the following:
²Driver Airbag
²Clock Spring Assembly
8O - 4 RESTRAINTSRS
CLOCK SPRING (Continued)
ProCarManuals.com
Page 584 of 2321

The components above must be replaced because
they cannot be reused. Replace any other driver air-
bag system components if damaged.
REMOVAL
DEPLOYED AIRBAG
The Driver Airbag and Driver Airbag Cover/Horn
Pad are serviced separately from each other.
(1) Clean powder residue from interior of vehicle,
(Refer to 8 - ELECTRICAL/RESTRAINTS/DRIVER
AIRBAG - STANDARD PROCEDURE ) Cleanup.
(2) Remove two screws attaching Driver Airbag to
steering wheel.
(3) Remove the driver airbag from steering wheel.
(4) Disconnect wire connectors from Airbag and
Clock Spring.
(5) Adjust the steering wheel so that the tires are
in a straight ahead position. Remove steering wheel,
(Refer to 19 - STEERING/COLUMN/STEERING
WHEEL - REMOVAL)
(6) Disconnect the 2-way and 4-way connectors
between the clock spring and the instrument panel
wiring harness.
(7) Remove upper and lower steering column
shrouds.
(8) Remove clock spring from the housing assem-
bly by depressing the 2 tabs on the clock spring.
UNDEPLOYED AIRBAG
(1) Remove screws attaching airbag/horn switch to
steering wheel.
(2) Remove Driver Airbag from steering wheel.
(3) Disconnect wire connectors from driver airbag
and clock spring.
INSTALLATION
DEPLOYED AIRBAG
(1) Perform cleanup procedure.(Refer to 8 - ELEC-
TRICAL/RESTRAINTS/DRIVER AIRBAG - STAN-
DARD PROCEDURE)
(2) Install a new steering column assembly and
lower steering column coupler. Refer to Steering, Col-
umn, Installation.
(3) Install the clock spring.
(4) Install the driver airbag and the two screws
retaining the airbag. Tighten screws to 10 N´m (90
in. lbs.)
WARNING: DO NOT CONNECT THE BATTERY NEGA-
TIVE CABLE. REFER TO ELECTRICAL, RESTRAINTS,
DIAGNOSIS AND TESTING - AIRBAG SYSTEM FIRST.
UNDEPLOYED AIRBAG
(1) Position a new airbag into the airbag cavity.(2) Install the two screws retaining the airbag.
Tighten screws to 10 N´m (90 in. lbs.)
WARNING: DO NOT CONNECT THE BATTERY NEGA-
TIVE CABLE. REFER TO ELECTRICAL, RESTRAINTS,
DIAGNOSIS AND TESTING - AIRBAG SYSTEM FIRST.
OCCUPANT RESTRAINT
CONTROLLER
DESCRIPTION
The front driver and passenger airbag system is
designed to reduce the risk of fatality or serious
injury, caused by a frontal impact of the vehicle.
The Occupant Restraint Controller (ORC) contains
the impact sensor and energy reserve capacitor. It is
mounted on a bracket, under the instrument panel,
just forward of the storage bin. The ORC monitors
the system to determine the system readiness. The
ORC contains on-board diagnostics and will light the
AIRBAG warning lamp in the message center when a
problem occurs.
OPERATION
The impact sensor provides verification of the
direction and severity of the impact. One impact sen-
sor is used. It is located inside the Occupant
Restraint Controller (ORC). The impact sensor is an
accelerometer that senses deceleration. The decelera-
tion pulses are sent to a microprocessor which con-
tains a decision algorithm. When an impact is severe
enough to require airbag protection, the ORC micro-
processor sends a signal that completes the electrical
circuit to the driver and passenger airbags. The
impact sensor is calibrated for the specific vehicle
and reacts to the severity and direction of an impact.
REMOVAL
(1)Disconnect and isolate the battery negative cable.
(2) Remove storage bin from instrument panel.
Refer to Body, Instrument Panel, Storage Bin,
Removal.
(3) Remove three bolts holding ORC to floor
bracket.
(4) Disconnect the wire connector from ORC.
(5) Remove the ORC w/bracket assembly from
vehicle.
INSTALLATION
WARNING: DO NOT INSTALL ORC IF MOUNTING
LOCATION IS DEFORMED OR DAMAGED.
RSRESTRAINTS8O-5
DRIVER AIRBAG (Continued)
ProCarManuals.com
Page 585 of 2321
CAUTION: Use correct screws when installing the
ORC.
(1) Install the ORC assembly into vehicle.
(2) Connect the wire connector to the ORC.
(3) Install three bolts holding ORC to floor
bracket. Torque bolts to 7.3 - 9.6 N´m (65 to 85 in.
lbs.)
(4) Install the storage bin onto the instrument
panel. Refer to Body, Instrument Panel, Storage Bin,
Installation.
WARNING: DO NOT CONNECT THE BATTERY NEG-
ATIVE CABLE. REFER TO ELECTRICAL,
RESTRAINTS, DIAGNOSIS AND TESTING - AIRBAG
SYSTEM FIRST.
PASSENGER AIRBAG
DESCRIPTION
WARNING: NEVER DISASSEMBLE THE PASSEN-
GER AIRBAG, THE PASSENGER AIRBAG HAS NO
SERVICEABLE PARTS.
The Passenger Airbag is located beneath the
instrument panel and pad assembly. The airbag is
mounted to the back side of the instrument panel
reinforcement.
The instrument panel top pad is the most visible
part of the passenger airbag system. Located under
the instrument panel top pad are the airbag door, the
passenger airbag cushion and the airbag cushion
supporting components.
The passenger airbag includes a magnesium hous-
ing within which the cushion and inflator are
mounted and sealed.
Following a passenger airbag deployment, the pas-
senger airbag and the instrument panel must be
replaced. The passenger airbag cannot be repaired,
and must be replaced if deployed or damaged in any
way.
OPERATION
The passenger airbag is equipped with two infla-
tors, each with three levels of pressure output. The
inflators seal the hole in the airbag cushion so it can
discharge the gas it produces directly into the cush-
ion when supplied with the proper electrical signal.
Following an airbag deployment, the airbag cushion
quickly deflates by venting this gas through the
cushion material towards the instrument panel.
The passenger airbag is secured with screws to the
instrument panel beneath the instrument panel top
pad and above the glove box opening. The instrumentpanel top pad above the glove box opening conceals
the airbag door and a predetermined hinge line
beneath its decorative cover. Upon airbag deploy-
ment, the top pad will bend at the hinge line and the
door will fold back out of the way onto the top of the
instrument panel.
WHEN THE FRONT AIRBAG SYSTEM IS
DEPLOYED BECAUSE OF A COLLISION, THE
FOLLOWING MUST BE REPLACED:
²COMPLETE STEERING COLUMN ASSEMBLY
²LOWER STEERING COUPLER
²STEERING WHEEL
²STEERING COLUMN CLOCK SPRING
²DRIVER AIRBAG COVER/HORN SWITCH
²DRIVER AIRBAG
²PASSENGER AIRBAG
²UPPER INSTRUMENT PANEL WITH PAD
CARE OF UNDEPLOYED AIRBAGS
Airbags must be stored in their original special
container until used for service. At no time should a
source of electricity be permitted near the inflator on
the back of an airbag. When carrying or handling an
undeployed airbag, the trim side of the airbag should
be pointing away from the body to minimize possibil-
ity of injury if accidental deployment occurs. Do not
place undeployed airbag face down on a solid surface,
the airbag will propel into the air if accidental
deployment occurs.
STANDARD PROCEDURE - DEPLOYED
PASSENGER AIRBAG CLEAN UP
Roll or fold the passenger airbag towards the
instrument panel surface and close the door over the
folded bag. Then tape the door shut.
Use a vacuum cleaner to remove any residual pow-
der from the vehicle interior. Work from the outside
in to avoid kneeling or sitting in a contaminated
area. Vacuum the heater and A/C outlets as well. If
HVAC was in RECIRC mode at time of airbag
deployment, operate HVAC blower on low speed/heat
and vacuum powder residue expelled from the heat
outlets. Multiple vacuum cleaning may be necessary
to decontaminate the interior of the vehicle.
SERVICE OF DEPLOYED AIRBAG
If a Passenger Airbag has been deployed, but not
due to a collision, replace the following:
²Passenger Airbag
²Upper instrument panel with pad
The component above must be replaced because
they cannot be reused. Inspect the heat duct near the
passenger airbag for any damage replace as neces-
sary. Replace any other passenger airbag system
components if damaged.
8O - 6 RESTRAINTSRS
OCCUPANT RESTRAINT CONTROLLER (Continued)
ProCarManuals.com