2001 DODGE RAM radiator
[x] Cancel search: radiatorPage 405 of 2889
INSTALLATION
(1) Clean gasket mating surfaces.
(2) Using a new gasket, install water pump to
engine as follows: Guide water pump nipple into
bypass hose as pump is being installed. Install water
pump bolts (Fig. 52). Tighten water pump mounting
bolts to 40 N´m (30 ft. lbs.) torque.
(3) Position bypass hose clamp to bypass hose.
(4) Spin water pump to be sure that pump impel-
ler does not rub against timing chain case/cover.
(5) Install a new o-ring to the heater hose coolant
return tube (Fig. 51). Coat the new o-ring with anti-
freeze before installation.
(6) Install coolant return tube and its mounting
bolt to engine (Fig. 51). Be sure the slot in tube
bracket is bottomed to mounting bolt. This will prop-
erly position return tube.
(7) Connect radiator lower hose to water pump.
(8) Connect heater hose and hose clamp to coolant
return tube.
(9) Install drive belt (Refer to 7 - COOLING/AC-
CESSORY DRIVE/DRIVE BELTS - INSTALLATION)
(Fig. 50).
(10) Position fan shroud and fan blade/viscous fan
drive assembly to vehicle as a complete unit.
(11) Install fan shroud.
(12) Install fan blade/viscous fan drive assembly to
water pump shaft.
(13) Fill cooling system (Refer to 7 - COOLING -
STANDARD PROCEDURE).
(14) Connect negative battery cable.
(15) Start and warm the engine. Check for leaks.
WATER PUMP - 8.0L
DIAGNOSIS AND TESTINGÐWATER PUMP
A quick test to determine if pump is working is to
check if heater warms properly. A defective water
pump will not be able to circulate heated coolant
through the long heater hose to the heater core.
REMOVAL
NOTE: The water pump on all models can be
removed without discharging the air conditioning
system (if equipped).
The water pump on all gas powered engines is
bolted directly to the engine timing chain case/
cover.
On the 8.0L V-10 engine, a rubber o-ring (instead of
a gasket) is used as a seal between the water pump
and timing chain case/cover.If water pump is replaced because of bearing/shaft
damage or leaking shaft seal, the mechanical cooling
fan assembly should also be inspected. Inspect for
fatigue cracks, loose blades or loose rivets that could
have resulted from excessive vibration. Replace fan if
any of these conditions are found. Also check condi-
tion of the thermal viscous fan drive (Refer to 7 -
COOLING/ENGINE/FAN DRIVE VISCOUS
CLUTCH - DIAGNOSIS AND TESTING).
(1) Disconnect negative battery cable from battery.
(2) Drain cooling system (Refer to 7 - COOLING -
STANDARD PROCEDURE).
Do not waste reusable coolant. If solution is clean,
drain coolant into a clean container for reuse.
(3) Remove windshield washer reservoir tank from
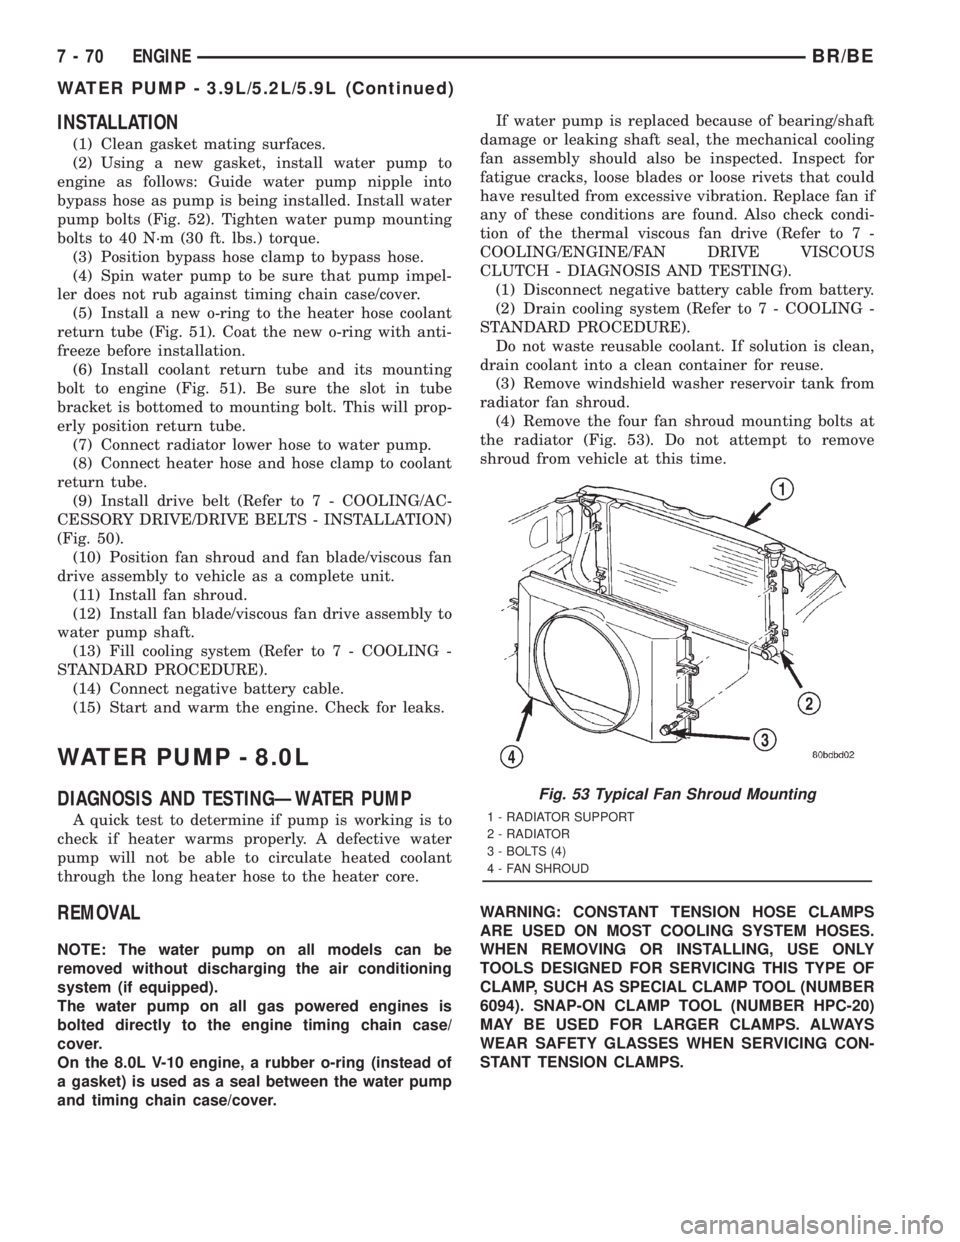
radiator fan shroud.
(4) Remove the four fan shroud mounting bolts at
the radiator (Fig. 53). Do not attempt to remove
shroud from vehicle at this time.
WARNING: CONSTANT TENSION HOSE CLAMPS
ARE USED ON MOST COOLING SYSTEM HOSES.
WHEN REMOVING OR INSTALLING, USE ONLY
TOOLS DESIGNED FOR SERVICING THIS TYPE OF
CLAMP, SUCH AS SPECIAL CLAMP TOOL (NUMBER
6094). SNAP-ON CLAMP TOOL (NUMBER HPC-20)
MAY BE USED FOR LARGER CLAMPS. ALWAYS
WEAR SAFETY GLASSES WHEN SERVICING CON-
STANT TENSION CLAMPS.
Fig. 53 Typical Fan Shroud Mounting
1 - RADIATOR SUPPORT
2 - RADIATOR
3 - BOLTS (4)
4 - FAN SHROUD
7 - 70 ENGINEBR/BE
WATER PUMP - 3.9L/5.2L/5.9L (Continued)
Page 406 of 2889
CAUTION: A number or letter is stamped into the
tongue of constant tension clamps. If replacement
is necessary, use only an original equipment clamp
with a matching number or letter.
(5) Remove radiator upper hose at radiator.
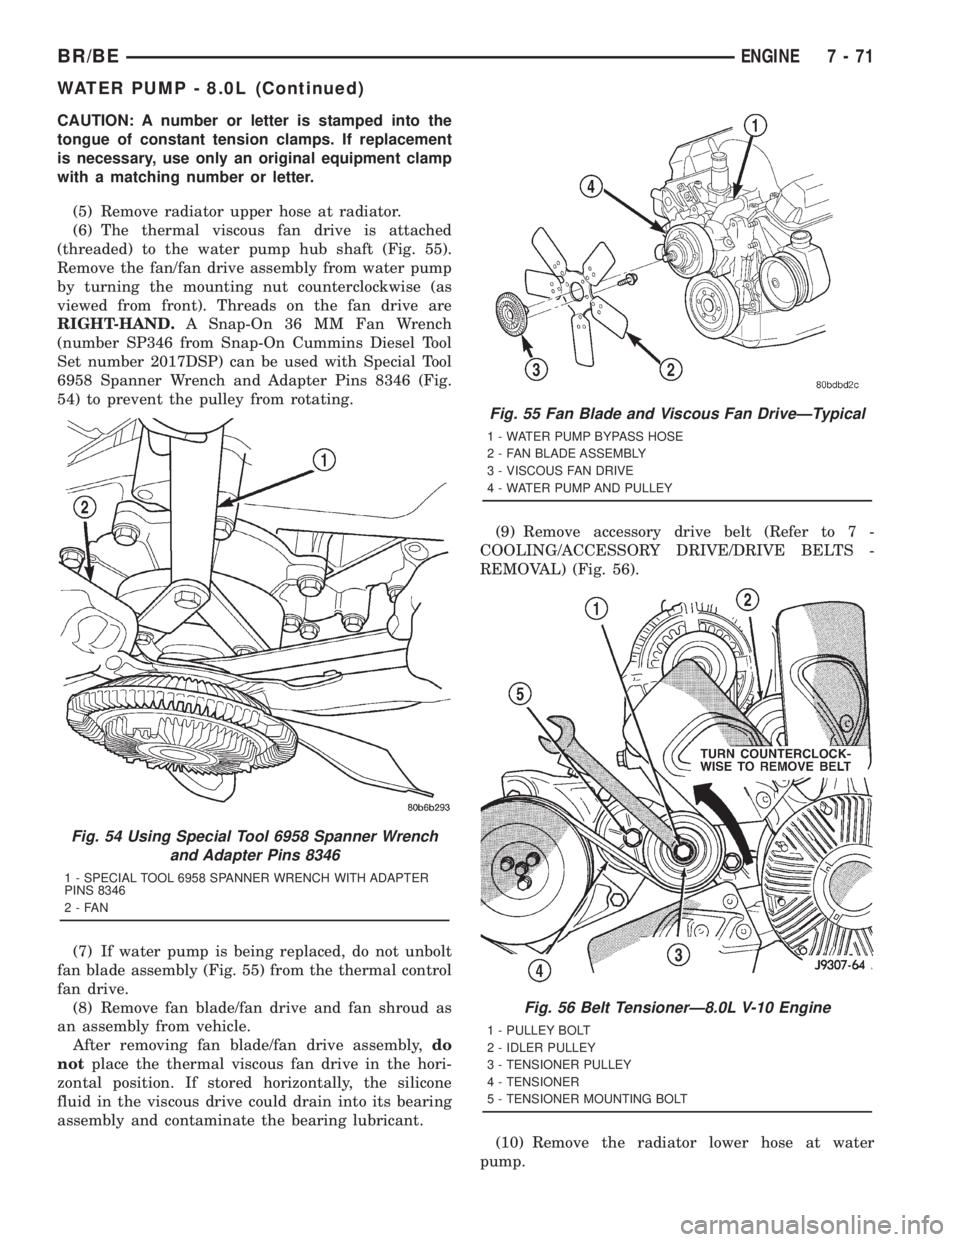
(6) The thermal viscous fan drive is attached
(threaded) to the water pump hub shaft (Fig. 55).
Remove the fan/fan drive assembly from water pump
by turning the mounting nut counterclockwise (as
viewed from front). Threads on the fan drive are
RIGHT-HAND.A Snap-On 36 MM Fan Wrench
(number SP346 from Snap-On Cummins Diesel Tool
Set number 2017DSP) can be used with Special Tool
6958 Spanner Wrench and Adapter Pins 8346 (Fig.
54) to prevent the pulley from rotating.
(7) If water pump is being replaced, do not unbolt
fan blade assembly (Fig. 55) from the thermal control
fan drive.
(8) Remove fan blade/fan drive and fan shroud as
an assembly from vehicle.
After removing fan blade/fan drive assembly,do
notplace the thermal viscous fan drive in the hori-
zontal position. If stored horizontally, the silicone
fluid in the viscous drive could drain into its bearing
assembly and contaminate the bearing lubricant.(9) Remove accessory drive belt (Refer to 7 -
COOLING/ACCESSORY DRIVE/DRIVE BELTS -
REMOVAL) (Fig. 56).
(10) Remove the radiator lower hose at water
pump.
Fig. 54 Using Special Tool 6958 Spanner Wrench
and Adapter Pins 8346
1 - SPECIAL TOOL 6958 SPANNER WRENCH WITH ADAPTER
PINS 8346
2-FAN
Fig. 55 Fan Blade and Viscous Fan DriveÐTypical
1 - WATER PUMP BYPASS HOSE
2 - FAN BLADE ASSEMBLY
3 - VISCOUS FAN DRIVE
4 - WATER PUMP AND PULLEY
Fig. 56 Belt TensionerÐ8.0L V-10 Engine
1 - PULLEY BOLT
2 - IDLER PULLEY
3 - TENSIONER PULLEY
4 - TENSIONER
5 - TENSIONER MOUNTING BOLT
BR/BEENGINE 7 - 71
WATER PUMP - 8.0L (Continued)
Page 407 of 2889
(11) Remove heater hose at water pump fitting.
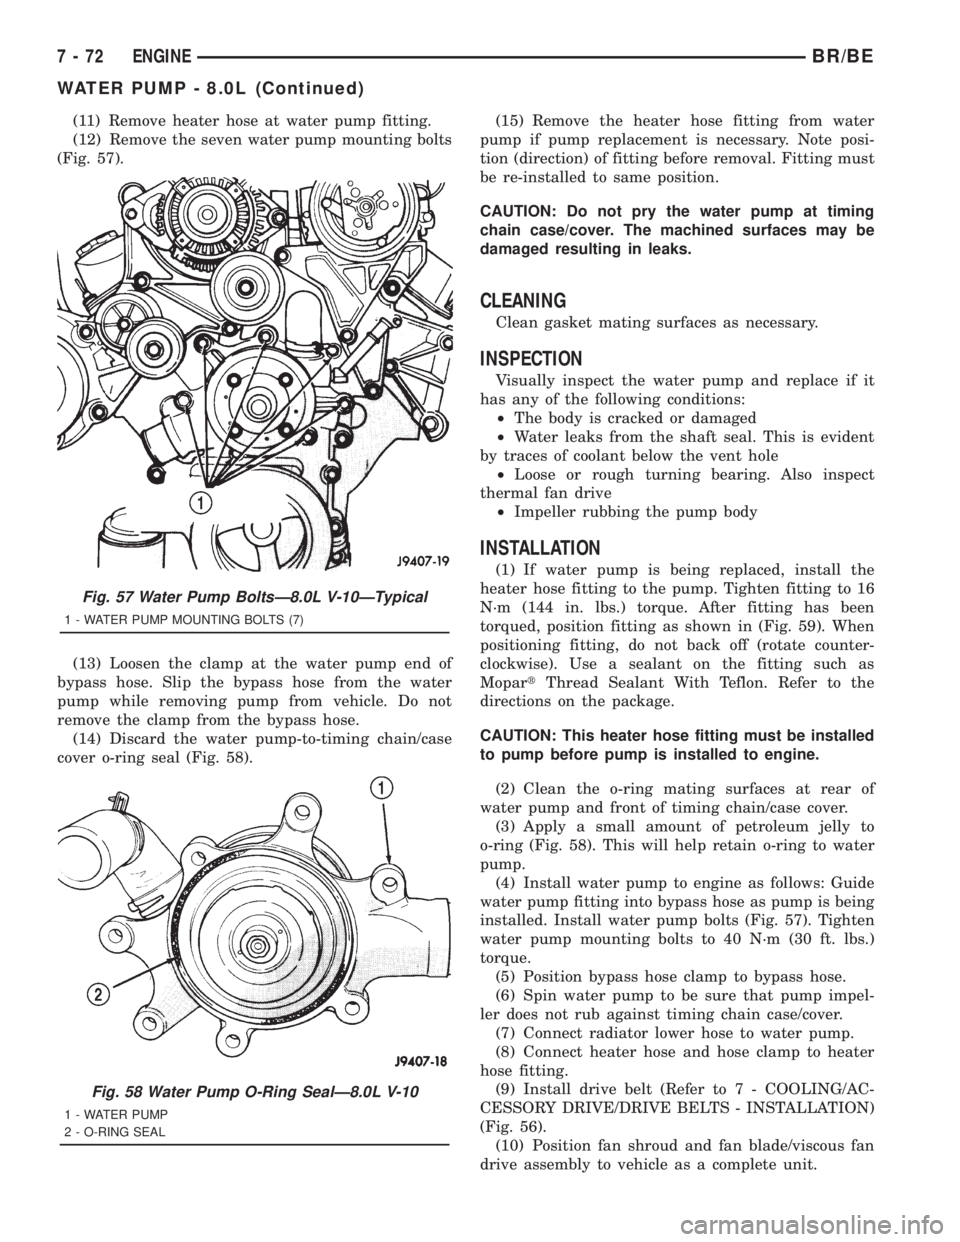
(12) Remove the seven water pump mounting bolts
(Fig. 57).
(13) Loosen the clamp at the water pump end of
bypass hose. Slip the bypass hose from the water
pump while removing pump from vehicle. Do not
remove the clamp from the bypass hose.
(14) Discard the water pump-to-timing chain/case
cover o-ring seal (Fig. 58).(15) Remove the heater hose fitting from water
pump if pump replacement is necessary. Note posi-
tion (direction) of fitting before removal. Fitting must
be re-installed to same position.
CAUTION: Do not pry the water pump at timing
chain case/cover. The machined surfaces may be
damaged resulting in leaks.
CLEANING
Clean gasket mating surfaces as necessary.
INSPECTION
Visually inspect the water pump and replace if it
has any of the following conditions:
²The body is cracked or damaged
²Water leaks from the shaft seal. This is evident
by traces of coolant below the vent hole
²Loose or rough turning bearing. Also inspect
thermal fan drive
²Impeller rubbing the pump body
INSTALLATION
(1) If water pump is being replaced, install the
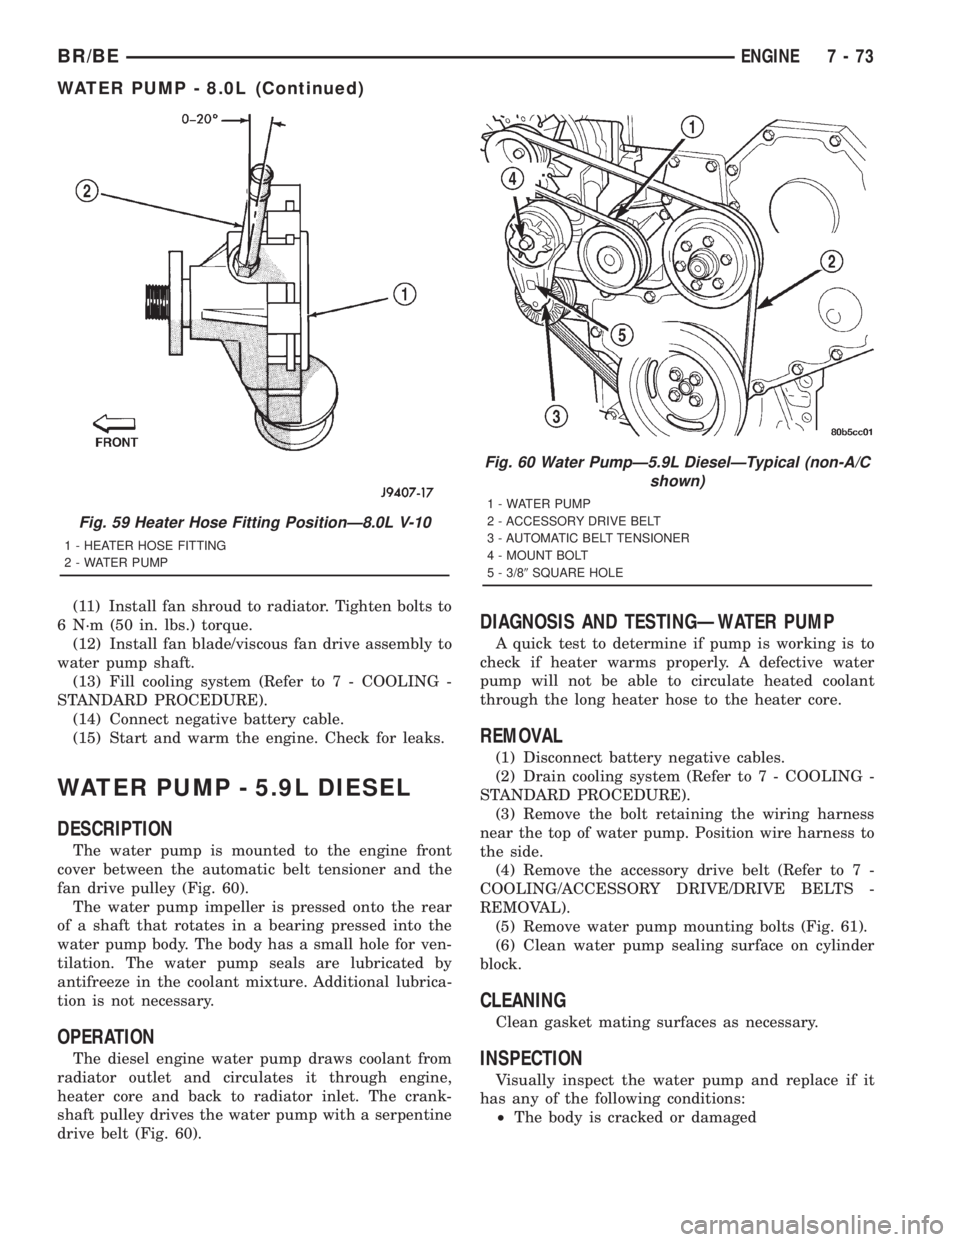
heater hose fitting to the pump. Tighten fitting to 16
N´m (144 in. lbs.) torque. After fitting has been
torqued, position fitting as shown in (Fig. 59). When
positioning fitting, do not back off (rotate counter-
clockwise). Use a sealant on the fitting such as
MopartThread Sealant With Teflon. Refer to the
directions on the package.
CAUTION: This heater hose fitting must be installed
to pump before pump is installed to engine.
(2) Clean the o-ring mating surfaces at rear of
water pump and front of timing chain/case cover.
(3) Apply a small amount of petroleum jelly to
o-ring (Fig. 58). This will help retain o-ring to water
pump.
(4) Install water pump to engine as follows: Guide
water pump fitting into bypass hose as pump is being
installed. Install water pump bolts (Fig. 57). Tighten
water pump mounting bolts to 40 N´m (30 ft. lbs.)
torque.
(5) Position bypass hose clamp to bypass hose.
(6) Spin water pump to be sure that pump impel-
ler does not rub against timing chain case/cover.
(7) Connect radiator lower hose to water pump.
(8) Connect heater hose and hose clamp to heater
hose fitting.
(9) Install drive belt (Refer to 7 - COOLING/AC-
CESSORY DRIVE/DRIVE BELTS - INSTALLATION)
(Fig. 56).
(10) Position fan shroud and fan blade/viscous fan
drive assembly to vehicle as a complete unit.
Fig. 57 Water Pump BoltsÐ8.0L V-10ÐTypical
1 - WATER PUMP MOUNTING BOLTS (7)
Fig. 58 Water Pump O-Ring SealÐ8.0L V-10
1 - WATER PUMP
2 - O-RING SEAL
7 - 72 ENGINEBR/BE
WATER PUMP - 8.0L (Continued)
Page 408 of 2889
(11) Install fan shroud to radiator. Tighten bolts to
6 N´m (50 in. lbs.) torque.
(12) Install fan blade/viscous fan drive assembly to
water pump shaft.
(13) Fill cooling system (Refer to 7 - COOLING -
STANDARD PROCEDURE).
(14) Connect negative battery cable.
(15) Start and warm the engine. Check for leaks.
WATER PUMP - 5.9L DIESEL
DESCRIPTION
The water pump is mounted to the engine front
cover between the automatic belt tensioner and the
fan drive pulley (Fig. 60).
The water pump impeller is pressed onto the rear
of a shaft that rotates in a bearing pressed into the
water pump body. The body has a small hole for ven-
tilation. The water pump seals are lubricated by
antifreeze in the coolant mixture. Additional lubrica-
tion is not necessary.
OPERATION
The diesel engine water pump draws coolant from
radiator outlet and circulates it through engine,
heater core and back to radiator inlet. The crank-
shaft pulley drives the water pump with a serpentine
drive belt (Fig. 60).
DIAGNOSIS AND TESTINGÐWATER PUMP
A quick test to determine if pump is working is to
check if heater warms properly. A defective water
pump will not be able to circulate heated coolant
through the long heater hose to the heater core.
REMOVAL
(1) Disconnect battery negative cables.
(2) Drain cooling system (Refer to 7 - COOLING -
STANDARD PROCEDURE).
(3) Remove the bolt retaining the wiring harness
near the top of water pump. Position wire harness to
the side.
(4) Remove the accessory drive belt (Refer to 7 -
COOLING/ACCESSORY DRIVE/DRIVE BELTS -
REMOVAL).
(5) Remove water pump mounting bolts (Fig. 61).
(6) Clean water pump sealing surface on cylinder
block.
CLEANING
Clean gasket mating surfaces as necessary.
INSPECTION
Visually inspect the water pump and replace if it
has any of the following conditions:
²The body is cracked or damaged
Fig. 59 Heater Hose Fitting PositionÐ8.0L V-10
1 - HEATER HOSE FITTING
2 - WATER PUMP
Fig. 60 Water PumpÐ5.9L DieselÐTypical (non-A/C
shown)
1 - WATER PUMP
2 - ACCESSORY DRIVE BELT
3 - AUTOMATIC BELT TENSIONER
4 - MOUNT BOLT
5 - 3/89SQUARE HOLE
BR/BEENGINE 7 - 73
WATER PUMP - 8.0L (Continued)
Page 410 of 2889
(2) Do not waste reusable coolant. If the solution is
clean, drain the coolant into a clean container for
reuse.
(3) Remove upper radiator hose clamp at radiator.
A special clamp tool must be used to remove the con-
stant tension clamps. Remove hose at radiator.
(4) Disconnect throttle cable from clip at radiator
fan shroud.
(5) Unplug wiring harness from A/C compressor.
(6) Remove the air cleaner assembly.
(7) Remove accessory drive belt (Refer to 7 -
COOLING/ACCESSORY DRIVE/DRIVE BELTS -
REMOVAL).
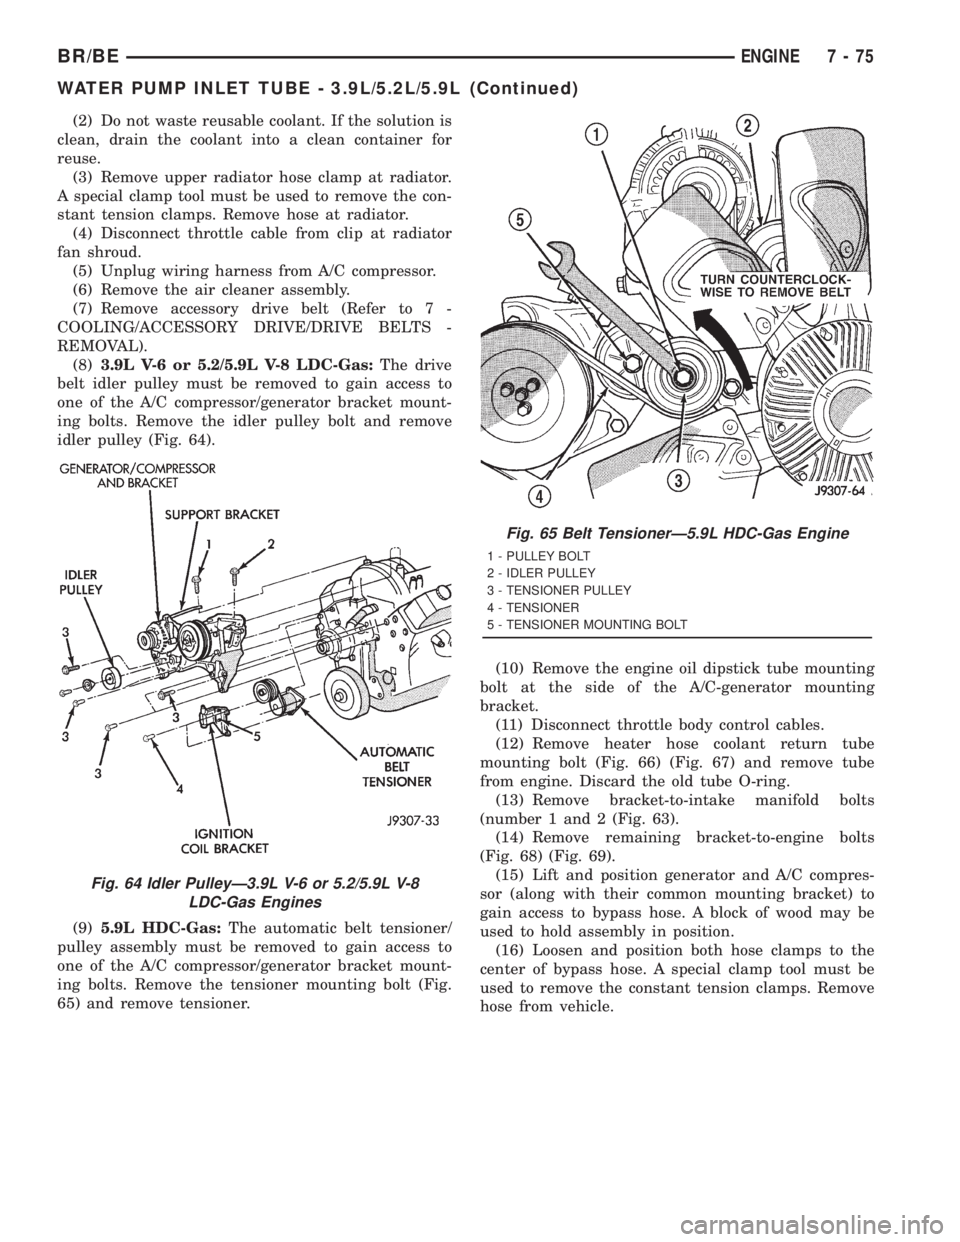
(8)3.9L V-6 or 5.2/5.9L V-8 LDC-Gas:The drive
belt idler pulley must be removed to gain access to
one of the A/C compressor/generator bracket mount-
ing bolts. Remove the idler pulley bolt and remove
idler pulley (Fig. 64).
(9)5.9L HDC-Gas:The automatic belt tensioner/
pulley assembly must be removed to gain access to
one of the A/C compressor/generator bracket mount-
ing bolts. Remove the tensioner mounting bolt (Fig.
65) and remove tensioner.(10) Remove the engine oil dipstick tube mounting
bolt at the side of the A/C-generator mounting
bracket.
(11) Disconnect throttle body control cables.
(12) Remove heater hose coolant return tube
mounting bolt (Fig. 66) (Fig. 67) and remove tube
from engine. Discard the old tube O-ring.
(13) Remove bracket-to-intake manifold bolts
(number 1 and 2 (Fig. 63).
(14) Remove remaining bracket-to-engine bolts
(Fig. 68) (Fig. 69).
(15) Lift and position generator and A/C compres-
sor (along with their common mounting bracket) to
gain access to bypass hose. A block of wood may be
used to hold assembly in position.
(16) Loosen and position both hose clamps to the
center of bypass hose. A special clamp tool must be
used to remove the constant tension clamps. Remove
hose from vehicle.
Fig. 64 Idler PulleyÐ3.9L V-6 or 5.2/5.9L V-8
LDC-Gas Engines
Fig. 65 Belt TensionerÐ5.9L HDC-Gas Engine
1 - PULLEY BOLT
2 - IDLER PULLEY
3 - TENSIONER PULLEY
4 - TENSIONER
5 - TENSIONER MOUNTING BOLT
BR/BEENGINE 7 - 75
WATER PUMP INLET TUBE - 3.9L/5.2L/5.9L (Continued)
Page 413 of 2889
CAUTION: When installing the serpentine accessory
drive belt, the belt must be routed correctly. If not,
the engine may overheat due to the water pump
rotating in the wrong direction (Refer to 7 - COOL-
ING/ACCESSORY DRIVE/DRIVE BELTS - INSTALLA-
TION). The correct belt with the correct length must
be used.(12) Install air cleaner assembly.
(13) Install upper radiator hose to radiator.
(14) Connect throttle cable to clip at radiator fan
shroud.
(15) Connect wiring harness to A/C compressor.
(16) Fill cooling system (Refer to 7 - COOLING -
STANDARD PROCEDURE).
(17) Start and warm the engine. Check for leaks.
INSTALLATIONÐWATER PUMP BYPASS HOSE
WITHOUT AIR CONDITIONING
(1) Position bypass hose clamps to the center of
hose.
(2) Install bypass hose to engine.
(3) Secure both hose clamps.
(4) Fill cooling system (Refer to 7 - COOLING -
STANDARD PROCEDURE).
(5) Start and warm the engine. Check for leaks.
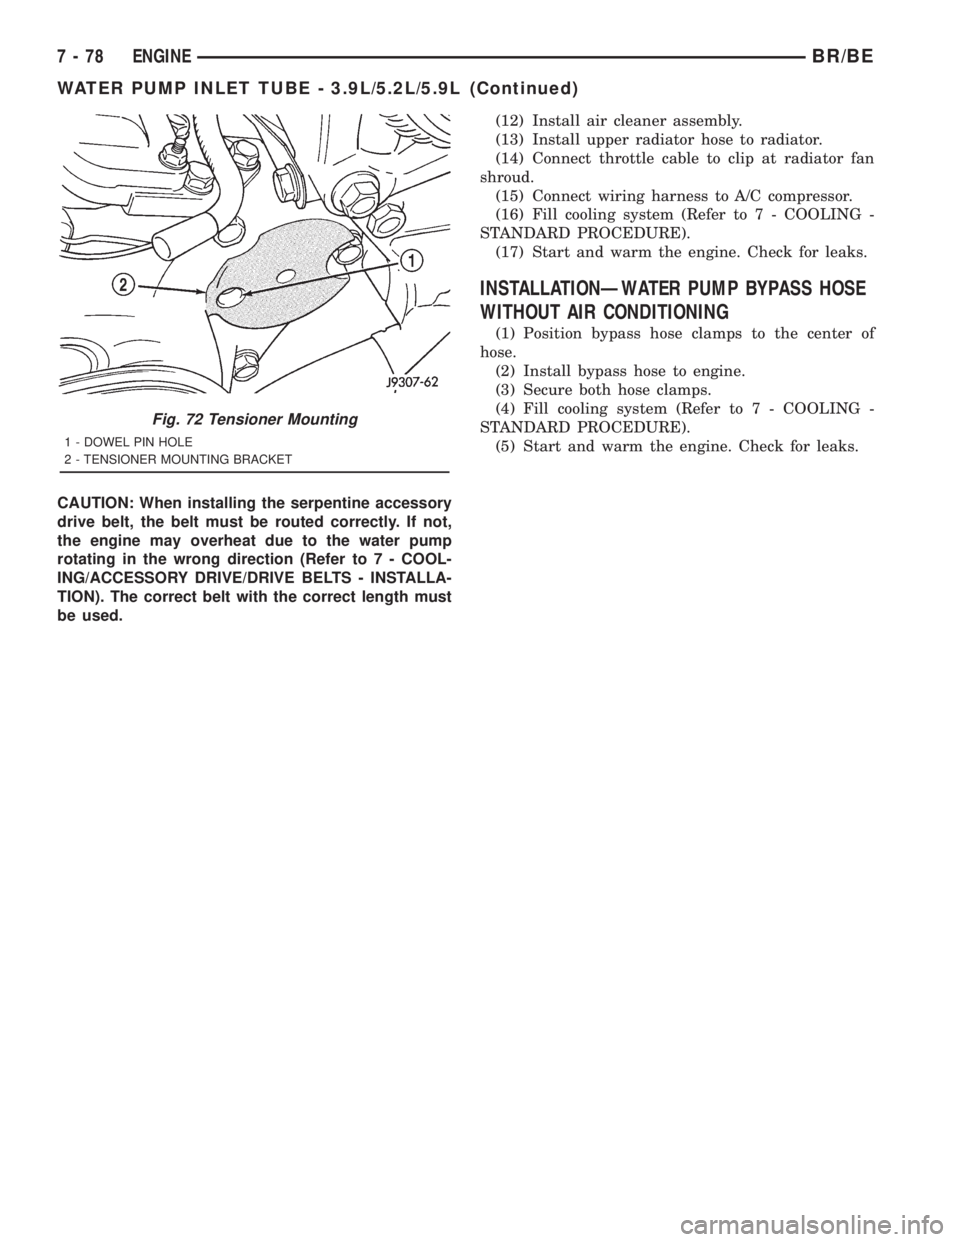
Fig. 72 Tensioner Mounting
1 - DOWEL PIN HOLE
2 - TENSIONER MOUNTING BRACKET
7 - 78 ENGINEBR/BE
WATER PUMP INLET TUBE - 3.9L/5.2L/5.9L (Continued)
Page 414 of 2889
TRANSMISSION
TABLE OF CONTENTS
page page
TRANS COOLER - 3.9L/5.2L/5.9L
DESCRIPTION...........................79
OPERATION.............................79
STANDARD PROCEDURE..................79
FLUSHING COOLERS AND TUBES - WITH
RADIATOR IN-TANK TRANSMISSION OIL
COOLER..............................79
FLUSHING COOLER AND TUBES -
WITHOUT RADIATOR IN-TANK
TRANSMISSION OIL COOLER.............80
REMOVAL..............................81
DISASSEMBLY...........................81
ASSEMBLY.............................82
INSTALLATION...........................82
TRANS COOLER - 8.0L
DESCRIPTION...........................82
OPERATION.............................82
STANDARD PROCEDURE..................83
FLUSHING COOLERS AND TUBES - WITH
RADIATOR IN-TANK TRANSMISSION OIL
COOLER..............................83FLUSHING COOLER AND TUBES -
WITHOUT RADIATOR IN-TANK
TRANSMISSION OIL COOLER.............83
REMOVAL..............................84
INSTALLATION...........................85
TRANS COOLER - 5.9L DIESEL
DESCRIPTION...........................85
OPERATION.............................85
STANDARD PROCEDURE..................85
FLUSHING COOLERS AND TUBES - WITH
RADIATOR IN-TANK TRANSMISSION OIL
COOLER..............................85
FLUSHING COOLER AND TUBES -
WITHOUT RADIATOR IN-TANK
TRANSMISSION OIL COOLER.............86
REMOVAL..............................87
INSTALLATION...........................88
TRANS COOLER - 3.9L/5.2L/
5.9L
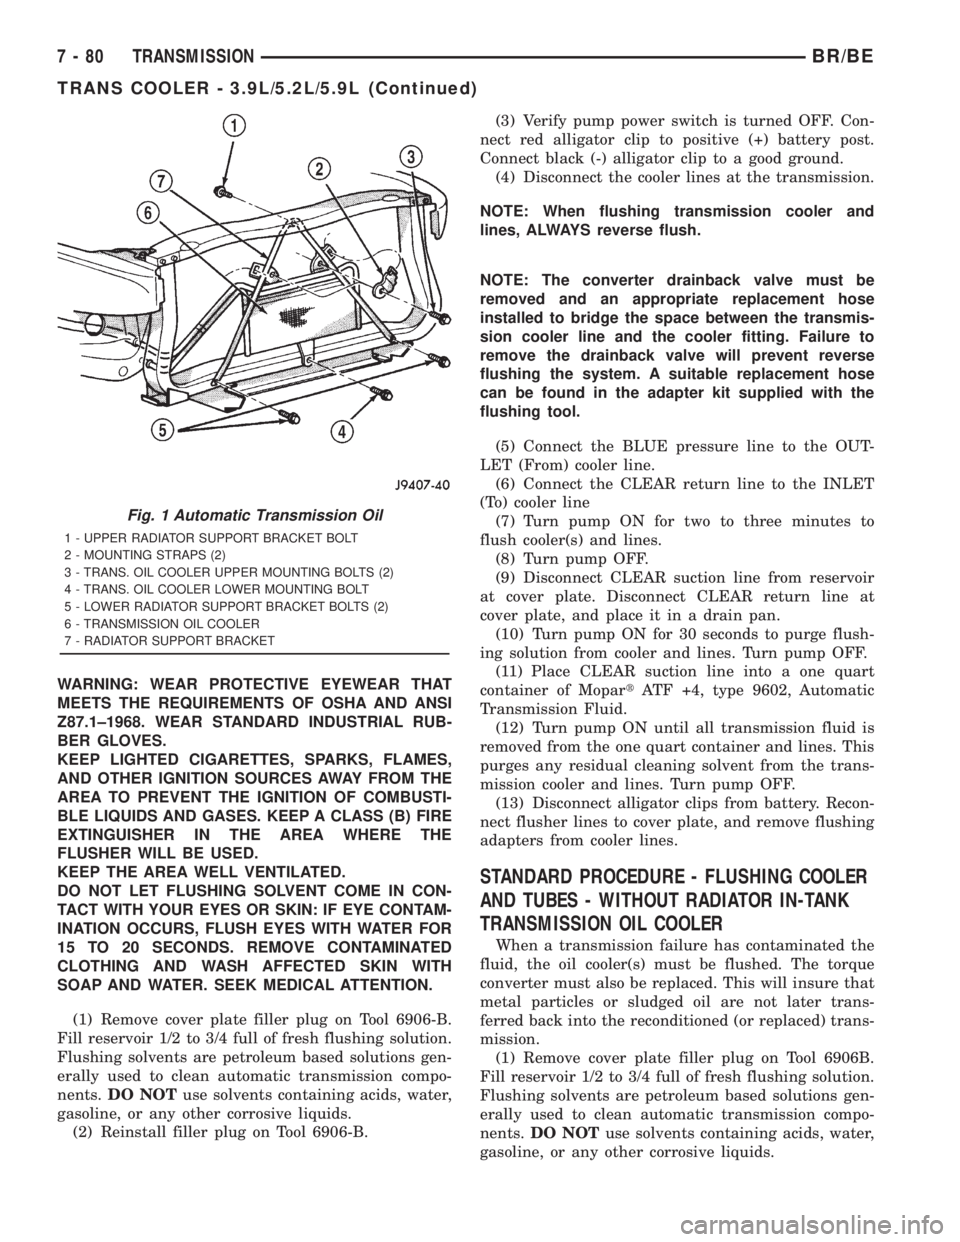
DESCRIPTION
An air-to-oil transmission oil cooler is standard on
all engine packages. the cooler is located between the
radiator and air conditioning condenser (Fig. 1).
OPERATION
The transmission oil is routed through the cooler
where heat is removed from the transmission oil
before returning to the transmission. The cooler has
an internal thermostat that controls fluid flow
through the cooler. When the transmission fluid is
cold ( less than operating temperature) the fluid is
routed through the cooler bypass. when the transmis-
sion fluid reaches operating temperatures and above,the thermostat closes off the bypass allowing fluid
flow through the cooler. The thermostat MUST be
removed from the cooler before the cooler can be
flushed. The thermostat is serviceable.
STANDARD PROCEDURE - FLUSHING
COOLERS AND TUBES - WITH RADIATOR
IN-TANK TRANSMISSION OIL COOLER
When a transmission failure has contaminated the
fluid, the oil cooler(s) must be flushed. The torque
converter must also be replaced. This will insure that
metal particles or sludged oil are not later trans-
ferred back into the reconditioned (or replaced) trans-
mission.
The only recommended procedure for flushing cool-
ers and lines is to use Tool 6906-B Cooler Flusher.
BR/BETRANSMISSION 7 - 79
Page 415 of 2889
WARNING: WEAR PROTECTIVE EYEWEAR THAT
MEETS THE REQUIREMENTS OF OSHA AND ANSI
Z87.1±1968. WEAR STANDARD INDUSTRIAL RUB-
BER GLOVES.
KEEP LIGHTED CIGARETTES, SPARKS, FLAMES,
AND OTHER IGNITION SOURCES AWAY FROM THE
AREA TO PREVENT THE IGNITION OF COMBUSTI-
BLE LIQUIDS AND GASES. KEEP A CLASS (B) FIRE
EXTINGUISHER IN THE AREA WHERE THE
FLUSHER WILL BE USED.
KEEP THE AREA WELL VENTILATED.
DO NOT LET FLUSHING SOLVENT COME IN CON-
TACT WITH YOUR EYES OR SKIN: IF EYE CONTAM-
INATION OCCURS, FLUSH EYES WITH WATER FOR
15 TO 20 SECONDS. REMOVE CONTAMINATED
CLOTHING AND WASH AFFECTED SKIN WITH
SOAP AND WATER. SEEK MEDICAL ATTENTION.
(1) Remove cover plate filler plug on Tool 6906-B.
Fill reservoir 1/2 to 3/4 full of fresh flushing solution.
Flushing solvents are petroleum based solutions gen-
erally used to clean automatic transmission compo-
nents.DO NOTuse solvents containing acids, water,
gasoline, or any other corrosive liquids.
(2) Reinstall filler plug on Tool 6906-B.(3) Verify pump power switch is turned OFF. Con-
nect red alligator clip to positive (+) battery post.
Connect black (-) alligator clip to a good ground.
(4) Disconnect the cooler lines at the transmission.
NOTE: When flushing transmission cooler and
lines, ALWAYS reverse flush.
NOTE: The converter drainback valve must be
removed and an appropriate replacement hose
installed to bridge the space between the transmis-
sion cooler line and the cooler fitting. Failure to
remove the drainback valve will prevent reverse
flushing the system. A suitable replacement hose
can be found in the adapter kit supplied with the
flushing tool.
(5) Connect the BLUE pressure line to the OUT-
LET (From) cooler line.
(6) Connect the CLEAR return line to the INLET
(To) cooler line
(7) Turn pump ON for two to three minutes to
flush cooler(s) and lines.
(8) Turn pump OFF.
(9) Disconnect CLEAR suction line from reservoir
at cover plate. Disconnect CLEAR return line at
cover plate, and place it in a drain pan.
(10) Turn pump ON for 30 seconds to purge flush-
ing solution from cooler and lines. Turn pump OFF.
(11) Place CLEAR suction line into a one quart
container of MopartATF +4, type 9602, Automatic
Transmission Fluid.
(12) Turn pump ON until all transmission fluid is
removed from the one quart container and lines. This
purges any residual cleaning solvent from the trans-
mission cooler and lines. Turn pump OFF.
(13) Disconnect alligator clips from battery. Recon-
nect flusher lines to cover plate, and remove flushing
adapters from cooler lines.
STANDARD PROCEDURE - FLUSHING COOLER
AND TUBES - WITHOUT RADIATOR IN-TANK
TRANSMISSION OIL COOLER
When a transmission failure has contaminated the
fluid, the oil cooler(s) must be flushed. The torque
converter must also be replaced. This will insure that
metal particles or sludged oil are not later trans-
ferred back into the reconditioned (or replaced) trans-
mission.
(1) Remove cover plate filler plug on Tool 6906B.
Fill reservoir 1/2 to 3/4 full of fresh flushing solution.
Flushing solvents are petroleum based solutions gen-
erally used to clean automatic transmission compo-
nents.DO NOTuse solvents containing acids, water,
gasoline, or any other corrosive liquids.
Fig. 1 Automatic Transmission Oil
1 - UPPER RADIATOR SUPPORT BRACKET BOLT
2 - MOUNTING STRAPS (2)
3 - TRANS. OIL COOLER UPPER MOUNTING BOLTS (2)
4 - TRANS. OIL COOLER LOWER MOUNTING BOLT
5 - LOWER RADIATOR SUPPORT BRACKET BOLTS (2)
6 - TRANSMISSION OIL COOLER
7 - RADIATOR SUPPORT BRACKET
7 - 80 TRANSMISSIONBR/BE
TRANS COOLER - 3.9L/5.2L/5.9L (Continued)