2001 DODGE RAM wheel
[x] Cancel search: wheelPage 448 of 2889
WARNING: ON VEHICLES EQUIPPED WITH AIR-
BAGS, DISABLE THE AIRBAG SYSTEM BEFORE
ATTEMPTING ANY STEERING WHEEL, STEERING
COLUMN, OR INSTRUMENT PANEL COMPONENT
DIAGNOSIS OR SERVICE. DISCONNECT AND ISO-
LATE THE BATTERY NEGATIVE (GROUND) CABLE,
THEN WAIT TWO MINUTES FOR THE AIRBAG SYS-TEM CAPACITOR TO DISCHARGE BEFORE PER-
FORMING FURTHER DIAGNOSIS OR SERVICE. THIS
IS THE ONLY SURE WAY TO DISABLE THE AIRBAG
SYSTEM. FAILURE TO TAKE THE PROPER PRE-
CAUTIONS COULD RESULT IN ACCIDENTAL AIR-
BAG DEPLOYMENT AND POSSIBLE PERSONAL
INJURY.
CHIME WARNING SYSTEM DIAGNOSIS
CONDITION POSSIBLE CAUSES CORRECTION
SEAT BELT WARNING
CHIME WITH SEAT BELT
BUCKLED1. Seat belt switch sense
circuit shorted.1. Disconnect the body wire harness connector
for the seat belt switch and the instrument panel
wire harness connector (Connector C2) for the
EMIC. Check for continuity between the seat belt
switch sense circuit cavity and a good ground.
There should be no continuity. Repair the seat
belt switch sense circuit, if required.
2. Faulty seat belt switch. 2. Check for continuity between the ground circuit
cavity and the seat belt switch sense circuit cavity
of the seat belt switch connector receptacle.
There should be no continuity with the seat belt
buckled. Replace the faulty seat belt, if required.
NO SEAT BELT WARNING
CHIME WITH SEAT BELT
UNBUCKLED, BUT OTHER
CHIME FEATURES OK1. Seat belt switch ground
circuit open.1. Disconnect the body wire harness connector
for the seat belt switch. Check for continuity
between the ground circuit cavity of the connector
for the seat belt switch and a good ground. There
should be continuity. If not OK, repair the open
ground circuit to ground as required.
2. Seat belt switch sense
circuit open.2. With the body wire harness connector for the
seat belt switch and the instrument panel wire
harness connector (Connector C2) for the EMIC
disconnected, there should be continuity between
the seat belt switch sense circuit cavities of the
two connectors. Repair the seat belt switch sense
circuit, if required.
3. Faulty seat belt switch. 3. Check for continuity between the ground circuit
cavity and the seat belt switch sense circuit cavity
of the seat belt switch connector receptacle.
There should be continuity with the seat belt
unbuckled. Replace the faulty seat belt, if
required.
BR/BECHIME/BUZZER 8B - 3
CHIME WARNING SYSTEM (Continued)
Page 455 of 2889
²Horn relay control - high-line/premium version
only
²VTSS indicator driver - high-line/premium ver-
sion only
²Wiper motor relay control
MESSAGING
The high-line/premium CTM uses the following
messages received from other electronic modules over
the CCD data bus:
²Airbag Deploy (ACM)
²Charging System Failure (PCM)
²Engine RPM (PCM)
²System Voltage (PCM)
²Vehicle Speed (PCM)
²Voltage Fault (PCM)
The high-line/premium CTM provides the following
messages to other electronic modules over the CCD
data bus:
²Engine Enable (PCM)
²Radio Seek Up (Radio)
²Radio Seek Down (Radio)
²Radio Volume Up (Radio)
²Radio Volume Down (Radio)
²Preset Scan (Radio)
DIAGNOSIS AND TESTING - CENTRAL TIMER
MODULE
The hard wired inputs to and outputs from the
Central Timer Module (CTM) may be diagnosed and
tested using conventional diagnostic tools and meth-
ods. Refer to the appropriate wiring information. The
wiring information includes wiring diagrams, proper
wire and connector repair procedures, further details
on wire harness routing and retention, as well as
pin-out and location views for the various wire har-
ness connectors, splices and grounds.
However, conventional diagnostic methods may not
prove conclusive in the diagnosis of the high-line/pre-
mium CTM. In order to obtain conclusive testing of
the high-line/premium CTM, the Chrysler Collision
Detection (CCD) data bus network and all of the elec-
tronic modules that provide inputs to or receive out-
puts from the CTM must also be checked. The most
reliable, efficient, and accurate means to diagnose
the high-line/premium CTM, the CCD data bus net-
work, and the electronic modules that provide inputs
to or receive outputs from the high-line/premium
CTM requires the use of a DRBIIItscan tool and the
appropriate diagnostic information. The DRBIIIt
scan tool can provide confirmation that the CCD data
bus network is functional, that all of the electronic
modules are sending and receiving the proper mes-
sages over the CCD data bus, and that the CTM is
receiving the proper hard wired inputs and respond-ing with the proper hard wired outputs needed to
perform its many functions.
WARNING: ON VEHICLES EQUIPPED WITH AIR-
BAGS, DISABLE THE AIRBAG SYSTEM BEFORE
ATTEMPTING ANY STEERING WHEEL, STEERING
COLUMN, OR INSTRUMENT PANEL COMPONENT
DIAGNOSIS OR SERVICE. DISCONNECT AND ISO-
LATE THE BATTERY NEGATIVE (GROUND) CABLE,
THEN WAIT TWO MINUTES FOR THE AIRBAG SYS-
TEM CAPACITOR TO DISCHARGE BEFORE PER-
FORMING FURTHER DIAGNOSIS OR SERVICE. THIS
IS THE ONLY SURE WAY TO DISABLE THE AIRBAG
SYSTEM. FAILURE TO TAKE THE PROPER PRE-
CAUTIONS COULD RESULT IN ACCIDENTAL AIR-
BAG DEPLOYMENT AND POSSIBLE PERSONAL
INJURY.
NOTE: The following tests may not prove conclu-
sive in the diagnosis of the high-line or premium
versions of the Central Timer Module (CTM). The
most reliable, efficient, and accurate means to diag-
nose the high-line or premium CTM requires the
use of a DRBIIITscan tool and the appropriate diag-
nostic information.
(1) Check the fused B(+) fuse (Fuse 13 - 10
ampere) in the Junction Block (JB). If OK, go to Step
2. If not OK, repair the shorted circuit or component
as required and replace the faulty fuse.
(2) Check for battery voltage at the fused B(+) fuse
(Fuse 13 - 10 ampere) in the JB. If OK, go to Step 3.
If not OK, repair the open fused B(+) circuit between
the JB and the Power Distribution Center (PDC) as
required.
(3) For a base version CTM, check the fused igni-
tion switch output (st-run) fuse (Fuse 11 - 10 ampere)
in the JB. For a high-line/premium version CTM,
check the fused ignition switch output (run-acc) fuse
(Fuse6-25ampere) in the JB. If OK, go to Step 4. If
not OK, repair the shorted circuit or component as
required and replace the faulty fuse.
(4) Turn the ignition switch to the On position. For
a base version CTM, check for battery voltage at the
fused ignition switch output (st-run) fuse (Fuse 11 -
10 ampere) in the JB. For a high-line/premium ver-
sion CTM, check for battery voltage at the fused igni-
tion switch output (run-acc) fuse (Fuse6-25
ampere) in the JB. If OK, go to Step 5. If not OK,
repair the shorted circuit or component as required
and replace the faulty fuse.
(5) Turn the ignition switch to the Off position.
Disconnect and isolate the battery negative cable.
Remove the CTM from its mounting bracket to access
the CTM wire harness connector(s). Disconnect the
instrument panel wire harness connector(s) for the
8E - 4 ELECTRONIC CONTROL MODULESBR/BE
BODY CONTROL/CENTRAL TIMER MODULE (Continued)
Page 456 of 2889
CTM from the CTM connector receptacle(s). Check
the wire harness connectors and the CTM receptacles
for loose, corroded, or damaged terminals and pins. If
OK, go to Step 6. If not OK, repair as required.
(6) Check for continuity between the ground cir-
cuit cavity of the instrument panel wire harness con-
nector (Connector C1) for the CTM and a good
ground. For the high-line/premium version of the
CTM only, repeat the check between the ground cir-
cuit cavity of the instrument panel wire harness con-
nector (Connector C2) for the CTM and a good
ground. In each case, there should be continuity. If
OK, go to Step 7. If not OK, repair the open ground
circuit(s) to ground as required.
(7) Reconnect the battery negative cable. Check for
battery voltage at the fused B(+) circuit cavity of the
instrument panel wire harness connector (Connector
C1) for the CTM. If OK, go to Step 8. If not OK,
repair the open fused B(+) circuit between the CTM
and the JB as required.
(8) Turn the ignition switch to the On position.
Check for battery voltage at the fused ignition switch
output (st-run) circuit cavity (base version) or fused
ignition switch output (run-acc) circuit cavity (high-
line/premium version) of the instrument panel wire
harness connector (Connector C1) for the CTM. If OK
with a base version CTM, replace the faulty CTM. If
OK with a high-line/premium version CTM, use a
DRBIIItscan tool and the appropriate diagnostic
information to perform further diagnosis of the CTM.
If not OK, repair the open fused ignition switch out-
put circuit between the CTM and the JB.
REMOVAL
WARNING: ON VEHICLES EQUIPPED WITH AIR-
BAGS, DISABLE THE AIRBAG SYSTEM BEFORE
ATTEMPTING ANY STEERING WHEEL, STEERING
COLUMN, OR INSTRUMENT PANEL COMPONENT
DIAGNOSIS OR SERVICE. DISCONNECT AND ISO-
LATE THE BATTERY NEGATIVE (GROUND) CABLE,
THEN WAIT TWO MINUTES FOR THE AIRBAG SYS-
TEM CAPACITOR TO DISCHARGE BEFORE PER-
FORMING FURTHER DIAGNOSIS OR SERVICE. THIS
IS THE ONLY SURE WAY TO DISABLE THE AIRBAG
SYSTEM. FAILURE TO TAKE THE PROPER PRE-
CAUTIONS COULD RESULT IN ACCIDENTAL AIR-
BAG DEPLOYMENT AND POSSIBLE PERSONAL
INJURY.
NOTE: Before replacing a high-line/premium version
Central Timer Module (CTM), use a DRBIIITscan
tool to retrieve the current settings for the CTM pro-
grammable features. Refer to the appropriate diag-
nostic information. These settings should be
duplicated in the replacement high-line/premiumCTM using the DRBIIITscan tool before returning
the vehicle to service.
(1) Disconnect and isolate the battery negative
cable.
(2) Remove the steering column opening cover
from the instrument panel. (Refer to 23 - BODY/IN-
STRUMENT PANEL/STEERING COLUMN OPEN-
ING COVER - REMOVAL).
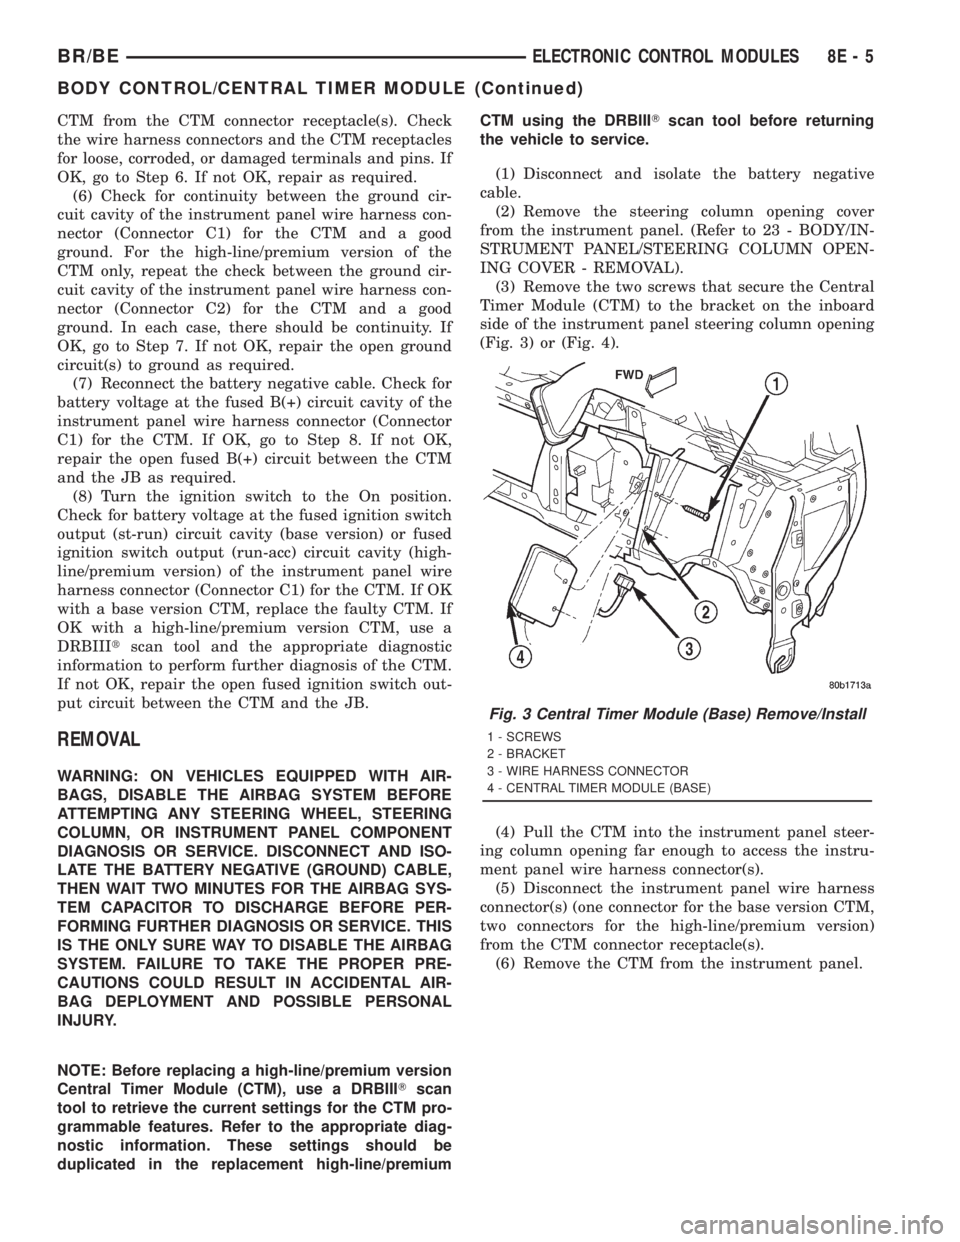
(3) Remove the two screws that secure the Central
Timer Module (CTM) to the bracket on the inboard
side of the instrument panel steering column opening
(Fig. 3) or (Fig. 4).
(4) Pull the CTM into the instrument panel steer-
ing column opening far enough to access the instru-
ment panel wire harness connector(s).
(5) Disconnect the instrument panel wire harness
connector(s) (one connector for the base version CTM,
two connectors for the high-line/premium version)
from the CTM connector receptacle(s).
(6) Remove the CTM from the instrument panel.
Fig. 3 Central Timer Module (Base) Remove/Install
1 - SCREWS
2 - BRACKET
3 - WIRE HARNESS CONNECTOR
4 - CENTRAL TIMER MODULE (BASE)
BR/BEELECTRONIC CONTROL MODULES 8E - 5
BODY CONTROL/CENTRAL TIMER MODULE (Continued)
Page 457 of 2889

INSTALLATION
WARNING: ON VEHICLES EQUIPPED WITH AIR-
BAGS, DISABLE THE AIRBAG SYSTEM BEFORE
ATTEMPTING ANY STEERING WHEEL, STEERING
COLUMN, OR INSTRUMENT PANEL COMPONENT
DIAGNOSIS OR SERVICE. DISCONNECT AND ISO-
LATE THE BATTERY NEGATIVE (GROUND) CABLE,
THEN WAIT TWO MINUTES FOR THE AIRBAG SYS-
TEM CAPACITOR TO DISCHARGE BEFORE PER-
FORMING FURTHER DIAGNOSIS OR SERVICE. THIS
IS THE ONLY SURE WAY TO DISABLE THE AIRBAG
SYSTEM. FAILURE TO TAKE THE PROPER PRE-
CAUTIONS COULD RESULT IN ACCIDENTAL AIR-
BAG DEPLOYMENT AND POSSIBLE PERSONAL
INJURY.
NOTE: Before replacing a high-line/premium version
Central Timer Module (CTM), use a DRBIIITscan
tool to retrieve the current settings for the CTM pro-
grammable features. Refer to the appropriate diag-
nostic information. These settings should be
duplicated in the replacement high-line/premium
CTM using the DRBIIITscan tool before returning
the vehicle to service.(1) Position the CTM to the inboard side of the
instrument panel steering column opening.
(2) Reconnect the instrument panel wire harness
connector(s) for the CTM (one connector for the base
version CTM, two connectors for the high-line/pre-
mium version) to the CTM connector receptacle(s)
(Fig. 3) or (Fig. 4).
(3) Position the CTM to the bracket on the inboard
side of the instrument panel steering column open-
ing.
(4) Install and tighten the two screws that secure
the CTM to the bracket on the inboard side of instru-
ment panel steering column opening. Tighten the
screws to 1.6 N´m (15 in. lbs.).
(5) Reinstall the steering column opening cover
onto the instrument panel. (Refer to 23 - BODY/IN-
STRUMENT PANEL/STEERING COLUMN OPEN-
ING COVER - INSTALLATION).
(6) Reconnect the battery negative cable.
COMMUNICATION
DESCRIPTION - CCD DATA BUS
The Chrysler Collision Detection (also referred to
as CCD or C2D ) data bus system is a multiplex sys-
tem used for vehicle communications on many
Chrysler Corporation vehicles. Within the context of
the CCD system, the term ªcollisionª refers to the
system's ability to avoid collisions of the electronic
data that enters the data bus from various electronic
control modules at approximately the same time.
Multiplexing is a system that enables the trans-
mission of several messages over a single channel or
circuit. Many Chrysler vehicles use this principle for
communication between the various microprocessor-
based electronic control modules.
Many of the electronic control modules in a vehicle
require information from the same sensing device. In
the past, if information from one sensing device was
required by several controllers, a wire from each con-
troller needed to be connected in parallel to that sen-
sor. In addition, each controller utilizing analog
sensors required an Analog/Digital (A/D) converter in
order to ªreadª these sensor inputs. Multiplexing
reduces wire harness complexity, sensor current
loads and controller hardware because each sensing
device is connected to only one controller, which
reads and distributes the sensor information to the
other controllers over the data bus. Also, because
each controller on the data bus can access the con-
troller sensor inputs to every other controller on the
data bus, more function and feature capabilities are
possible.
Fig. 4 Central Timer Module (High-Line/Premium)
Remove/Install
1 - SCREWS
2 - BRACKET
3 - WIRE HARNESS CONNECTORS
4 - CENTRAL TIMER MODULE (HIGH-LINE/PREMIUM)
8E - 6 ELECTRONIC CONTROL MODULESBR/BE
BODY CONTROL/CENTRAL TIMER MODULE (Continued)
Page 462 of 2889

the module attempts to have the CCD chip re-send
the message.
DIAGNOSIS AND TESTING - CCD DATA BUS
CCD BUS FAILURE
The CCD data bus can be monitored using the
DRBIIItscan tool. However, it is possible for the
data bus to pass all tests since the voltage parame-
ters will be in ªrangeª and false signals are being
sent. There are essentially 12 ªhard failuresª that
can occur with the CCD data bus:
²Bus Shorted to Battery
²Bus Shorted to 5 Volts
²Bus Shorted to Ground
²Bus (+) Shorted to Bus (±)
²Bus (±) and Bus (+) Open
²Bus (+) Open
²Bus (±) Open
²No Bus Bias
²Bus Bias Level Too High
²Bus Bias Level Too Low
²No Bus Termination
²Not Receiving Bus Messages Correctly
Refer to the appropriate diagnostic procedures for
details on how to diagnose these faults using a
DRBIIItscan tool.
BUS FAILURE VISUAL SYMPTOM DIAGNOSIS
The following visible symptoms or customer com-
plaints, alone or in combination, may indicate a CCD
data bus failure:
²Airbag Indicator Lamp and Malfuntion Indicator
Lamp (MIL) Illuminated
²Instrument Cluster Gauges (All) Inoperative
²No Compass Mini-Trip Computer (CMTC) Oper-
ation
CONTROLLER ANTILOCK
BRAKE
DESCRIPTION
The Controller Antilock Brakes (CAB) is a micro-
processor which handles testing, monitoring and con-
trolling the ABS brake system operation (Fig. 10).
The CAB functions are:
²Perform self-test diagnostics.
²Monitor the RWAL brake system for proper oper-
ation.
²Control the RWAL valve solenoids.
NOTE: If the CAB needs to be replaced, the rear
axle type and tire revolutions per mile must be pro-
gramed into the new CAB. For axle type refer to
Group 3 Differential and Driveline. For tire revolu-tions per mile,(Refer to 22 - TIRES/WHEELS/TIRES -
SPECIFICATIONS) . To program the CAB refer to the
Chassis Diagnostic Manual.
OPERATION
SYSTEM SELF-TEST
When the ignition switch is turned-on the micro-
processor RAM and ROM are tested. If an error
occurs during the test, a DTC will be set into the
RAM memory. However it is possible the DTC will
not be stored in memory if the error has occurred in
the RAM module were the DTC's are stored. Also it
is possible a DTC may not be stored if the error has
occurred in the ROM which signals the RAM to store
the DTC.
CAB INPUTS
The CAB continuously monitors the speed of the
differential ring gear by monitoring signals generated
by the rear wheel speed sensor. The CAB determines
a wheel locking tendency when it recognizes the ring
gear is decelerating too rapidly. The CAB monitors
the following inputs to determine when a wheel lock-
ing tendency may exists:
²Rear Wheel Speed Sensor
²Brake Lamp Switch
²Brake Warning Lamp Switch
²Reset Switch
²4WD Switch (If equipped)
CAB OUTPUTS
The CAB controls the following outputs for antilock
braking and brake warning information:
²RWAL Valve
Fig. 10 RWAL CAB
1-RWALCAB
BR/BEELECTRONIC CONTROL MODULES 8E - 11
COMMUNICATION (Continued)
Page 495 of 2889
NEGATIVE CABLE INSTALLATION - GASOLINE
(1) Position the battery wire harness into the
engine compartment and under the compressor
mounting bracket, if equipped.
(2) Install and tighten the nut that secures the
battery negative cable ground eyelet terminal to the
stud on the power steering pump pivot bolt.
(3) Install the generator output cable eyelet termi-
nal onto the generator output terminal stud.
(4) Install and tighten the nut that secures the
generator output cable eyelet terminal to the genera-
tor output terminal stud. Tighten the nut to 8.4 N´m
(75 in. lbs.).
(5) Position the cover for the generator output ter-
minal stud housing onto the back of the generator
and snap it into place.
(6) Secure wire assembly in place with pushpin
retainers in there original positions.
(7) Install and tighten the screw that secures the
battery negative cable eyelet terminal to the radiator
closure panel, near the battery. Tighten the screw to
40 in. lbs.
(8) Install and tighten the screw that secures the
battery negative cable eyelet terminal to the left
front side of the frame assembly. Tighten the screw
to 80 in. lbs.
(9) Install and tighten the nut that secures the
battery positive cable eyelet terminal and the gener-
ator output cable eyelet terminal to the PDC B(+)
terminal stud. Tighten the nut to 80 in. lbs.
(10) Reconnect the battery negative cable terminal
clamp to the battery negative terminal post. Tighten
the terminal clamp pinch-bolt hex nut to 35 in. lbs.
(11)
Apply a thin coating of petroleum jelly or chassis
grease to the exposed surfaces of the battery cable ter-
minal clamps and the battery terminal posts.
BATTERY TRAY
DESCRIPTION
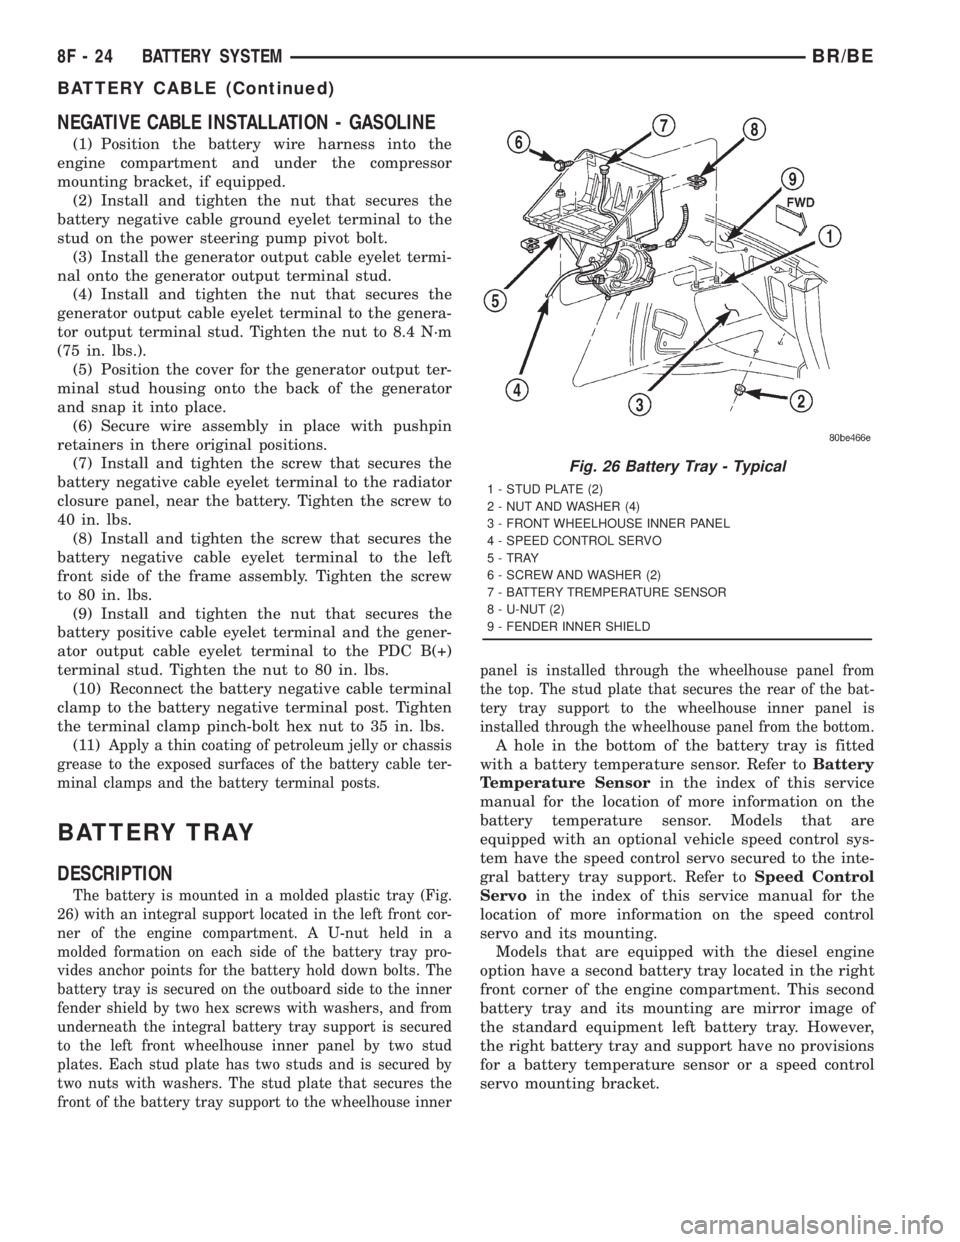
The battery is mounted in a molded plastic tray (Fig.
26) with an integral support located in the left front cor-
ner of the engine compartment. A U-nut held in a
molded formation on each side of the battery tray pro-
vides anchor points for the battery hold down bolts. The
battery tray is secured on the outboard side to the inner
fender shield by two hex screws with washers, and from
underneath the integral battery tray support is secured
to the left front wheelhouse inner panel by two stud
plates. Each stud plate has two studs and is secured by
two nuts with washers. The stud plate that secures the
front of the battery tray support to the wheelhouse innerpanel is installed through the wheelhouse panel from
the top. The stud plate that secures the rear of the bat-
tery tray support to the wheelhouse inner panel is
installed through the wheelhouse panel from the bottom.
A hole in the bottom of the battery tray is fitted
with a battery temperature sensor. Refer toBattery
Temperature Sensorin the index of this service
manual for the location of more information on the
battery temperature sensor. Models that are
equipped with an optional vehicle speed control sys-
tem have the speed control servo secured to the inte-
gral battery tray support. Refer toSpeed Control
Servoin the index of this service manual for the
location of more information on the speed control
servo and its mounting.
Models that are equipped with the diesel engine
option have a second battery tray located in the right
front corner of the engine compartment. This second
battery tray and its mounting are mirror image of
the standard equipment left battery tray. However,
the right battery tray and support have no provisions
for a battery temperature sensor or a speed control
servo mounting bracket.
Fig. 26 Battery Tray - Typical
1 - STUD PLATE (2)
2 - NUT AND WASHER (4)
3 - FRONT WHEELHOUSE INNER PANEL
4 - SPEED CONTROL SERVO
5 - TRAY
6 - SCREW AND WASHER (2)
7 - BATTERY TREMPERATURE SENSOR
8 - U-NUT (2)
9 - FENDER INNER SHIELD
8F - 24 BATTERY SYSTEMBR/BE
BATTERY CABLE (Continued)
Page 496 of 2889
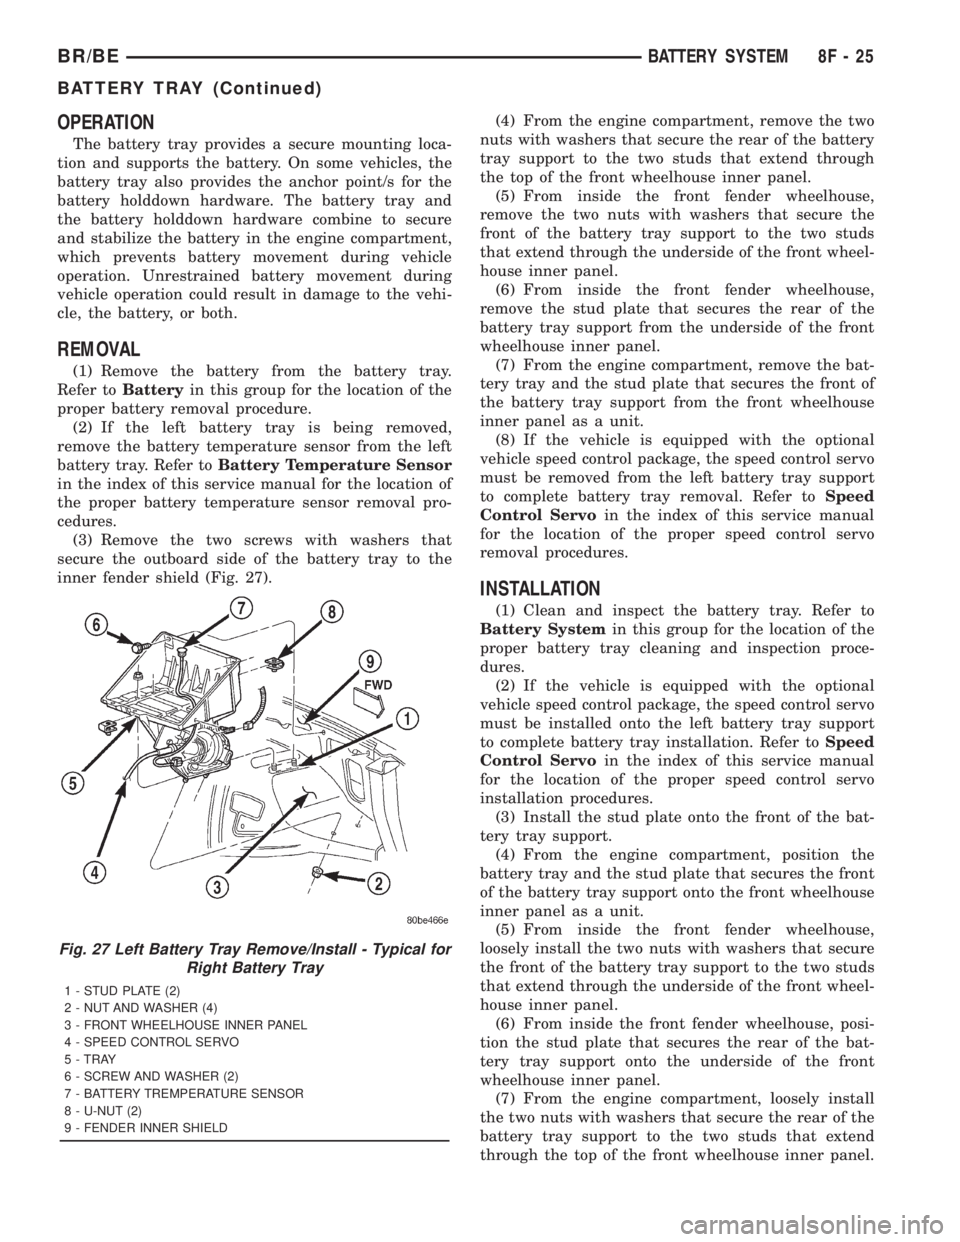
OPERATION
The battery tray provides a secure mounting loca-
tion and supports the battery. On some vehicles, the
battery tray also provides the anchor point/s for the
battery holddown hardware. The battery tray and
the battery holddown hardware combine to secure
and stabilize the battery in the engine compartment,
which prevents battery movement during vehicle
operation. Unrestrained battery movement during
vehicle operation could result in damage to the vehi-
cle, the battery, or both.
REMOVAL
(1) Remove the battery from the battery tray.
Refer toBatteryin this group for the location of the
proper battery removal procedure.
(2) If the left battery tray is being removed,
remove the battery temperature sensor from the left
battery tray. Refer toBattery Temperature Sensor
in the index of this service manual for the location of
the proper battery temperature sensor removal pro-
cedures.
(3) Remove the two screws with washers that
secure the outboard side of the battery tray to the
inner fender shield (Fig. 27).(4) From the engine compartment, remove the two
nuts with washers that secure the rear of the battery
tray support to the two studs that extend through
the top of the front wheelhouse inner panel.
(5) From inside the front fender wheelhouse,
remove the two nuts with washers that secure the
front of the battery tray support to the two studs
that extend through the underside of the front wheel-
house inner panel.
(6) From inside the front fender wheelhouse,
remove the stud plate that secures the rear of the
battery tray support from the underside of the front
wheelhouse inner panel.
(7) From the engine compartment, remove the bat-
tery tray and the stud plate that secures the front of
the battery tray support from the front wheelhouse
inner panel as a unit.
(8) If the vehicle is equipped with the optional
vehicle speed control package, the speed control servo
must be removed from the left battery tray support
to complete battery tray removal. Refer toSpeed
Control Servoin the index of this service manual
for the location of the proper speed control servo
removal procedures.
INSTALLATION
(1) Clean and inspect the battery tray. Refer to
Battery Systemin this group for the location of the
proper battery tray cleaning and inspection proce-
dures.
(2) If the vehicle is equipped with the optional
vehicle speed control package, the speed control servo
must be installed onto the left battery tray support
to complete battery tray installation. Refer toSpeed
Control Servoin the index of this service manual
for the location of the proper speed control servo
installation procedures.
(3) Install the stud plate onto the front of the bat-
tery tray support.
(4) From the engine compartment, position the
battery tray and the stud plate that secures the front
of the battery tray support onto the front wheelhouse
inner panel as a unit.
(5) From inside the front fender wheelhouse,
loosely install the two nuts with washers that secure
the front of the battery tray support to the two studs
that extend through the underside of the front wheel-
house inner panel.
(6) From inside the front fender wheelhouse, posi-
tion the stud plate that secures the rear of the bat-
tery tray support onto the underside of the front
wheelhouse inner panel.
(7) From the engine compartment, loosely install
the two nuts with washers that secure the rear of the
battery tray support to the two studs that extend
through the top of the front wheelhouse inner panel.
Fig. 27 Left Battery Tray Remove/Install - Typical for
Right Battery Tray
1 - STUD PLATE (2)
2 - NUT AND WASHER (4)
3 - FRONT WHEELHOUSE INNER PANEL
4 - SPEED CONTROL SERVO
5 - TRAY
6 - SCREW AND WASHER (2)
7 - BATTERY TREMPERATURE SENSOR
8 - U-NUT (2)
9 - FENDER INNER SHIELD
BR/BEBATTERY SYSTEM 8F - 25
BATTERY TRAY (Continued)
Page 497 of 2889

(8) Install and tighten the two screws with wash-
ers that secure the outboard side of the battery tray
to the inner fender shield. Tighten the screws to 15.8
N´m (140 in. lbs.).
(9) Final tighten the four nuts with washers that
secure the battery tray support to the stud plates on
the front wheelhouse inner panel. Tighten the nuts
to 15.8 N´m (140 in. lbs.).(10) If the left battery tray is being installed,
install the battery temperature sensor onto the left
battery tray. Refer toBattery Temperature Sensor
in the index of this service manual for the location of
the proper battery temperature sensor installation
procedures.
(11) Install the battery onto the battery tray. Refer
toBatteryin this group for the location of the
proper battery installation procedures.
8F - 26 BATTERY SYSTEMBR/BE
BATTERY TRAY (Continued)