2001 CHRYSLER VOYAGER Engine
[x] Cancel search: EnginePage 3933 of 4284
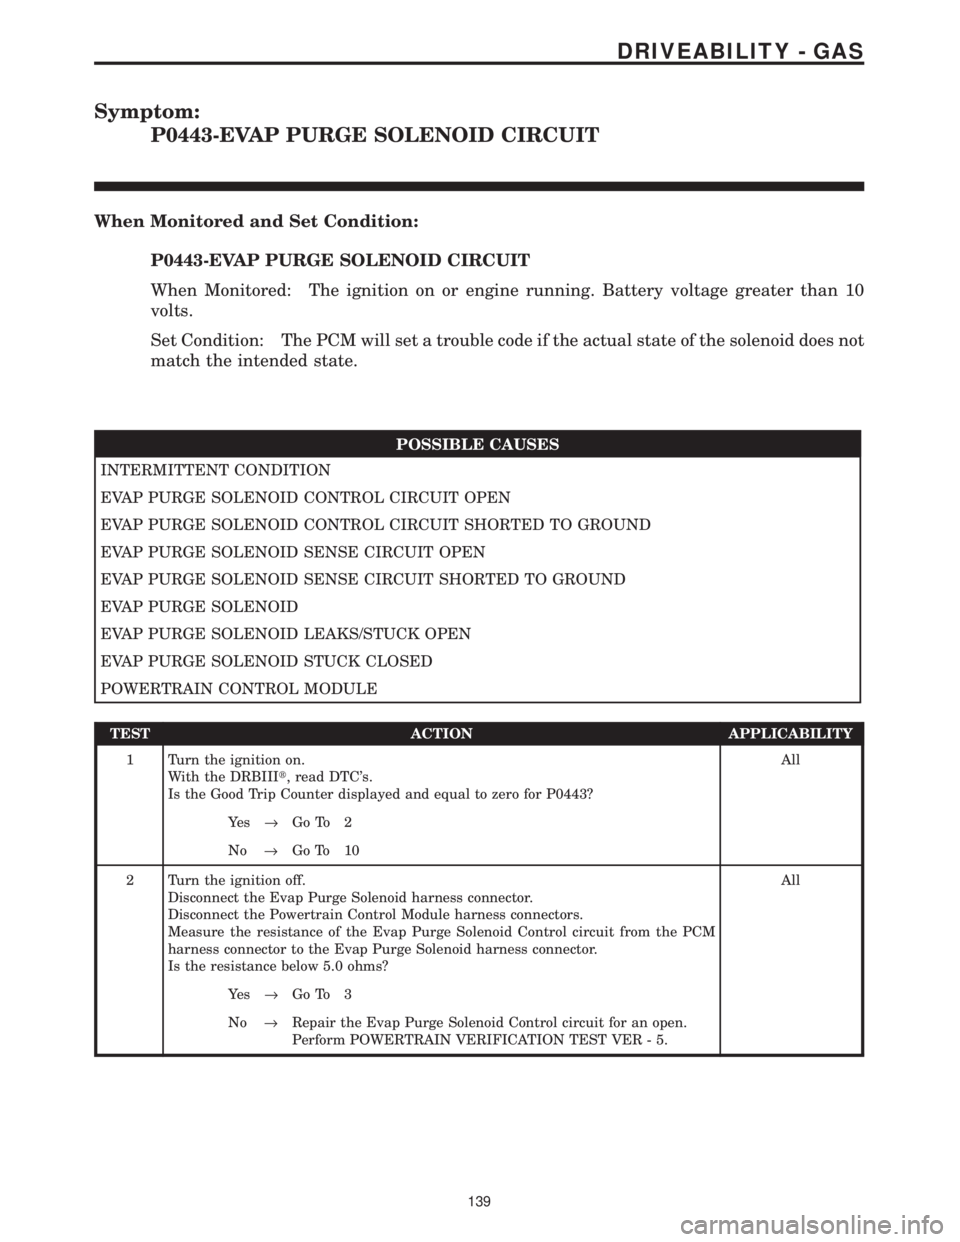
Symptom:
P0443-EVAP PURGE SOLENOID CIRCUIT
When Monitored and Set Condition:
P0443-EVAP PURGE SOLENOID CIRCUIT
When Monitored: The ignition on or engine running. Battery voltage greater than 10
volts.
Set Condition: The PCM will set a trouble code if the actual state of the solenoid does not
match the intended state.
POSSIBLE CAUSES
INTERMITTENT CONDITION
EVAP PURGE SOLENOID CONTROL CIRCUIT OPEN
EVAP PURGE SOLENOID CONTROL CIRCUIT SHORTED TO GROUND
EVAP PURGE SOLENOID SENSE CIRCUIT OPEN
EVAP PURGE SOLENOID SENSE CIRCUIT SHORTED TO GROUND
EVAP PURGE SOLENOID
EVAP PURGE SOLENOID LEAKS/STUCK OPEN
EVAP PURGE SOLENOID STUCK CLOSED
POWERTRAIN CONTROL MODULE
TEST ACTION APPLICABILITY
1 Turn the ignition on.
With the DRBIIIt, read DTC's.
Is the Good Trip Counter displayed and equal to zero for P0443?All
Ye s®Go To 2
No®Go To 10
2 Turn the ignition off.
Disconnect the Evap Purge Solenoid harness connector.
Disconnect the Powertrain Control Module harness connectors.
Measure the resistance of the Evap Purge Solenoid Control circuit from the PCM
harness connector to the Evap Purge Solenoid harness connector.
Is the resistance below 5.0 ohms?All
Ye s®Go To 3
No®Repair the Evap Purge Solenoid Control circuit for an open.
Perform POWERTRAIN VERIFICATION TEST VER - 5.
139
DRIVEABILITY - GAS
Page 3935 of 4284
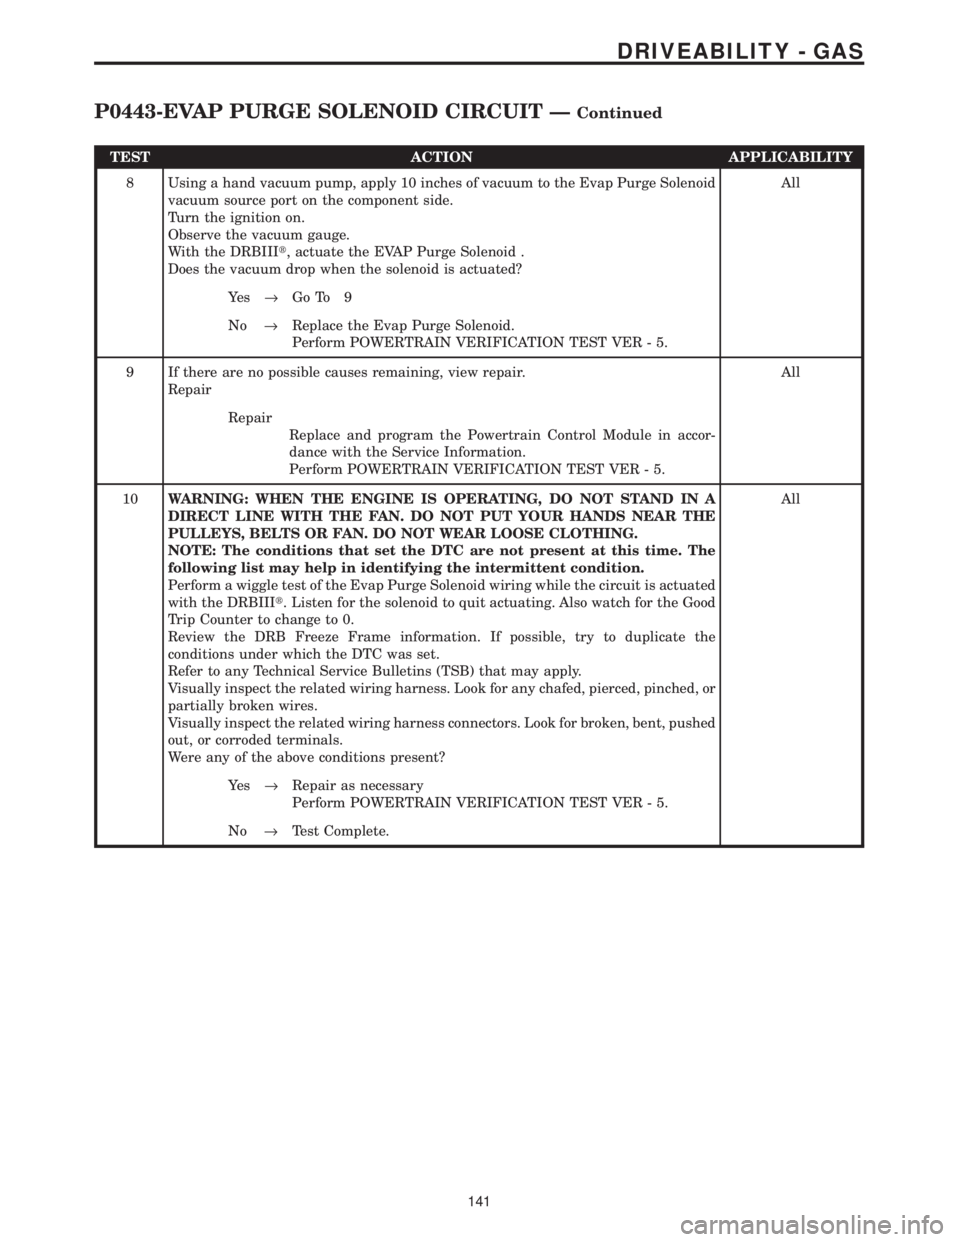
TEST ACTION APPLICABILITY
8 Using a hand vacuum pump, apply 10 inches of vacuum to the Evap Purge Solenoid
vacuum source port on the component side.
Turn the ignition on.
Observe the vacuum gauge.
With the DRBIIIt, actuate the EVAP Purge Solenoid .
Does the vacuum drop when the solenoid is actuated?All
Ye s®Go To 9
No®Replace the Evap Purge Solenoid.
Perform POWERTRAIN VERIFICATION TEST VER - 5.
9 If there are no possible causes remaining, view repair.
RepairAll
Repair
Replace and program the Powertrain Control Module in accor-
dance with the Service Information.
Perform POWERTRAIN VERIFICATION TEST VER - 5.
10WARNING: WHEN THE ENGINE IS OPERATING, DO NOT STAND IN A
DIRECT LINE WITH THE FAN. DO NOT PUT YOUR HANDS NEAR THE
PULLEYS, BELTS OR FAN. DO NOT WEAR LOOSE CLOTHING.
NOTE: The conditions that set the DTC are not present at this time. The
following list may help in identifying the intermittent condition.
Perform a wiggle test of the Evap Purge Solenoid wiring while the circuit is actuated
with the DRBIIIt. Listen for the solenoid to quit actuating. Also watch for the Good
Trip Counter to change to 0.
Review the DRB Freeze Frame information. If possible, try to duplicate the
conditions under which the DTC was set.
Refer to any Technical Service Bulletins (TSB) that may apply.
Visually inspect the related wiring harness. Look for any chafed, pierced, pinched, or
partially broken wires.
Visually inspect the related wiring harness connectors. Look for broken, bent, pushed
out, or corroded terminals.
Were any of the above conditions present?All
Ye s®Repair as necessary
Perform POWERTRAIN VERIFICATION TEST VER - 5.
No®Test Complete.
141
DRIVEABILITY - GAS
P0443-EVAP PURGE SOLENOID CIRCUIT ÐContinued
Page 3937 of 4284
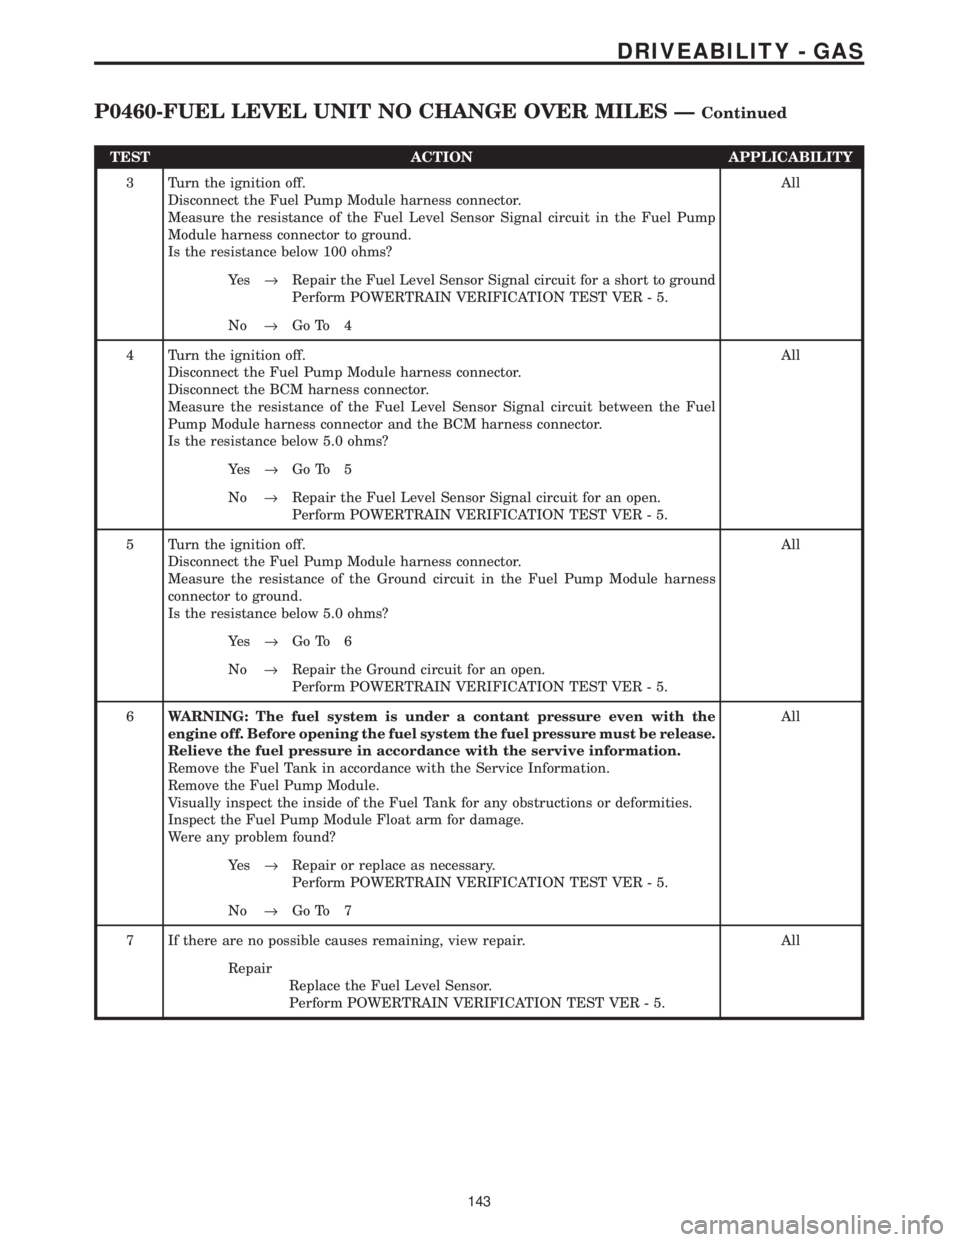
TEST ACTION APPLICABILITY
3 Turn the ignition off.
Disconnect the Fuel Pump Module harness connector.
Measure the resistance of the Fuel Level Sensor Signal circuit in the Fuel Pump
Module harness connector to ground.
Is the resistance below 100 ohms?All
Ye s®Repair the Fuel Level Sensor Signal circuit for a short to ground
Perform POWERTRAIN VERIFICATION TEST VER - 5.
No®Go To 4
4 Turn the ignition off.
Disconnect the Fuel Pump Module harness connector.
Disconnect the BCM harness connector.
Measure the resistance of the Fuel Level Sensor Signal circuit between the Fuel
Pump Module harness connector and the BCM harness connector.
Is the resistance below 5.0 ohms?All
Ye s®Go To 5
No®Repair the Fuel Level Sensor Signal circuit for an open.
Perform POWERTRAIN VERIFICATION TEST VER - 5.
5 Turn the ignition off.
Disconnect the Fuel Pump Module harness connector.
Measure the resistance of the Ground circuit in the Fuel Pump Module harness
connector to ground.
Is the resistance below 5.0 ohms?All
Ye s®Go To 6
No®Repair the Ground circuit for an open.
Perform POWERTRAIN VERIFICATION TEST VER - 5.
6WARNING: The fuel system is under a contant pressure even with the
engine off. Before opening the fuel system the fuel pressure must be release.
Relieve the fuel pressure in accordance with the servive information.
Remove the Fuel Tank in accordance with the Service Information.
Remove the Fuel Pump Module.
Visually inspect the inside of the Fuel Tank for any obstructions or deformities.
Inspect the Fuel Pump Module Float arm for damage.
Were any problem found?All
Ye s®Repair or replace as necessary.
Perform POWERTRAIN VERIFICATION TEST VER - 5.
No®Go To 7
7 If there are no possible causes remaining, view repair. All
Repair
Replace the Fuel Level Sensor.
Perform POWERTRAIN VERIFICATION TEST VER - 5.
143
DRIVEABILITY - GAS
P0460-FUEL LEVEL UNIT NO CHANGE OVER MILES ÐContinued
Page 3938 of 4284
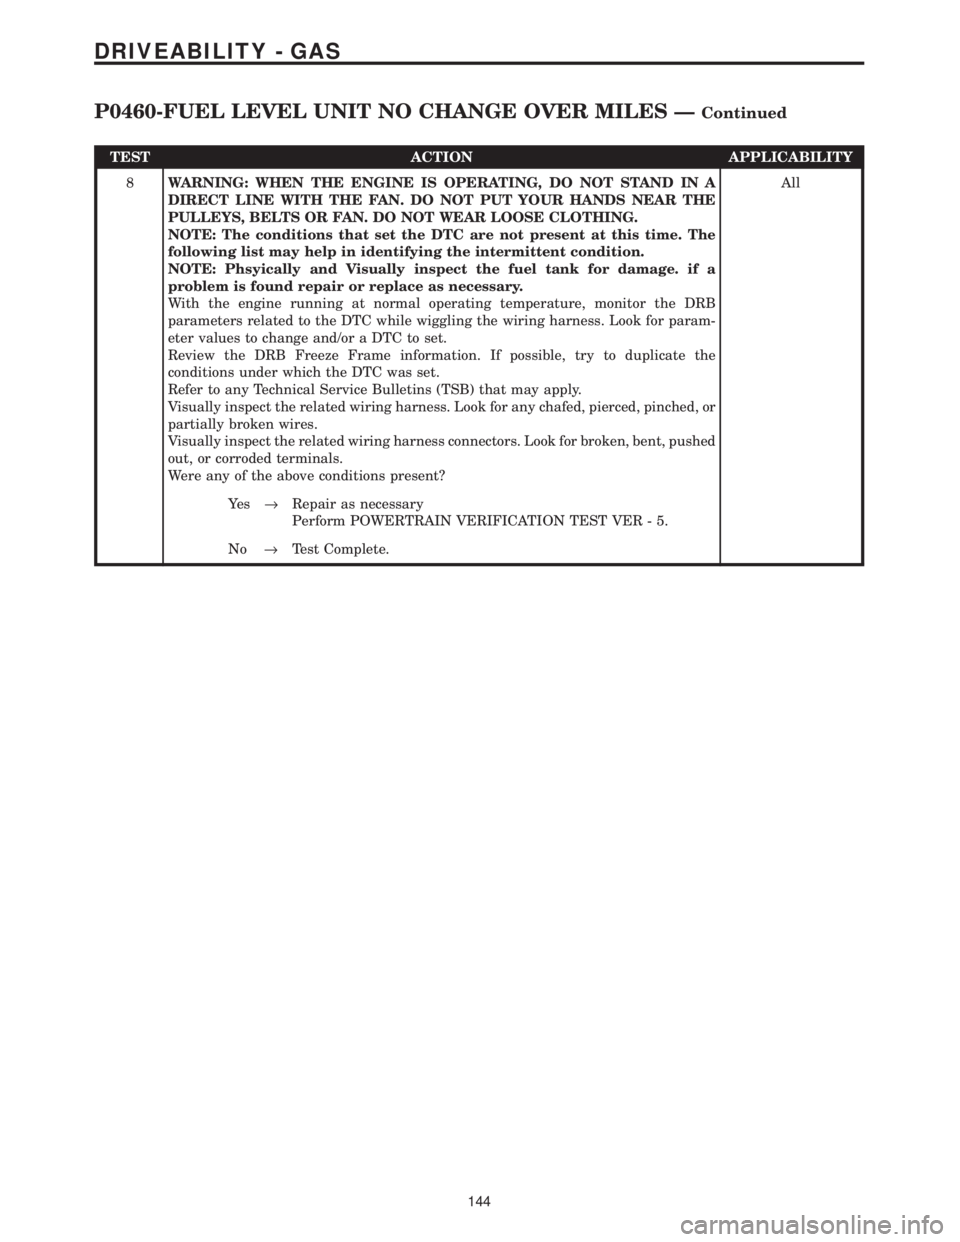
TEST ACTION APPLICABILITY
8WARNING: WHEN THE ENGINE IS OPERATING, DO NOT STAND IN A
DIRECT LINE WITH THE FAN. DO NOT PUT YOUR HANDS NEAR THE
PULLEYS, BELTS OR FAN. DO NOT WEAR LOOSE CLOTHING.
NOTE: The conditions that set the DTC are not present at this time. The
following list may help in identifying the intermittent condition.
NOTE: Phsyically and Visually inspect the fuel tank for damage. if a
problem is found repair or replace as necessary.
With the engine running at normal operating temperature, monitor the DRB
parameters related to the DTC while wiggling the wiring harness. Look for param-
eter values to change and/or a DTC to set.
Review the DRB Freeze Frame information. If possible, try to duplicate the
conditions under which the DTC was set.
Refer to any Technical Service Bulletins (TSB) that may apply.
Visually inspect the related wiring harness. Look for any chafed, pierced, pinched, or
partially broken wires.
Visually inspect the related wiring harness connectors. Look for broken, bent, pushed
out, or corroded terminals.
Were any of the above conditions present?All
Ye s®Repair as necessary
Perform POWERTRAIN VERIFICATION TEST VER - 5.
No®Test Complete.
144
DRIVEABILITY - GAS
P0460-FUEL LEVEL UNIT NO CHANGE OVER MILES ÐContinued
Page 3940 of 4284

TEST ACTION APPLICABILITY
2WARNING: WHEN THE ENGINE IS OPERATING, DO NOT STAND IN A
DIRECT LINE WITH THE FAN. DO NOT PUT YOUR HANDS NEAR THE
PULLEYS, BELTS OR FAN. DO NOT WEAR LOOSE CLOTHING.
NOTE: The conditions that set the DTC are not present at this time. The
following list may help in identifying the intermittent condition.
NOTE: Phsyically and Visually inspect the fuel tank for damage. if a
problem is found repair or replace as necessary.
With the engine running at normal operating temperature, monitor the DRB
parameters related to the DTC while wiggling the wiring harness. Look for param-
eter values to change and/or a DTC to set.
Review the DRB Freeze Frame information. If possible, try to duplicate the
conditions under which the DTC was set.
Refer to any Technical Service Bulletins (TSB) that may apply.
Visually inspect the related wiring harness. Look for any chafed, pierced, pinched, or
partially broken wires.
Visually inspect the related wiring harness connectors. Look for broken, bent, pushed
out, or corroded terminals.
Were any of the above conditions present?All
Ye s®Repair as necessary
Perform POWERTRAIN VERIFICATION TEST VER - 5.
No®Test Complete.
146
DRIVEABILITY - GAS
P0462-FUEL LEVEL SENDING UNIT VOLTS TOO LOW ÐContinued
Page 3941 of 4284
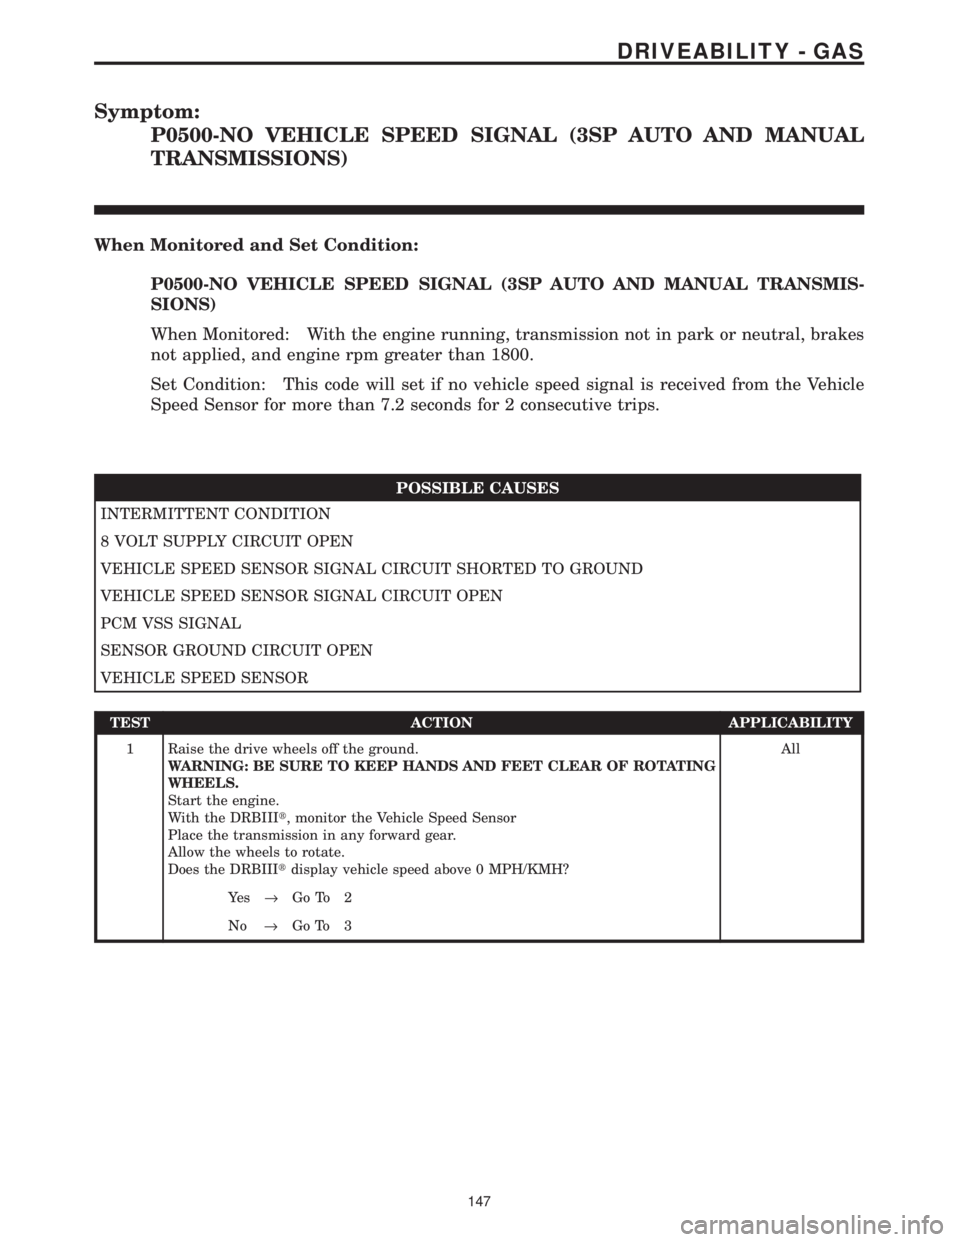
Symptom:
P0500-NO VEHICLE SPEED SIGNAL (3SP AUTO AND MANUAL
TRANSMISSIONS)
When Monitored and Set Condition:
P0500-NO VEHICLE SPEED SIGNAL (3SP AUTO AND MANUAL TRANSMIS-
SIONS)
When Monitored: With the engine running, transmission not in park or neutral, brakes
not applied, and engine rpm greater than 1800.
Set Condition: This code will set if no vehicle speed signal is received from the Vehicle
Speed Sensor for more than 7.2 seconds for 2 consecutive trips.
POSSIBLE CAUSES
INTERMITTENT CONDITION
8 VOLT SUPPLY CIRCUIT OPEN
VEHICLE SPEED SENSOR SIGNAL CIRCUIT SHORTED TO GROUND
VEHICLE SPEED SENSOR SIGNAL CIRCUIT OPEN
PCM VSS SIGNAL
SENSOR GROUND CIRCUIT OPEN
VEHICLE SPEED SENSOR
TEST ACTION APPLICABILITY
1 Raise the drive wheels off the ground.
WARNING: BE SURE TO KEEP HANDS AND FEET CLEAR OF ROTATING
WHEELS.
Start the engine.
With the DRBIIIt, monitor the Vehicle Speed Sensor
Place the transmission in any forward gear.
Allow the wheels to rotate.
Does the DRBIIItdisplay vehicle speed above 0 MPH/KMH?All
Ye s®Go To 2
No®Go To 3
147
DRIVEABILITY - GAS
Page 3942 of 4284
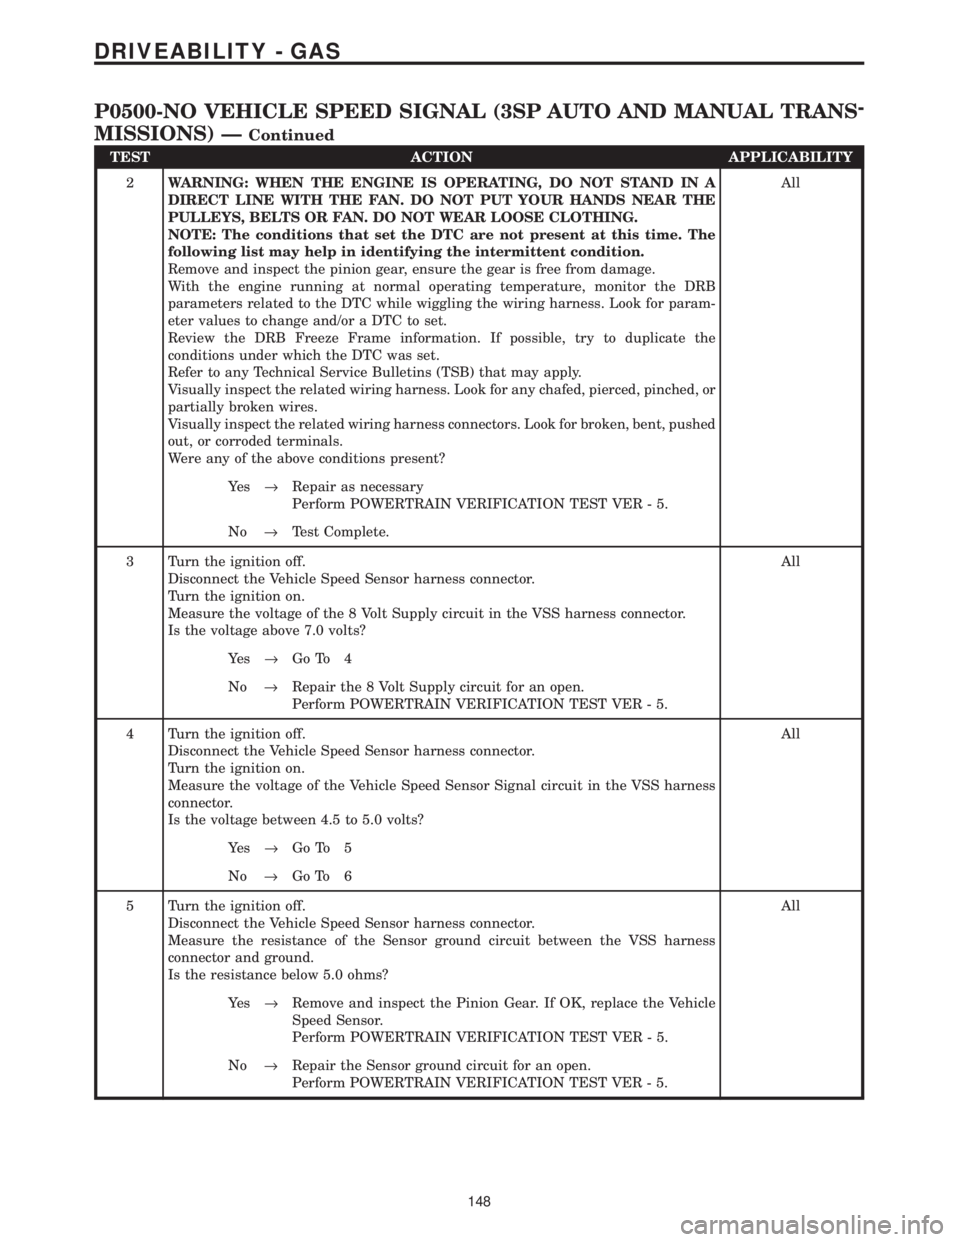
TEST ACTION APPLICABILITY
2WARNING: WHEN THE ENGINE IS OPERATING, DO NOT STAND IN A
DIRECT LINE WITH THE FAN. DO NOT PUT YOUR HANDS NEAR THE
PULLEYS, BELTS OR FAN. DO NOT WEAR LOOSE CLOTHING.
NOTE: The conditions that set the DTC are not present at this time. The
following list may help in identifying the intermittent condition.
Remove and inspect the pinion gear, ensure the gear is free from damage.
With the engine running at normal operating temperature, monitor the DRB
parameters related to the DTC while wiggling the wiring harness. Look for param-
eter values to change and/or a DTC to set.
Review the DRB Freeze Frame information. If possible, try to duplicate the
conditions under which the DTC was set.
Refer to any Technical Service Bulletins (TSB) that may apply.
Visually inspect the related wiring harness. Look for any chafed, pierced, pinched, or
partially broken wires.
Visually inspect the related wiring harness connectors. Look for broken, bent, pushed
out, or corroded terminals.
Were any of the above conditions present?All
Ye s®Repair as necessary
Perform POWERTRAIN VERIFICATION TEST VER - 5.
No®Test Complete.
3 Turn the ignition off.
Disconnect the Vehicle Speed Sensor harness connector.
Turn the ignition on.
Measure the voltage of the 8 Volt Supply circuit in the VSS harness connector.
Is the voltage above 7.0 volts?All
Ye s®Go To 4
No®Repair the 8 Volt Supply circuit for an open.
Perform POWERTRAIN VERIFICATION TEST VER - 5.
4 Turn the ignition off.
Disconnect the Vehicle Speed Sensor harness connector.
Turn the ignition on.
Measure the voltage of the Vehicle Speed Sensor Signal circuit in the VSS harness
connector.
Is the voltage between 4.5 to 5.0 volts?All
Ye s®Go To 5
No®Go To 6
5 Turn the ignition off.
Disconnect the Vehicle Speed Sensor harness connector.
Measure the resistance of the Sensor ground circuit between the VSS harness
connector and ground.
Is the resistance below 5.0 ohms?All
Ye s®Remove and inspect the Pinion Gear. If OK, replace the Vehicle
Speed Sensor.
Perform POWERTRAIN VERIFICATION TEST VER - 5.
No®Repair the Sensor ground circuit for an open.
Perform POWERTRAIN VERIFICATION TEST VER - 5.
148
DRIVEABILITY - GAS
P0500-NO VEHICLE SPEED SIGNAL (3SP AUTO AND MANUAL TRANS-
MISSIONS) Ð
Continued
Page 3944 of 4284
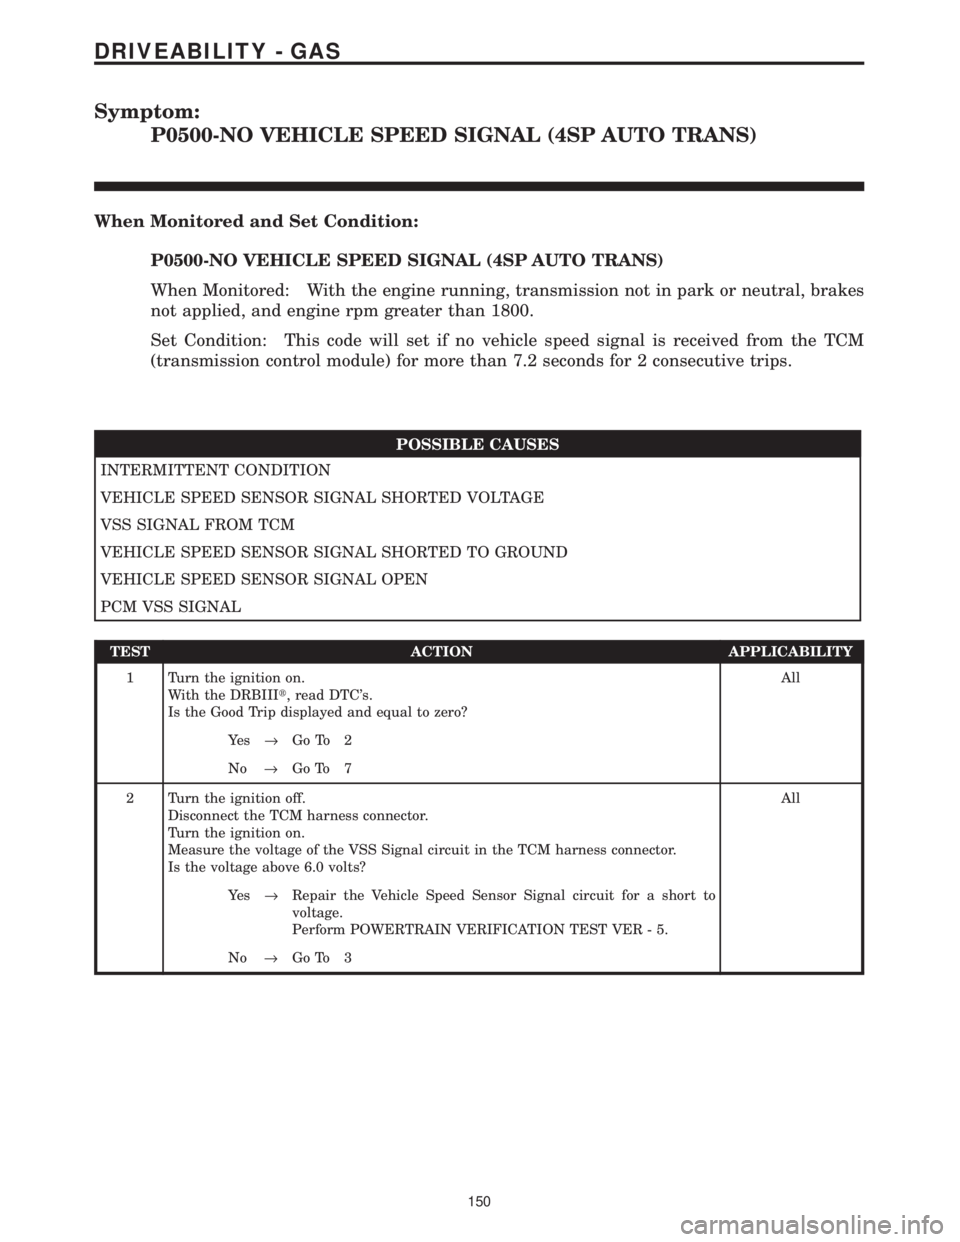
Symptom:
P0500-NO VEHICLE SPEED SIGNAL (4SP AUTO TRANS)
When Monitored and Set Condition:
P0500-NO VEHICLE SPEED SIGNAL (4SP AUTO TRANS)
When Monitored: With the engine running, transmission not in park or neutral, brakes
not applied, and engine rpm greater than 1800.
Set Condition: This code will set if no vehicle speed signal is received from the TCM
(transmission control module) for more than 7.2 seconds for 2 consecutive trips.
POSSIBLE CAUSES
INTERMITTENT CONDITION
VEHICLE SPEED SENSOR SIGNAL SHORTED VOLTAGE
VSS SIGNAL FROM TCM
VEHICLE SPEED SENSOR SIGNAL SHORTED TO GROUND
VEHICLE SPEED SENSOR SIGNAL OPEN
PCM VSS SIGNAL
TEST ACTION APPLICABILITY
1 Turn the ignition on.
With the DRBIIIt, read DTC's.
Is the Good Trip displayed and equal to zero?All
Ye s®Go To 2
No®Go To 7
2 Turn the ignition off.
Disconnect the TCM harness connector.
Turn the ignition on.
Measure the voltage of the VSS Signal circuit in the TCM harness connector.
Is the voltage above 6.0 volts?All
Ye s®Repair the Vehicle Speed Sensor Signal circuit for a short to
voltage.
Perform POWERTRAIN VERIFICATION TEST VER - 5.
No®Go To 3
150
DRIVEABILITY - GAS