Page 65 of 86
6-33
PERIODIC MAINTENANCE AND MINOR REPAIR
1
2
3
4
5
6
7
8
9 4. Turn the bulb holder counter-
clockwise to remove it and
then remove the defective
bulb.EW000119
w
Keep flammable products and your
hands away from a bulb while it is
on, as it is hot. Do not touch a bulb
until it cools down.
5. Put a new bulb into position
and secure it in place with the
bulb holder.
1. Bulb holder
6. Install the bulb holder cover,
connector and headlight unit.
7. Install the cowling.
8. If the headlight beam adjust-
ment is necessary, ask a
Yamaha dealer to make that
adjustment.EAU00855Turn signal and taillight bulb
replacement
1. Remove the screws and the
lens.
1. Screw
11
5EK-9-E1 (TW125)<3.1> 4/6/0 11:50 PM Page 63
Page 66 of 86

3. Place a new bulb in the socket.
Push the bulb inward and turn
it clo")
6-34
PERIODIC MAINTENANCE AND MINOR REPAIR
1
2
3
4
5
6
7
8
92. Push the bulb inward and turn
it counterclockwise.
1. Screw (´2)
3. Place a new bulb in the socket.
Push the bulb inward and turn
it clockwise until it engages
into the socket.
4. Install the lens and the screws.
EC000108
cC
Do not over-tighten the screws as
the lens may break.
1. Bulb
EAU01579Supporting the motorcycle
Since the Yamaha TW125 has no
centerstand, follow these precau-
tions when removing the front and
rear wheel or performing other
maintenance requiring the motor-
cycle to stand upright. Check that
the motorcycle is in a stable and
level position before starting any
maintenance. A strong wooden
box can be placed under the
engine for added stability.
Front wheel service
To stabilize the rear of the motor-
cycle, either use a motorcycle
stand or place a motorcycle jack
under the frame in front of the rear
wheel to prevent it from moving
from side to side. Then use a
motorcycle stand to elevate the
front wheel off of the ground.11
5EK-9-E1 (TW125)<3.1> 4/6/0 11:50 PM Page 64
Page 67 of 86
6-35
PERIODIC MAINTENANCE AND MINOR REPAIR
1
2
3
4
5
6
7
8
9 Rear wheel service
Use a motorcycle stand or motor-
cycle jack to elevate the motorcycle
so the rear wheel is off the ground.
Alternatively, two jacks can be
placed under the frame or
swingarm.
1
2
EAU01494Front wheel removalEW000122
w
8It is advisable to have a
Yamaha dealer service the
wheel.
8Securely support the motorcy-
cle so there is no danger of it
falling over.
1. Remove the speedometer
cable from the front wheel
side.
1. Speedometer cable
2. Wheel axle nut
2. Loosen the wheel axle nut.
3. Elevate the front wheel by
placing a suitable stand under
the engine.
4. Remove the wheel axle nut,
the wheel axle and the front
wheel. Make sure the motorcy-
cle is properly supported.
NOTE:
Do not depress the brake lever
when the disc and caliper are sepa-
rated.
5EK-9-E1 (TW125)<3.1> 4/6/0 11:50 PM Page 65
Page 68 of 86

6-36
PERIODIC MAINTENANCE AND MINOR REPAIR
1
2
3
4
5
6
7
8
9
EAU01495Front wheel installation
1. Install the speedometer gear
unit housing into the wheel
hub. Make sure the projections
are meshed into the slots.
2. Lift up the wheel between the
front fork legs. Make sure that
there is enough gap between
the brake pads before inserting
the brake disc and that the slot
in the speedometer gear unit
housing fits over the stopper
on the front fork outer tube.3. Install the wheel axle and axle
nut. Then, let the motorcycle
down.
4. Tighten the axle nut to the
specified torque.
5. Install the speedometer cable.EAU01496Rear wheel removalEW000122
w
8It is advisable to have a
Yamaha dealer service the
wheel.
8Securely support the motorcy-
cle so there is no danger of it
falling over.
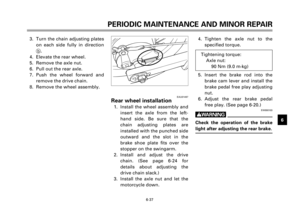
1. Loosen the wheel axle nut.
2. Remove the brake adjusting
nut and brake rod from the
brake cam lever.
1. Wheel axle nut
2. Chain adjusting plate
3. Brake adjusting nut
4. Brake rod
21
a
b
34
Tightening torque:
Axle nut:
90 Nm (9.0 m·kg)
5EK-9-E1 (TW125)<3.1> 4/6/0 11:50 PM Page 66
Page 69 of 86

6-37
PERIODIC MAINTENANCE AND MINOR REPAIR
1
2
3
4
5
6
7
8
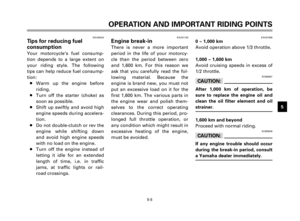
9 3. Turn the chain adjusting plates
on each side fully in direction
b.
4. Elevate the rear wheel.
5. Remove the axle nut.
6. Pull out the rear axle.
7. Push the wheel forward and
remove the drive chain.
8. Remove the wheel assembly.
EAU01497Rear wheel installation
1. Install the wheel assembly and
insert the axle from the left-
hand side. Be sure that the
chain adjusting plates are
installed with the punched side
outward and the slot in the
brake shoe plate fits over the
stopper on the swingarm.
2. Install and adjust the drive
chain. (See page 6-24 for
details about adjusting the
drive chain slack.)
3. Install the axle nut and let the
motorcycle down.4. Tighten the axle nut to the
specified torque.
5. Insert the brake rod into the
brake cam lever and install the
brake pedal free play adjusting
nut.
6. Adjust the rear brake pedal
free play. (See page 6-20.)EW000103
w
Check the operation of the brake
light after adjusting the rear brake.
Tightening torque:
Axle nut:
90 Nm (9.0 m·kg)
5EK-9-E1 (TW125)<3.1> 4/6/0 11:50 PM Page 67
Page 70 of 86
6-38
PERIODIC MAINTENANCE AND MINOR REPAIR
1
2
3
4
5
6
7
8
9
EAU01008Troubleshooting
Although Yamaha motorcycles
receive a rigid inspection before
shipment from the factory, trouble
may occur during operation.
Any problem in the fuel, compres-
sion, or ignition systems can cause
poor starting and loss of power.
The troubleshooting chart
describes a quick, easy procedure
for making checks.
If your motorcycle requires any
repair, bring it to a Yamaha dealer.
The skilled technicians at a
Yamaha dealership have the tools,
experience, and know-how to
properly service your motorcycle.
Use only genuine Yamaha parts on
your motorcycle. Imitation parts
may look like Yamaha parts, but
they are often inferior.
Consequently, they have a shorter
service life and can lead to expen-
sive repair bills.
5EK-9-E1 (TW125)<3.1> 4/6/0 11:50 PM Page 68
Page 71 of 86
PERIODIC MAINTENANCE AND MINOR REPAIR
1
2
3
4
5
6
7
8
9
6-39
EAU03009Troubleshooting chartEW000125
w
Never check the fuel system while smoking or in the vicinity of an open flame.
1. Fuel
2. Compression
3. Ignition
4. Battery
Use the electric starter.
Remove spark
There is compression.
Go to ignition check.
No compression.
Ask a Yamaha dealer to inspect.
Wet.
Dry.Wipe clean with dry cloth and Open throttle half-way and start
Ask a Yamaha dealer to inspect.
Engine turns over
Engine turns overBattery good.
Check fluid, recharge,
Use the electric starter.
Check if there is fuel
Enough fuel.
No fuel.Go to compression check.
Supply fuel.
in the fuel tank.
electrodes. plug and check
quickly.
slowly. check connections.Engine doesn’t start, go to battery
check.the engine. correct spark gap or replace plug.
Engine doesn’t start, ask a Yamahadealer to inspect.
Engine doesn’t start, go to compression check.
5EK-9-E1 (TW125)<3.1> 4/6/0 11:50 PM Page 69
Page 72 of 86

7-1
EAU01518
MOTORCYCLE CARE AND STORAGE
1
2
3
4
5
6
7
8
9
Care
The exposure of its technology
makes a motorcycle charming but
also vulnerable. Although high-
quality components are used, they
are not all rust-resistant. While a
rusty exhaust pipe may remain
unnoticed on a car, it does look
unattractive on a motorcycle.
Frequent and proper care, howev-
er, will keep your motorcycle look-
ing good, extend its life and main-
tain its performance. Moreover, the
warranty states that the vehicle
must be properly taken care of. For
all these reasons, it is recommend-
ed that you observe the following
cleaning and storing precautions.Before cleaning
1. Cover up the muffler outlet
with a plastic bag.
2. Make sure that all caps and
covers as well as all electrical
couplers and connectors,
including the spark plug cap,
are tightly installed.
3. Remove extremely stubborn
dirt, like oil burnt onto the
crankcase, with a degreasing
agent and a brush, but never
apply such products onto
seals, gaskets, sprockets, the
drive chain and wheel axles.
Always rinse the dirt and
degreaser off with water.Cleaning
After normal use
Remove dirt with warm water, a
neutral detergent and a soft clean
sponge, then rinse with plenty of
clean water. Use a tooth or bottle
brush for hard-to-reach parts.
Tougher dirt and insects will come
off more easily if the area is cov-
ered with a wet cloth for a few
minutes before cleaning.
ECA00010
cC
8Avoid using strong acidic
wheel cleaners, especially on
spoked wheels. If you do use
such products for hard-to-
remove dirt, do not leave it on
any longer than instructed,
then thoroughly rinse it off
with water, immediately dry
the area and apply a corrosion
protection spray.
5EK-9-E1 (TW125)<3.1> 4/6/0 11:50 PM Page 70