Page 156 of 4770
Using a cylinder gauge, measure the cylinder bore
diameter at positions A, B and C in the thrust and axial
directions.
Standard diameter:
STD
Mark ª1º
87.000 ± 87.010 mm (3.4252 ± 3.4256 in.)
Mark ª2º
87.010 ± 87.020 mm (3.4256 ± 3.4260 in.)
Mark ª3º
87.020 ± 87.030 mm (3.4260 ± 3.4264 In.)
Maximum diameter:
STD
87.23 mm (3.4342 in.)
O/S 0.50
87.73 mm (3.4350 In.)
If the diameter is greater than maximum, rebore all the 4
cylinders. If necessary, replace the cylinder block. 4. INSPECT CYLINDER BORE DIAMETER
HINT: There are 3 sizes of the standard cylinder bore
diameter, marked ª1º, ª2º and ª3º accordingly. The
mark is stamped on the top of the cylinder block.
5. REMOVE CYLINDER RIDGE
If the wear is less than 0.2 mm (0.008 in.), using a
ridge reamer, grind the top of the cylinder.
± 5S±FE ENGINEENGINE MECHANICALEG1±106
Page 159 of 4770

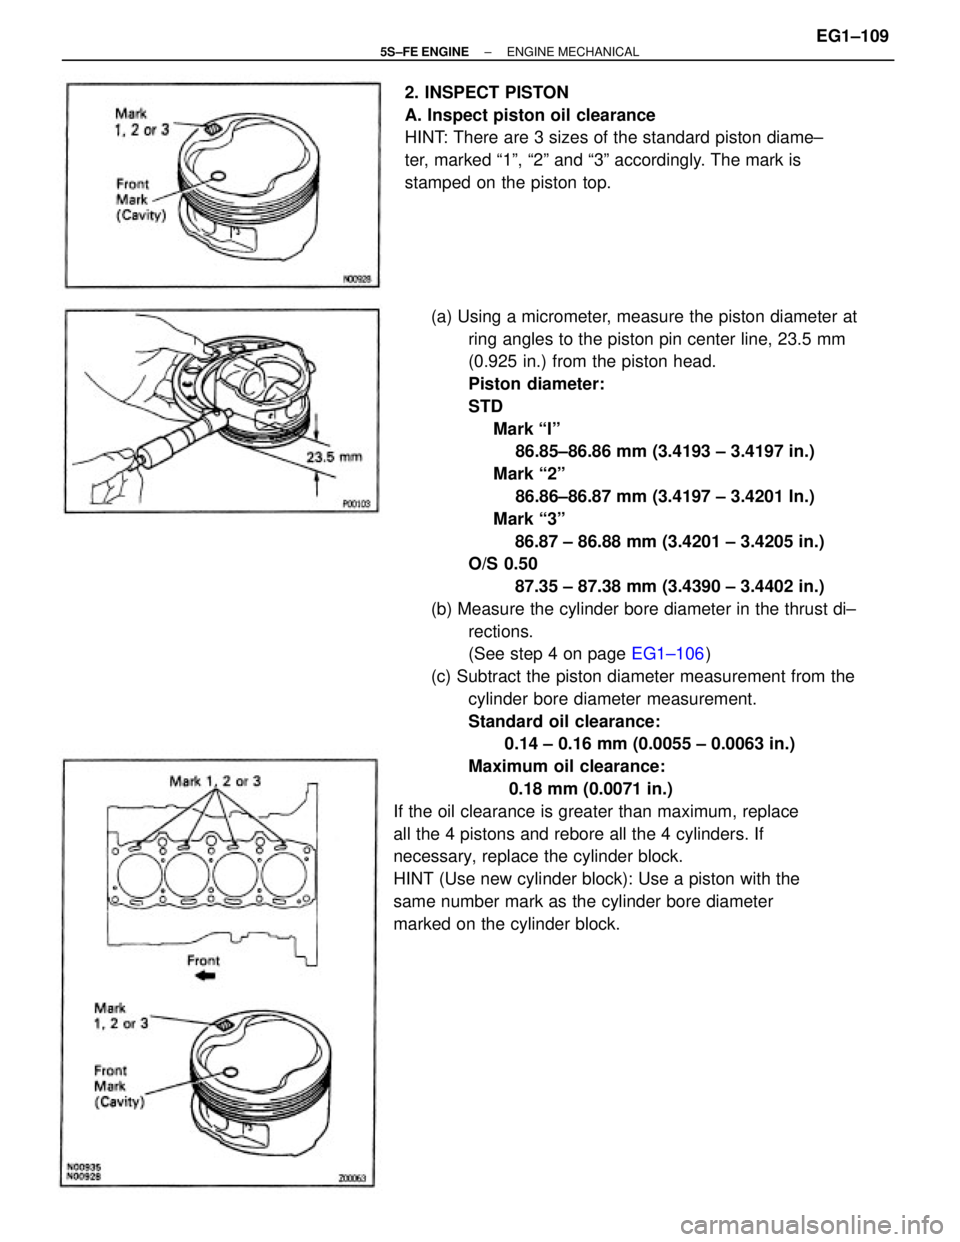
(a) Using a micrometer, measure the piston diameter at
ring angles to the piston pin center line, 23.5 mm
(0.925 in.) from the piston head.
Piston diameter:
STD
Mark ªIº
86.85±86.86 mm (3.4193 ± 3.4197 in.)
Mark ª2º
86.86±86.87 mm (3.4197 ± 3.4201 In.)
Mark ª3º
86.87 ± 86.88 mm (3.4201 ± 3.4205 in.)
O/S 0.50
87.35 ± 87.38 mm (3.4390 ± 3.4402 in.)
(b) Measure the cylinder bore diameter in the thrust di±
rections.
(See step 4 on page EG1±106)
(c) Subtract the piston diameter measurement from the
cylinder bore diameter measurement.
Standard oil clearance:
0.14 ± 0.16 mm (0.0055 ± 0.0063 in.)
Maximum oil clearance:
0.18 mm (0.0071 in.)
If the oil clearance is greater than maximum, replace
all the 4 pistons and rebore all the 4 cylinders. If
necessary, replace the cylinder block.
HINT (Use new cylinder block): Use a piston with the
same number mark as the cylinder bore diameter
marked on the cylinder block.2. INSPECT PISTON
A. Inspect piston oil clearance
HINT: There are 3 sizes of the standard piston diame±
ter, marked ª1º, ª2º and ª3º accordingly. The mark is
stamped on the piston top.
± 5S±FE ENGINEENGINE MECHANICALEG1±109
Page 160 of 4770

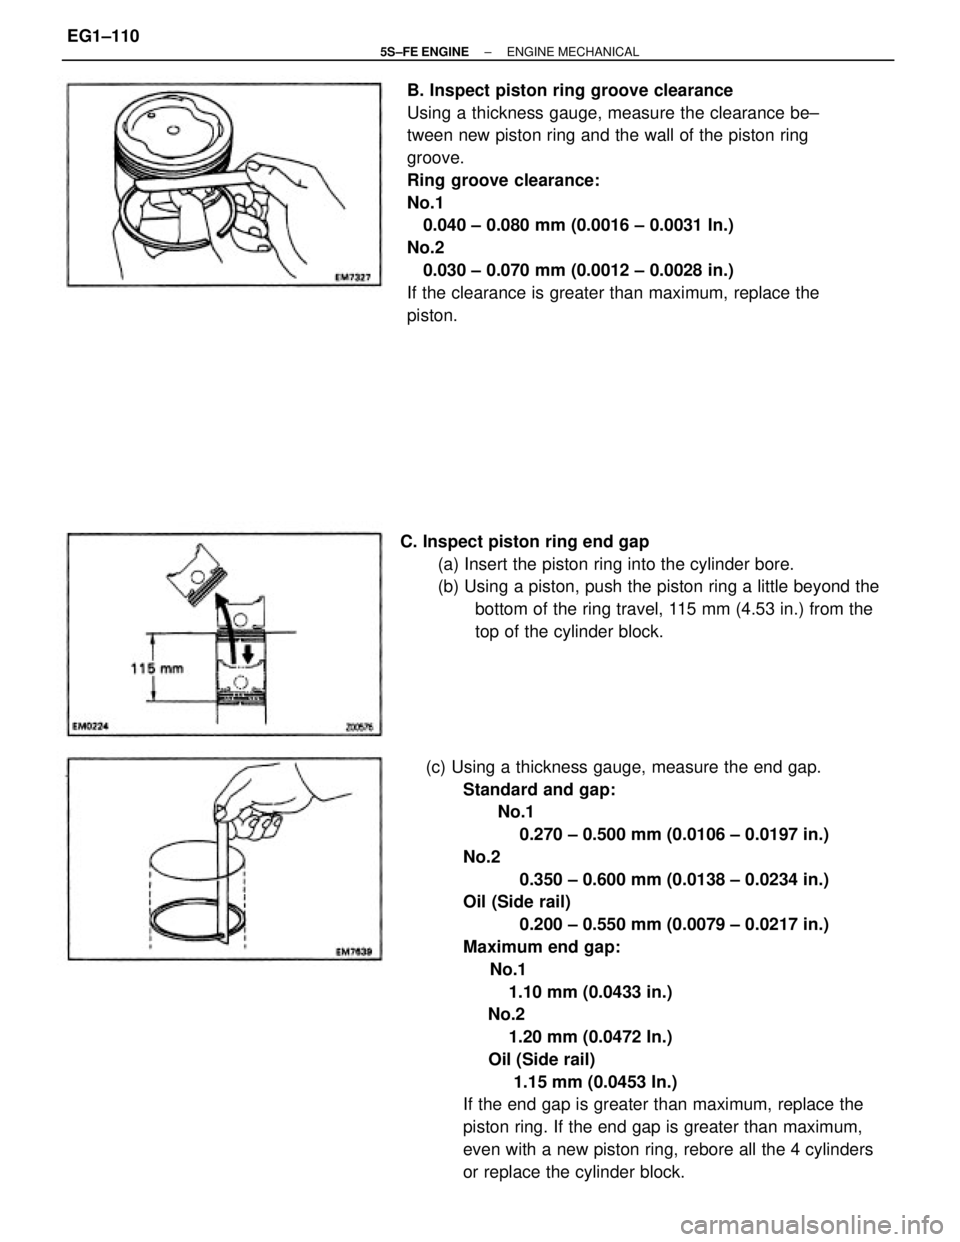
(c) Using a thickness gauge, measure the end gap.
Standard and gap:
No.1
0.270 ± 0.500 mm (0.0106 ± 0.0197 in.)
No.2
0.350 ± 0.600 mm (0.0138 ± 0.0234 in.)
Oil (Side rail)
0.200 ± 0.550 mm (0.0079 ± 0.0217 in.)
Maximum end gap:
No.1
1.10 mm (0.0433 in.)
No.2
1.20 mm (0.0472 In.)
Oil (Side rail)
1.15 mm (0.0453 In.)
If the end gap is greater than maximum, replace the
piston ring. If the end gap is greater than maximum,
even with a new piston ring, rebore all the 4 cylinders
or replace the cylinder block. B. Inspect piston ring groove clearance
Using a thickness gauge, measure the clearance be±
tween new piston ring and the wall of the piston ring
groove.
Ring groove clearance:
No.1
0.040 ± 0.080 mm (0.0016 ± 0.0031 In.)
No.2
0.030 ± 0.070 mm (0.0012 ± 0.0028 in.)
If the clearance is greater than maximum, replace the
piston.
C. Inspect piston ring end gap
(a) Insert the piston ring into the cylinder bore.
(b) Using a piston, push the piston ring a little beyond the
bottom of the ring travel, 115 mm (4.53 in.) from the
top of the cylinder block.
± 5S±FE ENGINEENGINE MECHANICALEG1±110
Page 165 of 4770

CRANKSHAFT INSPECTION AND REPAIR
1. INSPECT CRANKSHAFT FOR RUNOUT
(a) Place the crankshaft on V±blocks.
(b) Using a dial indicator, measure the circle runout at the
center journal.
Maximum circle runout:
0.06 mm (0.0024 In.)
If the circle runout is greater than maximum, replace
the crankshaft.
2. INSPECT MAIN JOURNALS AND CRANK PINS
(a) Using a micrometer, measure the diameter of each
main journal and crank pin.
Main journal diameter:
STD size
54.988 ± 55.003 mm (2.1653±2.1655 in.)
U/S 0.25
54.745 ± 54.755 mm (2.1553±2.1557 in.)
Crank pin diameter:
STD size
51.985 ± 52.000 mm (2.0466±2.0472 in.)
U/S 0.25
51.745 ± 51.755 mm (2.0372±2.0376 in.)
If the diameter is not as specified, check the oil clear±
ance (See pages EG1±98 to 104). If necessary, grind
or replace the crankshaft.
(b) Check each main journal and crank pin for taper and
out±of±round as shown.
Maximum taper and out±of±round:
0.02 mm (0.0008 in.)
If the taper and out±of±round is greater than maxi±
mum, replace the crankshaft.
3. IF NECESSARY. GRIND AND HONE MAIN JOUR±
NALS AND/OR CRANK PINS
Grind and hone the main journals and/or crank pins to
the finished undersized diameter (See procedure in
step 2).
Install new main journal and/or crankshaft pin under±
sized bearings.
± 5S±FE ENGINEENGINE MECHANICALEG1±115
Page 166 of 4770
B. If oil pump is installed to the cylinder block:
(a) Using a knife, cut off the oil seal lip.
(b) Using a screwdriver, pry out the oil seal.
NOTICE: Be careful not to damage the crankshaft. Tape
the screwdriver tip.
CRANKSHAFT OIL SEALS
REPLACEMENT
HINT: There are 2 methods (A and B) to replace the oil
seal which are as follows:
(b) Using SST and a hammer, tap in a new oil seal until its
surface is flush with the oil pump case edge.
SST 09223 ± 63010
(c) Apply MP grease to the oil seal lip. 1. REPLACE CRANKSHAFT FRONT OIL SEAL
A. If oil pump is removed from cylinder block:
(a) Using a screwdriver and a hammer, tap out the oil
seal.
(c) Apply MP grease to a new oil seal lip.
(d) Using SST and a hammer, tap in the oil seal until its
surface is flush with the oil pump case edge.
SST 09226 ±10010
± 5S±FE ENGINEENGINE MECHANICALEG1±116
Page 167 of 4770
(b) Using SST and a hammer, tap in a new oil seal until its
surface is flush with the rear oil seal edge.
SST 09223±63010
(c) Apply MP grease to the oil seal lip.
B. If rear oil seal retainer Is installed to cylinder block:
(a) Using a knife, cut off the oil seal lip.
(b) Using a screwdriver, pry out the oil seal.
NOTICE: Be careful not to damage the crankshaft. Tape
the screwdriver tip.
2. REPLACE CRANKSHAFT REAR OIL SEAL
A. If rear oil seal retainer is removed from cylinder
block:
(a) Using screwdriver and hammer, tap out the oil seal.
(c) Apply MP grease to a new oil seal lip.
(d) Using SST and a hammer, tap in the oil seal until its
surface is flush with the rear oil seal retainer edge.
SST 09223 ± 63010
± 5S±FE ENGINEENGINE MECHANICALEG1±117
Page 169 of 4770

CYLINDER BLOCK ASSEMBLY
(See Components for Cylinder Block Disassembly and
Assembly)
HINT:
wThoroughly clean all parts to be assembled.
wBefore installing the parts, apply new engine oil
to all sliding and rotating surfaces.
wReplace all gaskets, 0±rings and oil seals with
new parts.
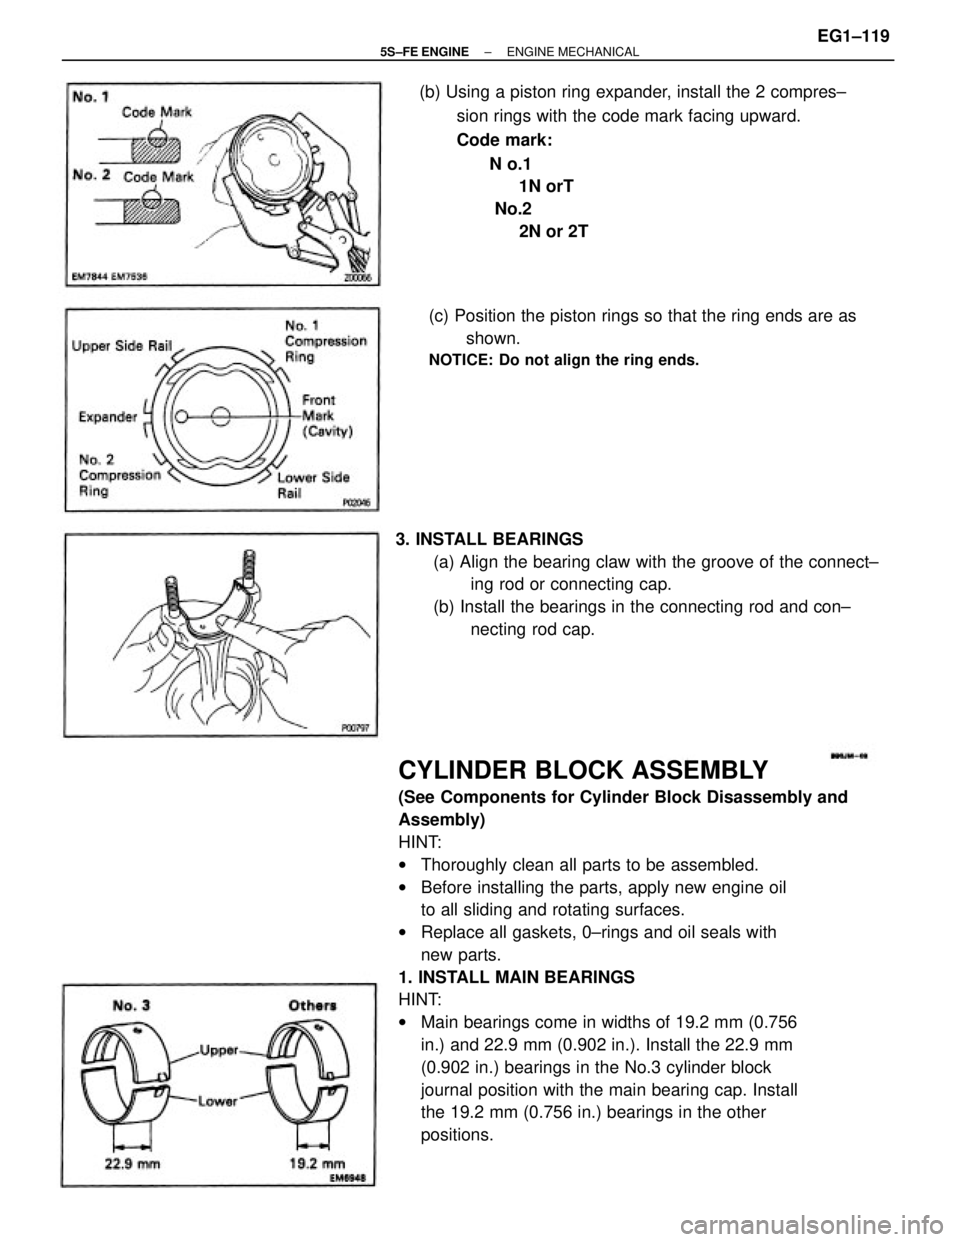
1. INSTALL MAIN BEARINGS
HINT:
wMain bearings come in widths of 19.2 mm (0.756
in.) and 22.9 mm (0.902 in.). Install the 22.9 mm
(0.902 in.) bearings in the No.3 cylinder block
journal position with the main bearing cap. Install
the 19.2 mm (0.756 in.) bearings in the other
positions. (b) Using a piston ring expander, install the 2 compres±
sion rings with the code mark facing upward.
Code mark:
N o.1
1N orT
No.2
2N or 2T
3. INSTALL BEARINGS
(a) Align the bearing claw with the groove of the connect±
ing rod or connecting cap.
(b) Install the bearings in the connecting rod and con±
necting rod cap. (c) Position the piston rings so that the ring ends are as
shown.
NOTICE: Do not align the ring ends.
± 5S±FE ENGINEENGINE MECHANICALEG1±119
Page 170 of 4770
(b) Align the bearing claw with the claw groove of the
main bearing cap, and push in the 5 lower bearings.
HINT: A number is marked on each main bearing cap
to indicate the installation position.
2. INSTALL UPPER THRUST WASHERS
Install the 2 thrust washers under the No.3 journal
position of the cylinder block with the oil grooves
facing outward.(a) Align the bearing claw with the claw groove of the
cylinder block, and push in the 5 upper bearings. wUpper bearings have an oil groove and oil holes;
lower bearings do not.
3. PLACE CRANKSHAFT ON CYLINDER BLOCK
± 5S±FE ENGINEENGINE MECHANICALEG1±120