Page 1383 of 4770

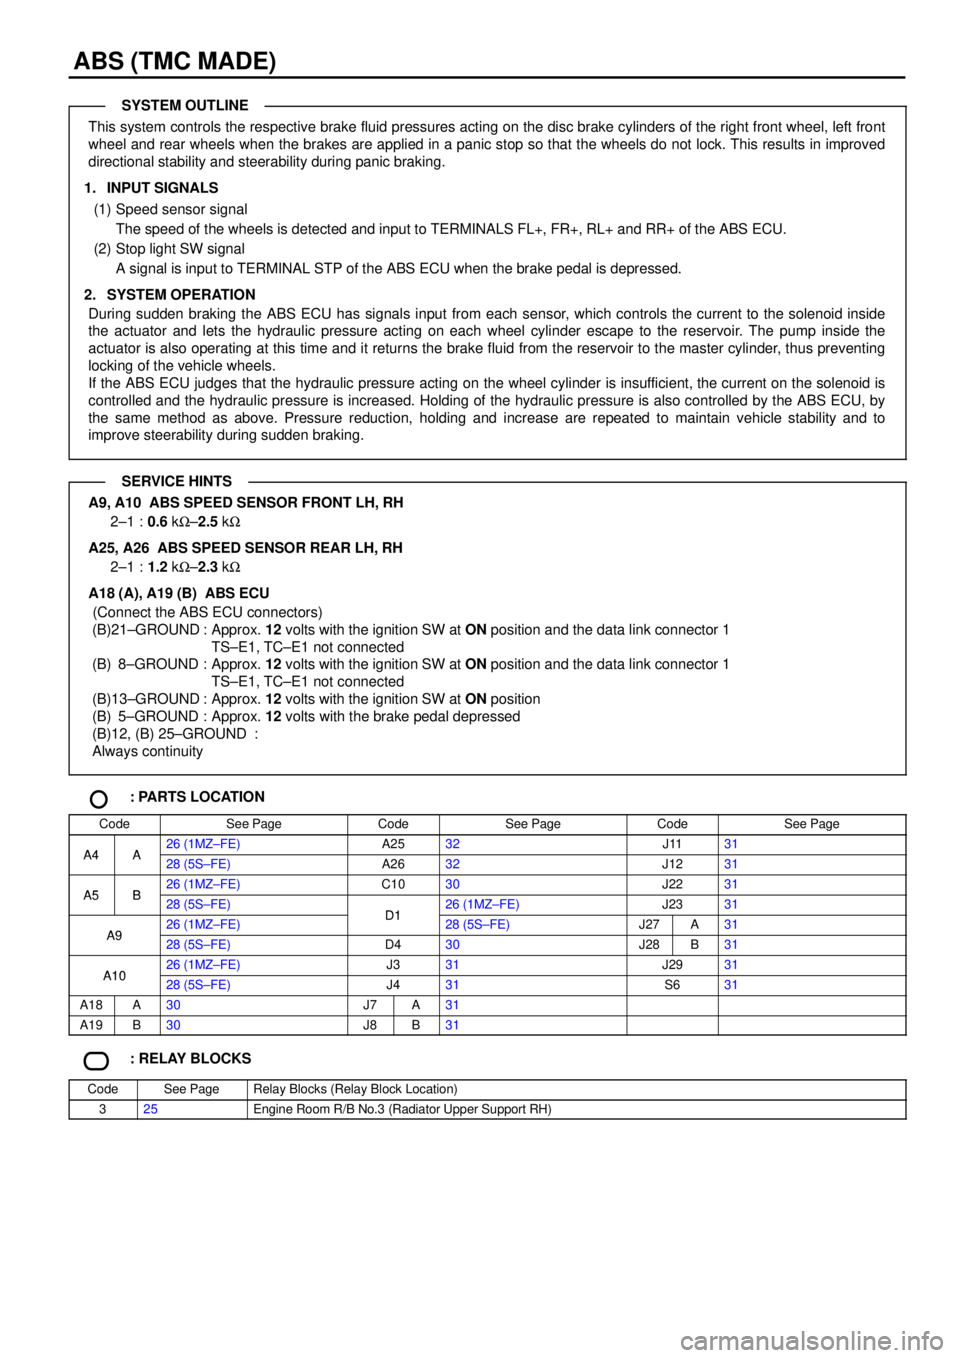
ABS (TMC MADE)
This system controls the respective brake fluid pressures acting on the disc brake cylinders of the right front wheel, left front
wheel and rear wheels when the brakes are applied in a panic stop so that the wheels do not lock. This results in improved
directional stability and steerability during panic braking.
1. INPUT SIGNALS
(1) Speed sensor signal
The speed of the wheels is detected and input to TERMINALS FL+, FR+, RL+ and RR+ of the ABS ECU.
(2) Stop light SW signal
A signal is input to TERMINAL STP of the ABS ECU when the brake pedal is depressed.
2. SYSTEM OPERATION
During sudden braking the ABS ECU has signals input from each sensor, which controls the current to the solenoid inside
the actuator and lets the hydraulic pressure acting on each wheel cylinder escape to the reservoir. The pump inside the
actuator is also operating at this time and it returns the brake fluid from the reservoir to the master cylinder, thus preventing
locking of the vehicle wheels.
If the ABS ECU judges that the hydraulic pressure acting on the wheel cylinder is insufficient, the current on the solenoid is
controlled and the hydraulic pressure is increased. Holding of the hydraulic pressure is also controlled by the ABS ECU, by
the same method as above. Pressure reduction, holding and increase are repeated to maintain vehicle stability and to
improve steerability during sudden braking.
A9, A10 ABS SPEED SENSOR FRONT LH, RH
2±1 :0.6 kW±2.5 kW
A25, A26 ABS SPEED SENSOR REAR LH, RH
2±1 :1.2 kW±2.3 kW
A18 (A), A19 (B) ABS ECU
(Connect the ABS ECU connectors)
(B)21±GROUND : Approx. 12 volts with the ignition SW at ON position and the data link connector 1
TS±E1, TC±E1 not connected
(B) 8±GROUND : Approx. 12 volts with the ignition SW at ON position and the data link connector 1
TS±E1, TC±E1 not connected
(B)13±GROUND : Approx. 12 volts with the ignition SW at ON position
(B) 5±GROUND : Approx. 12 volts with the brake pedal depressed
(B)12, (B) 25±GROUND :
Always continuity
: PARTS LOCATION
CodeSee PageCodeSee PageCodeSee Page
A4A26 (1MZ±FE)A2532J1131A4A28 (5S±FE)A2632J1231
A5B26 (1MZ±FE)C1030J2231A5B28 (5S±FE)D126 (1MZ±FE)J2331
A926 (1MZ±FE)D128 (5S±FE)J27A31A928 (5S±FE)D430J28B31
A1026 (1MZ±FE)J331J2931A1028 (5S±FE)J431S631
A18A30J7A31
A19B30J8B31
: RELAY BLOCKS
CodeSee PageRelay Blocks (Relay Block Location)
325Engine Room R/B No.3 (Radiator Upper Support RH)
SYSTEM OUTLINE
SERVICE HINTS
Page 1389 of 4770

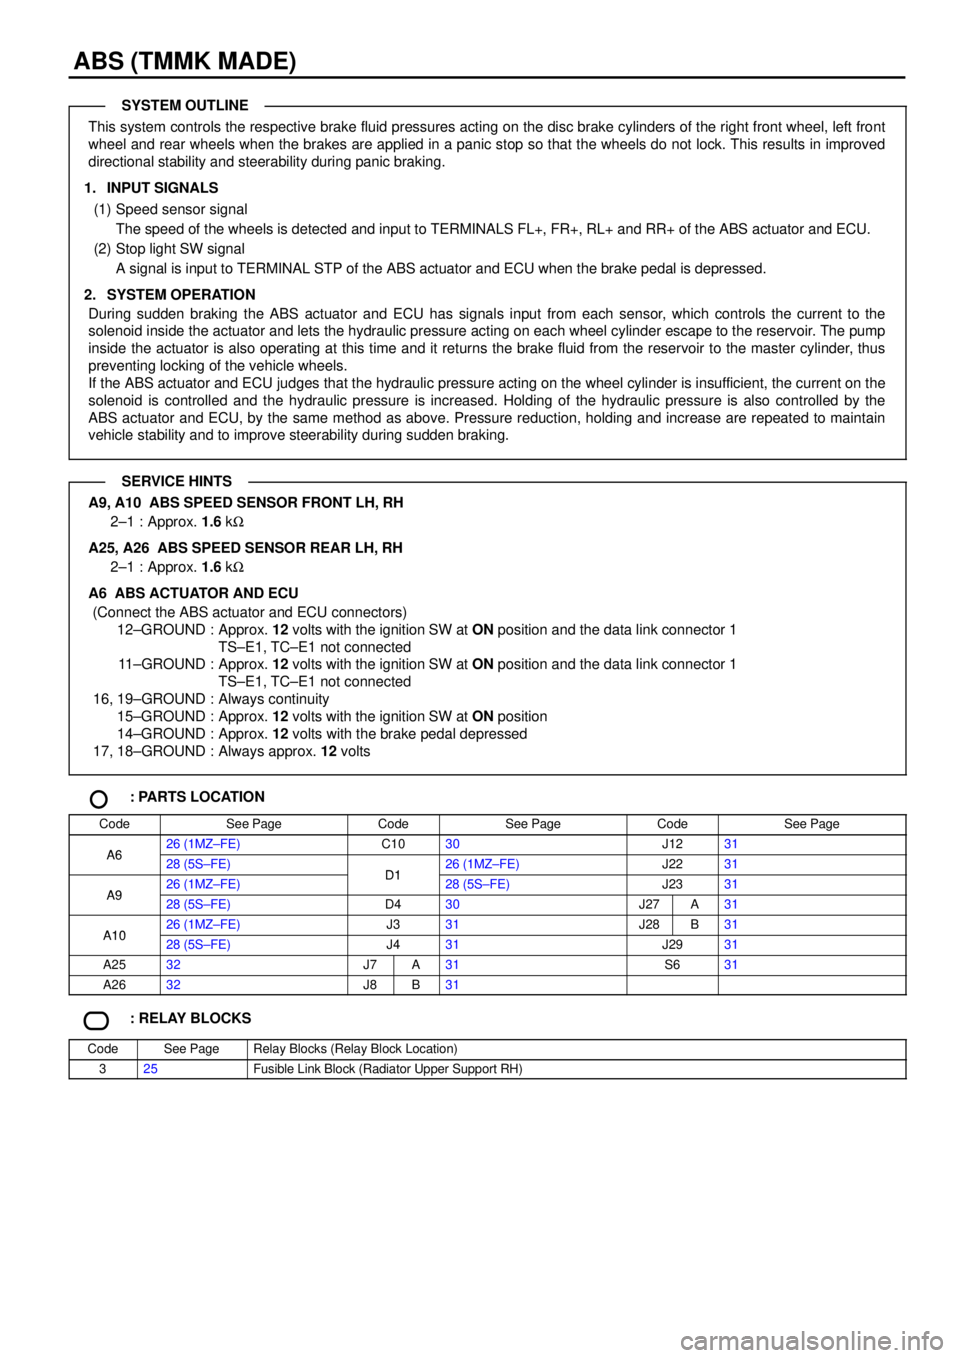
ABS (TMMK MADE)
This system controls the respective brake fluid pressures acting on the disc brake cylinders of the right front wheel, left front
wheel and rear wheels when the brakes are applied in a panic stop so that the wheels do not lock. This results in improved
directional stability and steerability during panic braking.
1. INPUT SIGNALS
(1) Speed sensor signal
The speed of the wheels is detected and input to TERMINALS FL+, FR+, RL+ and RR+ of the ABS actuator and ECU.
(2) Stop light SW signal
A signal is input to TERMINAL STP of the ABS actuator and ECU when the brake pedal is depressed.
2. SYSTEM OPERATION
During sudden braking the ABS actuator and ECU has signals input from each sensor, which controls the current to the
solenoid inside the actuator and lets the hydraulic pressure acting on each wheel cylinder escape to the reservoir. The pump
inside the actuator is also operating at this time and it returns the brake fluid from the reservoir to the master cylinder, thus
preventing locking of the vehicle wheels.
If the ABS actuator and ECU judges that the hydraulic pressure acting on the wheel cylinder is insufficient, the current on the
solenoid is controlled and the hydraulic pressure is increased. Holding of the hydraulic pressure is also controlled by the
ABS actuator and ECU, by the same method as above. Pressure reduction, holding and increase are repeated to maintain
vehicle stability and to improve steerability during sudden braking.
A9, A10 ABS SPEED SENSOR FRONT LH, RH
2±1 : Approx. 1.6 kW
A25, A26 ABS SPEED SENSOR REAR LH, RH
2±1 : Approx. 1.6 kW
A6 ABS ACTUATOR AND ECU
(Connect the ABS actuator and ECU connectors)
12±GROUND : Approx. 12 volts with the ignition SW at ON position and the data link connector 1
TS±E1, TC±E1 not connected
11±GROUND : Approx. 12 volts with the ignition SW at ON position and the data link connector 1
TS±E1, TC±E1 not connected
16, 19±GROUND : Always continuity
15±GROUND : Approx. 12 volts with the ignition SW at ON position
14±GROUND : Approx. 12 volts with the brake pedal depressed
17, 18±GROUND : Always approx. 12 volts
: PARTS LOCATION
CodeSee PageCodeSee PageCodeSee Page
A626 (1MZ±FE)C1030J1231A628 (5S±FE)D126 (1MZ±FE)J2231
A926 (1MZ±FE)D128 (5S±FE)J2331A928 (5S±FE)D430J27A31
A1026 (1MZ±FE)J331J28B31A1028 (5S±FE)J431J2931
A2532J7A31S631
A2632J8B31
: RELAY BLOCKS
CodeSee PageRelay Blocks (Relay Block Location)
325Fusible Link Block (Radiator Upper Support RH)
SYSTEM OUTLINE
SERVICE HINTS
Page 1403 of 4770
HORN
6
11
G±B
G±W
G±W FROM POWER SOURCE SYSTEM (
SEE PAGE 50)
10A
HORN
HORN
(
HIGH)HORN
(
LOW) H 5 H 6 23 15
2K 10 2F1
G±B
C C
JUNCTION
CONNECTOR J 2HORN
RELAY
HORN SW
[COMB. SW] C12
G±W
Page 1404 of 4770
HORN RELAY [ENGINE ROOM J/B NO.2]
5±3 : Closed with the horn SW on
: PARTS LOCATION
CodeSee PageCodeSee PageCodeSee Page
C1230H528 (5S±FE)H628 (5S±FE)
H526 (1MZ±FE)H626 (1MZ±FE)J231
: JUNCTION BLOCK AND WIRE HARNESS CONNECTOR
CodeSee PageJunction Block and Wire Harness (Connector Location)
2F22Engine Room Main Wire and Engine Room J/B No.2 (Engine Compartment Left)
2K22Cowl Wire And Engine Room J/B No.2 (Engine Compartment Left)
XX���6
11� � � � �
CCC���� BLACK BLACK BLACK BLACK
(Hint : See Page 7)
C12 H5 H6 J2
SERVICE HINTS
Page 1407 of 4770
KEY REMINDER AND SEAT BELT WARNING
2 1
1
2 1
2 1 2J 12 1D2
1T 3
1M 51S71S4
1J 71M 3DD
1W 1
IGBL
R±W
R L±B W±B
R±G
R±Y R±Y
R±Y W±B W±B
W±B W±B
R±L R±LFROM POWER SOURCE SYSTEM (
SEE PAGE 50)
10A
GAU GE7. 5A
DOME
INTEGRATION RELAY SEAT BELT
WARNING LIGHT
[COMB. METER]JUNCTION
CONNECTOR
UNLOCK
WARNING S W
DOOR COURTESY
SW FRONT LHBUCKLE
SW LHBUCKLE
SW LH J 4
U 1
D12 B 7 B 6
(
*1)
(
W/ O POWER SE AT)
A
A
JUNCTION
CONNECTOR J40
(
W/O POWER SEAT)(
*1) (
*1) (
*1)
BQ1 3
A
JUNCTION
CONNECTOR J11971
8 6 5 10C 7
A 4
BUZZER* 1 : W/ POWER SEAT
BQ1 1 C C 8 A , C10
Page 1408 of 4770

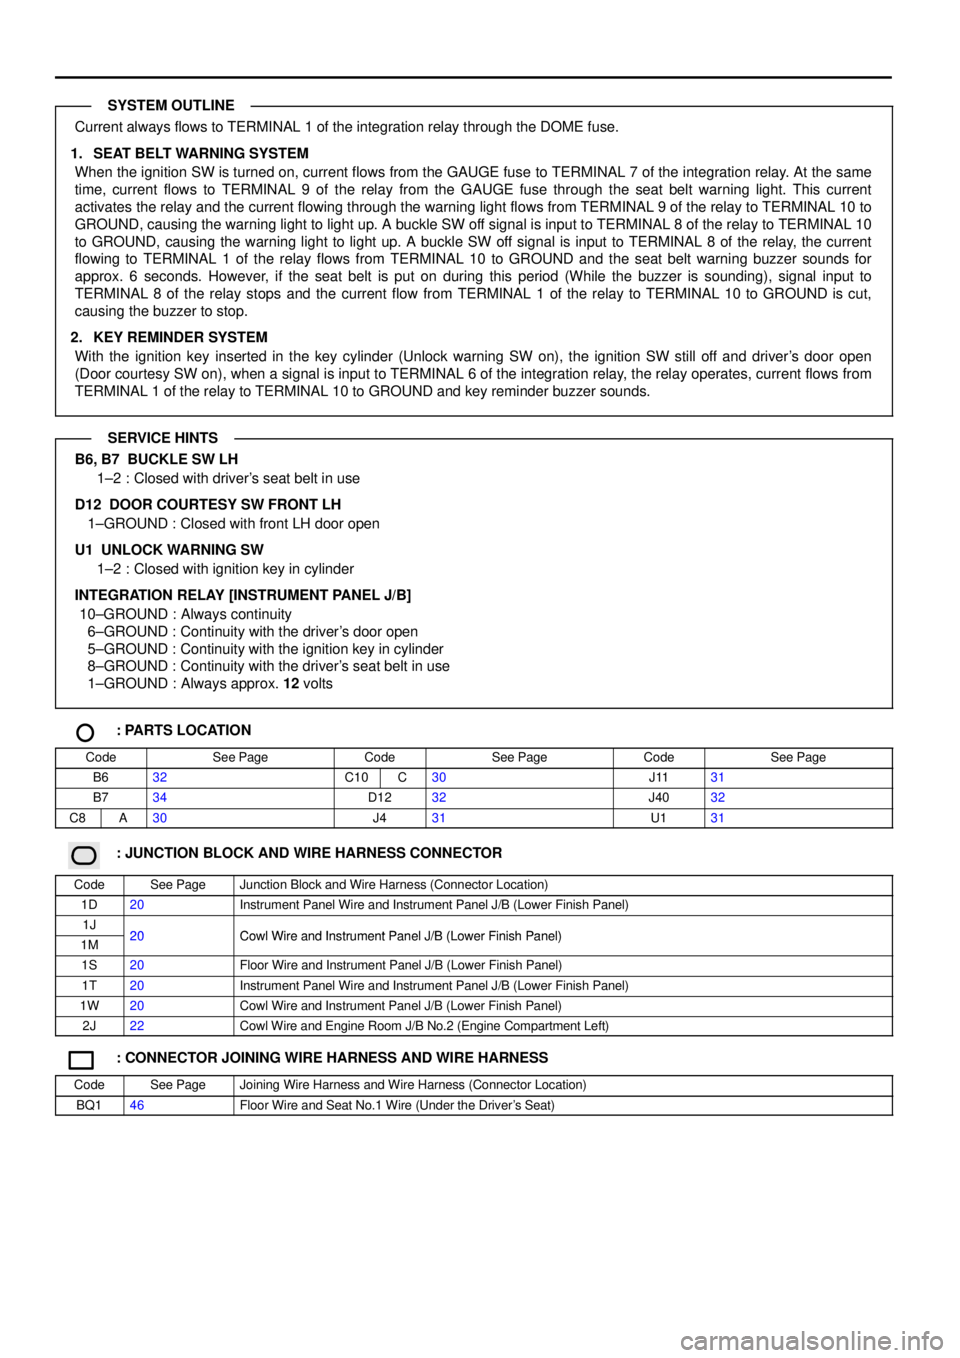
Current always flows to TERMINAL 1 of the integration relay through the DOME fuse.
1. SEAT BELT WARNING SYSTEM
When the ignition SW is turned on, current flows from the GAUGE fuse to TERMINAL 7 of the integration relay. At the same
time, current flows to TERMINAL 9 of the relay from the GAUGE fuse through the seat belt warning light. This current
activates the relay and the current flowing through the warning light flows from TERMINAL 9 of the relay to TERMINAL 10 to
GROUND, causing the warning light to light up. A buckle SW off signal is input to TERMINAL 8 of the relay to TERMINAL 10
to GROUND, causing the warning light to light up. A buckle SW off signal is input to TERMINAL 8 of the relay, the current
flowing to TERMINAL 1 of the relay flows from TERMINAL 10 to GROUND and the seat belt warning buzzer sounds for
approx. 6 seconds. However, if the seat belt is put on during this period (While the buzzer is sounding), signal input to
TERMINAL 8 of the relay stops and the current flow from TERMINAL 1 of the relay to TERMINAL 10 to GROUND is cut,
causing the buzzer to stop.
2. KEY REMINDER SYSTEM
With the ignition key inserted in the key cylinder (Unlock warning SW on), the ignition SW still off and driver's door open
(Door courtesy SW on), when a signal is input to TERMINAL 6 of the integration relay, the relay operates, current flows from
TERMINAL 1 of the relay to TERMINAL 10 to GROUND and key reminder buzzer sounds.
B6, B7 BUCKLE SW LH
1±2 : Closed with driver's seat belt in use
D12 DOOR COURTESY SW FRONT LH
1±GROUND : Closed with front LH door open
U1 UNLOCK WARNING SW
1±2 : Closed with ignition key in cylinder
INTEGRATION RELAY [INSTRUMENT PANEL J/B]
10±GROUND : Always continuity
6±GROUND : Continuity with the driver's door open
5±GROUND : Continuity with the ignition key in cylinder
8±GROUND : Continuity with the driver's seat belt in use
1±GROUND : Always approx. 12 volts
: PARTS LOCATION
CodeSee PageCodeSee PageCodeSee Page
B632C10C30J1131
B734D1232J4032
C8A30J431U131
: JUNCTION BLOCK AND WIRE HARNESS CONNECTOR
CodeSee PageJunction Block and Wire Harness (Connector Location)
1D20Instrument Panel Wire and Instrument Panel J/B (Lower Finish Panel)
1J20Cowl Wire and Instrument Panel J/B (Lower Finish Panel)1M20Cowl Wire and Instrument Panel J/B (Lower Finish Panel)
1S20Floor Wire and Instrument Panel J/B (Lower Finish Panel)
1T20Instrument Panel Wire and Instrument Panel J/B (Lower Finish Panel)
1W20Cowl Wire and Instrument Panel J/B (Lower Finish Panel)
2J22Cowl Wire and Engine Room J/B No.2 (Engine Compartment Left)
: CONNECTOR JOINING WIRE HARNESS AND WIRE HARNESS
CodeSee PageJoining Wire Harness and Wire Harness (Connector Location)
BQ146Floor Wire and Seat No.1 Wire (Under the Driver's Seat)
SYSTEM OUTLINE
SERVICE HINTS
Page 1415 of 4770

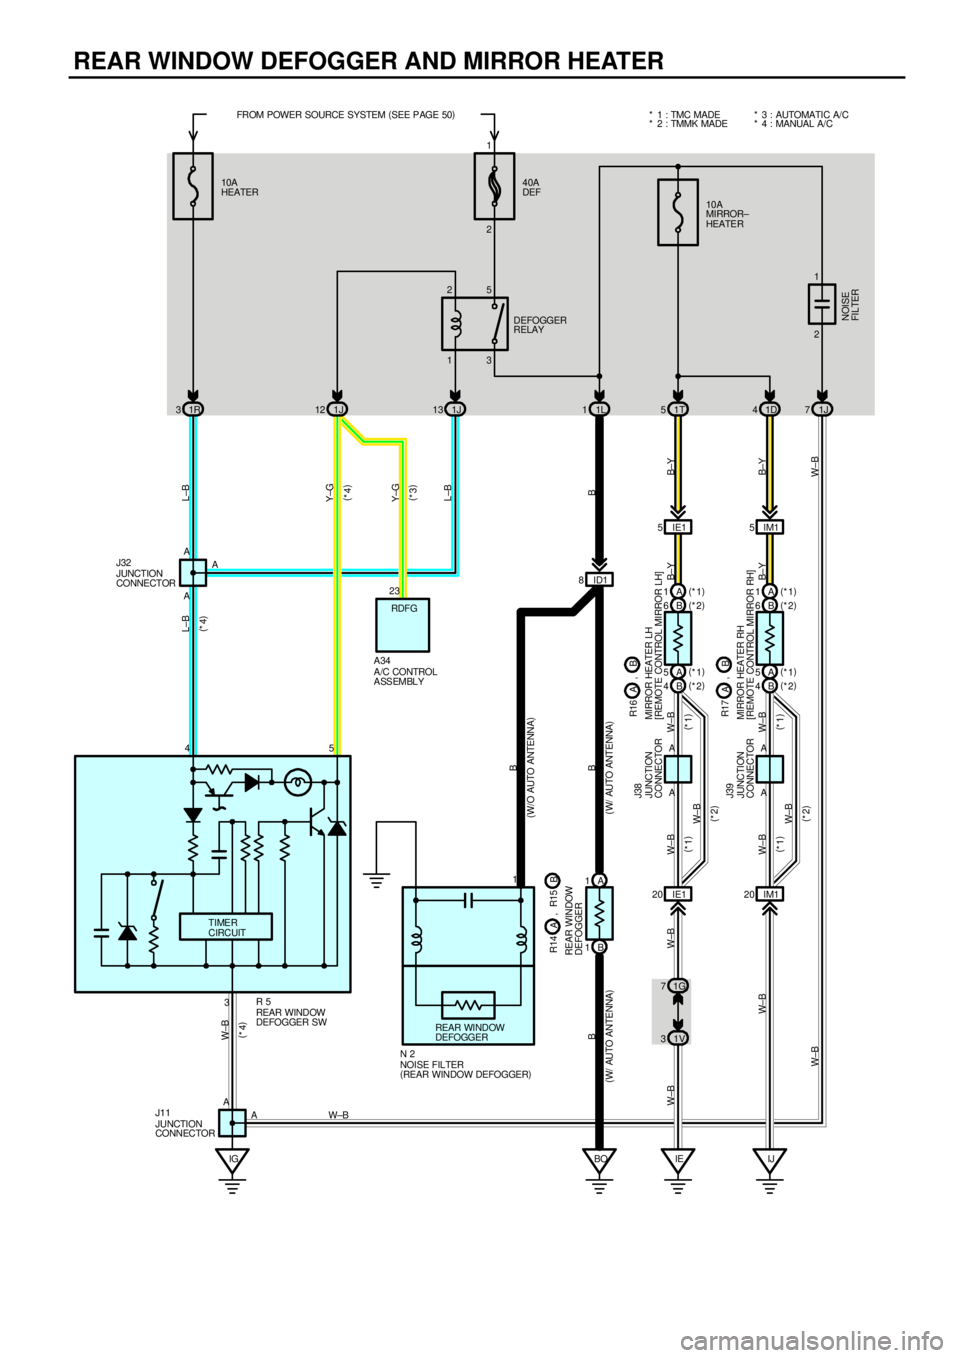
REAR WINDOW DEFOGGER AND MIRROR HEATER
1R 31J13
IE BOA 1
B 1
IJ 1V 31G 7A A 10A
HEATER40A
DEF
DEFOGGER
RELAY
JUNCTION
CONNECTOR
FROM POWER SOURCE SYSTEM (
SEE PAGE 50)
W±B W±BBB
W±BJ38
13 25
ID1 8
B
2
IGIE1 20 IM120 IE1 5IM15 10A
MIRROR±
HEATER
1T 51D4 1L 1 1J 12
3 A
A
A 45 A
A A
REAR WINDOW
DEFOGGER SW R 5 JUNCTION
CONNECTOR J32
JUNCTION
CONNECTOR J39
MIRROR HEATER RH
[REMOTE CONTROL MIRROR RH] MIRROR HEATER LH
[REMOTE CONTROL MIRROR LH]
JUNCTION
CONNECTOR J11
L±B
L±B Y±G L±B
B W±B
W± BW±B
W±B W±B
B±Y B±Y B±Y
B±Y
1
TIMER
CIRCUIT
(
W/ AUTO ANTENNA) (
W/ AUTO ANTENNA)
REAR WINDOW
DEFOGGER
(
W/O AUTO ANTENNA)
NOISE FILTER
(
REAR WINDOW DEFOGGER) N 21B 6(
*2) A 1(
*1)
B 6(
*2) A 1(
*1)
B 4(
*2) A 5(
*1)
B 4(
*2) A 5(
*1) * 2 : TMMK MADE * 1 : TMC MADE
R14
REAR WINDOW
DEFOGGERB A, R15
B R17
A, B R16 A ,
RDFG
(
*4)
Y±G
(
*3)
A /C CONTROL
ASSEMBLY A34
(
*4)
2 1
1J 7
W±B
NOISE
FI L TER (
*1)
(
*1) (
*1)
(
*1)W± B
W± B(
*2)
(
*2) (
*4)
23* 4 : MANUAL A/C * 3 : AUTOMATI C A/ C
W±B
AW±B
Page 1416 of 4770
![TOYOTA CAMRY 2000 Service Repair Manual DEFOGGER RELAY [INSTRUMENT PANEL J/B]
5±3 : Closed with the ignition SW on and the rear window defogger SW on
R5 REAR WINDOW DEFOGGER SW
4±GROUND : Approx. 12 volts with the ignition SW on
3±GROUN TOYOTA CAMRY 2000 Service Repair Manual DEFOGGER RELAY [INSTRUMENT PANEL J/B]
5±3 : Closed with the ignition SW on and the rear window defogger SW on
R5 REAR WINDOW DEFOGGER SW
4±GROUND : Approx. 12 volts with the ignition SW on
3±GROUN](/manual-img/14/57447/w960_57447-1415.png)
DEFOGGER RELAY [INSTRUMENT PANEL J/B]
5±3 : Closed with the ignition SW on and the rear window defogger SW on
R5 REAR WINDOW DEFOGGER SW
4±GROUND : Approx. 12 volts with the ignition SW on
3±GROUND : Always continuity
5±GROUND : Continuity with the rear window defogger SW on and approx. 15 minutes thereafter
R16 (A), (B), R17 (A), (B) MIRROR HEATER LH, RH [REMOTE CONTROL MIRROR LH, RH]
(A)1, (B) 6±GROUND : Approx. 12 volts with the rear window defogger SW on
(A)5, (B) 4±GROUND : Always continuity
: PARTS LOCATION
CodeSee PageCodeSee PageCodeSee Page
A3430N233R16B33
J1131R531R17A33
J3231R14A33R17B33
J3832R15B33
J3932R16A33
: JUNCTION BLOCK AND WIRE HARNESS CONNECTOR
CodeSee PageJunction Block and Wire Harness (Connector Location)
1D20Instrument Panel Wire and Instrument Panel J/B (Lower Finish Panel)1G20Instrument Panel Wire and Instrument Panel J/B (Lower Finish Panel)
1J
1L20Cowl Wire and Instrument Panel J/B (Lower Finish Panel)
1R
()
1T20Instrument Panel Wire and Instrument Panel J/B (Lower Finish Panel)
1V20Cowl Wire and Instrument Panel J/B (Lower Finish Panel)
: CONNECTOR JOINING WIRE HARNESS AND WIRE HARNESS
CodeSee PageJoining Wire Harness and Wire Harness (Connector Location)
ID140Floor Wire and Cowl Wire (Left Kick Panel)
IE140Front Door LH Wire and Instrument Panel Wire (Left Kick Panel)
IM142Front Door RH Wire and Instrument Panel Wire (Right Kick Panel)
: GROUND POINTS
CodeSee PageGround Points Location
IE40Cowl Side Panel LH
IG40Instrument Panel Brace LH
IJ40Right Kick Panel
BO44Right Quarter Pillar
SERVICE HINTS