Page 4477 of 4770

DOOR GLASS DISPLACEMENT ± BO017±99 November 26, 1999
Page 2 of 2
1. Lower the door glass, disconnect the power window switch, remove the front door
trim panel, speaker, and loosen the door mirror mounts to gain access to the door
glass and lower frames. Remove the front lower frame (2 screws).
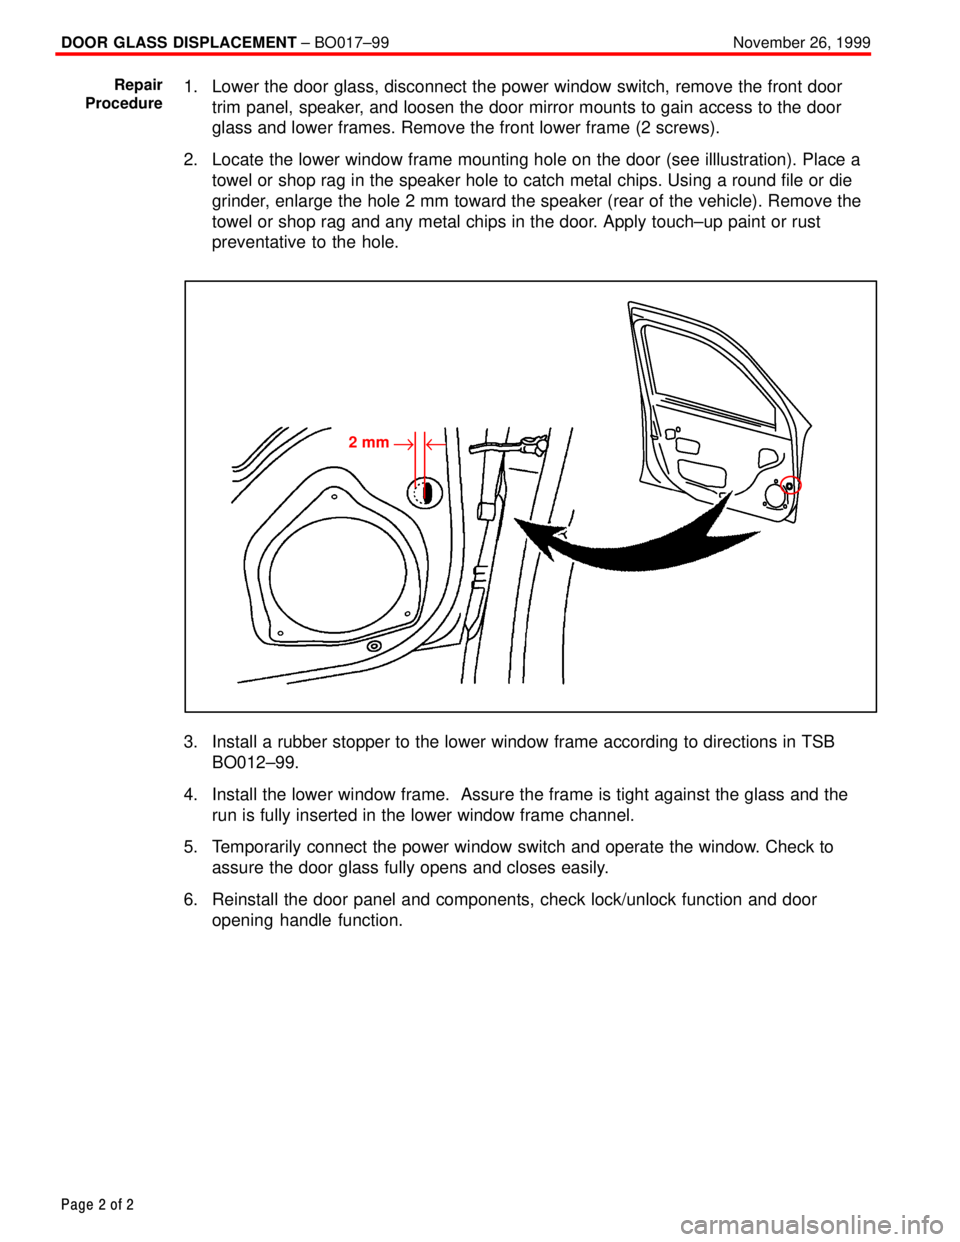
2. Locate the lower window frame mounting hole on the door (see illlustration). Place a
towel or shop rag in the speaker hole to catch metal chips. Using a round file or die
grinder, enlarge the hole 2 mm toward the speaker (rear of the vehicle). Remove the
towel or shop rag and any metal chips in the door. Apply touch±up paint or rust
preventative to the hole.
2 mm"u
3. Install a rubber stopper to the lower window frame according to directions in TSB
BO012±99.
4. Install the lower window frame. Assure the frame is tight against the glass and the
run is fully inserted in the lower window frame channel.
5. Temporarily connect the power window switch and operate the window. Check to
assure the door glass fully opens and closes easily.
6. Reinstall the door panel and components, check lock/unlock function and door
opening handle function.
Repair
Procedure
Page 4586 of 4770

SPEEDOMETER/TACHOMETER NEEDLE MOVEMENT ± EL003-02Revised: December 13, 2002 February 11, 2000
Page 2 of 2
PREVIOUS PART NUMBERCURRENT PART NUMBERPART NAME
83220 XXXXXSameSpeedometer83220-XXXXXSameTachometer
TOOLS & MATERIALSQUANTITY
Double Sided Cotton Swab1
Distilled Water1 oz.
1. Remove the combination meter
assembly per repair manual
instructions.
2. Remove the window plate from the
instrument cluster.
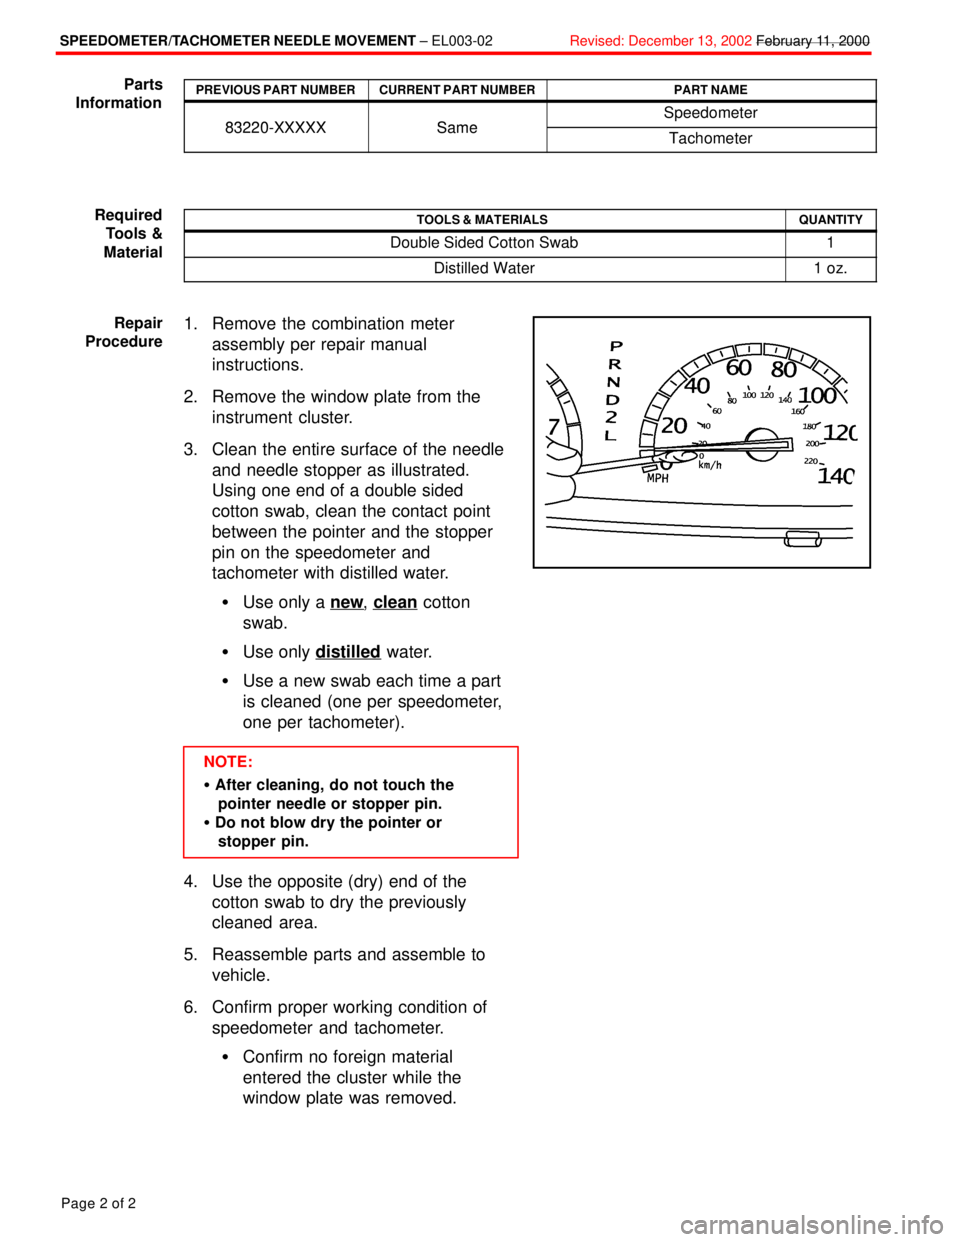
3. Clean the entire surface of the needle
and needle stopper as illustrated.
Using one end of a double sided
cotton swab, clean the contact point
between the pointer and the stopper
pin on the speedometer and
tachometer with distilled water.
�Use only a new
, clean cotton
swab.
�Use only distilled
water.
�Use a new swab each time a part
is cleaned (one per speedometer,
one per tachometer).
NOTE:
� After cleaning, do not touch the
pointer needle or stopper pin.
� Do not blow dry the pointer or
stopper pin.
4. Use the opposite (dry) end of the
cotton swab to dry the previously
cleaned area.
5. Reassemble parts and assemble to
vehicle.
6. Confirm proper working condition of
speedometer and tachometer.
�Confirm no foreign material
entered the cluster while the
window plate was removed.
Parts
Information
Required
Tools &
Material
Repair
Procedure
Page 4646 of 4770
WARRANTY PARTS MARKING PROCEDURE ± PG006-03September 26, 2003
Page 3 of 3
NOTE:
The following parts do not have to be marked unless the technician can determine
failure and location.
air induction/ejection systems fuel injection systems
all computers fuel injectors
alternators fuel pump
audio (internal) ignition system
batteries internal engine components
bearings internal transmission components
belts oil cooler
catalytic converter power door lock switches
crankshaft remanufactured parts
cruise control starters
distributors suspension components
EGR systems valve covers
engine control systems window regulators
exchange parts wiper motors
exhaust systems
Parts
Marking
List
(Continued)
Page 4681 of 4770
MIDTRONICS BATTERY TESTER SOFTWARE UPDATE ± SS002-02June 7, 2002
Page 3 of 10
1. Installing the Midtronics Update Wizard (MUW).
NOTE:
The Midtronics Update Wizard only needs to be installed once and must be installed
before the rest of the update process can take place. If this step is already complete,
continue on to step 2.
A. Click on the text ªInstall MUW.º (Figure 2.)
B. The file download window will appear. Click on ªRun this program from it's current
location.º
C. Click the ªOKº button.
D. Allow the Update Wizard to perform its self±installation. This will take only a few
minutes.
B
C
FIGURE 2.
A
Operation
Procedure
Page 4686 of 4770
MIDTRONICS BATTERY TESTER SOFTWARE UPDATE ± SS002-02June 7, 2002
Page 8 of 10
F. Confirm the software version and click ªNext.º (Figure 7.)
FIGURE 7.
F
Figures 7±1 and 7±2 are confirmation dialogs that will pop up over the Update
Information window (Figure 7) when:
�The update file is an older revision level than that found in the battery tester
(Figure 7±1) or
�The update file is the same revision level as that found in the tester
(Figure 7±2).
Click the ªYesº button to clear the pop±up dialog and continue with the update.
FIGURE 7±1. FIGURE 7±2.
Operation
Procedure
(Continued)