2000 SUZUKI SWIFT engine
[x] Cancel search: enginePage 287 of 447
IMMOBILIZER CONTROL SYSTEM 8G-9
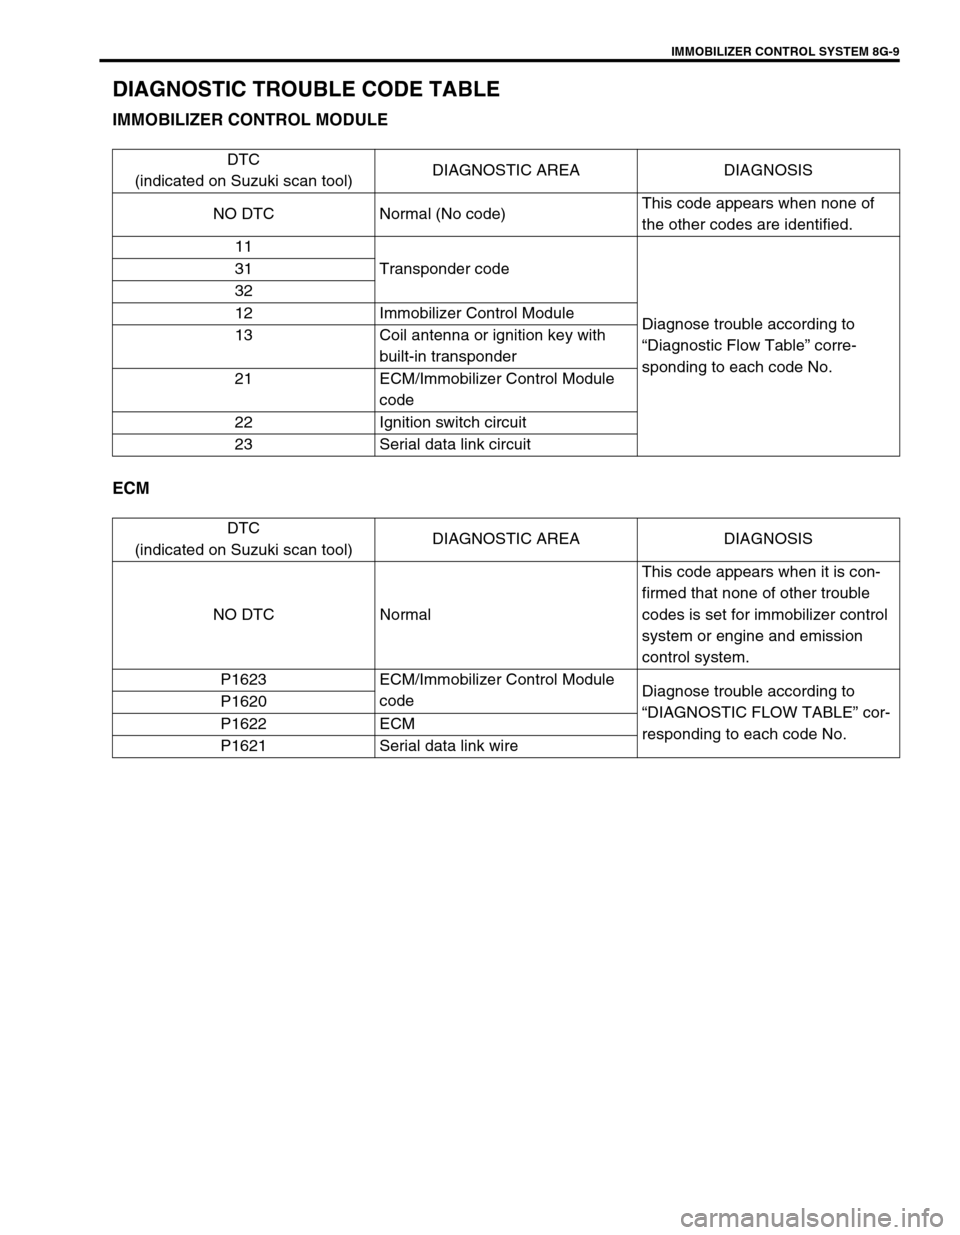
DIAGNOSTIC TROUBLE CODE TABLE
IMMOBILIZER CONTROL MODULE
ECM
DTC
(indicated on Suzuki scan tool)DIAGNOSTIC AREA DIAGNOSIS
NO DTC Normal (No code)This code appears when none of
the other codes are identified.
11
Transponder code
Diagnose trouble according to
“Diagnostic Flow Table” corre-
sponding to each code No. 31
32
12 Immobilizer Control Module
13 Coil antenna or ignition key with
built-in transponder
21 ECM/Immobilizer Control Module
code
22 Ignition switch circuit
23 Serial data link circuit
DTC
(indicated on Suzuki scan tool)DIAGNOSTIC AREA DIAGNOSIS
NO DTC NormalThis code appears when it is con-
firmed that none of other trouble
codes is set for immobilizer control
system or engine and emission
control system.
P1623 ECM/Immobilizer Control Module
codeDiagnose trouble according to
“DIAGNOSTIC FLOW TABLE” cor-
responding to each code No. P1620
P1622 ECM
P1621 Serial data link wire
Page 289 of 447

IMMOBILIZER CONTROL SYSTEM 8G-11
TABLE B - IMMOBILIZER INDICATOR LAMP CHECK (IMMOBILIZER INDICA-
TOR LAMP REMAINS ON AFTER ENGINE STARTS)
WIRING DIAGRAM
INSPECTION
1. Main fuse 2. Main relay 3. ECM 4. Immobilizer indicator lamp
BRN/WHT
BLK/RED
BLK/WHT
PNKBLK
BLK/ORG
BLK/ORG
BLK/YEL
C42-2
C42-1
C42-3 C41-10
C41-5/6
G02-6
G02-12
4
1
2
3
Step Action Yes No
1 1) With ignition switch OFF, disconnect cou-
plers from ECM.
Does immobilizer indicator lamp turn ON at
ignition switch ON?“PNK” wire shorted to
ground circuit.Substitute a known-good
ECM and recheck.
Page 298 of 447
8G-20 IMMOBILIZER CONTROL SYSTEM
INSPECTION OF ECM, IMMOBILIZER CON-
TROL MODULE AND ITS CIRCUIT
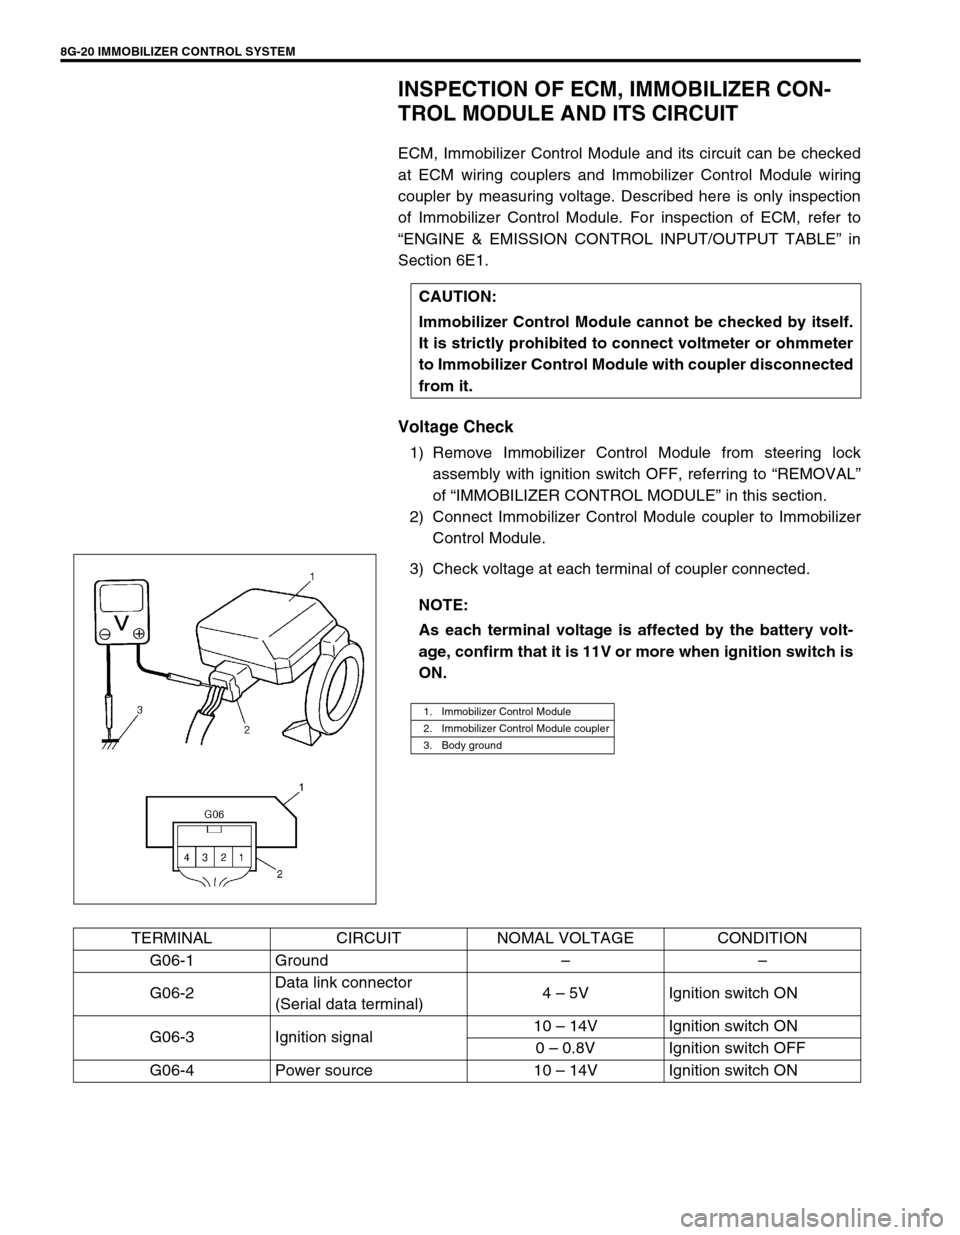
ECM, Immobilizer Control Module and its circuit can be checked
at ECM wiring couplers and Immobilizer Control Module wiring
coupler by measuring voltage. Described here is only inspection
of Immobilizer Control Module. For inspection of ECM, refer to
“ENGINE & EMISSION CONTROL INPUT/OUTPUT TABLE” in
Section 6E1.
Voltage Check
1) Remove Immobilizer Control Module from steering lock
assembly with ignition switch OFF, referring to “REMOVAL”
of “IMMOBILIZER CONTROL MODULE” in this section.
2) Connect Immobilizer Control Module coupler to Immobilizer
Control Module.
3) Check voltage at each terminal of coupler connected.CAUTION:
Immobilizer Control Module cannot be checked by itself.
It is strictly prohibited to connect voltmeter or ohmmeter
to Immobilizer Control Module with coupler disconnected
from it.
NOTE:
As each terminal voltage is affected by the battery volt-
age, confirm that it is 11V or more when ignition switch is
ON.
1. Immobilizer Control Module
2. Immobilizer Control Module coupler
3. Body ground
TERMINAL CIRCUIT NOMAL VOLTAGE CONDITION
G06-1 Ground––
G06-2Data link connector
(Serial data terminal)4 – 5V Ignition switch ON
G06-3 Ignition signal10 – 14V Ignition switch ON
0 – 0.8V Ignition switch OFF
G06-4 Power source 10 – 14V Ignition switch ON
Page 299 of 447
IMMOBILIZER CONTROL SYSTEM 8G-21
ON-VEHICLE SERVICE
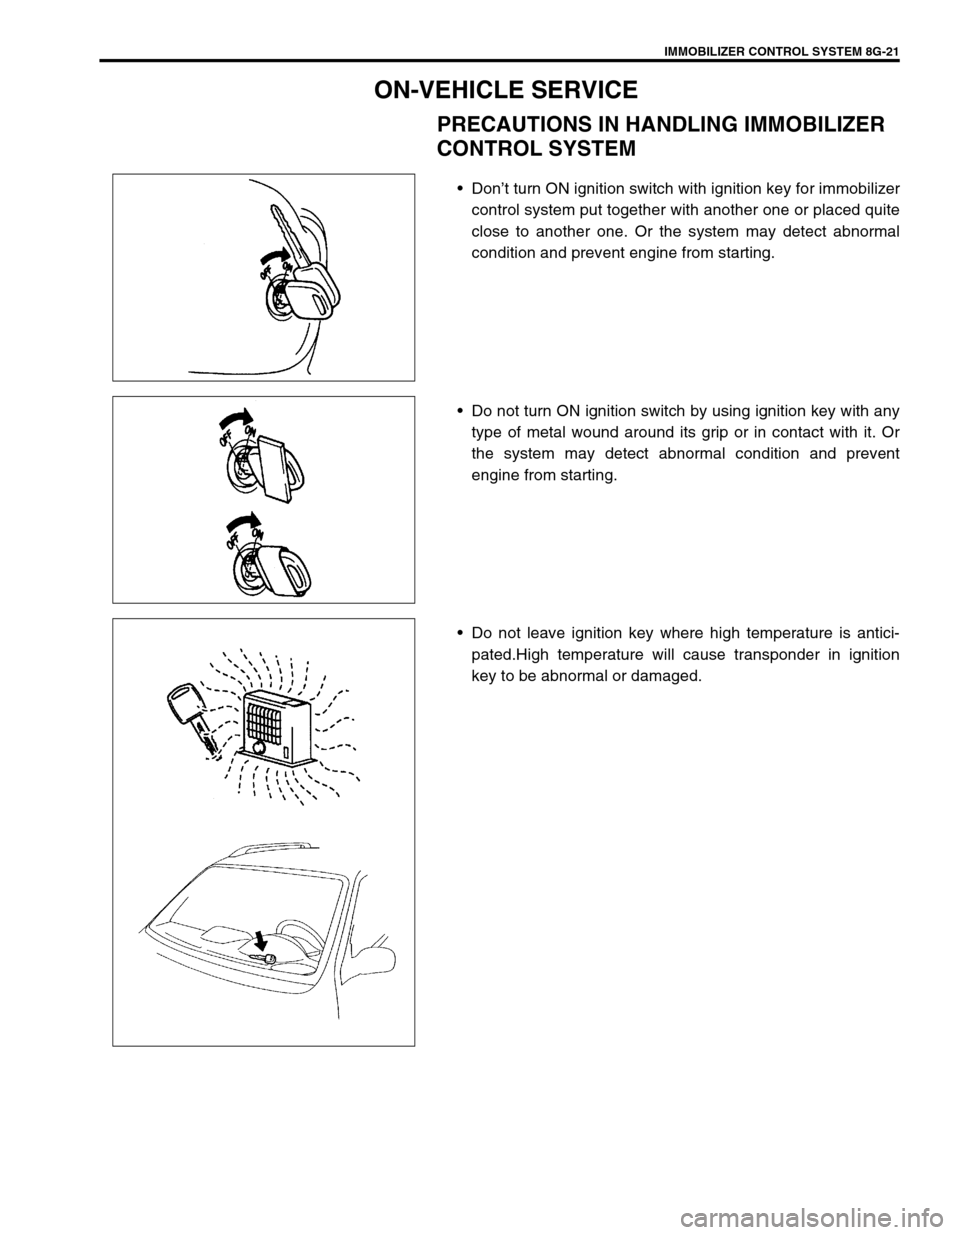
PRECAUTIONS IN HANDLING IMMOBILIZER
CONTROL SYSTEM
Don’t turn ON ignition switch with ignition key for immobilizer
control system put together with another one or placed quite
close to another one. Or the system may detect abnormal
condition and prevent engine from starting.
Do not turn ON ignition switch by using ignition key with any
type of metal wound around its grip or in contact with it. Or
the system may detect abnormal condition and prevent
engine from starting.
Do not leave ignition key where high temperature is antici-
pated.High temperature will cause transponder in ignition
key to be abnormal or damaged.
Page 300 of 447
8G-22 IMMOBILIZER CONTROL SYSTEM
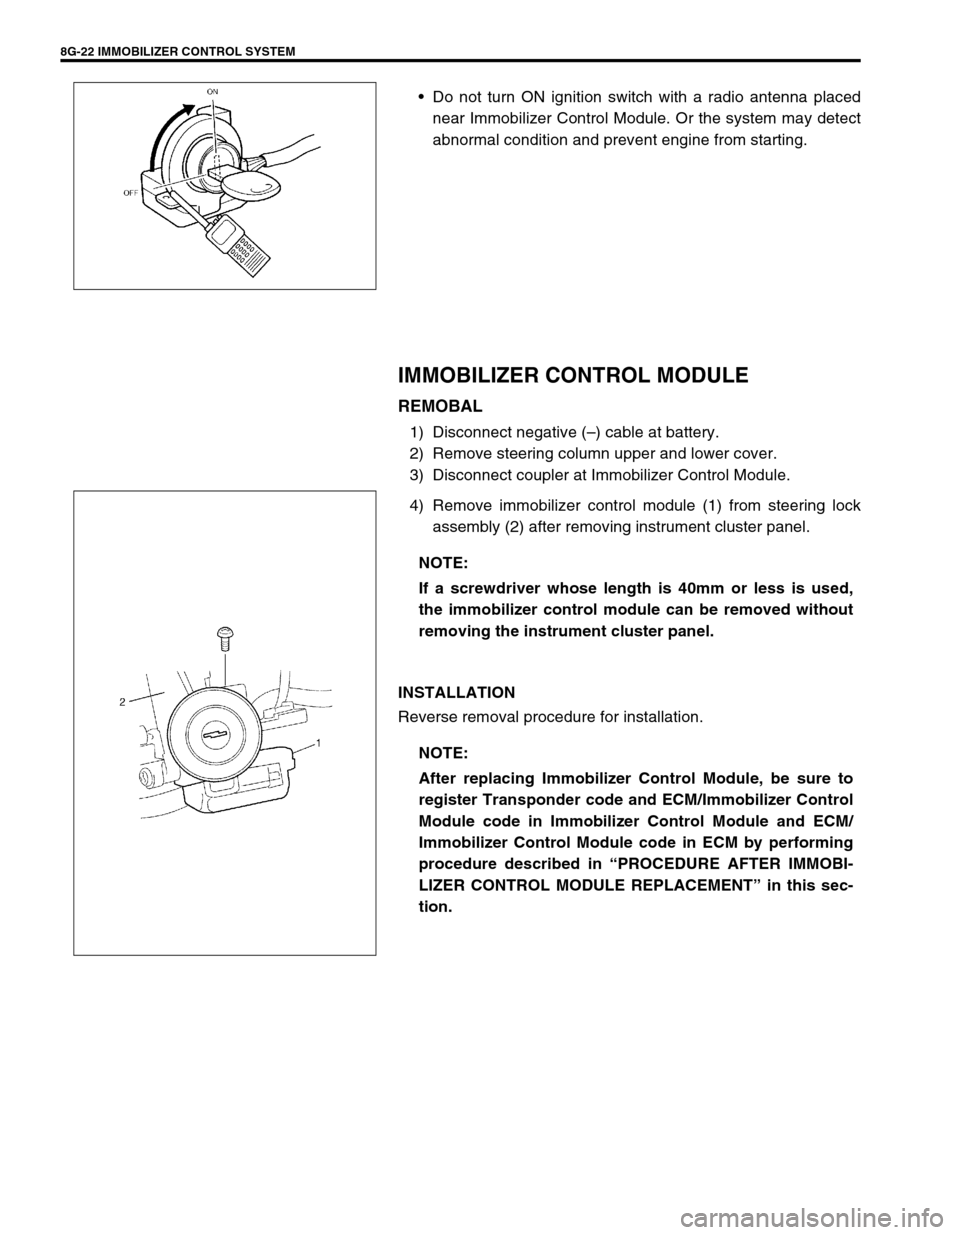
Do not turn ON ignition switch with a radio antenna placed
near Immobilizer Control Module. Or the system may detect
abnormal condition and prevent engine from starting.
IMMOBILIZER CONTROL MODULE
REMOBAL
1) Disconnect negative (–) cable at battery.
2) Remove steering column upper and lower cover.
3) Disconnect coupler at Immobilizer Control Module.
4) Remove immobilizer control module (1) from steering lock
assembly (2) after removing instrument cluster panel.
INSTALLATION
Reverse removal procedure for installation.
NOTE:
If a screwdriver whose length is 40mm or less is used,
the immobilizer control module can be removed without
removing the instrument cluster panel.
NOTE:
After replacing Immobilizer Control Module, be sure to
register Transponder code and ECM/Immobilizer Control
Module code in Immobilizer Control Module and ECM/
Immobilizer Control Module code in ECM by performing
procedure described in “PROCEDURE AFTER IMMOBI-
LIZER CONTROL MODULE REPLACEMENT” in this sec-
tion.
Page 305 of 447
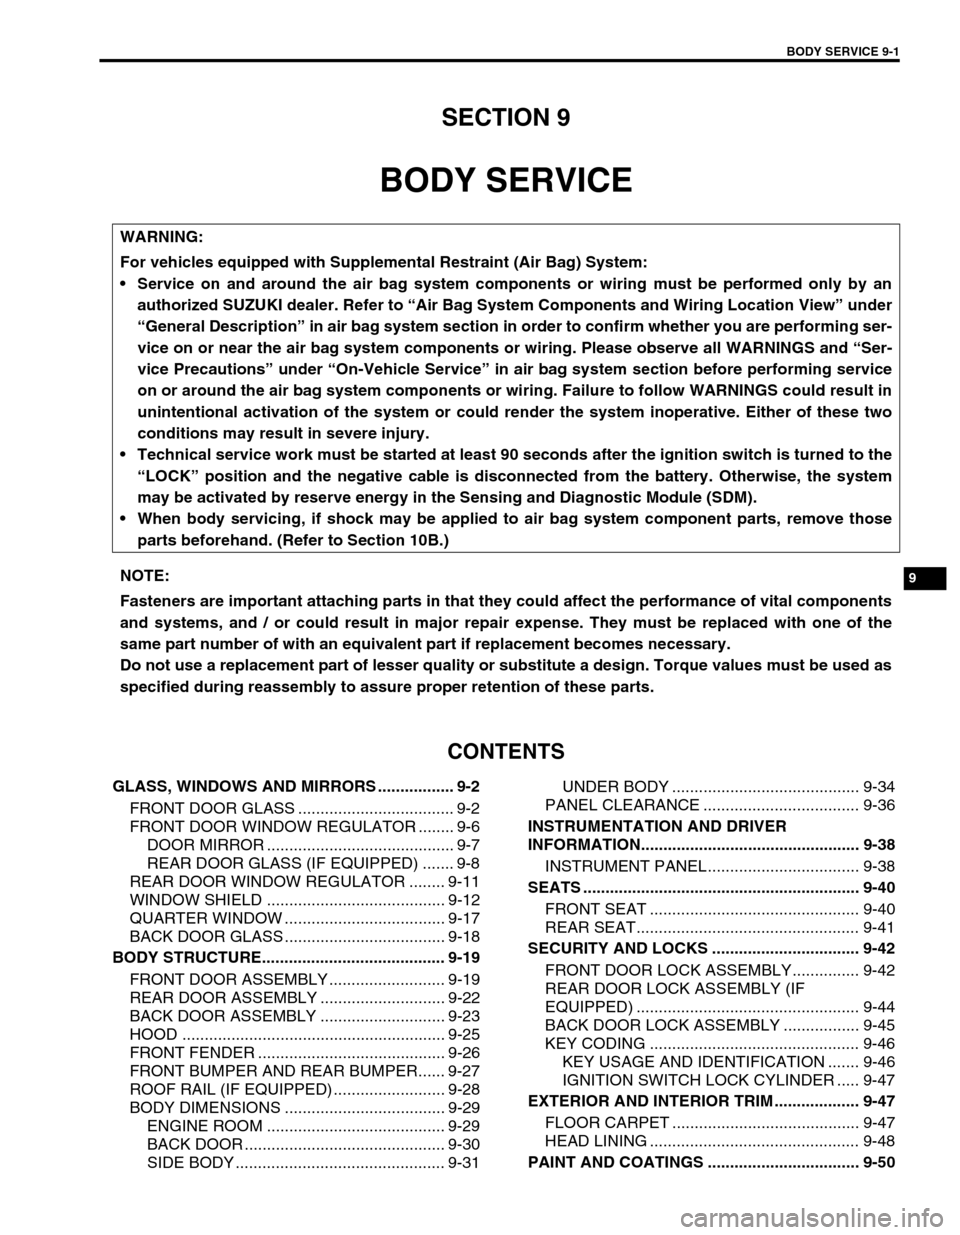
BODY SERVICE 9-1
6F1
6F2
6G
6H
6K
7A
7A1
7B1
7C1
7D
7E
7F
8A
8B
8C
8D
8E
9
10
10A
10B
SECTION 9
BODY SERVICE
CONTENTS
GLASS, WINDOWS AND MIRRORS ................. 9-2
FRONT DOOR GLASS ................................... 9-2
FRONT DOOR WINDOW REGULATOR ........ 9-6
DOOR MIRROR .......................................... 9-7
REAR DOOR GLASS (IF EQUIPPED) ....... 9-8
REAR DOOR WINDOW REGULATOR ........ 9-11
WINDOW SHIELD ........................................ 9-12
QUARTER WINDOW .................................... 9-17
BACK DOOR GLASS .................................... 9-18
BODY STRUCTURE......................................... 9-19
FRONT DOOR ASSEMBLY .......................... 9-19
REAR DOOR ASSEMBLY ............................ 9-22
BACK DOOR ASSEMBLY ............................ 9-23
HOOD ........................................................... 9-25
FRONT FENDER .......................................... 9-26
FRONT BUMPER AND REAR BUMPER...... 9-27
ROOF RAIL (IF EQUIPPED) ......................... 9-28
BODY DIMENSIONS .................................... 9-29
ENGINE ROOM ........................................ 9-29
BACK DOOR ............................................. 9-30
SIDE BODY ............................................... 9-31UNDER BODY .......................................... 9-34
PANEL CLEARANCE ................................... 9-36
INSTRUMENTATION AND DRIVER
INFORMATION................................................. 9-38
INSTRUMENT PANEL .................................. 9-38
SEATS .............................................................. 9-40
FRONT SEAT ............................................... 9-40
REAR SEAT.................................................. 9-41
SECURITY AND LOCKS ................................. 9-42
FRONT DOOR LOCK ASSEMBLY............... 9-42
REAR DOOR LOCK ASSEMBLY (IF
EQUIPPED) .................................................. 9-44
BACK DOOR LOCK ASSEMBLY ................. 9-45
KEY CODING ............................................... 9-46
KEY USAGE AND IDENTIFICATION ....... 9-46
IGNITION SWITCH LOCK CYLINDER ..... 9-47
EXTERIOR AND INTERIOR TRIM ................... 9-47
FLOOR CARPET .......................................... 9-47
HEAD LINING ............................................... 9-48
PAINT AND COATINGS .................................. 9-50 WARNING:
For vehicles equipped with Supplemental Restraint (Air Bag) System:
Service on and around the air bag system components or wiring must be performed only by an
authorized SUZUKI dealer. Refer to “Air Bag System Components and Wiring Location View” under
“General Description” in air bag system section in order to confirm whether you are performing ser-
vice on or near the air bag system components or wiring. Please observe all WARNINGS and “Ser-
vice Precautions” under “On-Vehicle Service” in air bag system section before performing service
on or around the air bag system components or wiring. Failure to follow WARNINGS could result in
unintentional activation of the system or could render the system inoperative. Either of these two
conditions may result in severe injury.
Technical service work must be started at least 90 seconds after the ignition switch is turned to the
“LOCK” position and the negative cable is disconnected from the battery. Otherwise, the system
may be activated by reserve energy in the Sensing and Diagnostic Module (SDM).
When body servicing, if shock may be applied to air bag system component parts, remove those
parts beforehand. (Refer to Section 10B.)
NOTE:
Fasteners are important attaching parts in that they could affect the performance of vital components
and systems, and / or could result in major repair expense. They must be replaced with one of the
same part number of with an equivalent part if replacement becomes necessary.
Do not use a replacement part of lesser quality or substitute a design. Torque values must be used as
specified during reassembly to assure proper retention of these parts.
Page 333 of 447

BODY SERVICE 9-29
BODY DIMENSIONS
ENGINE ROOM
Hole to hole distance
a. Garnish installation center hole (φ5)
e. Hood cushion installation hole i (i’). Head light installation hole
b (b’). Front fender installation hole f (f’). Engine mounting installation front hole j (j’). Front fender installation hole
c (c’). Strut installation front hole g (g’). Jig hole (φ15
mm)
d (d’). Front fender installation hole h. Bumper member upper side installation hole
a-b : 673 mm (26.50 in.) a-i’ : 760 mm (29.92 in.) f-f’ : 954 mm (37.56 in.)
a-c’ : 584 mm (22.99 in.) b-b’ : 1340 mm (52.76 in.) g-g’ : 1315 mm (51.77 in.)
a-d : 793 mm (31.22 in.) b-d’ : 1410 mm (55.51 in.) g-h : 231 mm (9.09 in.)
a-e : 584 mm (22.99 in.) b-j : 638 mm (25.12 in.) g’-h : 1139 mm (44.84 in.)
a-f : 774 mm (30.47 in.) b’-d’ : 470 mm (18.50 in.) i-i’ : 866 mm (34.09 in.)
a-f’ : 836 mm (32.91 in.) c-c’ : 1098 mm (43.23 in.) j-j’ : 1496 mm (58.90 in.)
a-g : 889 mm (35.00 in.) d-d’ : 1320 mm (51.97 in.)
ba
b’
e
f
h
gj
i
d
c
i’
f’ c’
d’
j’
g’
Page 338 of 447

9-34 BODY SERVICE
UNDER BODY
Hole to hole distance
a. Jack bracket installation hole g (g’). Jig hole (φ
10 mm)
b (b’). Front stabilizer bracket front installation hole h (h’). Jig hole (φ
10 mm)
c (c’). Front stabilizer bracket rear installation hole i (i’). Trailing arm installation hole
d (d’). Suspension control arm installation front hole j (j’). Bump stopper installation hole
e. Rear engine mounting front installation hole k. Lateral rod installation hole
f (f’). Jig hole (φ
15 mm) l (l’). Jig hole (φ
16 mm)
a-f : 909 mm (35.79 in.) d’-g’ : 708 mm (27.87 in.) h-k : 1724 mm (67.87 in.)
a-f’ : 862 mm (33.94 in.) e-g : 702 mm (27.64 in.) h-l : 1718 mm (67.64 in.)
b-b’ : 740 mm (29.13 in.) e-g’ : 647 mm (25.47 in.) h’-i : 1204 mm (47.40 in.)
b’-g : 1464 mm (57.64 in.) f-f’ : 754 mm (29.68 in.) h’-j’ : 1384 mm (54.45 in.)
b’-g’ : 1259 mm (49.57 in.) f-g : 471 mm (18.54 in.) h’-k : 1497 mm (58.94 in.)
c-c’ : 968 mm (38.11 in.) f-g’ : 889 mm (35.00 in.) h’-l : 1940 mm (76.38 in.)
c-g : 1148 mm (45.20 in.) g-g’ : 754 mm (29.68 in.) i-i’ : 1017 mm (40.04 in.)
c-g’ : 1431 mm (56.34 in.) g’-h : 791 mm (31.14 in.) i-l’ : 1392 mm (54.80 in.)
c’-d : 970 mm (38.19 in.) g’-h’ : 240 mm (9.45 in.) i’-l’ : 918 mm (36.14 in.)
c’-d’ : 452 mm (17.80 in.) h-h’ : 754 mm (29.68 in.) j-j’ : 1028 mm (40.47 in.)
d-d’ : 761 mm (29.96 in.) h-i : 826 mm (32.52 in.) l-l’ : 1076 mm (42.36 in.)
d’-g : 1037 mm (40.83 in.) h-j’ : 1640 mm (64.57 in.)
c
a
a
b’
b
b
c
bfg
c’
d’f’
e
g’h’
i’j’l’
lji
h
b’
c’
d’
e
dfgh
g’h’f’
i’j’kl’
lji