Page 305 of 447

BODY SERVICE 9-1
6F1
6F2
6G
6H
6K
7A
7A1
7B1
7C1
7D
7E
7F
8A
8B
8C
8D
8E
9
10
10A
10B
SECTION 9
BODY SERVICE
CONTENTS
GLASS, WINDOWS AND MIRRORS ................. 9-2
FRONT DOOR GLASS ................................... 9-2
FRONT DOOR WINDOW REGULATOR ........ 9-6
DOOR MIRROR .......................................... 9-7
REAR DOOR GLASS (IF EQUIPPED) ....... 9-8
REAR DOOR WINDOW REGULATOR ........ 9-11
WINDOW SHIELD ........................................ 9-12
QUARTER WINDOW .................................... 9-17
BACK DOOR GLASS .................................... 9-18
BODY STRUCTURE......................................... 9-19
FRONT DOOR ASSEMBLY .......................... 9-19
REAR DOOR ASSEMBLY ............................ 9-22
BACK DOOR ASSEMBLY ............................ 9-23
HOOD ........................................................... 9-25
FRONT FENDER .......................................... 9-26
FRONT BUMPER AND REAR BUMPER...... 9-27
ROOF RAIL (IF EQUIPPED) ......................... 9-28
BODY DIMENSIONS .................................... 9-29
ENGINE ROOM ........................................ 9-29
BACK DOOR ............................................. 9-30
SIDE BODY ............................................... 9-31UNDER BODY .......................................... 9-34
PANEL CLEARANCE ................................... 9-36
INSTRUMENTATION AND DRIVER
INFORMATION................................................. 9-38
INSTRUMENT PANEL .................................. 9-38
SEATS .............................................................. 9-40
FRONT SEAT ............................................... 9-40
REAR SEAT.................................................. 9-41
SECURITY AND LOCKS ................................. 9-42
FRONT DOOR LOCK ASSEMBLY............... 9-42
REAR DOOR LOCK ASSEMBLY (IF
EQUIPPED) .................................................. 9-44
BACK DOOR LOCK ASSEMBLY ................. 9-45
KEY CODING ............................................... 9-46
KEY USAGE AND IDENTIFICATION ....... 9-46
IGNITION SWITCH LOCK CYLINDER ..... 9-47
EXTERIOR AND INTERIOR TRIM ................... 9-47
FLOOR CARPET .......................................... 9-47
HEAD LINING ............................................... 9-48
PAINT AND COATINGS .................................. 9-50 WARNING:
For vehicles equipped with Supplemental Restraint (Air Bag) System:
Service on and around the air bag system components or wiring must be performed only by an
authorized SUZUKI dealer. Refer to “Air Bag System Components and Wiring Location View” under
“General Description” in air bag system section in order to confirm whether you are performing ser-
vice on or near the air bag system components or wiring. Please observe all WARNINGS and “Ser-
vice Precautions” under “On-Vehicle Service” in air bag system section before performing service
on or around the air bag system components or wiring. Failure to follow WARNINGS could result in
unintentional activation of the system or could render the system inoperative. Either of these two
conditions may result in severe injury.
Technical service work must be started at least 90 seconds after the ignition switch is turned to the
“LOCK” position and the negative cable is disconnected from the battery. Otherwise, the system
may be activated by reserve energy in the Sensing and Diagnostic Module (SDM).
When body servicing, if shock may be applied to air bag system component parts, remove those
parts beforehand. (Refer to Section 10B.)
NOTE:
Fasteners are important attaching parts in that they could affect the performance of vital components
and systems, and / or could result in major repair expense. They must be replaced with one of the
same part number of with an equivalent part if replacement becomes necessary.
Do not use a replacement part of lesser quality or substitute a design. Torque values must be used as
specified during reassembly to assure proper retention of these parts.
Page 309 of 447
BODY SERVICE 9-5
Adjust equalizer (1) of window regular so that measurement
“a” and “b” are equal.
Secure door sealing cover (1) with adhesive (2).
Install door window regulator handle (1) so that it has a 45°
±12.5° angle when glass is fully closed as shown in figure
1 “a”“b”
1
2
A : Front
Page 314 of 447

9-10 BODY SERVICE
8) Remove rear door outer garnish (1).
9) Remove outer weather-strip (2).
Lower window all the way down. Then, use a tape-wrapped
putty knife (or screwdriver) to pry off outer weather-strip.
10) Detach rear part of glass run (1) from sash (2) and remove
sash (2) by removing 2 screws (3).
11) Loosen window regulator mounting screws (5).
12) When removing door glass (4), turn door glass 90° counter-
clockwise to remove it.
INSTALLATION
Reverse removal procedure to install door glass noting the follow-
ing instructions.
If there is deformity for glass run, replace new one.
Tighten bottom channel attaching screws. Tighten rear
screw first, and then tighten front screw.
Glass fitted position of bottom channel (1) is as shown in fig-
ure.
Glass fitted position of bottom channel
“a” : 201.9 - 204.9 mm (7.95 - 8.07 in.)
Secure door sealing cover (1) with adhesive (2). NOTE:
When removed outer weather-strip (2) from door panel
(3), be careful not to deformation for outer weather-strip
(2).
2 3
1
4
1
23
5
4
1
2
Page 321 of 447

BODY SERVICE 9-17
QUARTER WINDOW
REMOVAL AND INSTALLATION
Refer to “WINDSHIELD” in this section as removal and installa-
tion procedures are basically the same. However, note the follow-
ing.
Observe the following precautions when applying adhesive
(1) along glass (2) edge.
Adhesive (1) should be applied evenly especially in height.
Be careful not to damage primer (3).
Press glass against body quickly after adhesive (1) is
applied.
Adhesive amount specification and position for quarter
window
Height “a” : 13 mm (0.51 in.)
Width “b” : 6 mm (0.24 in.)
Width “c” : 14 mm (0.55 in.)
Position “d” : 5 mm (0.20 in.) for glass front section.
Position “e” : 11 mm (0.43 in.) for glass rear and upper
sections
Position “e” : 8 mm (0.31 in.) for 3 door model glass bot-
tom section
Position “e” : 10 mm (0.39 in.) for 5 door model glass bot-
tom section CAUTION:
Upon completion of installation, note the following.
Sudden closing of door before adhesive is completely
set may cause glass to become loose or to come off.
Therefore, if door is opened or closed before adhesive
is completely set, make sure to open all door glasses
and use proper care.
If molding is not securely in place, hold it down with a
tape until adhesive is completely set.
Each adhesive has its own setting time.
Be sure to refer to its maker’s instruction, check set-
ting time of adhesive to be used and observe precau-
tions to be taken before adhesive is set.
Refrain from driving till adhesive is completely set so
as to ensure proper and sufficient adhesion.
[A] : 3-door model
[B] : 5-door model
“A”
“A”“B”
“B”
“B”
“B”
“B”“B”
11
22
2
33 “d”
“c”“c”“e”
“a”“a”
“b”“b”
11
2 “A”“B”
[A]
[B]
Page 328 of 447

9-24 BODY SERVICE
INSTALLATION
Reverse removal procedure to install back door noting the follow-
ing instructions.
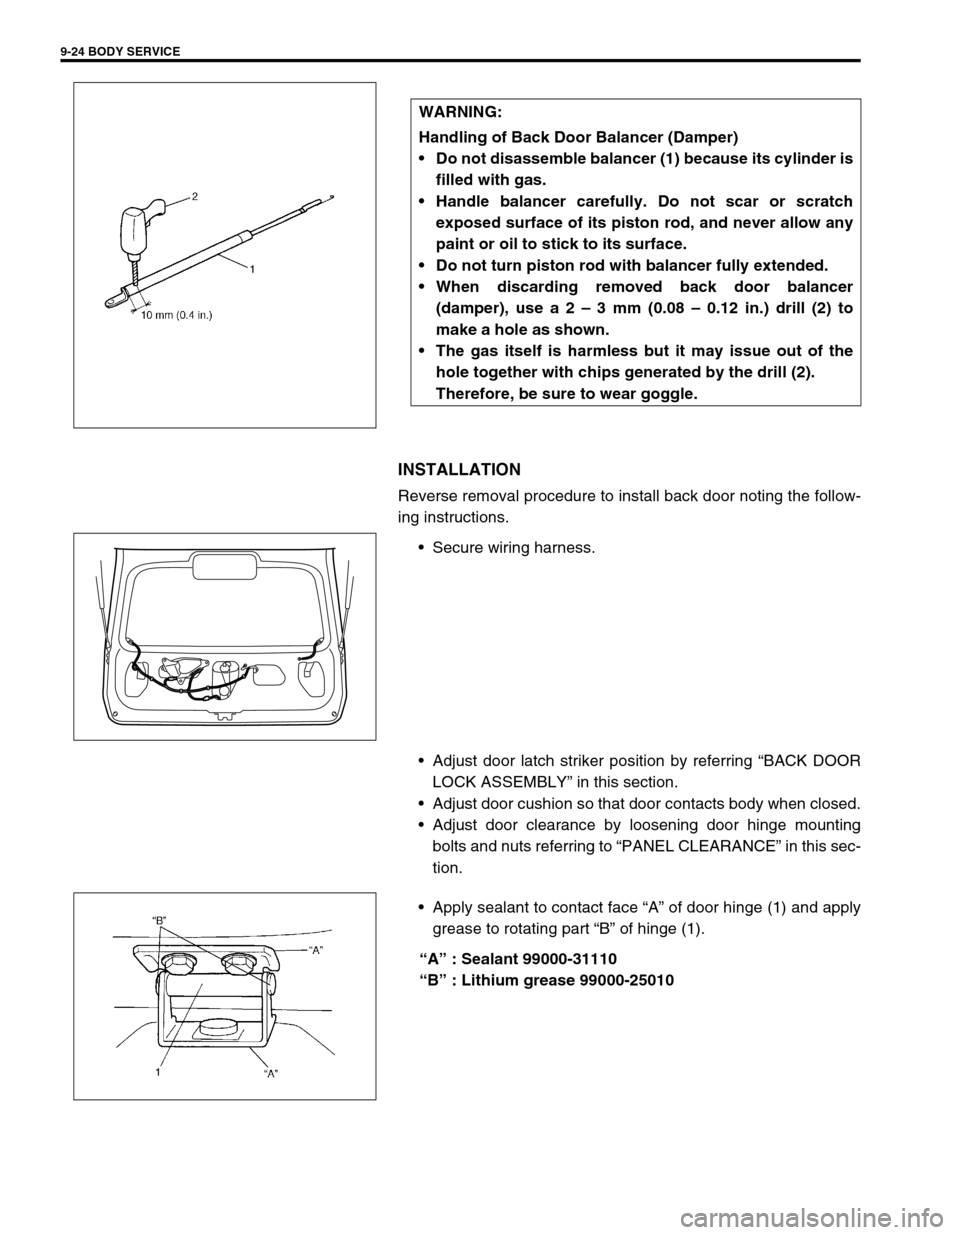
Secure wiring harness.
Adjust door latch striker position by referring “BACK DOOR
LOCK ASSEMBLY” in this section.
Adjust door cushion so that door contacts body when closed.
Adjust door clearance by loosening door hinge mounting
bolts and nuts referring to “PANEL CLEARANCE” in this sec-
tion.
Apply sealant to contact face “A” of door hinge (1) and apply
grease to rotating part “B” of hinge (1).
“A” : Sealant 99000-31110
“B” : Lithium grease 99000-25010 WARNING:
Handling of Back Door Balancer (Damper)
Do not disassemble balancer (1) because its cylinder is
filled with gas.
Handle balancer carefully. Do not scar or scratch
exposed surface of its piston rod, and never allow any
paint or oil to stick to its surface.
Do not turn piston rod with balancer fully extended.
When discarding removed back door balancer
(damper), use a 2 – 3 mm (0.08 – 0.12 in.) drill (2) to
make a hole as shown.
The gas itself is harmless but it may issue out of the
hole together with chips generated by the drill (2).
Therefore, be sure to wear goggle.
Page 330 of 447
9-26 BODY SERVICE
INSPECTION
Check that hood opens and closes smoothly and properly. Lubri-
cate if necessary. Also check that secondary latch operates prop-
erly (check that secondary latch keeps hood from opening all the
way) and hood locks securely when closed.
Adjust hood locks position if necessary.
FRONT FENDER
REMOVAL
1) Remove front fender side moulding.
2) Remove front bumper.
3) Disconnect connector of side turn signal (or side marker)
lamp.
4) Remove front fender lining.
5) Remove front fender.
INSTALLATION
Reverse removal procedure to install front fender noting the fol-
lowing instructions.
If paint on fender bolt is peeled off, be sure to apply paint
again.
Adjust panel clearance referring to “PANEL CLEARANCE” in
this section.
1. Front fender lining 2. Front fender 3. Front fender side moulding
“A”“A”
2
3
1
“A”
Page 332 of 447
9-28 BODY SERVICE
ROOF RAIL (IF EQUIPPED)
REMOVAL
1) Remove roof rail front and rear caps as shown in figure.
2) Remove nuts.
3) Remove roof rail assembly.
INSTALLATION
Reverse removal procedure for installation.
Confirm that each roof rail fixing nut is tightened securely.
1. Roof rail assembly
2. Front cap
3. Rear cap
4. Base seal
5. Nut
Page 346 of 447

9-42 BODY SERVICE
SECURITY AND LOCKS
FRONT DOOR LOCK ASSEMBLY
REMOVAL
1) Remove door trim and door sealing cover, refer to steps 1) to
6) of “REMOVAL” under “FRONT DOOR GLASS” in this sec-
tion.
2) Raise window all the way up.
3) Remove door sash.
4) Disconnect door opening control rod (1) from outside handle.
5) Disconnect door latch control rod (2).
6) Disconnect door lock motor lead wire (if equipped).
7) Remove door lock knob (3).
8) Loosen door latch screw (4), door latch actuator screw (5) (if
equipped power door lock) and remove door lock assembly
(6).
9) Remove key cylinder retainer (7).
10) Remove key cylinder (8).
[A] : Without power door lock model 3. Inside handle bezel 7. Key cylinder retainer
[B] : With power door lock model 4. Latch striker 8. Door latch screw
1. Front door latch assembly
: Apply lithium grease 99000-25010 to sliding part5. Shim 9. Door latch striker screw
2. Outside handle 6. Key cylinder 10. Door latch actuator screw
1
1
8
85
4
9
10 2
7
6
3[A]
[B]
3
17
8
2
4
6 5