2000 SUZUKI SWIFT ring
[x] Cancel search: ringPage 370 of 447

10-4 RESTRAINT SYSTEM
ON-VEHICLE SERVICE
SERVICE PRECAUTIONS
SERVICE AND DIAGNOSIS
Before servicing or replacing seat belts, refer to following precautionary items.
Seat belts should be normal relative to strap retractor and buckle portions.
Keep sharp edges and damaging objects away from belts.
Avoid bending or damaging any portion of belt buckle or latch plate.
Do not bleach or dye belt webbing. (Use only mild soap and lukewarm water to clean it.)
When installing a seat belt anchor bolt, it should be tightened by hand at first to prevent cross-threading and
then to specified torque.
Do not attempt any repairs on retractor mechanisms or retractor covers. Replace defective assemblies with
new replacement parts.
Keep belts dry and clean at all times.
If there exist any parts in question, replace such parts.
Replace belts whose webbing is cut or otherwise damaged.
Do not put anything into trim panel opening which seat belt webbing passes through.
For Seat Belt with Pretensioner
Refer to “SERVICE AND DIAGNOSIS” of “SERVICE PRECAUTIONS” under “ON-VEHICLE SERVICE” in Sec-
tion 10B.
DISABLING AIR BAG SYSTEM
Refer to “DISABLING AIR BAG SYSTEM” of “SERVICE PRECAUTIONS” under “ON-VEHICLE SERVICE” in
Section 10B.
ENABLING AIR BAG SYSTEM
Refer to “ENABLING AIR BAG SYSTEM” of “SERVICE PRECAUTIONS” under “ON-VEHICLE SERVICE” in
Section 10B.
HANDLING AND STORAGE
Refer to “HANDLING AND STORAGE” of “SERVICE PRECAUTIONS” under “ON-VEHICLE SERVICE” in Sec-
tion 10B.
DISPOSAL
Refer to “DISPOSAL” of “SERVICE PRECAUTIONS” under “ON-VEHICLE SERVICE” in Section 10B. WARNING:
If replacing seat belt is necessary, replace buckle and ELR (or webbing) together as a set. This is for
the reason of ensuring locking of tongue plate with buckle.
If these parts are replaced individually, such a locking condition may become unreliable. For this rea-
son, SUZUKI will supply only the spare buckle and ELR (or webbing) in a set part.
WARNING:
When performing service on or around air bag system components or air bag system wiring, disable
the air bag system. Refer to “DISABLING AIR BAG SYSTEM” of “SERVICE PRECAUTIONS” under
“ON-VEHICLE SERVICE” in Section 10B.
Failure to follow procedures could result in possible air bag activation, personal injury or unneeded
air bag system repairs.
Page 371 of 447

RESTRAINT SYSTEM 10-5
FRONT SEAT BELT
WARNING:
Never attempt to disassemble or repair the seat belt pretensioner (retractor assembly). If any abnor-
mality is found, be sure to replace it with new one as an assembly.
Be sure to read “SERVICE PRECAUTIONS”, before starting to work and observe every precaution
during work. Neglecting them may result in personal injury or unactivation of the seat belt preten-
sioner when necessary.
1. Upper anchor 4. BuckleTightening torque
2. Lower anchor 5. Yellow connector (for seat belt pretensioner) (if equipped)
3. Retractor assembly 6. Retractor assembly upper mounting bolt
: After tightening lower bolt, tightening upper bolt
Page 375 of 447

AIR BAG SYSTEM 10B-1
6F1
6F2
6G
6H
6K
7A
7A1
7B1
7C1
7D
7E
7F
8A
8B
8C
8D
8E
9
10
10B
SECTION 10B
AIR BAG SYSTEM
CONTENTS
GENERAL DESCRIPTION .............................10B-3
SYSTEM COMPONENTS AND WIRING
LOCATION VIEW AND CONNECTORS..... 10B-4
SYSTEM WIRING DIAGRAM ..................... 10B-5
DIAGNOSIS ....................................................10B-6
DIAGNOSTIC TROUBLE CODE (DTC) ...... 10B-6
USE OF SPECIAL TOOL ............................ 10B-6
INTERMITTENTS AND POOR
CONNECTIONS .......................................... 10B-8
AIR BAG DIAGNOSTIC SYSTEM CHECK . 10B-9
AIR BAG DIAGNOSTIC SYSTEM
CHECK FLOW TABLE .............................. 10B-10
DTC CHECK ............................................. 10B-11
DTC CLEARANCE .................................... 10B-12
DTC TABLE .............................................. 10B-13
TABLE A - “AIR BAG” WARNING LAMP
COMES ON STEADY ............................... 10B-15
TABLE B - “AIR BAG” WARNING LAMP
DOES NOT COME ON ............................. 10B-15
TABLE C - “AIR BAG” WARNING LAMP
FLASHES .................................................. 10B-15
TABLE D - “AIR BAG” WARNING LAMP
CANNOT INDICATE FLASHING
PATTERN OF DTC ................................... 10B-15TABLE E - SDM CANNOT COMMUNICATE
THROUGH THE SERIAL DATA
CIRCUIT ................................................... 10B-21
DTC B1015 - PASSENGER AIR BAG
INITIATOR CIRCUIT RESISTANCE
HIGH ......................................................... 10B-23
DTC B1016 - PASSENGER AIR BAG
INITIATOR CIRCUIT RESISTANCE
LOW .......................................................... 10B-23
DTC B1018 - PASSENGER AIR BAG
INITIATOR CIRCUIT SHORT TO
GROUND .................................................. 10B-23
DTC B1019 - PASSENGER AIR BAG
INITIATOR CIRCUIT SHORT TO
POWER CIRCUIT ..................................... 10B-23
DTC B1021 – DRIVER AIR BAG
INITIATOR CIRCUIT RESISTANCE
HIGH ......................................................... 10B-29
DTC B1022 – DRIVER AIR BAG
INITIATOR CIRCUIT RESISTANCE
LOW .......................................................... 10B-29
DTC B1024 – DRIVER AIR BAG
INITIATOR CIRCUIT SHORT TO
GROUND .................................................. 10B-29 WARNING:
Service on or around the air bag system components or wiring must be performed only by an
authorized SUZUKI dealer. Please observe all WARNINGS and “Service Precautions” under “On-
Vehicle Service” in this section before performing service on or around the air bag system compo-
nents or wiring. Failure to follow WARNINGS could result in unintended activation of the system or
could render the system inoperative. Either of these two conditions may result in severe injury.
The procedures in this section must be followed in the order listed to disable the air bag system
temporarily and prevent false diagnostic trouble codes from setting. Failure to follow procedures
could result in possible activation of the air bag system, personal injury or otherwise unneeded air
bag system repairs.
CAUTION:
When fasteners are removed, always reinstall them at the same location from which they were
removed. If a fastener needs to be replaced, use the correct part number fastener for that application.
If the correct part number fastener is not available, a fastener of equal size and strength (or stronger)
may be used. Fasteners that are not reused, and those requiring thread-locking compound, will be
called out. The correct torque value must be used when installing fasteners that require it. If the above
conditions are not followed, parts or system damage could result.
Page 377 of 447

AIR BAG SYSTEM 10B-3
GENERAL DESCRIPTION
With the air bag system which includes air bags for both the
driver’s and passenger’s sides as well as the seat belt pretension-
ers (if equipped), the sag of the seat belt is taken up (for seat belt
with pretensioner), the driver air bag (inflator) module is deployed
from the center of the steering column and the passenger air bag
(inflator) module from the top of the instrument panel in front of
the front passenger seat in occurrence of a front collision with an
impact larger than a certain set value to supplement protection
offered by the driver and front passenger seat belts.
The air bag system is designed to activate only in severe frontal
collisions. It is not designed to activate in rear impacts, side
impacts, rollovers, or minor frontal collisions, since it would offer
no protection in those types of accidents.
1. Driver side air bag
2. Passenger side air bag
3. Seat belt pretensioner (if equipped)
Page 378 of 447

10B-4 AIR BAG SYSTEM
SYSTEM COMPONENTS AND WIRING LOCATION VIEW AND CONNECTORS
1. Air bag harness 6. Passenger air bag (inflator) module
2.“Air bag” monitor coupler 7. SDM
3. DLC 8. Seat belt pretensioner (retractor assembly) (if equipped)
4. Contact coil assembly 9. Ground for air bag system
5. Driver air bag (inflator) module
CONNECTOR “Q02”CONNECTOR “G39”
146
9
5
7
8 3
8
“Q06”
Page 379 of 447

AIR BAG SYSTEM 10B-5
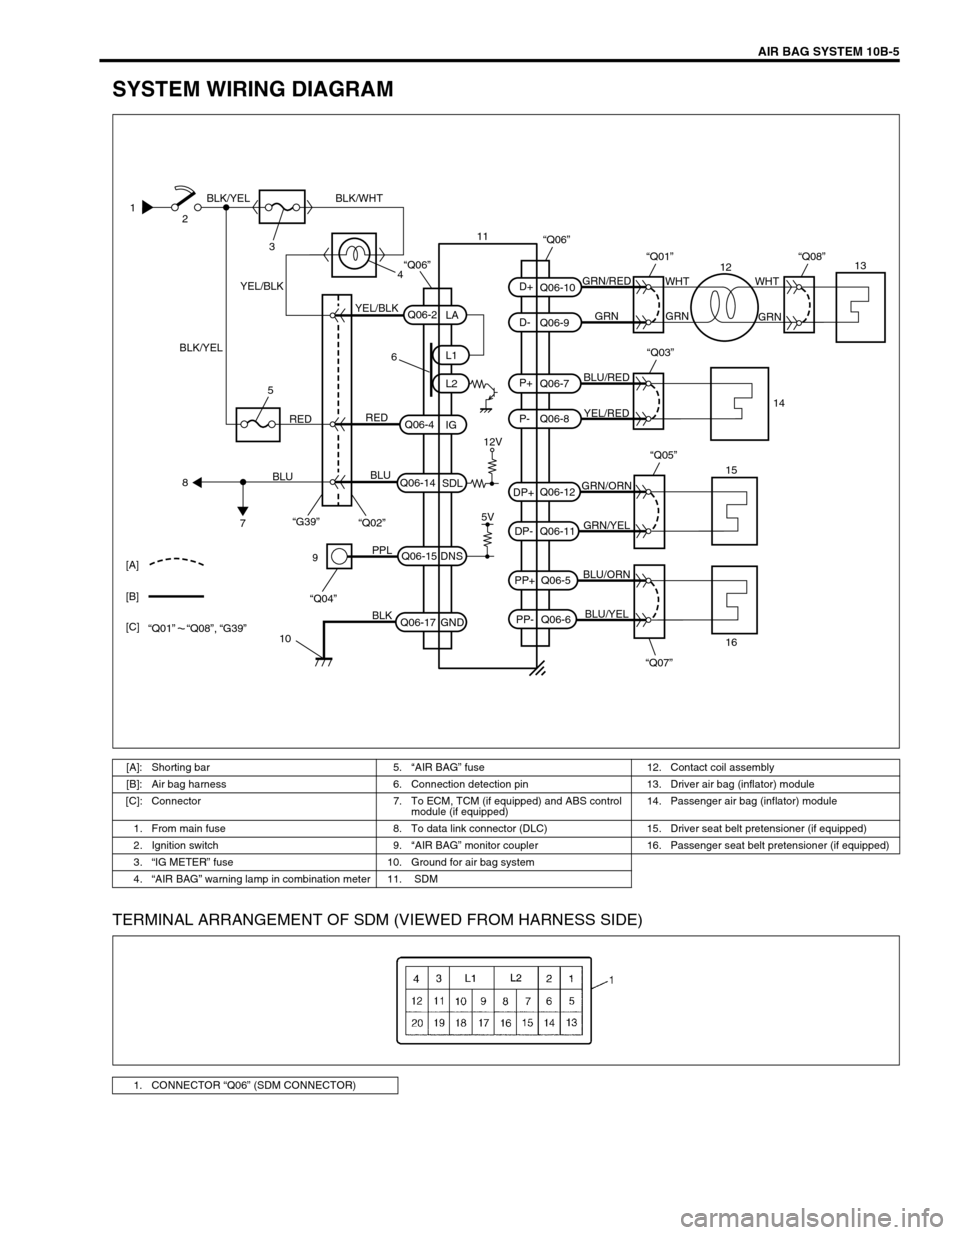
SYSTEM WIRING DIAGRAM
TERMINAL ARRANGEMENT OF SDM (VIEWED FROM HARNESS SIDE)
1
2
3
4 BLK/YEL
BLK/YELBLK/WHT
YEL/BLK
YEL/BLKGRN/RED
GRN GRNWHT WHT
GRN
BLU/RED
YEL/RED
GRN/ORN
GRN/YEL
BLU/ORN
BLU/YEL
6
12V
5V REDRED
BLU
BLU
5
8
7“G39”
“Q02”
“Q07” “Q05”
9
10PPL
BLK
“Q04”
Q06-2
Q06-4
Q06-14Q06-7
Q06-8 Q06-10
Q06-9
Q06-12
Q06-11
Q06-5
Q06-6 Q06-15
Q06-17L1
L2
IG
SDL
DNS
GNDLA
PP- PP+ DP- DP+P- P+ D- D+
“Q03”
“Q01”
“Q06”
“Q08”
15
161413
12 11
[A]
[B]
[C]
“Q01” “Q08”, “G39”
“Q06”
[A]: Shorting bar 5.“AIR BAG” fuse 12. Contact coil assembly
[B]: Air bag harness 6. Connection detection pin 13. Driver air bag (inflator) module
[C]: Connector 7. To ECM, TCM (if equipped) and ABS control
module (if equipped) 14. Passenger air bag (inflator) module
1. From main fuse 8. To data link connector (DLC) 15. Driver seat belt pretensioner (if equipped)
2. Ignition switch 9.“AIR BAG” monitor coupler 16. Passenger seat belt pretensioner (if equipped)
3.“IG METER” fuse 10. Ground for air bag system
4.“AIR BAG” warning lamp in combination meter 11. SDM
1. CONNECTOR “Q06” (SDM CONNECTOR)
Page 381 of 447

AIR BAG SYSTEM 10B-7
The adapter will also give an idea of whether contact tension is
sufficient, helping to find an open or intermittent open due to poor
terminal contact.
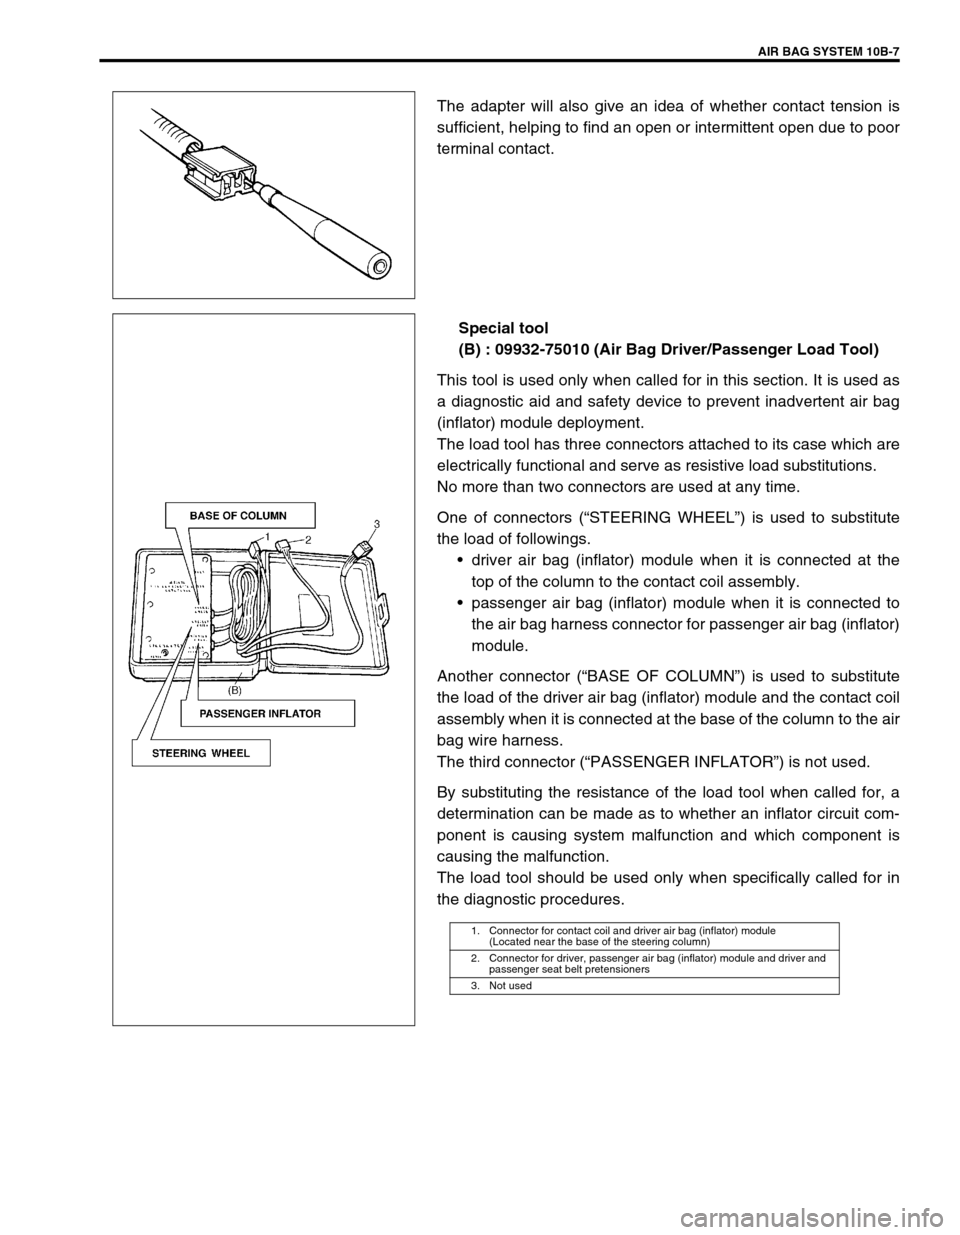
Special tool
(B) : 09932-75010 (Air Bag Driver/Passenger Load Tool)
This tool is used only when called for in this section. It is used as
a diagnostic aid and safety device to prevent inadvertent air bag
(inflator) module deployment.
The load tool has three connectors attached to its case which are
electrically functional and serve as resistive load substitutions.
No more than two connectors are used at any time.
One of connectors (“STEERING WHEEL”) is used to substitute
the load of followings.
driver air bag (inflator) module when it is connected at the
top of the column to the contact coil assembly.
passenger air bag (inflator) module when it is connected to
the air bag harness connector for passenger air bag (inflator)
module.
Another connector (“BASE OF COLUMN”) is used to substitute
the load of the driver air bag (inflator) module and the contact coil
assembly when it is connected at the base of the column to the air
bag wire harness.
The third connector (“PASSENGER INFLATOR”) is not used.
By substituting the resistance of the load tool when called for, a
determination can be made as to whether an inflator circuit com-
ponent is causing system malfunction and which component is
causing the malfunction.
The load tool should be used only when specifically called for in
the diagnostic procedures.
1. Connector for contact coil and driver air bag (inflator) module
(Located near the base of the steering column)
2. Connector for driver, passenger air bag (inflator) module and driver and
passenger seat belt pretensioners
3. Not used
Page 382 of 447

10B-8 AIR BAG SYSTEM
INTERMITTENTS AND POOR CONNECTIONS
Most intermittents are caused by faulty electrical connections or
wiring. When a check for proper connection is requested in a
diagnostic flow table, perform careful check of suspect circuits for:
Poor mating of connector halves, or terminals not fully
seated in the connector body (backed out).
Dirt or corrosion on the terminals. The terminals must be
clean and free of any foreign material which could impede
proper terminal contact.
However, cleaning the terminal with a sand paper or the like
is prohibited.
Damaged connector body, exposing the terminals to mois-
ture and dirt, as well as not maintaining proper terminal ori-
entation with the component or mating connector.
Improperly formed or damaged terminals.
Check each connector terminal in problem circuits carefully
to ensure good contact tension by using the corresponding
mating terminal included in the connector test adapter kit
(special tool).
If contact tension is not enough, reform it to increase contact
tension or replace.
Special tool
(A) : 09932-76010 (Connector Test Adapter Kit)
Poor terminal-to-wire connection.
Check each wire harness in problem circuits for poor con-
nection by shaking it by hand lightly. If any abnormal condi-
tion is found, change the wire harness assembly or
component parts with new ones.
Wire insulation which is rubbed through, causing an intermit-
tent short as the bare area touches other wiring or parts of
the vehicle.
Wire broken inside the insulation. This condition could cause
a continuity check to show a good circuit, but if only 1 or 2
strands of a multi-strand-type wire are intact, resistance
could be far too high.
If any abnormality is found, repair or replace as a wire harness
assembly.