Page 488 of 698
ENGINE GENERAL INFORMATION AND DIAGNOSIS 6-119
Fig. 1 for Step 2
Fig. 2 for Step 3
Fig. 3 for Step 44 Check Fuel Pump Relay for operation.
1) Check resistance between each two termi-
nals of fuel pump relay. See Fig.3.
Between terminals “c” and “d” : Infinity
Between terminals “a” and “b” : 56 – 146
Ω
2) Check that there is continuity between ter-
minals “c” and “d” when battery is con-
nected to terminals “a” and “b”. See Fig. 3.
Is fuel pump relay in good condition?“PNK” circuit open or poor
C41-19 connection.
If wire and connection are
OK, substitute a known-
good ECM and recheck.Replace fuel pump
relay. Step Action Yes No
Page 489 of 698

6-120 ENGINE GENERAL INFORMATION AND DIAGNOSIS
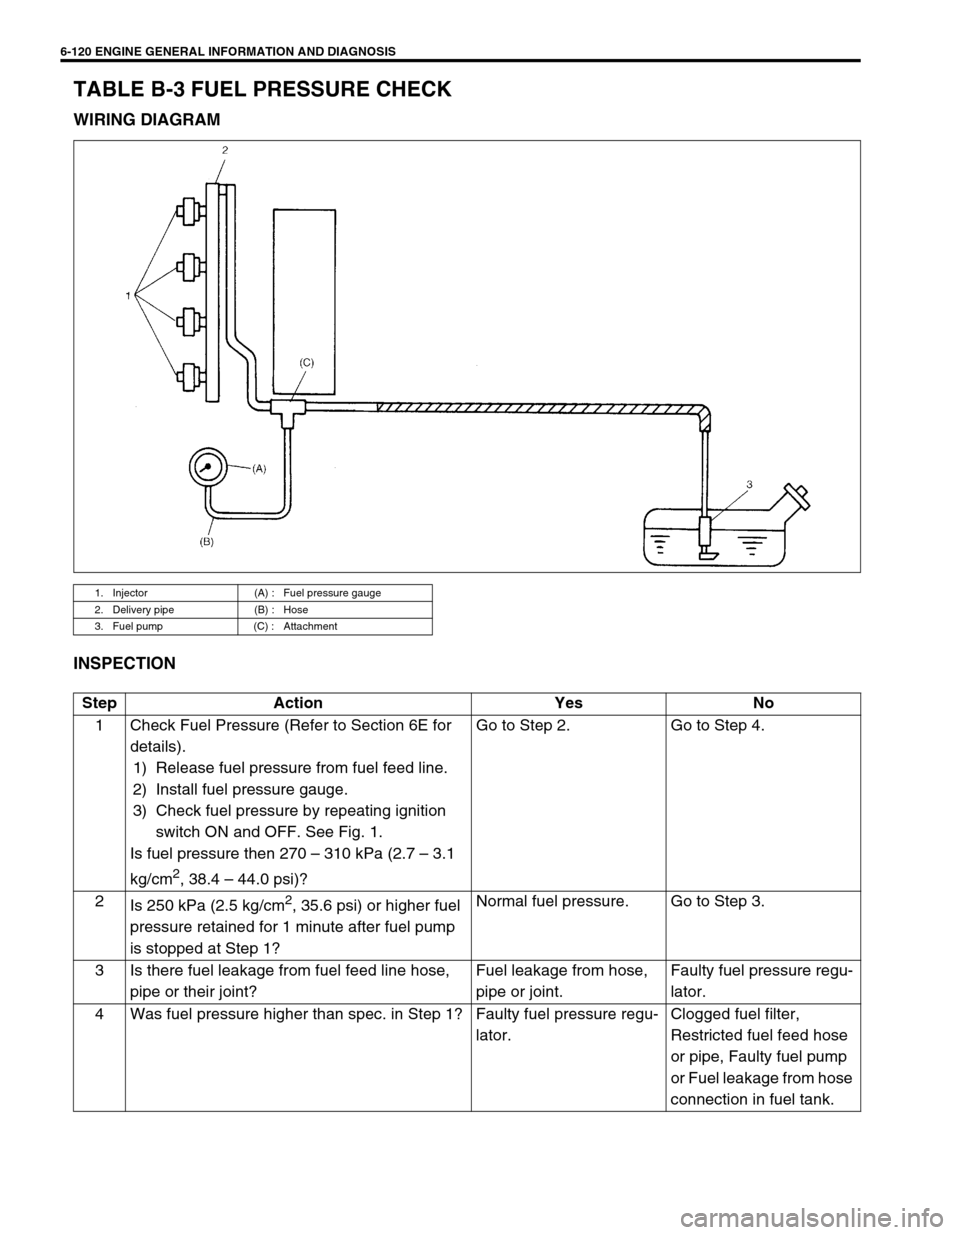
TABLE B-3 FUEL PRESSURE CHECK
WIRING DIAGRAM
INSPECTION
1. Injector (A) : Fuel pressure gauge
2. Delivery pipe (B) : Hose
3. Fuel pump (C) : Attachment
Step Action Yes No
1 Check Fuel Pressure (Refer to Section 6E for
details).
1) Release fuel pressure from fuel feed line.
2) Install fuel pressure gauge.
3) Check fuel pressure by repeating ignition
switch ON and OFF. See Fig. 1.
Is fuel pressure then 270 – 310 kPa (2.7 – 3.1
kg/cm
2, 38.4 – 44.0 psi)?Go to Step 2. Go to Step 4.
2
Is 250 kPa (2.5 kg/cm
2, 35.6 psi) or higher fuel
pressure retained for 1 minute after fuel pump
is stopped at Step 1?Normal fuel pressure. Go to Step 3.
3 Is there fuel leakage from fuel feed line hose,
pipe or their joint?Fuel leakage from hose,
pipe or joint.Faulty fuel pressure regu-
lator.
4 Was fuel pressure higher than spec. in Step 1? Faulty fuel pressure regu-
lator.Clogged fuel filter,
Restricted fuel feed hose
or pipe, Faulty fuel pump
or Fuel leakage from hose
connection in fuel tank.
Page 490 of 698
ENGINE GENERAL INFORMATION AND DIAGNOSIS 6-121
Fig. 1 for Step 1
Special tool
(A) : 09912-58441
(B) : 09912-58490
1. Fuel pressure gauge
2. 3 way joint1, (A)
2, (B)
Page 505 of 698
6A1-4 ENGINE MECHANICAL (M13 ENGINE)
DIAGNOSIS
DIAGNOSIS TABLE
Refer to “ENGINE MECHANICAL DIAGNOSIS TABLE” in Sec-
tion 6.
COMPRESSION CHECK
Check compression pressure on all 4 cylinders as follows:
1) Warm up engine to normal operating temperature.
2) Stop engine after warming up.
3) Remove air cleaner assembly (1), resonator (2) and hoses.
Refer to “AIR CLEANER ASSEMBLY AND RESONATOR”.
4) Remove cylinder head upper cover (1).
5) Disconnect ignition coil couplers (1).
6) Remove ignition coil assemblies (2) with high-tension cord
(3).
7) Remove all spark plugs.
8) Disconnect fuel injector wires (4) at the coupler.NOTE:
After warming up engine, place transmission gear shift
lever in “Neutral” (shift selector lever to “P” range for A/T
model), and set parking brake and block drive wheels.
Page 507 of 698

6A1-6 ENGINE MECHANICAL (M13 ENGINE)
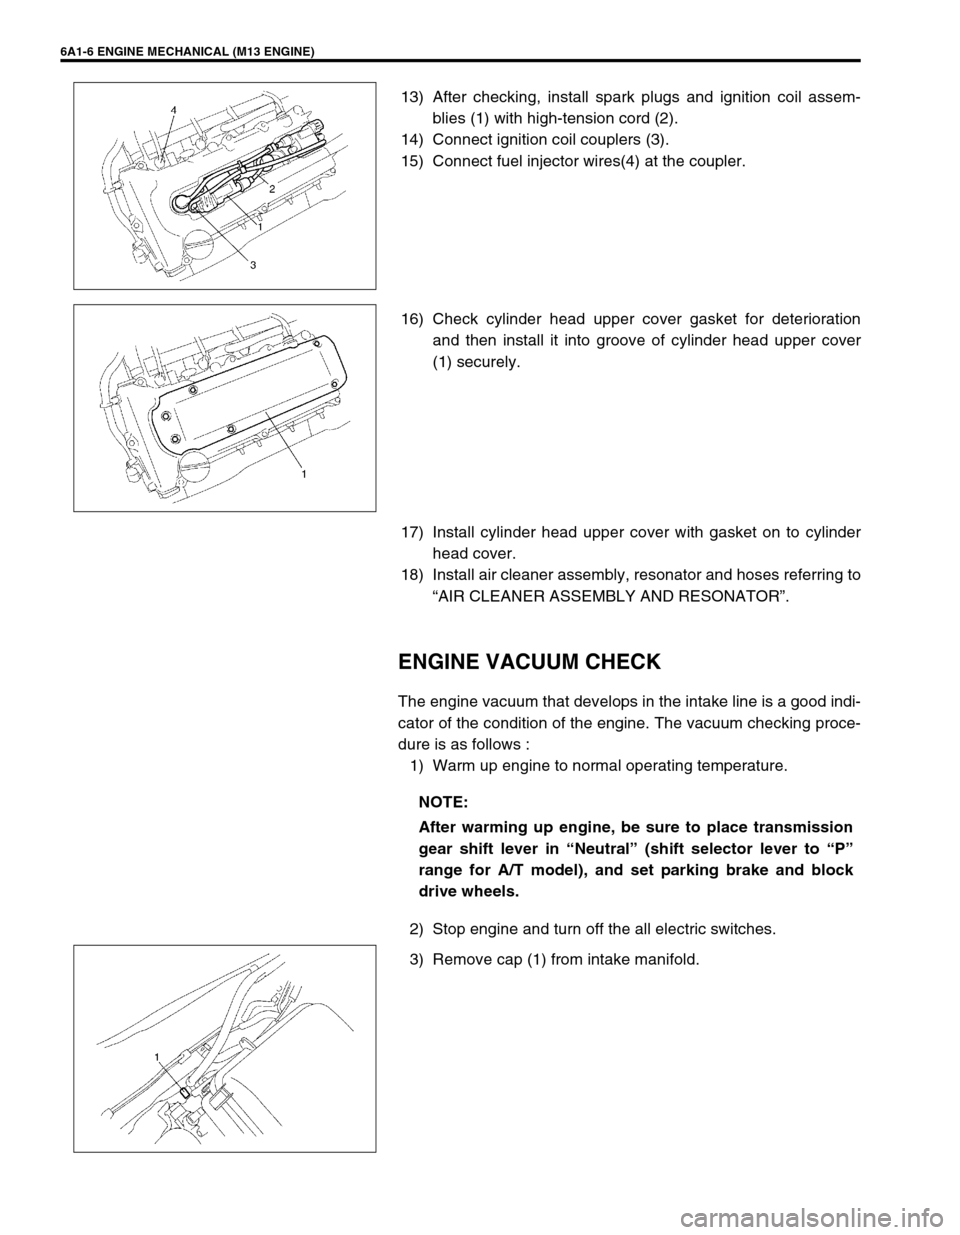
13) After checking, install spark plugs and ignition coil assem-
blies (1) with high-tension cord (2).
14) Connect ignition coil couplers (3).
15) Connect fuel injector wires(4) at the coupler.
16) Check cylinder head upper cover gasket for deterioration
and then install it into groove of cylinder head upper cover
(1) securely.
17) Install cylinder head upper cover with gasket on to cylinder
head cover.
18) Install air cleaner assembly, resonator and hoses referring to
“AIR CLEANER ASSEMBLY AND RESONATOR”.
ENGINE VACUUM CHECK
The engine vacuum that develops in the intake line is a good indi-
cator of the condition of the engine. The vacuum checking proce-
dure is as follows :
1) Warm up engine to normal operating temperature.
2) Stop engine and turn off the all electric switches.
3) Remove cap (1) from intake manifold.
NOTE:
After warming up engine, be sure to place transmission
gear shift lever in “Neutral” (shift selector lever to “P”
range for A/T model), and set parking brake and block
drive wheels.
Page 517 of 698
6A1-16 ENGINE MECHANICAL (M13 ENGINE)
THROTTLE BODY AND INTAKE MANIFOLD
REMOVAL
1) Relieve fuel pressure according to fuel pressure relief proce-
dure described in Section 6.
2) Disconnect negative cable at battery.
3) Drain coolant by loosening drain plug (1).
1. Intake manifold 7. EVAP canister purge valve 13. Intake manifold mounting bolt (short) 19. Cushion
2. Intake manifold gasket 8. TP sensor 14. Intake manifold mounting bolt (long) 20. Fuel delivery pipe mounting bolt
3. Throttle body 9. IAC valve 15. EGR pipe gasket Tightening torque
4. Gasket 10. Fuel delivery pipe 16. O-Ring Do not reuse.
5. EGR pipe 11. Intake manifold stiffener 17. Grommet
6. MAP sensor 12. Intake manifold mounting nut 18. Injector assembly
WARNING:
To help avoid danger of being burned, do not remove
drain plug (1) and radiator cap while engine and radiator
are still hot. Scalding fluid and steam can be blown out
under pressure if plug and cap are taken off too soon.
Page 518 of 698
ENGINE MECHANICAL (M13 ENGINE) 6A1-17
4) Remove air cleaner assembly, resonator and hoses by refer-
ring to “AIR CLEANER ASSEMBLY AND RESONATOR”.
5) Disconnect the following electric lead wires :
IAC valve (1)
TP sensor (2)
EVAP canister purge valve (3)
MAP sensor (4)
Fuel injector wire harness at couplers (5)
Each wire harness clamps
6) Disconnect accelerator cable from throttle body.
7) Disconnect the following hoses :
Brake booster hose (1) from intake manifold
PCV hose (2) from PCV valve
Canister purge hose (3) from EVAP canister purge valve
Water hoses (4) from throttle body and thermostat case
Fuel feed hose (5) from fuel delivery pipe
8) Remove fuel delivery pipe with fuel injectors from cylinder
head.
9) Disconnect EGR pipe (6) from EGR valve.
10) Remove intake manifold stiffener (1).
Page 519 of 698
6A1-18 ENGINE MECHANICAL (M13 ENGINE)
11) Remove intake manifold (1) with throttle body (2) and EGR
pipe (3) from cylinder head, and then its gasket.
INSTALLATION
Reverse removal procedure for installation noting the followings.
Use new intake manifold gasket and EGR pipe gasket.
Tighten bolts (1) and nuts (2) to specified torque.
Tightening torque
Intake manifold bolts and nuts
(a) : 25 N·m (2.5 kg-m, 18.0 lb-ft)
Check to ensure that all removed parts are back in place.
Reinstall any necessary parts which have not been rein-
stalled.
Adjust accelerator cable play referring in Section 6E1.
Refill cooling system referring in Section 6B.
Upon completion of installation, turn ignition switch ON but
engine OFF and check for fuel leaks.
Finally, start engine and check for engine coolant leaks.