2000 HONDA PASSPORT ECO mode
[x] Cancel search: ECO modePage 7 of 267

Importan
t Safet y Precaution s
You'll find many safety
recommendations throughout this section, and throughout this
manual. The recommendations on
this page are the ones we consider
to be the most important.
Alway s Wea r You r Sea t Bel t
A seat belt is your best protection in all types of collisions. Airbags
supplement seat belts, but airbags
are designed to inflate only in a
moderate to severe frontal
collision. So even though your
vehicle is equipped with airbags, make sure you and your
passengers always wear your seat belts, and wear them properly. (See page 13.)
Restrai n All Childre n
Children are safest when they are
properly restrained in the back seat, not the front seat. A child
who is too small for a seat belt must be properly restrained in a
child safety seat. (See page 18.)
B e Awar e o f Airba g Hazard s
While airbags save lives, they can
cause serious or fatal injuries to
occupants who sit too close to
them, or are not properly
restrained. Infants, young children, and short adults are atthe greatest risk. Be sure to follow
all instructions and warnings in
this manual. (See page 7.)
Don' t Drin k an d Driv e
Alcohol and driving don't mix.
Even one drink can reduce your ability to respond to changing
conditions, and your reaction time
gets worse with every additional
drink. So don't drink and drive,
and don't let your friends drinkand drive either. Contro
l You r Spee d
Excessive speed is a major factor in crash injuries and deaths.
Generally, the higher the speed
the greater the risk, but serious
accidents can also occur at lowerspeeds. Never drive faster than is
safe for current conditions,
regardless of the maximum speed
posted.
Kee p You r Vehicl e i n Saf e
Conditio n
Having a tire blowout or a
mechanical failure can be
extremely hazardous. To reduce the possibility of such problems,
check your tire pressure and
condition frequently, and perform
all regularly scheduled
maintenance. (See page 187.)
Drive r an d Passenge r Safet y
Page 22 of 267

Childre
n Shoul d Si t i n th e
Bac k Sea t
According to accident statistics,
children of all ages and sizes are safer when they are restrained in
the back seat, not the front seat.
The National Highway Traffic Safety Administration
recommends that all children ages 12 and under be properly
restrained in the back seat.
In the back seat, children are lesslikely to be injured by striking
hard interior parts during a
collision or hard braking. Also,
children cannot be injured by an inflating airbag when they ride in
the back.
Th
e Passenger' s Airba g
Pose s Seriou s Risk s t o
Childre n
Airbags have been designed to
help protect adults in a moderate to severe frontal collision. To do
this, the passenger's airbag is
quite large, and it inflates with
tremendous speed.
Infants
Never put a rear-facing child seat in the front seat of a vehicle
equipped with a passenger's
airbag. If the airbag inflates, it
can hit the back of the child seat
with enough force to kill or very seriously injure an infant. Small Children
Placing a forward-facing child seat in the front seat of a vehicle
equipped with a passenger's
airbag can be hazardous. If the vehicle seat is too far forward, or
the child's head is thrown forward
during a collision, an inflatingairbag can strike the child with
enough force to kill or very seriously injure a small child.
Larger Children Children who have outgrownchild seats are also at risk of
being injured or killed by an
inflating passenger's airbag.
Whenever possible, larger
children should sit in the back seat, properly restrained with a
seat belt. (See page 33 for
important information about
protecting larger children.)
Drive r an d Passenge r Safet y
Page 25 of 267

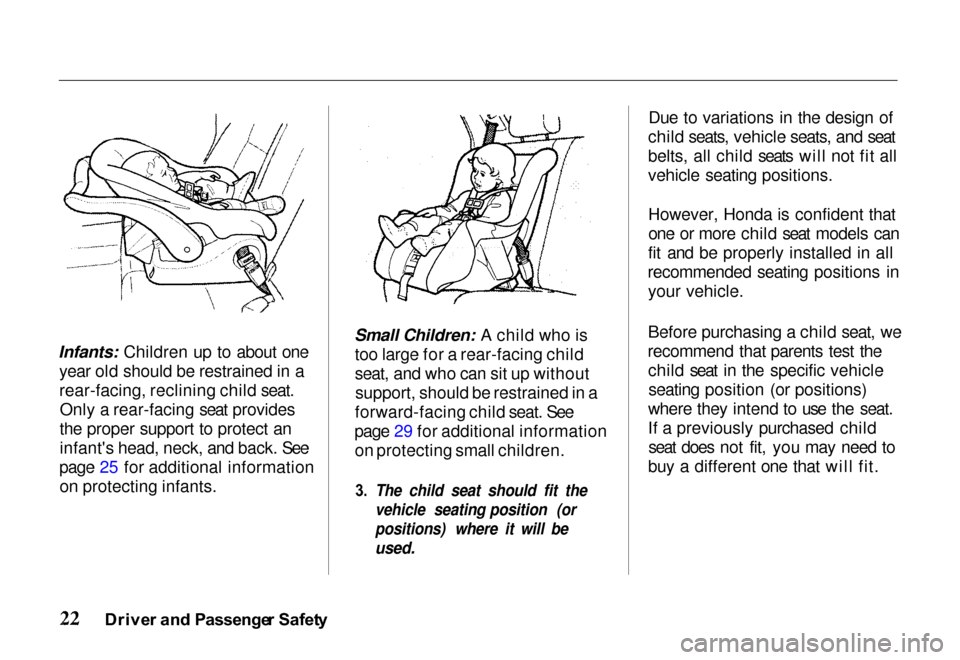
Infants: Children up to about one
yea
r old should be restrained in a
rear-facing
, reclining child seat.
Only a rear-facing seat provides
the proper support to protect an
infant's head, neck, and back. See
page
25 for additional information
on protecting infants. Small Children: A child who is
too
large for a rear-facing child
seat,
and who can sit up without
support, should be restrained in a
forward-facing child seat. See
page 29 for additional information on protecting small children.
3.
The child seat should fit the
vehicle seating position (or
positions) where it will be
used.
Due to variations in the design of
child
seats, vehicle seats, and seat
belts
, all child seats will not fit all
vehicl
e seating positions.
However,
Honda is confident that
one
or more child seat models can
fit and be properly installed in all
recommended
seating positions in
your vehicle.
Before purchasing a child seat, we
recommend
that parents test the
child seat in the specific vehicle seating
position (or positions)
where they intend to use the seat.
If a previously purchased child seat
does not fit, you may need to
buy
a different one that will fit.
Drive r an d Passenge r Safet y
Page 28 of 267

Protectin
g Infant s
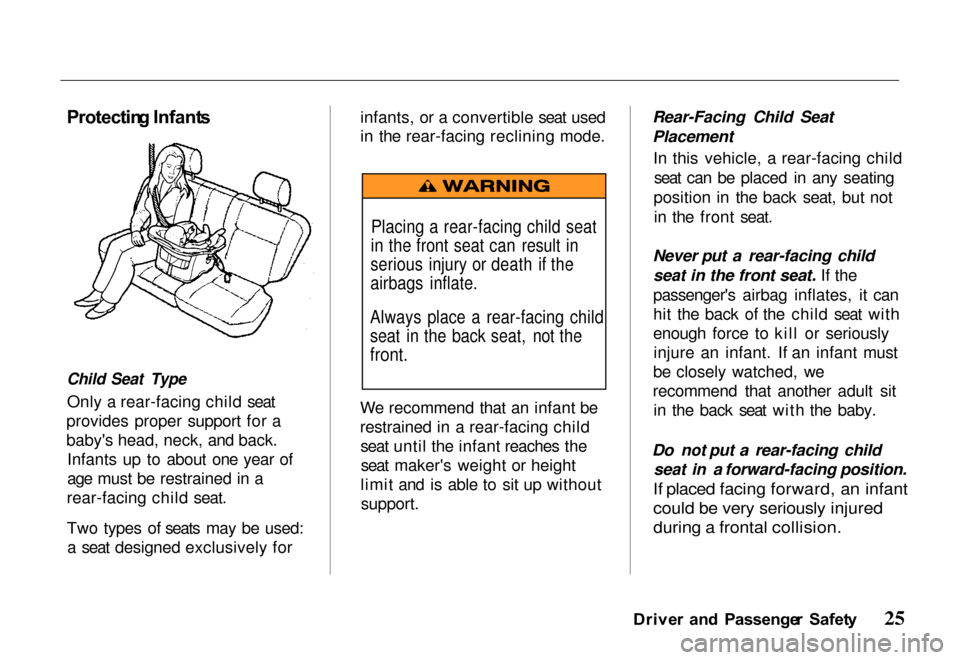
Child Seat Type
Only a rear-facing child seat
provides proper support for a
baby's head, neck, and back. Infants up to about one year of
age must be restrained in a
rear-facing child seat.
Two types of seats may be used: a seat designed exclusively for infants, or a convertible seat used
in the rear-facing reclining mode.
We recommend that an infant be
restrained in a rear-facing child seat until the infant reaches theseat maker's weight or height
limit and is able to sit up without support. Rear-Facing Child Seat
Placement
In this vehicle, a rear-facing childseat can be placed in any seating
position in the back seat, but not in the front seat.
Never put a rear-facing child seat in the front seat. If the
passenger's airbag inflates, it can
hit the back of the child seat with
enough force to kill or seriouslyinjure an infant. If an infant must
be closely watched, we
recommend that another adult sit in the back seat with the baby.
Do not put a rear-facing child seat in a forward-facing position.
If placed facing forward, an infant
could be very seriously injured
during a frontal collision.
Drive r an d Passenge r Safet y
Placing a rear-facing child seat
in the front seat can result in
serious injury or death if the
airbags inflate.
Always place a rear-facing child
seat in the back seat, not the
front.
Page 65 of 267

If you keep driving with the
malfunction indicator lamp on,
you can damage your vehicle's emissions controls and engine.Those repairs may not be covered
by your vehicle's warranties.
Reduce d Powe r
Indicato r
This light comes on for a few seconds when you turn the key to
the "ON" position
If it comes on at any other time, it
indicates that there is a problem in
the throttle "drive-by-wire"
system. With the light on, your
vehicle goes into "limp home"
mode — the engine runs on three
cylinders, and the accelerator
pedal no longer controls engine
speed.
As soon as it is safe, pull off the
road and turn off the engine.
Restart the engine to reset the
system. If the light remains on, or
comes on again while driving, have the vehicle towed to your
Honda dealer for repair.
Turn Signa l
Indicator s
A green light flashing on the instrument panel lets you know
that the front and rear turn signal lights are working. If the light
stays on and does not flash, check
for a burned out bulb. If there is no light when the lever is moved,check the fuse and bulb.
Whenever the Hazard Warning
Flasher Switch is on, both turn signals will flash.
Lo
w Fue l Indicato r
This light comes on when the tank
becomes nearly empty. Fill up the tank as soon as possible.
If the low fuel indicator light
comes on when the fuel tank is
not nearly empty, have the fuel
tank sensing unit and related
components inspected and
repaired by your Honda dealer.
Driving on a road with many
sharp curves may cause the fuel
indicator light to blink
intermittently. This is normal.
Low Oi l
Pressur e Indicato r
This light is designed to come on
to provide a "bulb check" when
the key is turned to the "ON"
position, but should go out after
Instrument s an d Control s
NOTIC
E
REDUCEDPOWER
Page 68 of 267

as indicated by the "U/S" (upshift)
light on the instrument panel.
If vehicle speed drops below
20 mph (30 km/h), or if the
engine is not running smoothly,
you should downshift to the next lower gear. You may need to
downshift two or more gears to
keep the engine running smoothly or for satisfactory performance.
This indicator comes on for a fewseconds when you turn the
ignition switch to the "ON"
position. 4-Whee
l Driv e
(4WD ) Indicato r
4WD models only
This indicator lights when the 4-Wheel Drive system is engaged.
With the 4WD-2WD switch in the "OFF" or 2WD position, this light
will come on to provide a "bulb
check" when the key is turned to the "ON" position, but should go
out after the engine is started.
If the 4WD-2WD switch is in the "ON" or 4WD position, this light
will come on when the key is
turned to the "ON" position and
remain on after the engine is
started.
Anti-Loc
k Indicato r
This light will come on and go out when the ignition switch is turned
to the "ON" position. (If the light
does not come on, see your Honda
dealer to have the system
repaired.)
If the light remains on after
engine start-up or comes on
during operation of the vehicle, stop as soon as possible and turn
the key off. Then start the engine
to reset the system. If the light stays on, or it comes on again
while you're driving, the anti-lock
brake system should be checked at your Honda dealer.
Until you get it fixed, you'll have
normal brakes, but you won't
have anti-lock.
Instrument s an d Control s
AB
S
Page 69 of 267

Chec
k Automati c
Transmissio n Indicato r
The indicator light comes on for a
few seconds when the ignition
switch is turned to the "ON"
position.
If the light flashes, it means the
computer controlling the
transmission has found a problem.
Have the automatic transmission checked by your Honda dealer as
soon as possible. You can safely
drive the vehicle while the light is
flashing, but the computer may
put the transmission into its "backup mode."
In the backup mode, the
transmission may not shiftautomatically. If the transmission
does not shift automatically, you must move the shift lever to
change gears. This chart shows the shift lever position and the
gear range that will result. "L" position First gear
"2" position Third gear
"3" position Fourth gear
"D" position Fourth gear
When the transmission is in
backup mode and does not shift
automatically, you should move
the selector lever to the
appropriate position for your
driving needs, as follows:
Select "3" or "D" for high speed
driving (over 50 mph, 80 km/h).
Select "2" for moderate speed
driving (between 15 mph [25
km/h] and 50 mph [80 km/h]).
Select "L" when starting from a
stop, driving up or down a steep
hill, or for engine braking when
towing a trailer downhill.
Do not exceed 65 mph (45 mph if
towing a trailer).
Instrument s an d Control s
Page 78 of 267

and the forward driving ranges.
The shift lever can be shifted freely into any position indicated by the arrow The lever
cannot be shifted into any position
indicated by the arrow
without pushing the button located on the end of the shift
lever. In this 4-speed automatic
transmission, the following three
modes can be selected by pressing the "POWER" or "WINTER"switch on the floor console, with
the key switch in the "ON"
position: NORMAL mode
POWER mode
WINTER mode
P (Park ) — Used to lock the
transmission when the vehicle is
parked or while starting the engine. Never move the shift lever
to Park until your vehicle is fullystopped. Use this position
together with the parking brake.
The shift lever can be moved from
PARK position if the regular brake is applied.
Refer to "Starting" in this section.R (Reverse ) — Used for backing
the vehicle. Bring your vehicle to a complete stop before shifting to
Reverse.
N (Neutral ) — The out-of-gear
position. You may restart a stalled
engine while the vehicle is still moving with the selector in
Neutral. Refer to "Starting" in thissection. This position is also used
when towing the vehicle. See "In
Case of Emergency" for towing information.
D (Drive ) (Firs t t o Fourt h
Gear ) — This position is for all
normal forward driving. For
normal driving, we recommend that you put the shift lever in the
"D" range. This will reduce
vehicle noise and improve fuel
economy.
Instrument s an d Control s
PAR
K
RE V
NEU T
DRIV E
3R D
2N D
1S T