2000 AUDI ALLROAD Sun roof
[x] Cancel search: Sun roofPage 6 of 306

----------------------------------------------TABLE OFCONT ENTS
I GENERAL ILLUSTRATION
General illustration 0 0 0. • • • 8
Warning and indicator lights 10
I SAFETY
FIRST
W elcome ... 0 0 0 •• •• 13
Safety first 0 0
• 0 • 0 0 0 0 • 0 •
13
Safety belts
• . . 0 0 0 • 0 0
14
Airbag system 0 ••••••• 0 0 • • • • • • • 25
Child safety ........ 0 • 0 0 0 0 0 0 0 0 0 44
I CONTROLS AND EQUIPMENT
Keys 0 0 0 0 0 0 0 0 0 0 0 •••• ••••• 0 0 • • 0
56
Power locks 0 0 0 0
Power windows
Mirrors 0 •• 0 0 0 •••
Head restraints
Front seats 0 0 0 •
0.- . 0 0 0 • • 59
69
• •• - •••• 0 ••• 0 72
75
•• 0 •• 0 76
Memory for front seats , .... 0 •• 0 81
Center armrest 0 0 0 0 0 0 0 0 0 •••••• 0 85 Rear
seats 0 0 •• 0 •• 0 • • • • • •
86
Luggage compartment , 0 0 88
Rear facing child seat bench 0 0 0 0 0 92
Ski sack 0 0 0 0 0 0 0 0 0 0 0 0 0 0 0 0.
96
Adjustable steering column
(tilt and telescopic) 0 0 0 0 • 0 0
98
Pedals 0 0 • 0 0 0 0 0 0 0 0 0 0 0 0 0 0 0 0 0 0 0 , 1 02
Parking brake lever 0 • 0 0 0 0 0 0 0 •• 0 1 03
5-speed automatic transmission
(Trptronic ®) 0 0 0 0 0 0 0 0 0 0 • 0 0 0 0 0. 0 • 104
Acoustic park assist
112
Ignition switch 0 0 0 0 0 0 0
1 13
Starting procedures . 0 • • 114
Stopping engine 0 0 0 0 0 0 • • • 115
Instrument cluster 0 0 0 0 0 0 116
Service Interval Display
121
Warning I Indic ator lights 0 0 0 0 0 0 • 122
On Board Diagnostic system 0 0 0 128
Driver information system 0 • 0 • • • 130
Menu display 0 0 0 0 0 0 0 0 0 0 0 0 0
0 131
Rear lid I door open indicator 0 0 0 137
Outside air temp erature 0 • 0 0 0 0 0 0 137 Radio
frequency display 13
8
Auto-Check system 0 0 0 o 0 138
Speed warning . 0 0 0 • 0 0 • • • • 0 • 0 0 144
Tr ip computer 0 0 0 0 0 0 •• 0
146
Switches 0 • 0 •• 0 0 0 0 • 0 0 0 0 148
Ride height adjustment
(4 Level Air Suspension) 0
153
Turn signals,
headlight dimmer switch lever 0 0 156
Cruise control 0 0 0 0 0 0 0 0 0 0 0 0 0 0 0 • • 158
Wiper and washer system 0 ••• 0 0 150
Climate controls 0 0 0 0 0 0 0 0 0 0 0 • 0 152
Power roof 0 0 0 0 0 0 0 • 0 0 0 0 0 • • • • • • 168
Int erior lights, reading lights 171
Luggage compartment light 0 0 0 0 172
Audi Homelink ®
Uni versal Transmitter . 0 0 • • • •
173
Sun visors 00 00 00 00 ... • .. •
177
Sun shade 0 0 0 0 0 0 0 0 •• , • • • ••• 0 0 177
Glo ve compartment
Coat hooks
Ashtray 178
179
180
5
Page 61 of 306

CONTROLS AND
EQUIPMENT--------------------
Remember- the panic function can be seen
and heard by other motorists and I or per
sons near you.
Use the panic function only if you
are In an emergency situation.
�W ARNING
Do not leave children unattended
in the vehicle especially with ac
cess to the remote control. There
mote control could be used to lock
the doors delaying access to the
children in an emergency.
Resetting the remote control
If your vehicle will not lock using the remote
control . it could be that the code for the con
trol unit and key needs to be reset. This can
occur if you frequently use the remote c �m
trol while standing outside of the effective
range.
60 Resetting
procedure
1 - To synchronize, press button A or but
ton Con the remote control one time.
2 - Then, within one minute, lock or un
lock the driver's door with the master
key.
The system is now functional.
Operating locks using the key
• To lock and unlock the vehicle from
the outside, turn the key in the lock of the
driver's door or the rear lid.
Yo u can also lock and unlock the vehicle by
turning the key in the re ar lid lock. See
page 63.
• Turn the key one time only to unlock
(A) either the driver's door or respectively
the rear lid.
• Turn the key two times to unlock all ve
hicle doors and the rear lid. Convenience
close I open feature
You can also close any open windows and
1 or the power roof* when you lock your car
with the key.
Insert the key into the lock of the driver's
door, turn it to the lock position (B) and hold
until the wind ows and sunroof are com
pletely closed. The automatic close function
will stop immediately if the key is released.
Always make sure the windows are
not obstructed.
To open all window s: insert your key into the
lock of the dr iver's door, turn it to the open
position (A) and then hold it in this position.
Page 167 of 306

CONT
ROLS AND EQUIPMENT
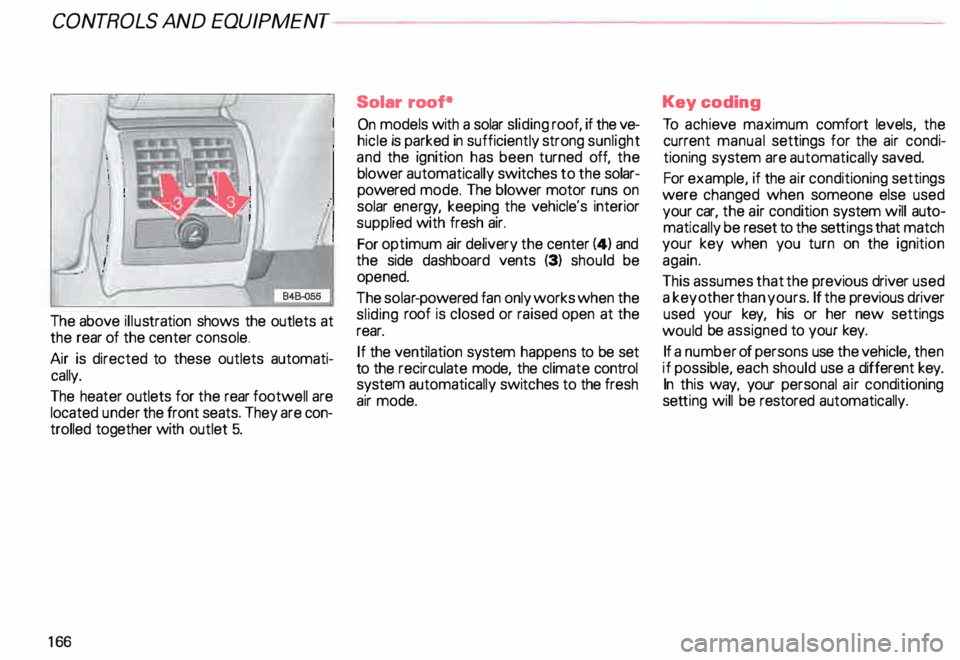
The above illustration shows the outlets at
the rear of the center console.
Air is directed to these outlets automati
cally.
The heater outlets for the rear footwall are
located under the front seats. They are con
trolled together with outlet 5.
16 6 Solar
roof*
On models with a solar sliding roof, if the ve
hicle is parked in sufficiently strong sunlight
and the ignition has been turned off, the
blower automatically switches to the solar
powered mode. The blower motor runs on
solar energy, keeping the vehicle's interior
supplied with fresh air.
For optimum air delivery the center (4) and
the side dashboard vents (3) should be
opened.
The solar -powered fan only works when the
sliding roof is closed or raised open at the
rear.
If the ventilation system happens to be set
to the recirculate mode, the climate control
system automatically switches to the fresh
air mode. Key
coding
To achie ve maximum comfort levels, the
current manual settings for the air condi
tioning system are automatically saved.
For example, if the air conditioning settings
were changed when someone else used
your car, the air condition system will auto
matically be reset to the settings that match
your key when you turn on the ignition
again.
This assumes that the previous driver used
a key other than yours. If the previous driver
used your key, his or her new settings
would be assigned to your key.
If a number of persons use the vehicle, then
if possible, each should use a different key.
In this way, your personal air conditioning
set ting will be restored automatically.
Page 168 of 306

---------------------CONTROLS AND
EQUIPMENT
General notes
• Vehicle heating is depend upon tne tem
perature of the engine coolant -therefore,
your vehicle interior will warm uponly when
the engine has reached its operating tem
perature.
When the ambient temperature is too low,
the fan only switches to high speed modes
when the coolant has reached a sufficiently
high temperature, or when the ® button
has been depressed.
• Keeping the air intake slots in front of the
windshield free from ice, snow and debris
helps to make sure that the climate control
system will work properly.
• When the air conditioner compressor is
on it reduces both the temperature and the
humid ity of the air inside the vehicle. This
prevents the windows from fogging up.
• The air conditioner works best with the
windows and power roof* closed. •
If the inside temperature is very high af
ter the vehicle has been parked in the sun,
open windows and allow the hot air to es
cape before switching on the air condi
tioner.
• The dust and pollen filter will prevent
dust and pollen etc. in the outside air from
entering the car. Switch to air recirculation
to prevent unpleasant fumes from entering
the vehicle.
If water drips under the
vehicle ...
At high outside temperatures and humidity,
condensation may drip from the evaporator.
This is normal and does not indicate a leak.
If the airflow is not cool ...
• At low ambient temperatures the air con
ditioner compressor switches off automati
cally. The compressor cannot be switc hed
on again in this case, even by pressing the
AUTO button. •
The air conditioner may switch itself off
temporarily to ensure sufficient engine
cooling when the engine is running at full
load.
The air conditioner will also be switched off
temporarily in the kick-down function. See
page 109.
• Check the air conditioning fuse on the
fuse p imel -see page 27 4. Have it replaced,
if necessary.
• If you suspect that the air conditioner is
damaged, for instance after an accident,
switch to the ECON and have the system
examined immediately for leaks or other
damage.
167
Page 169 of 306

CONTROLS AND
EQUIPMENT--------------------
Maintenance
• For maximum efficiency of the air condi
tioner the dust and pollen filter elements
must 'be replaced at the intervals indicated
in the Maintenance Schedule.
• The condenser must be checked regu
larly to make sure it is clean. If it becomes
obstructed by dirt or insects, spray 1t clear
with water.
• Repairs to the Audi air condition
ing system require specialized
knowledge and special tools.
If the system is not functioning
properly, contact your Audi Dealer.
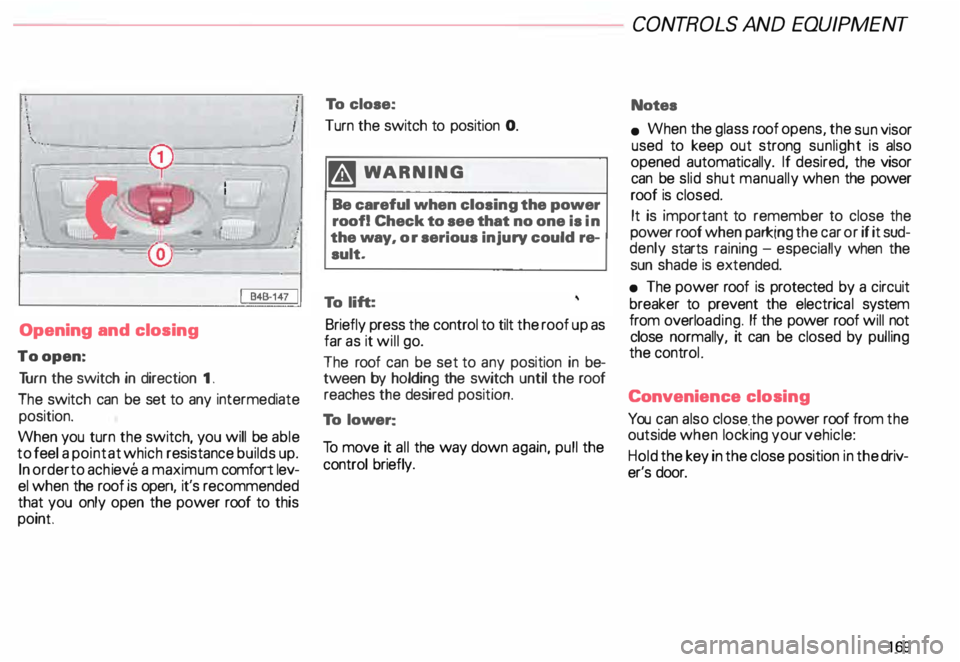
16 8 Power roof*
The roof will slide open or tilt up at the rear
as required. When the ignition is on it can be
opened and closed by turning the rota�
control next to the interior light. The roof 1s
tilted open or closed by pressing or pulling
the control -see illustration.
When turning the ignition off, however, the
sunr oof can still be operated as long as the
driver's and front passenger's door are
closed. When either door is opened, sliding
roof operation will be deactivated .
Always close the roof completely if you are
going to park your vehicle and leave. �W
ARNING
Be careful when closing the power
roof 1 tilt roof. Not paying atten
tion could cause you or others to
be caught and injured as the roof
closes. To help avoid injuries
caused by closing the roof, always
take your key whenever you leave
your vehicle.
Page 170 of 306

;
\ I
\. ,. _
---________.)
---------� =::�1
Opening and closing
To open: Tu rn the switch in direction 1.
The switch can be set to any intermediate
position.
When you turn the switch, you will be able
to feel a point at which resistance builds up.
In order to achieve a maximum comfort lev
el when the roof is operi, it's recommended
that you only open the power roof to this
point To
close:
Turn the switch to position 0.
�W ARNING
Be careful when closing the power
roof! Check to see that no one is in
the way, or serious injury could re
sult.
To lift:
Briefly press the control to tilt the roof up as
far as it will go.
The roof can be set to any position in be
tween by holding the switch until the roof
reaches the desired position.
To lower:
To move it all the way down again, pull the
control briefly. CONT
ROLS AND EQUIPMENT
Notes
• When the glass roof opens, the sun visor
used to keep out strong sunlight is also
opened automatically. If desired, the visor
can be slid shut manually when the power
roof is closed.
It is important to remember to close the
power roof when parking the car or if it sud
denly starts raining -especially when the
sun shade is extended.
• The power roof is protected by a circuit
breaker to prevent the electrica l system
from overlo ading. If the power roof will not
close normally, it can be closed by pulling
the controL
Conv enience closing
You can also close . the power roof from the
outside when locking your vehicle:
Hold the key in the close position in the driv
er's door.
169
Page 178 of 306

Sun
visors
I e4s-2e1
1
You can lift the visors out of the center
mounting {arrow 1 in illus tration) and move
them toward the door windows to protect
against side glare.
A vanity mirror is located on the back of the
sun visors.
The light for the mirror {which is located in
the roof) switches on automatically when
the mirror cover is slid open (arrow 2) and
switc hes itself off when the cover is closed .
The light also switches itself off when the
sun visor is pushed back up. There is
also a small folding sun visor lo
cated between the sun visors for the driver
and front passenger. You can use this sun vi
sor to cover the space about the rear-view
mi rror. CONT
ROLS AND EQUIPMENT
Sun shade*
·---� --�
For protect ion against direct sunlight, al
ways use the sun shade whenever you
must park your vehicle exposed to the sun.
Rear doors•
The sun shade can be used to cut glare
through the rear passengers' windows.
Pull out the shade and engage it in the hooks
on the upper part of the door frame.
177
Page 214 of 306

Washing
The best protection against environmental
influences is frequent washing and waxing.
How often this is required depends on how
much the vehicle is used, where it is parked
(garage, in the open under trees, etc.), the
seasonal and weather conditions as well as
env ironmental influences. The longer bird
droppings, insects, tree resin, road and in
dustrial grime, tar, soot, road salt and other
materials remain on the vehicle paint, the
more lasting their destructive effect will be.
High temperatures, as from strong sunlight,
intensify the corrosive effect.
Under certain circumstances, weekly
washing may be necessary. Under other
conditions. a monthly washing and waxing
may be adequate.
After the winter, the underside of the ve
hicle should be thoroughly washed. Automatic
car wash
The vehicle paint is so durable that the ve
hicle can normally be washed without prob
lems in an automatic car wash. However,
the effect on the paint depends to a large
extent on the design of the facil ity, the filter
ing of the wash water, the type of wash and
care material, etc. If the paint has a dull ap
pearance after going through the car wash
or is scratched, bring this to the atte ntion of
the operator immediately. If necessary use
a different car wash.
Notes
• Before going through a car wash, be sure
to take the usual precautions such as clos
ing the windows and sunroof*.
• You don't have to remove the factory
installed radio antenna. However, if your ve
hicle is equipped with the Navigation Sys
tem*, then you must remove the antenna.
• If you have installed additional accesso
ries on the vehicle -such as spoilers, roof
rack, etc. -it is best to ask the car wash op
erator if these should be remov ed. VE
HICLE CARE
Washing the vehicle by hand
� In the intsi'Sst of the environ
� msnt, the vehicle should only be
washed in special wash bays.
First soften the dirt with plenty of water and
rinse off as well as possible.
Then clean the vehicle with a soft sponge,
glove or brush starting on the roof and work
ing down using only slight pressure. Special
car wash soap should only be used for very
persistent dirt.
Rinse the sponge or glove thoroughly and
oft en.
Clean wheels .and sill panels last, using a dif
ferent sponge if pos sible.
After washing the vehicle, rinse thoroughly
with water and wipe it off.
213