2000 AUDI ALLROAD transmission
[x] Cancel search: transmissionPage 222 of 306

General
notes
• We recommend that you have the engine
compartment and the underside of your ve
hicle inspected twice a year for any damage
to the protective coating, preferably before
and after the winter season. Have neces
sary repairs done as soon as possible.
• Also, whenever the lower body sh�ll.
axle, transmission or engine assemblies
have been repaired, any anti-corrosion coat
ing lost on the affected surfaces should be
reapplied.
• Oil-based protective sprays must not be
applied. Only tar-or wax -based anti-corro
sion protectors are compatible with the fac
tory applied corrosion pro tection. Bef_ore ap
plication, road dirt, salt spray deposits and
oily substances must be removed. Yo
ur authorized Audi Dealer stocks the
cleaning and preservation solutions recom
mended by the factory for this purpose and
has the equipment necessary to apply
them. Therefore, any additional corrosion
protection work should be perform .ed by an
Audi Dealer. Using incorrect cleamng solu
tions could damage rubber parts or painted
surfaces.
� WARNING
Use only the correct cleaning solu
tions. Never use gasoline, Diesel
fuel or solvents which could cause
a fire. VE
HICLE CARE
221
Page 229 of 306

VEHICLE
CARE---------------------------------------------------
Maintenance
Yo ur vehicle has been designed to help
keep maintenance requirements to a mini
mum.
However. a certa in amount of regular main
tenance is still necessary to assure your ve
hic le's safety, economy and reliabili ty.
c£> By regularly maintaining your
vehicle, you help make sure that
emission standards are maintai ned,
thus minimizing adverse effects on
the envir onment.
For detailed vehicle maintenance consult
your Maintenance booklet.
Under difficult operating condi
tions, for example at extremely low out
side temperatures, in very dusty regions,
when towing a trailer very frequently, etc.,
some service work should be performed
between the intervals specified.
This applies particularly to:
• oil changes, and
• cleaning or replacing the air filter.
228 Important
considerations for
you and your vehicle:
The increasing use of electr onics, sophisti
cated fuel injection and emission control
systems, and the generally increasing tech
nical complexity of today's automobiles,
have steadily reduced the scope of mainte
nance and repairs which can be carried out
by vehicle owners. Also, safety and en
vironmental concerns place very strict
limi ts on the nature of repairs and adjust
ments to engine and transmission parts
which an owner can perform . Main
tenance, adjustments and repairs usu
ally require special tools, testing devices
and other equipment available to specially
trained workshop personnel in order to as
sure proper performance, reliability and
safety of the vehicle and its many systems.
Impr oper maintenan ce, adjustments and
repairs can impair the operation and reliabil
ity of your vehicle and even void your ve
hicle warranty. Therefore, proof of servicing
in accordance with the maintenance
schedule may be a condition for upholding
a possible warranty claim made within the
warranty period.
Above all, operational safety can be ad
versely affected, creating unnecessary
risks for you and your passengers.
Page 231 of 306

VEHI
CLE CARE
J'4 WARN ING continued
• If you must work underneath
the vehicle with the wheels on the
ground, always make sure the ve
hicle is on level ground. that the
wheels are always securely
blocked and that the engine can
not be started. Always remove the
ignition key before anyone gets
under the vehicle.
Always make sure the transmis
sion selector lever (automatic
transmission) is in "P" (Park posi
tion) and the hand brake is firmly
applied.
• Always be extremely careful
when working on the vehicle. Always follow commonly accepted safety practices and general com
mon sense. Never risk personal in
jury.
230 �
Changing the engine settings
will adversely aHect emission
levels. This Is detrimental to the en
vi ronment and increases fuel con
sumption.
Always observe environmental reg
ulations when disposing of old en
gine oil. used brake fluid, dirty en
gine coolant, spent batteries or
worn out tires.
Page 268 of 306

•
The deflated full size spare tire cannot be
repaired or mounted using conventional
shop equipment. This work always has to
be performed by the man ufacturer of the
collapsible tire.
• All the air must be let out of the tire after
use before stowing it in the storage area
prov ided for it in the vehicle. Once all the air
is out, the tire will return to its original form.
To let the air out of the tire, either use a
sharp object to press down on the metal pin
in the valve, or use the valve-remo ving tool
on the back side of the dust cap to unscrew
the valve stem. Changing
a wheel
�W ARNING
You or your passengers could be
injured while changing a wheel if
you do not follow safety precau
tions:
• If you have a flat tire, move a
safe distance off the road. Turn off
the engine, turn the emergency
flasher on and use other warning
devices to alert other motorists.
• Passengers must not rema in in
the vehicle when it is jacked up.
This includes children as well as
adults.
• Make sure that passengers wait
in a safe place away from the ve
hicle and well away from the road
way and traffic.
• Before you change a wheel, be
sure the ground is level and firm.
If necessary, use a sturdy board
under the jack. DO-IT-YOURSELF
SERVICE
�� WARN ING continued
• After installing the spare wheel,
make sure that you remount the
flat tire/Wheel in its storage area
properly and tighten the plastic
knurled screw securely.
• To help prevent the vehicle from
moving suddenly and possibly
slipping off the jack, always fully
set the parking brake and block
the wheel diagonally opposite the
wheel being changed. When one
front wheel is lifted off the
ground, placing the automatic
transmission in P (Park) will not
prevent vehicle movement.
267
Page 276 of 306

Fuse
arrangement
No. 1 - Heated washer jets !
B45-087C I
A 11
- .. 5
2 - Turn signals . . . . . . . . .
. 10
3 - Headlight washer (relay)
illum ination for glove compartment,
climate control, Automatic
Tr ansmission, instrument cluster ... 5
4 - License plate light . . . 5
l) Amps No.
A1l
5 - Ins trument cluster, seat heating,
test connection for cruise control,
bulb monitor, Automatic
Tr ansmis sion display, switch lighting,
mirror switches and actuators,
airbag warning light, outside
temperature indicator, climate
control, solar roof, acoustic parking
assistance system, navigation
system, car telephone, 4 Level Air
Suspension ............ .. ...... 1 0
6 - Power locking system . . . . . . . . . 5
7 - Anti-lock brake system (ABS),
brake light switch . . . . . . . . . . . . 1 0
8 - Car telephone . . . . . . . . . . . . . . .
. 5
9 - Heated mirrors . . . . . . . . . . . . . . 1 0
1 0- Automatic headlight adjustment
. 5
11 -Cruise control
(Automatic Transmission) . . .
1 0
12- On Board Diagnostic system .... _ 10
13 -Brake lights . . . . . . 1 0 DO-IT-YOURSELF
SERVICE
No. 14 -Interior lights, reading lights,
anti-theft alarm system,
vanity mirror, seat memory ....... 10
15 -Instrument cluster, climate control,
mirror and seat mem ory, .
navigation system . . . . . . . . . . . . . . 1 0
16- Electronic Stability Programm ..... 5
17 -Navigation system, 4 Level Air
Suspension, automatic headlight
adjustment .............. ...... 10
18-Hig h-beam, right ......... ....... 10
19 -H igh-beam, left . . . . . . . . . . . . .. 1 0
20 � Low beam, right, headlight
adjustment . . . . . . . . . . . . . . . • . .
15
21 -Low beam, left, headlight
adjustment . . . . . . . . . . . . . . . .. 15
22 -Side marker and tail light, right . 5
23 -Side marker and tail light, left . . . . . 5
24 -Wiper and washer system . . 25
25 -Blower for heating (climate
control), solar roof 30
275
Page 277 of 306

DO-IT-YOURSELF
SERVICE----------------------
No.
A11 No.
A 11 Automatic
circuit breakers
26 -Rear window defogger,
air recirculation . . . . . . . .
30
27 -Heated steering wheel,
rear window wiper , . . . . . 15
28 -Fuel pump . . . . . . . , . . . . 20
29 - Engine timing . . . . . . . . . .
30
30 -Power roof . . . . . .
. ... 20
31 -Back-up lights, cruise control,
Automatic Transmission,
data link connector for
On Board Diagnostic,
automatic dimmng inside mirror
15
32 -Engine timing . . . . . . . . . . . . . . . . . 20
33 -Ciga rette lighter 15
34 - Engine timing
1l Amps
276 15 35
-Va cant
36 -Front fog lights,
rear fog light ...... .
37 -Radio ........... .
38 - Luggage compartment light, . . .
15
. . ... 20
power locking system . . . . . . . . . . 20
39 -Emergency flasher system ....... 15
40 -Horn . . . . . . . . . . . . . . . . . . . . . . . 25
41 -Anti-lock brake system (ABS) .. .. 25
42 -Electronic Stability Programm .... 25
43 -$-contact (radio) . . . . . . . . . . . . . . 5
44 -Seat heating . ... ... . ... ... ..... 30 The
electric power windows and the elec
tric seat adjusters are protected with circuit
breakers which reset automatically after
the circuit overload has been correcte d.
Page 280 of 306

----------------------DO-IT-YOURSELF SERVICE
Note
• Applying a higher voltage booster
battery will cause expensive dam
age to sensitive electronic compo
nents, such as control units, relays,
radio, etc.
• Ve hicle with discharged battery:
Turn off lights and accessories, move lever
of automatic transmission to N (Neutral)
or P (Park) and set parking brake. Use
of jumper cables
�W ARNING
• To avoid serious personal Injury
and damage to the vehicle, heed
all warnings and instructions of
the jumper cable manufacturer.
If in doubt, call for road service.
• The jumper cables must be long
enough so that the vehicles do not
touch.
• When
connecting jumper
cables, make sure that they cannot
get caught in any moving parts in
the engine compartment. Removing
the battery cover -see
page 245.
Improper hook-up of jumper cables
can ruin the generator.
Always connect POSITIVE (+ ) to
POSITIVE (+ ). and NEGATIVE (-)to
NEGATIVE (-).
279
Page 282 of 306

---------------------DO-IT-YOURSEL F SERVICE
Emergency towing with commercial tow truck
The following information is to be used by
commercial tow truck operators who know
how to operate their equipment safely.
General hints
• Never tow your Audi otherwise
this will cause damage to the engine
and transmission.
• Never wrap the safety chains or
winch cables around the brake lines.
• To prevent unnecessary damage.
your Audi must be transported with
a car carrier (flat bed truck).
To load the vehicle on to the flat bed.
use the towing loop found in the ve
hicle tool kit and attach to the front
anchorage.
�W ARNING
A towed vehicle is not safe for pas
sengers. Never allow anyone to
ride in a towed vehicle for any rea
son. Front towing
anchorage
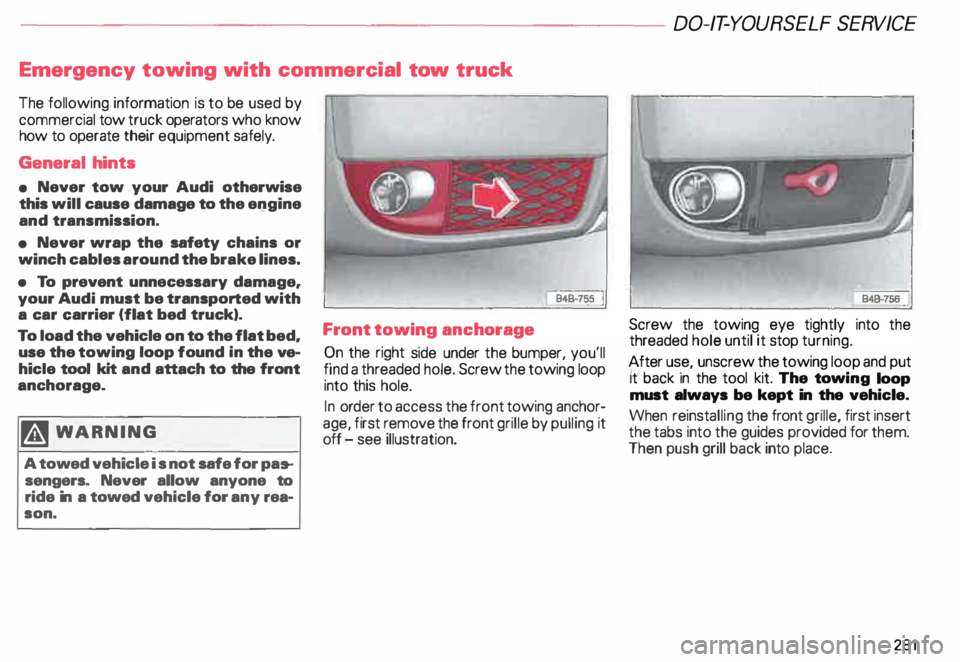
C? n the right side under the bumper, you'll
fmd a threaded hole. Screw the towing loop
into this hole.
In ord .er to access the front towing anchor
age, f1rst remove the front grille by pulling it
off -see illustration. Screw the towing eye tightly
into the
threaded hole until it stop turning.
After us .e, unscrew the towing loop and put
1t back In the tool kit. The towing loop
must always be kept in the vehicle.
When reinstalling the front grille, first insert
the tabs into the guides provided for them.
Then push grill back into place.
281