Page 1 of 4592

AC2810
AC0LG±02
AC2811
N11084
Wrong Okey
HI LO HILO
± AIR CONDITIONINGAIR CONDITIONING SYSTEM
AC±1
2483 Author�: Date�:
AIR CONDITIONING SYSTEM
PRECAUTION
1. DO NOT HANDLE REFRIGERANT IN AN ENCLOSED
AREA OR WEAR EYE PROTECTION
2. ALWAYS WEAR EYE PROTECTION
3. BE CAREFUL NOT TO GET LIQUID REFRIGERANT IN
YOUR EYES OR ON YOUR SKIN
If liquid refrigerant gets in your eyes or on your skin.
(a) Wash the area with lots of cool water.
CAUTION:
Do not rub your eyes or skin.
(b) Apply clean petroleum jelly to the skin.
(c) Go immediately to a physician or hospital for professional
treatment.
4. NEVER HEAT CONTAINER OR EXPOSE IT TO NAKED
FLAME
5. BE CAREFUL NOT TO DROP CONTAINER AND NOT
TO APPLY PHYSICAL SHOCKS TO IT
6. DO NOT OPERATE COMPRESSOR WITHOUT
ENOUGH REFRIGERANT IN REFRIGERATION SYS-
TEM
If there is not enough refrigerant in the refrigerant system oil lu-
brication will be insufficient and compressor burnout may occur,
so that care to avoid this, necessary care should be taken.
7. DO NOT OPEN PRESSURE MANIFOLD VALVE WHILE
COMPRESSOR IS OPERATE
If the high pressure valve is opened, refrigerant flows in the re-
verse direction and could cause the charging cylinder to rup-
ture, so open and close the only low pressure valve.
8. BE CAREFUL NOT TO OVERCHARGE SYSTEM WITH
REFRIGERANT
If refrigerant is overcharged, it causes problems such as insuffi-
cient cooling, poor fuel economy, engine overheating etc.
Page 25 of 4592
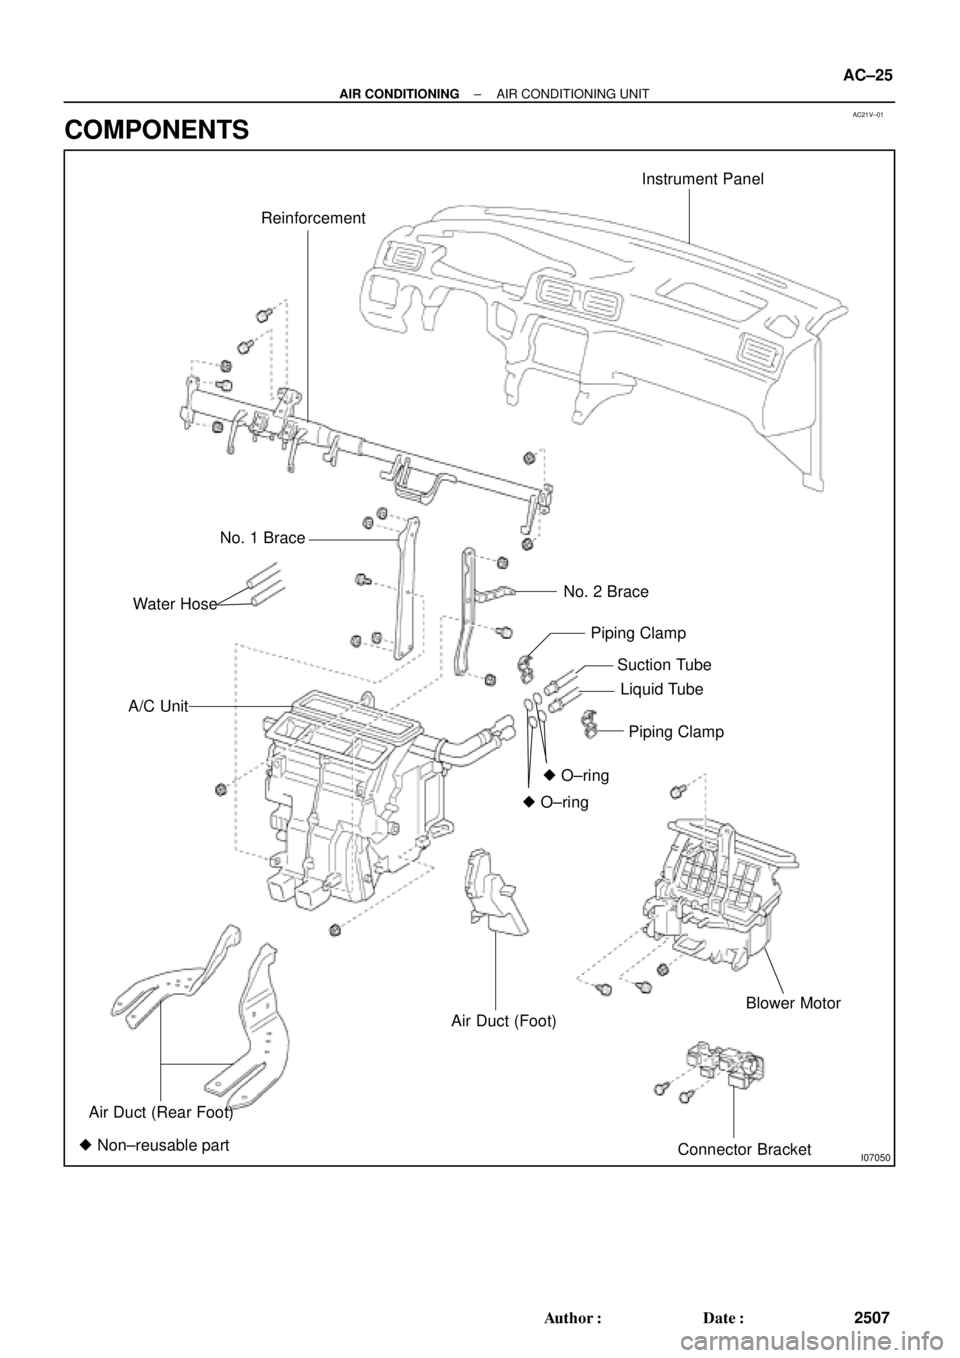
AC21V±01
I07050
ReinforcementInstrument Panel
No. 1 Brace
No. 2 Brace
A/C Unit
Piping Clamp
Suction Tube
Liquid Tube
Piping Clamp
� O±ring� O±ring
Air Duct (Rear Foot)
Air Duct (Foot)Blower Motor
Connector Bracket � Non±reusable partWater Hose
± AIR CONDITIONINGAIR CONDITIONING UNIT
AC±25
2507 Author�: Date�:
COMPONENTS
Page 26 of 4592
I07051
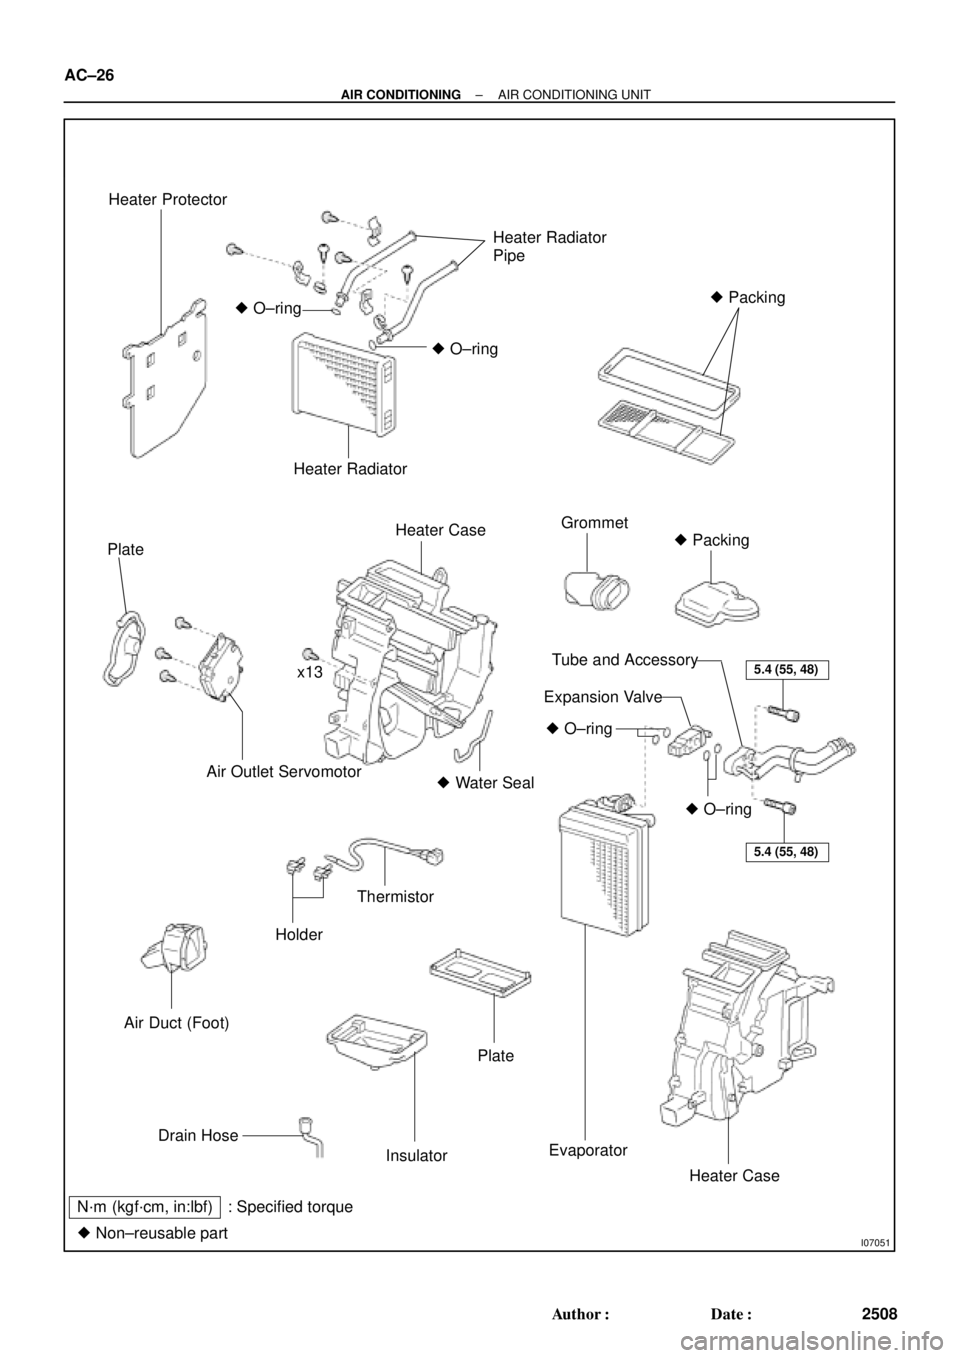
Heater Protector
Heater Radiator
Pipe
� Packing
� O±ring
� O±ring
Heater Radiator
Plate
Heater CaseGrommet
� Packing
x13
Air Outlet Servomotor� Water Seal
Air Duct (Foot)
Holder
Thermistor
5.4 (55, 48)
5.4 (55, 48)
� O±ring
� O±ring
Tube and Accessory
Expansion Valve
Drain Hose
Insulator
Plate
Evaporator
Heater Case
N´m (kgf´cm, in:lbf) : Specified torque
� Non±reusable part
AC±26
± AIR CONDITIONINGAIR CONDITIONING UNIT
2508 Author�: Date�:
Page 27 of 4592
AC21W±01
N20288
N20237
Water Hose
MarkingUpper
LH
Hose ClipRH Heater Radiator Pipe
45 ± 10°
Lower
I09160
± AIR CONDITIONINGAIR CONDITIONING UNIT
AC±27
2509 Author�: Date�:
REMOVAL
1. DISCHARGE REFRIGERANT FROM REFRIGERATION
SYSTEM
HINT:
At the time of installation, please refer to the following item.
Evacuate air from refrigeration system.
Charge system with refrigerant and inspect for leakage of refrig-
erant.
Specified amount: 800 ± 50 g (28.22 ± 1.76 oz.)
2. DRAIN ENGINE COOLANT FROM RADIATOR
HINT:
It is not necessary to drain out all the coolant.
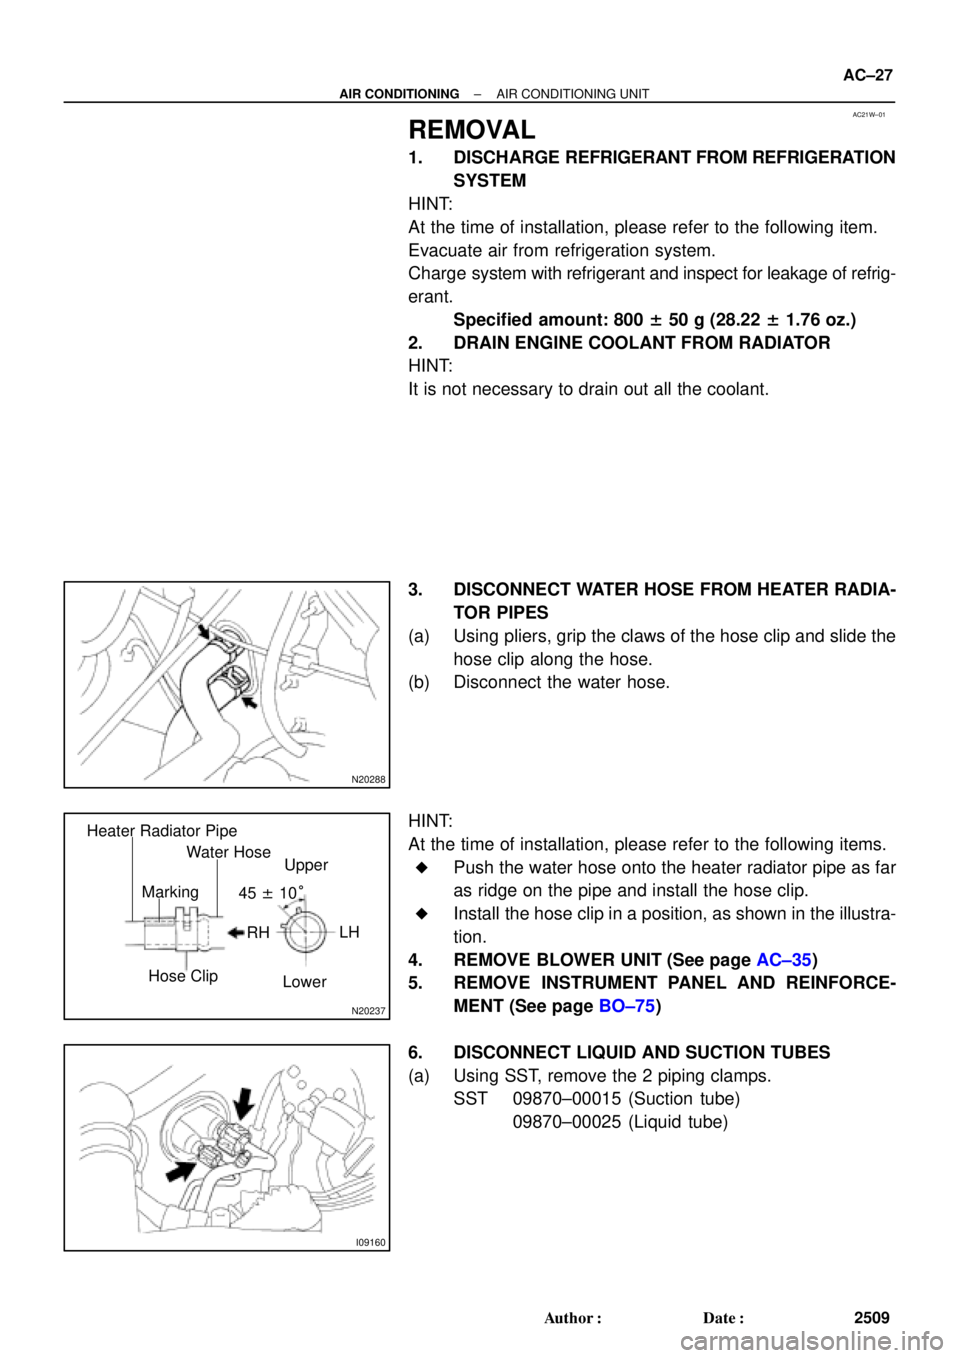
3. DISCONNECT WATER HOSE FROM HEATER RADIA-
TOR PIPES
(a) Using pliers, grip the claws of the hose clip and slide the
hose clip along the hose.
(b) Disconnect the water hose.
HINT:
At the time of installation, please refer to the following items.
�Push the water hose onto the heater radiator pipe as far
as ridge on the pipe and install the hose clip.
�Install the hose clip in a position, as shown in the illustra-
tion.
4. REMOVE BLOWER UNIT (See page AC±35)
5. REMOVE INSTRUMENT PANEL AND REINFORCE-
MENT (See page BO±75)
6. DISCONNECT LIQUID AND SUCTION TUBES
(a) Using SST, remove the 2 piping clamps.
SST 09870±00015 (Suction tube)
09870±00025 (Liquid tube)
Page 29 of 4592
AC21X±01
N20287
N20283
N20243
x13Water Seal
Plate
EvaporatorInsurator
N20293
± AIR CONDITIONINGAIR CONDITIONING UNIT
AC±29
2511 Author�: Date�:
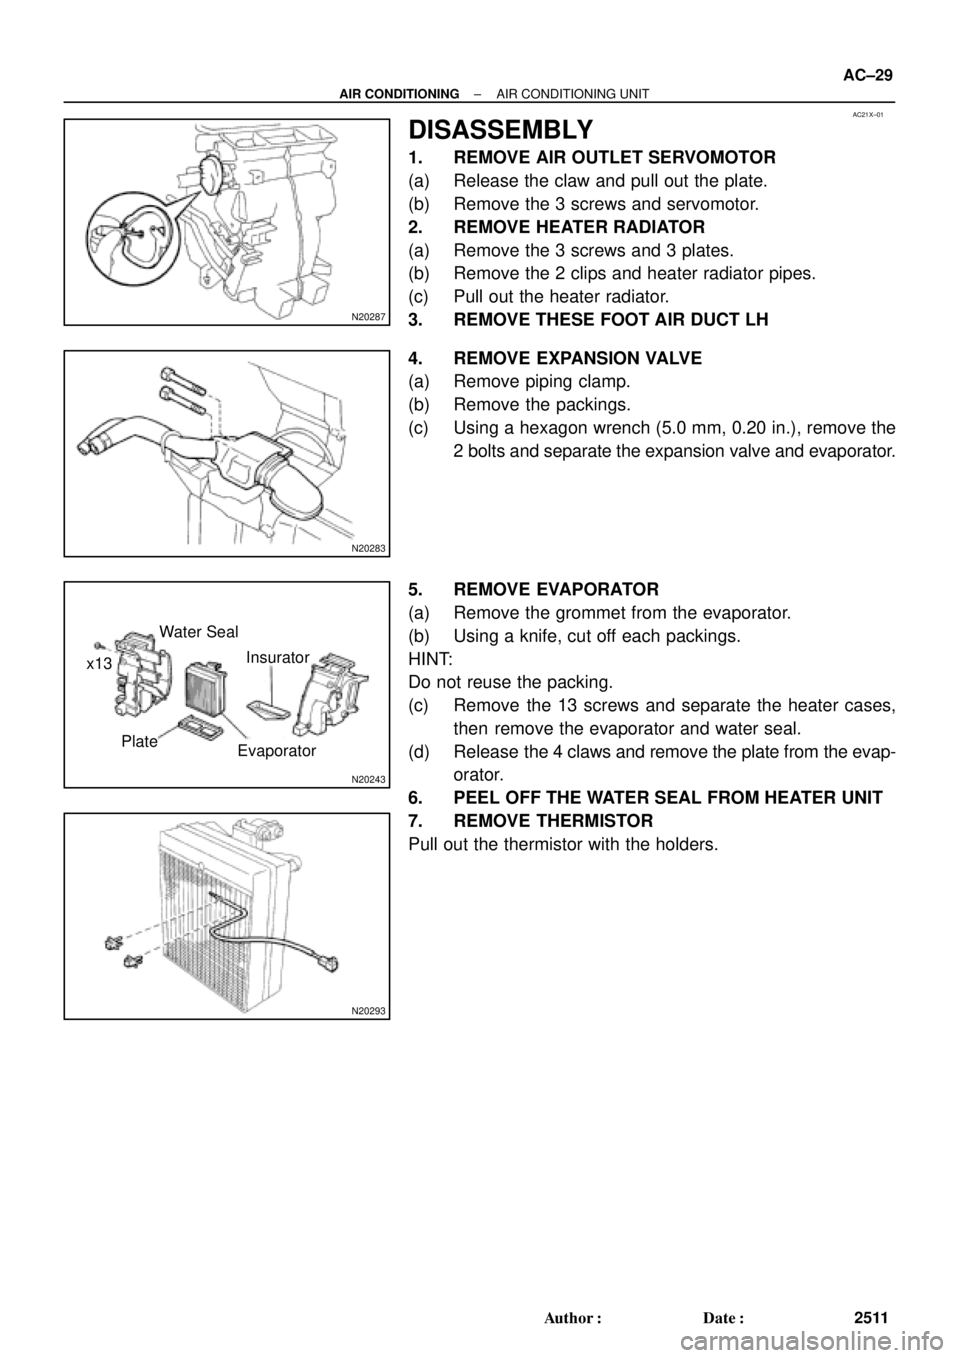
DISASSEMBLY
1. REMOVE AIR OUTLET SERVOMOTOR
(a) Release the claw and pull out the plate.
(b) Remove the 3 screws and servomotor.
2. REMOVE HEATER RADIATOR
(a) Remove the 3 screws and 3 plates.
(b) Remove the 2 clips and heater radiator pipes.
(c) Pull out the heater radiator.
3. REMOVE THESE FOOT AIR DUCT LH
4. REMOVE EXPANSION VALVE
(a) Remove piping clamp.
(b) Remove the packings.
(c) Using a hexagon wrench (5.0 mm, 0.20 in.), remove the
2 bolts and separate the expansion valve and evaporator.
5. REMOVE EVAPORATOR
(a) Remove the grommet from the evaporator.
(b) Using a knife, cut off each packings.
HINT:
Do not reuse the packing.
(c) Remove the 13 screws and separate the heater cases,
then remove the evaporator and water seal.
(d) Release the 4 claws and remove the plate from the evap-
orator.
6. PEEL OFF THE WATER SEAL FROM HEATER UNIT
7. REMOVE THERMISTOR
Pull out the thermistor with the holders.
Page 30 of 4592
AC21Y±01
I03338
Thermometer
Ice
10 cm
(0.39 in.)
Ohmmeter
Thermistor
Z04352
(W)
5,000
0 500 1,0001,500 2,000 2,500 3,000 3,500 4,000 4,500
5 010152025(°C)
32
4150 68
77(°F) 59
AC±30
± AIR CONDITIONINGAIR CONDITIONING UNIT
2512 Author�: Date�:
INSPECTION
1. CHECK EVAPORATOR FINS FOR BLOCKAGE
If the fins are clogged, clean them with compressed air.
NOTICE:
Never use water to clean the evaporator.
2. CHECK FITTING FOR CRACKS OR SCRATCHES
Repair as necessary.
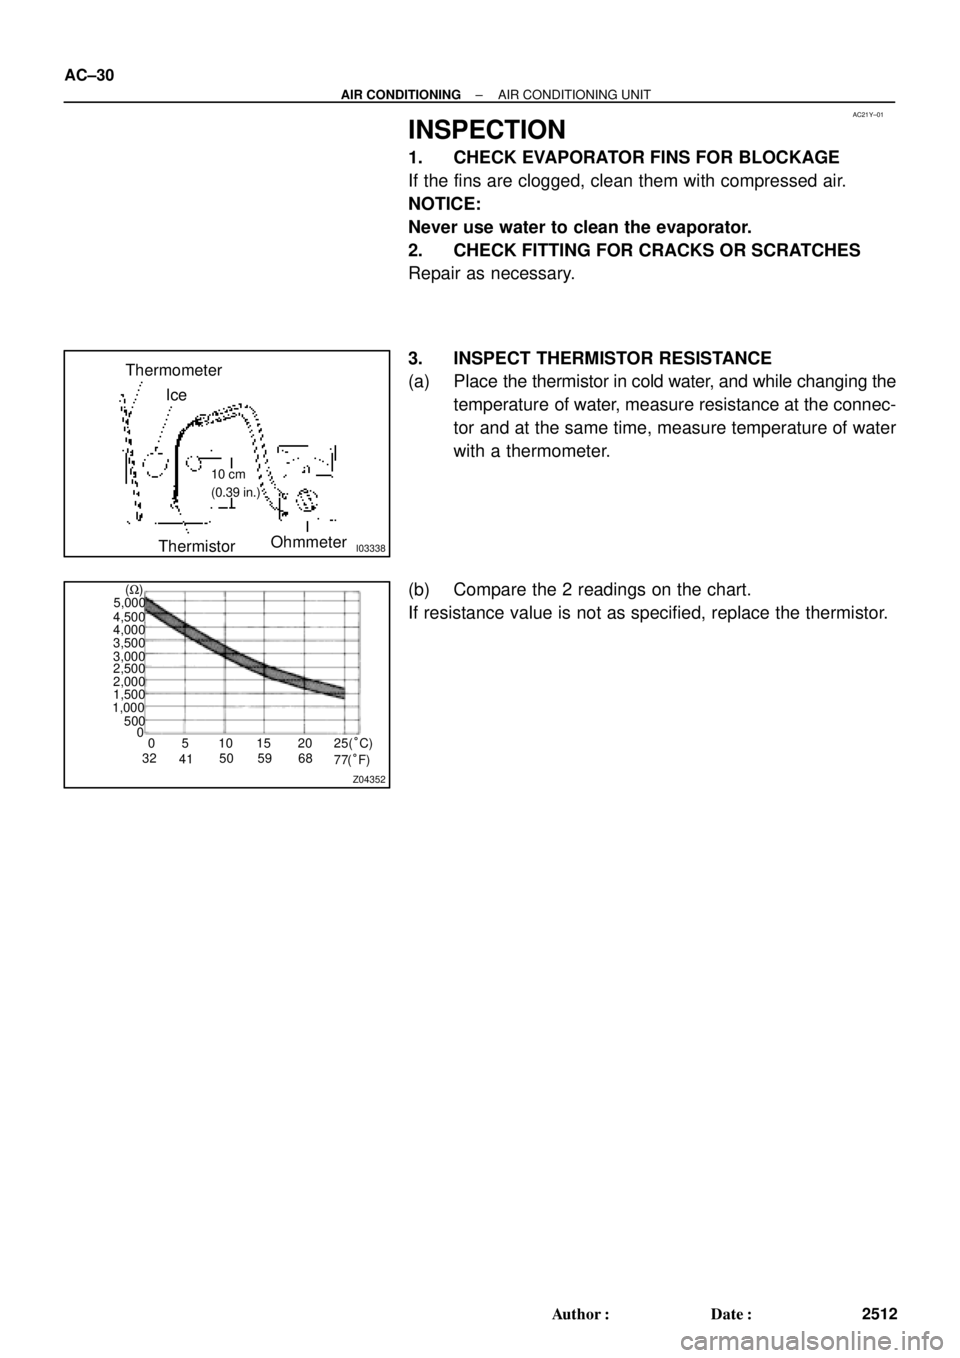
3. INSPECT THERMISTOR RESISTANCE
(a) Place the thermistor in cold water, and while changing the
temperature of water, measure resistance at the connec-
tor and at the same time, measure temperature of water
with a thermometer.
(b) Compare the 2 readings on the chart.
If resistance value is not as specified, replace the thermistor.
Page 31 of 4592
AC0LX±02
N21046
N21045
Packing Paper
N21044
± AIR CONDITIONINGAIR CONDITIONING UNIT
AC±31
2513 Author�: Date�:
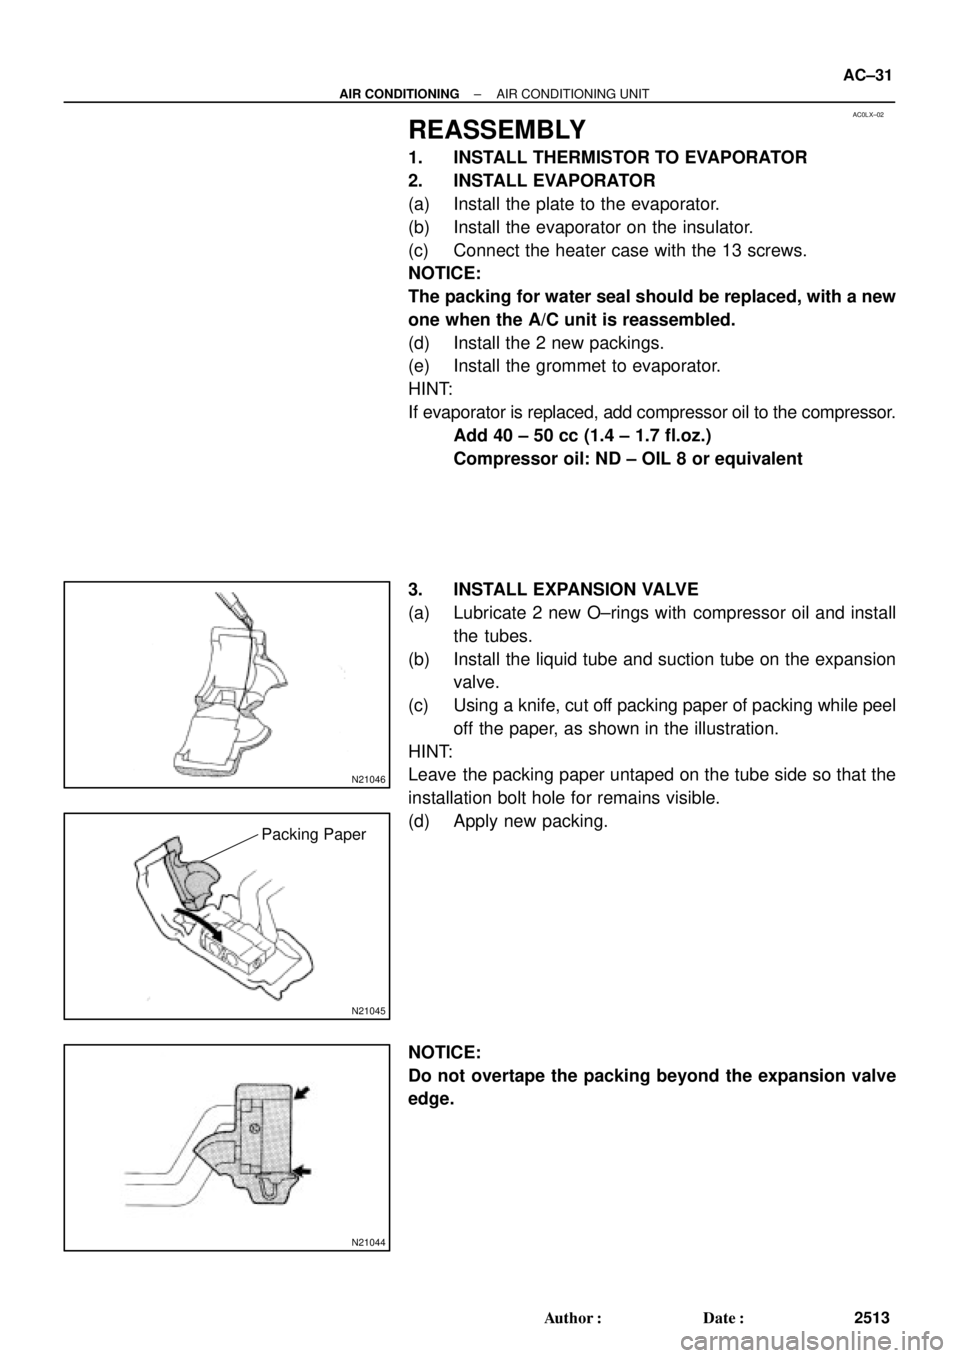
REASSEMBLY
1. INSTALL THERMISTOR TO EVAPORATOR
2. INSTALL EVAPORATOR
(a) Install the plate to the evaporator.
(b) Install the evaporator on the insulator.
(c) Connect the heater case with the 13 screws.
NOTICE:
The packing for water seal should be replaced, with a new
one when the A/C unit is reassembled.
(d) Install the 2 new packings.
(e) Install the grommet to evaporator.
HINT:
If evaporator is replaced, add compressor oil to the compressor.
Add 40 ± 50 cc (1.4 ± 1.7 fl.oz.)
Compressor oil: ND ± OIL 8 or equivalent
3. INSTALL EXPANSION VALVE
(a) Lubricate 2 new O±rings with compressor oil and install
the tubes.
(b) Install the liquid tube and suction tube on the expansion
valve.
(c) Using a knife, cut off packing paper of packing while peel
off the paper, as shown in the illustration.
HINT:
Leave the packing paper untaped on the tube side so that the
installation bolt hole for remains visible.
(d) Apply new packing.
NOTICE:
Do not overtape the packing beyond the expansion valve
edge.
Page 53 of 4592
AC0MD±01
AC±52
± AIR CONDITIONINGCONDENSER
2534 Author�: Date�:
CONDENSER
ON±VEHICLE INSPECTION
1. INSPECT CONDENSER FINS FOR BLOCKAGE OR DAMAGE
�If the fins are clogged, wash them with water and dry with compressed air.
NOTICE:
Be careful not to damage the fins.
�If the fins are bent, straighten them with a screwdriver or pliers.
2. INSPECT CONDENSER AND FITTINGS FOR LEAKAGE
Using a gas leak detector, check for leakage of refrigerant.
If there is leakage, check the tightening torque at the joints.