Page 2215 of 4592

A09397
ECM
J18
J/C
7 From
Battery
B
213
EFI Relay VSV
for EGR
21P-B23
E6EGR
E01
2K2
2J EFI
Engine Room J/B No.2 1B 9
B-Y
B
2AB-Y
IG3
EB
W-B
2F4B-Y
5
B-YFrom
Ignition SW
P20769
Vehicle Speed
60 ± 80 km/h
(38 ± 50 mph)
Idling
IG SW OFF
(1)(2)
Warm up
3 ± 5 min.2 min.
3 ± 5 min.Time (3)
(4)
(5)(6)
(7)
2 min. DI±64
± DIAGNOSTICSENGINE
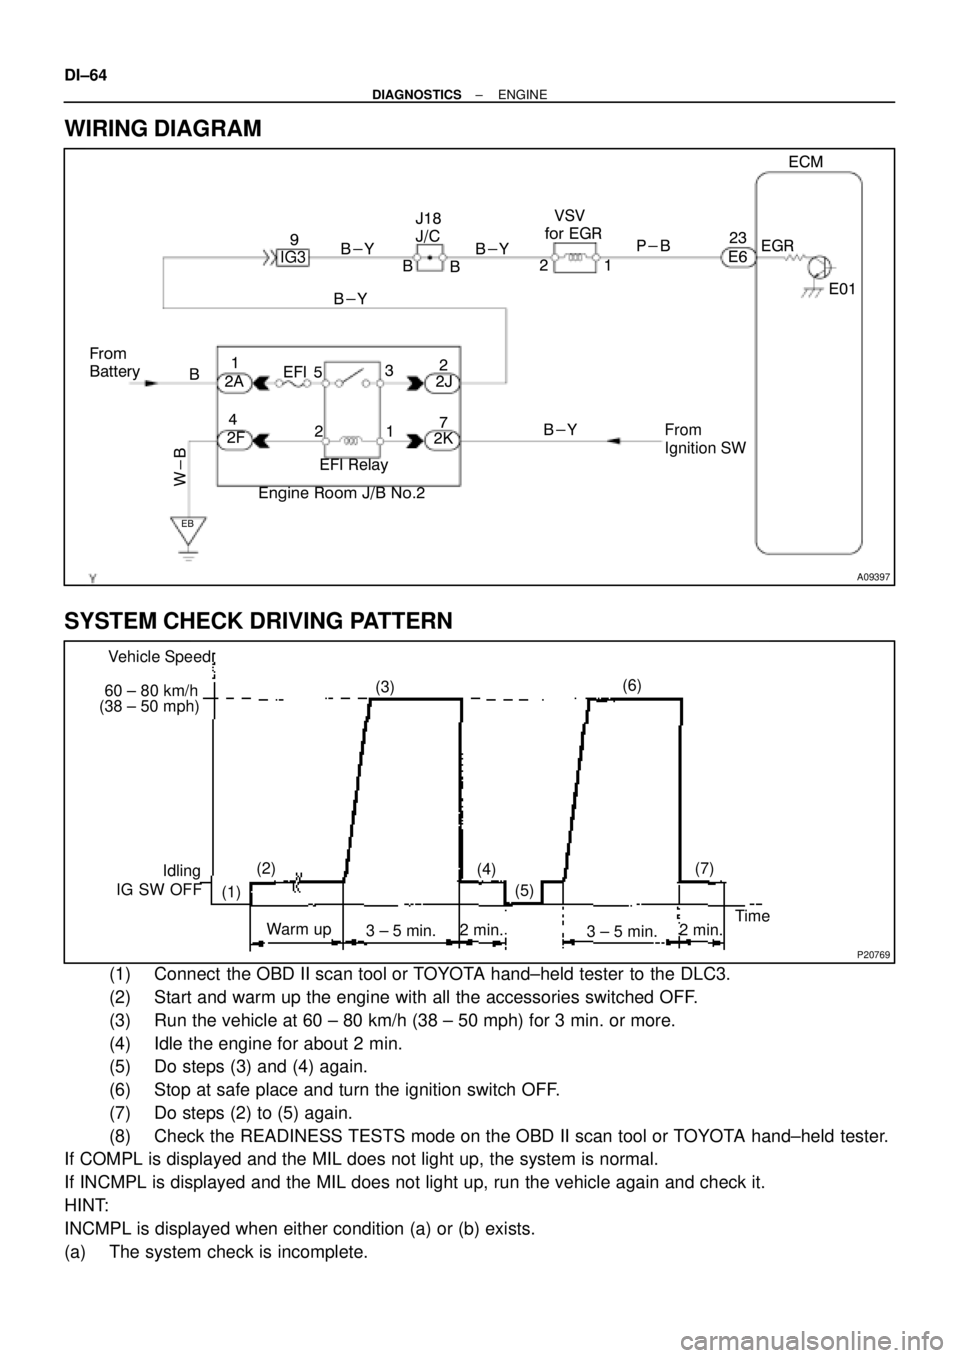
WIRING DIAGRAM
SYSTEM CHECK DRIVING PATTERN
(1) Connect the OBD II scan tool or TOYOTA hand±held tester to the DLC3.
(2) Start and warm up the engine with all the accessories switched OFF.
(3) Run the vehicle at 60 ± 80 km/h (38 ± 50 mph) for 3 min. or more.
(4) Idle the engine for about 2 min.
(5) Do steps (3) and (4) again.
(6) Stop at safe place and turn the ignition switch OFF.
(7) Do steps (2) to (5) again.
(8) Check the READINESS TESTS mode on the OBD II scan tool or TOYOTA hand±held tester.
If COMPL is displayed and the MIL does not light up, the system is normal.
If INCMPL is displayed and the MIL does not light up, run the vehicle again and check it.
HINT:
INCMPL is displayed when either condition (a) or (b) exists.
(a) The system check is incomplete.
Page 2216 of 4592

A00407
Air
Air FilterAir
E
System: OFFSystem: ON GG E
± DIAGNOSTICSENGINE
DI±65
(b) There is a malfunction in the system.
If there is a malfunction in the system, the MIL will light up after steps (2) to (5) above are done. (2 trip
detection logic)
INSPECTION PROCEDURE
HINT:
�If DTCs P0105, P0106 and P0400 are output simultaneously, perform troubleshooting of DTC P0105
first.
�Read freeze frame data using TOYOTA hand±held tester or OBD II scan tool. Because freeze frame
records the engine conditions when the malfunction is detected. When troubleshooting it is useful for
determining whether the vehicle was running or stopped, the engine was warmed up or not, the air±fuel
ratio was lean or rich, etc. at the time of the malfunction.
TOYOTA hand±held tester:
1 Check connection of vacuum hose and EGR hose (See Pub. No. RM654U, page
EC±12).
NG Repair or replace.
OK
2 Check VSV for EGR.
PREPARATION:
(a) Connect the TOYOTA hand±held tester to the DLC3.
(b) Turn the ignition switch ON and push the TOYOTA hand±
held tester main switch ON.
(c) Select the ACTIVE TEST mode on the TOYOTA hand±
held tester.
CHECK:
Check the operation of the VSV when it is operated by the TOY-
OTA hand±held tester.
OK:
EGR system is OFF:
Air from port E is flowing out through the air filter.
EGR system is ON:
Air from port E is flowing out port G.
OK Go to step 4.
NG
3 Check operation of VSV for EGR (See Pub. No. RM654U, page SF±43).
Page 2218 of 4592
A09281
A09423
ON
E6 Connector
EGR
OFF
Air
FilterON
Air
E
G E
VSV is ON
VSV is OFF Air
G
± DIAGNOSTICSENGINE
DI±67
Check and replace ECM (See page IN±29).
OBD II scan tool (excluding TOYOTA hand±held tester):
1 Check connection of vacuum hose and EGR hose (See Pub. No. RM654U, page
EC±12).
NG Repair or replace.
OK
2 Check VSV for EGR.
PREPARATION:
(a) Remove the glove compartment (See Pub. No. RM654U,
page SF±64).
(b) Disconnect the E6 connector from the ECM.
(c) Turn the ignition switch ON.
CHECK:
Check the VSV function.
(1) Connect between terminal EGR of the ECM con-
nector and body ground (ON).
(2) Disconnect between terminal EGR of the ECM con-
nector and body ground (ON).
OK:
(1) VSV is ON:
Air from port E is flowing out through the air filter.
(2) VSV is OFF:
Air from port E is flowing out port G.
OK Go to step 4.
NG
3 Check operation of VSV for EGR (See Pub. No. RM654U, page SF±43).
NG Replace VSV for EGR.
OK
Page 2221 of 4592

A09289BE6653A09267
SPD
ON
(+) (±)
AT7809
4.5 ± 5.5 V
0
Turn the wheel
DI±70
± DIAGNOSTICSENGINE
INSPECTION PROCEDURE
HINT:
Read freeze frame data using TOYOTA hand±held tester or OBD II scan tool. Because freeze frame records
the engine conditions when the malfunction is detected. When troubleshooting it is useful for determining
whether the vehicle was running or stopped, the engine was warmed up or not, the air±fuel ratio was lean
or rich, etc. at the time of the malfunction.
1 Check operation of speedometer.
CHECK:
Drive the vehicle and check if the operation of the speedmeter in the combination meter is normal.
HINT:
The vehicle speed sensor is operating normally if the speedometer display is normal.
NG Check speedometer circuit. See combination
meter troubleshooting (See Pub. No. RM654U,
page BE±2).
OK
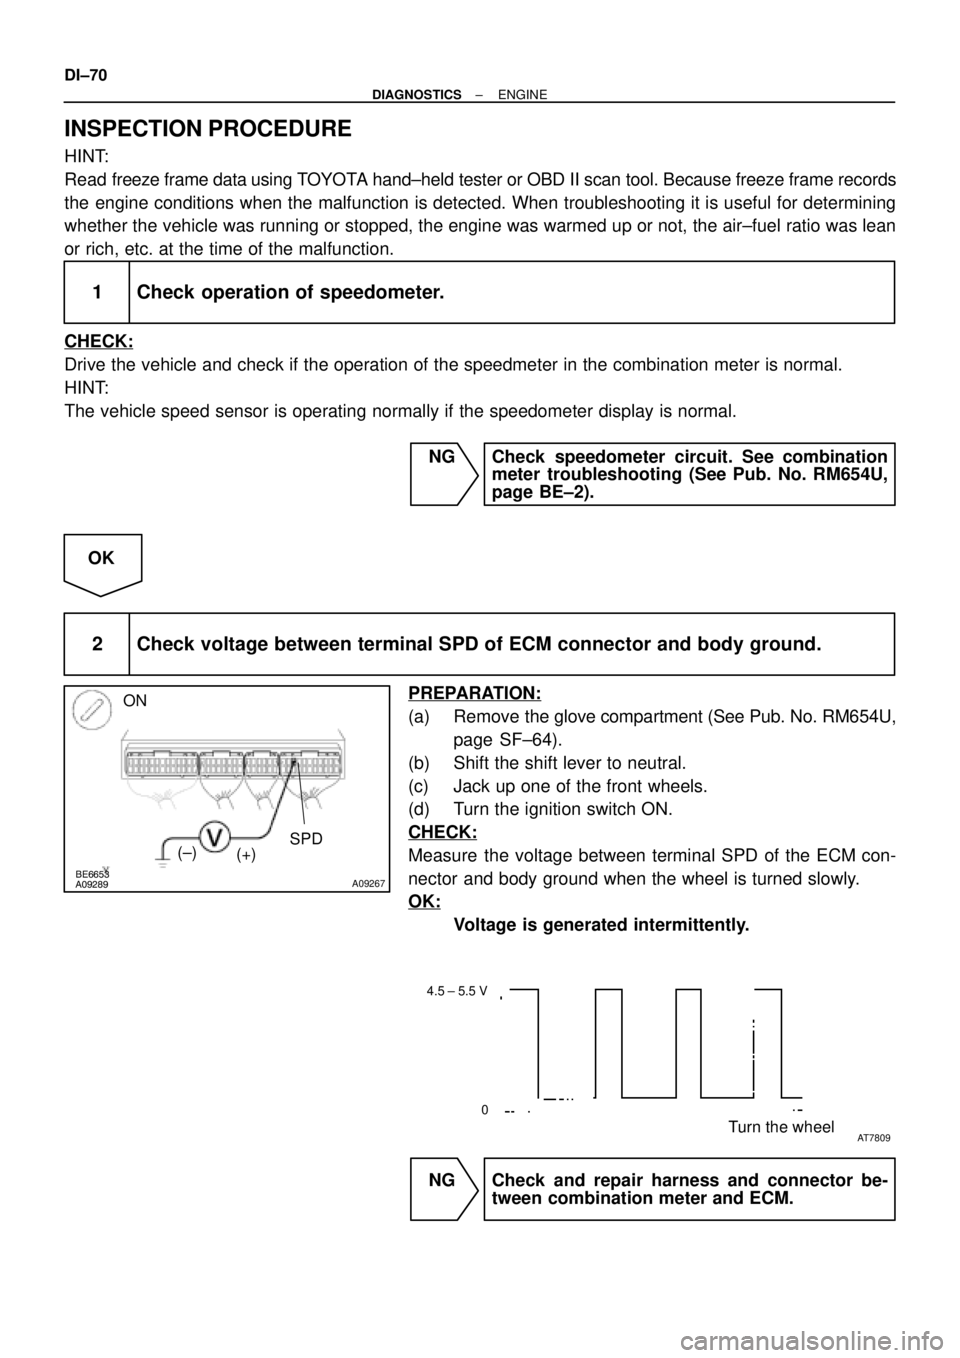
2 Check voltage between terminal SPD of ECM connector and body ground.
PREPARATION:
(a) Remove the glove compartment (See Pub. No. RM654U,
page SF±64).
(b) Shift the shift lever to neutral.
(c) Jack up one of the front wheels.
(d) Turn the ignition switch ON.
CHECK:
Measure the voltage between terminal SPD of the ECM con-
nector and body ground when the wheel is turned slowly.
OK:
Voltage is generated intermittently.
NG Check and repair harness and connector be-
tween combination meter and ECM.
Page 2224 of 4592

± DIAGNOSTICSENGINE
DI±73
INSPECTION PROCEDURE
HINT:
Read freeze frame data using TOYOTA hand±held tester or OBD II scan tool. Because freeze frame records
the engine conditions when the malfunction is detected. When troubleshooting it is useful for determining
whether the vehicle was running or stopped, the engine was warmed up or not, the air±fuel ratio was lean
or rich, etc. at the time of the malfunction.
TOYOTA hand±held tester:
1 Check idle speed.
PREPARATION:
(a) Warm up the engine to normal operating temperature.
(b) Switch off all the accessories.
(c) Switch off the A/C.
(d) Shift the transmission into the N or neutral position.
(e) Remove the fuse cover on the instrument panel.
(f) Connect the TOYOTA hand±held tester to the DLC3 on the vehicle and select the ACTIVE TEST
mode.
CHECK:
Check the difference of engine speed between the ones, less than 5 sec. and more than 5 sec. after switch-
ing the TE1 from OFF to ON by the TOYOTA hand±held tester.
OK:
Difference of engine speed: More than 100 rpm
OK Go to step 8.
NG
2 Check for IAC duty signal.
PREPARATION:
(a) Remove the fuse cover on the instrument panel.
(b) Connect the TOYOTA hand±held tester to the DLC3 on the vehicle.
(c) Turn the ignition switch ON and push the TOYOTA hand±held tester main switch ON.
CHECK:
Read the IAC duty ratio on the TOYOTA hand±held tester.
OK:
IAC duty ratio: 27 ± 47 %
OK Go to step 3.
NG
Check and replace ECM (See page IN±29).
Page 2225 of 4592
BE6653A01553A01584
ON
2
(±)(+)
DI±74
± DIAGNOSTICSENGINE
3 Check operation of IAC valve (See page SF±22).
NG Go to step 5.
OK
4 Check blockage of IAC valve and passage to bypass throttle valve.
NG Repair or replace IAC valve and throttle body.
OK
Go to step 8.
5 Check voltage between terminal 2 of IAC valve connector and body ground.
PREPARATION:
(a) Disconnect the IAC valve connector.
(b) Turn the ignition switch ON.
CHECK:
Measure the voltage between terminal 2 of the IAC valve con-
nector and body ground.
OK:
Voltage: 9 ± 14 V
NG Check for open and short in harness and con-
nector between IAC valve and J/B.
OK
6 Check for open and short in harness and connector between terminal 3 of IAC
valve connector and body ground.
NG Repair or replace.
Page 2227 of 4592
1 msec. /Division 5 V /Division
GND
A09303BE6653
A09648
ON
RSD
(±) (+)
DI±76
± DIAGNOSTICSENGINE
OK Go to step 8.
NG
2 Check for IAC duty signal.
PREPARATION:
(a) Warm up the engine normal operating temperature.
(b) Connect the oscilloscope between RSD of the ECM con-
nector and body ground.
CHECK:
Check if IAC duty signal is output.
OK:
HINT:
IAC duty ratio changes in response to engine operating condi-
tion.
OK Go to step 6.
NG
3 Check voltage between terminal RSD of ECM and body ground.
PREPARATION:
(a) Remove the lower center finish panel.
(b) Turn the ignition switch ON.
CHECK:
Measure the voltage between terminal RSD of the ECM con-
nector and body ground.
OK:
Voltage: 9 ± 14 V
OK Check and replace ECM (See page IN±29).
Page 2228 of 4592
BE6653A01553A01584
ON
2
(±)(+)
± DIAGNOSTICSENGINE
DI±77
NG
4 Check voltage between terminal 2 of IAC valve connector and body ground.
PREPARATION:
(a) Disconnect the IAC valve connector.
(b) Turn the ignition switch ON.
CHECK:
Measure the voltage between terminal 2 of the IAC valve con-
nector and body ground.
OK:
Voltage: 9 14 V
NG Check for open and short in harness and con-
nector between IAC valve and J/B.
OK
5 Check for open and short in harness and connector in RSD circuit.
NG Repair or replace.
OK
Replace IAC valve.
6 Check operation of IAC valve (See page SF±25).
OK Go to step 8.
NG
7 Check for open in harness and connector between terminal 3 of IAC valve con-
nector and body ground.