1999 TOYOTA CAMRY ignition
[x] Cancel search: ignitionPage 4340 of 4592
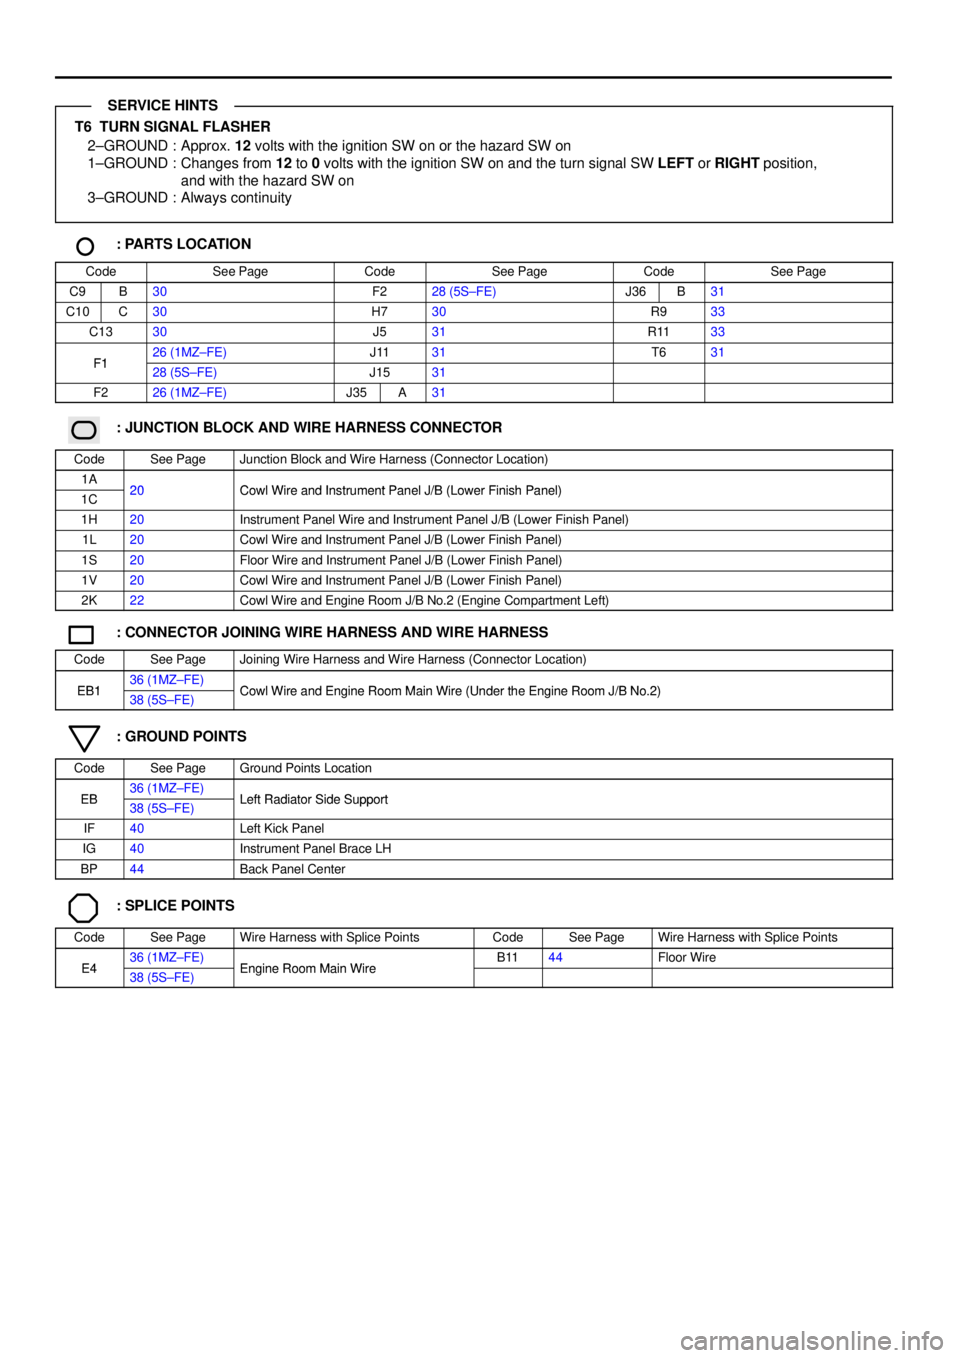
T6 TURN SIGNAL FLASHER
2±GROUND : Approx. 12 volts with the ignition SW on or the hazard SW on
1±GROUND : Changes from 12 to 0 volts with the ignition SW on and the turn signal SW LEFT or RIGHT position,
and with the hazard SW on
3±GROUND : Always continuity
: PARTS LOCATION
CodeSee PageCodeSee PageCodeSee Page
C9B30F228 (5S±FE)J36B31
C10C30H730R933
C1330J531R1133
F126 (1MZ±FE)J1131T631F128 (5S±FE)J1531
F226 (1MZ±FE)J35A31
: JUNCTION BLOCK AND WIRE HARNESS CONNECTOR
CodeSee PageJunction Block and Wire Harness (Connector Location)
1A20Cowl Wire and Instrument Panel J/B (Lower Finish Panel)1C20Cowl Wire and Instrument Panel J/B (Lower Finish Panel)
1H20Instrument Panel Wire and Instrument Panel J/B (Lower Finish Panel)
1L20Cowl Wire and Instrument Panel J/B (Lower Finish Panel)
1S20Floor Wire and Instrument Panel J/B (Lower Finish Panel)
1V20Cowl Wire and Instrument Panel J/B (Lower Finish Panel)
2K22Cowl Wire and Engine Room J/B No.2 (Engine Compartment Left)
: CONNECTOR JOINING WIRE HARNESS AND WIRE HARNESS
CodeSee PageJoining Wire Harness and Wire Harness (Connector Location)
EB136 (1MZ±FE)Cowl Wire and Engine Room Main Wire (Under the Engine Room J/B No 2)EB138 (5S±FE)Cowl Wire and Engine Room Main Wire (Under the Engine Room J/B No.2)
: GROUND POINTS
CodeSee PageGround Points Location
EB36 (1MZ±FE)Left Radiator Side SupportEB38 (5S±FE)Left Radiator Side Support
IF40Left Kick Panel
IG40Instrument Panel Brace LH
BP44Back Panel Center
: SPLICE POINTS
CodeSee PageWire Harness with Splice PointsCodeSee PageWire Harness with Splice Points
E436 (1MZ±FE)Engine Room Main WireB1144Floor WireE438 (5S±FE)Engine Room Main Wire
SERVICE HINTS
Page 4344 of 4592
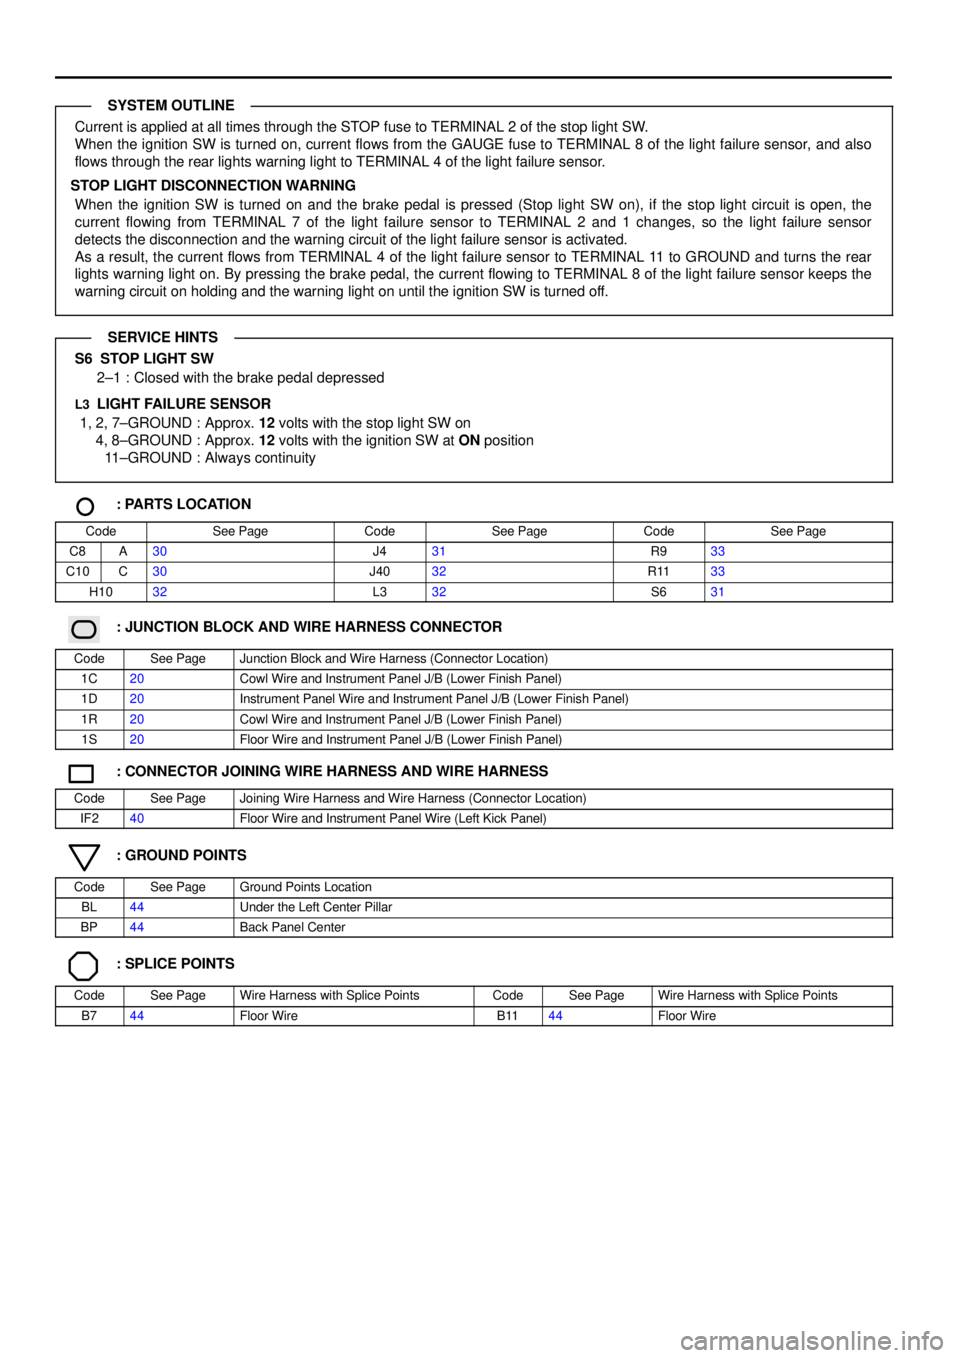
Current is applied at all times through the STOP fuse to TERMINAL 2 of the stop light SW.
When the ignition SW is turned on, current flows from the GAUGE fuse to TERMINAL 8 of the light failure sensor, and also
flows through the rear lights warning light to TERMINAL 4 of the light failure sensor.
STOP LIGHT DISCONNECTION WARNING
When the ignition SW is turned on and the brake pedal is pressed (Stop light SW on), if the stop light circuit is open, the
current flowing from TERMINAL 7 of the light failure sensor to TERMINAL 2 and 1 changes, so the light failure sensor
detects the disconnection and the warning circuit of the light failure sensor is activated.
As a result, the current flows from TERMINAL 4 of the light failure sensor to TERMINAL 11 to GROUND and turns the rear
lights warning light on. By pressing the brake pedal, the current flowing to TERMINAL 8 of the light failure sensor keeps the
warning circuit on holding and the warning light on until the ignition SW is turned off.
S6 STOP LIGHT SW
2±1 : Closed with the brake pedal depressed
L3 LIGHT FAILURE SENSOR
1, 2, 7±GROUND : Approx. 12 volts with the stop light SW on
4, 8±GROUND : Approx. 12 volts with the ignition SW at ON position
11±GROUND : Always continuity
: PARTS LOCATION
CodeSee PageCodeSee PageCodeSee Page
C8A30J431R933
C10C30J4032R1133
H1032L332S631
: JUNCTION BLOCK AND WIRE HARNESS CONNECTOR
CodeSee PageJunction Block and Wire Harness (Connector Location)
1C20Cowl Wire and Instrument Panel J/B (Lower Finish Panel)
1D20Instrument Panel Wire and Instrument Panel J/B (Lower Finish Panel)
1R20Cowl Wire and Instrument Panel J/B (Lower Finish Panel)
1S20Floor Wire and Instrument Panel J/B (Lower Finish Panel)
: CONNECTOR JOINING WIRE HARNESS AND WIRE HARNESS
CodeSee PageJoining Wire Harness and Wire Harness (Connector Location)
IF240Floor Wire and Instrument Panel Wire (Left Kick Panel)
: GROUND POINTS
CodeSee PageGround Points Location
BL44Under the Left Center Pillar
BP44Back Panel Center
: SPLICE POINTS
CodeSee PageWire Harness with Splice PointsCodeSee PageWire Harness with Splice Points
B744Floor WireB1144Floor Wire
SYSTEM OUTLINE
SERVICE HINTS
Page 4348 of 4592
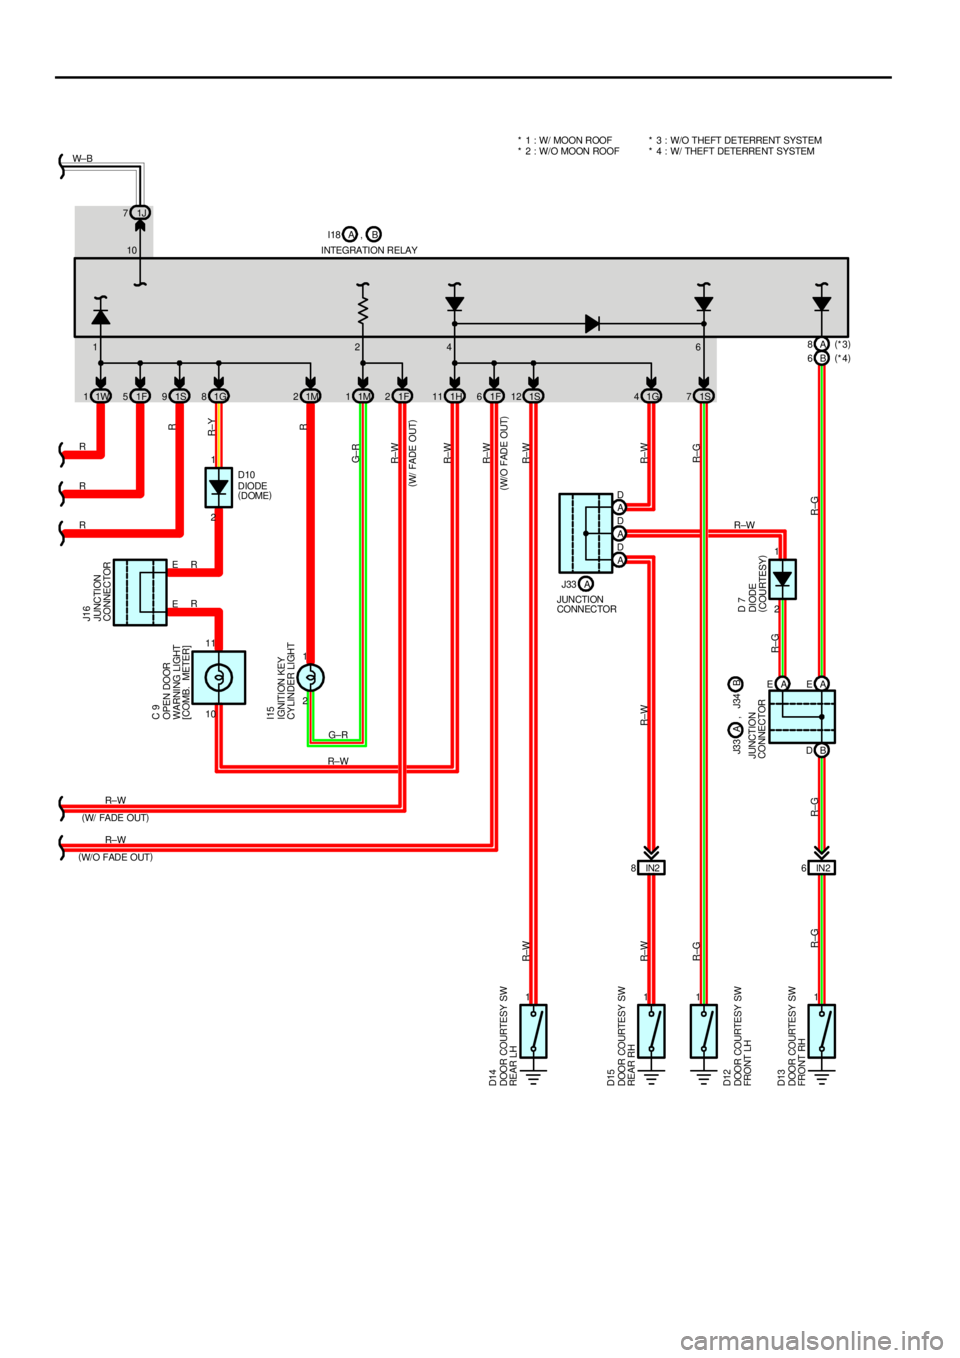
2 1
10 11
1111 1W 11F51S91G81M21M11F21H11 1F61S12 1G41S7 1J 7
A 8
B DA E A E
IN2 8IN26 2 1 126 10
R±W R±W R R R W± B
R±W
G±R
R±W R
R
R±Y
R
G± R
R±W
R±W
R±W
R±W
R±W
R±G
R±G R±G
R±G R±GR±W R±W
R±G R±W
E EINTEGRATION RELAYA
JUNCTION
CONNECTOR
I15
IGNITION KEY
CYLINDER LIGHTJUNCTION
CONNECTOR
OPEN DOOR
WARNING LIGHT
[COMB. METER]
DIODE
(
COURTESY) J16
C 9
D 7(
W/ FADE OUT)
(
W/O FADE OUT)
(
W/ FADE OUT)
(
W/O FADE OUT)
DOOR COURTESY SW
FRONT LH
DOOR COURTESY SW
FRONT RH DOOR COURTESY SW
REAR RH DOOR COURTESY SW
REAR LH D14
D15
D12
D13
* 1 : W/ MOON ROOF
* 2 : W/ O MOON ROOF
4
R2 1
DIODE
(
DOME) D10
AA D
A D
A DB 6(
*3)
(
*4) B , * 3 : W/O THEFT DETERRENT SYSTEM
* 4 : W/ THEFT DETERRENT SYSTEM
J3 3
JUNCTION
CONNECTORB A, J34
I18
J33
Page 4359 of 4592
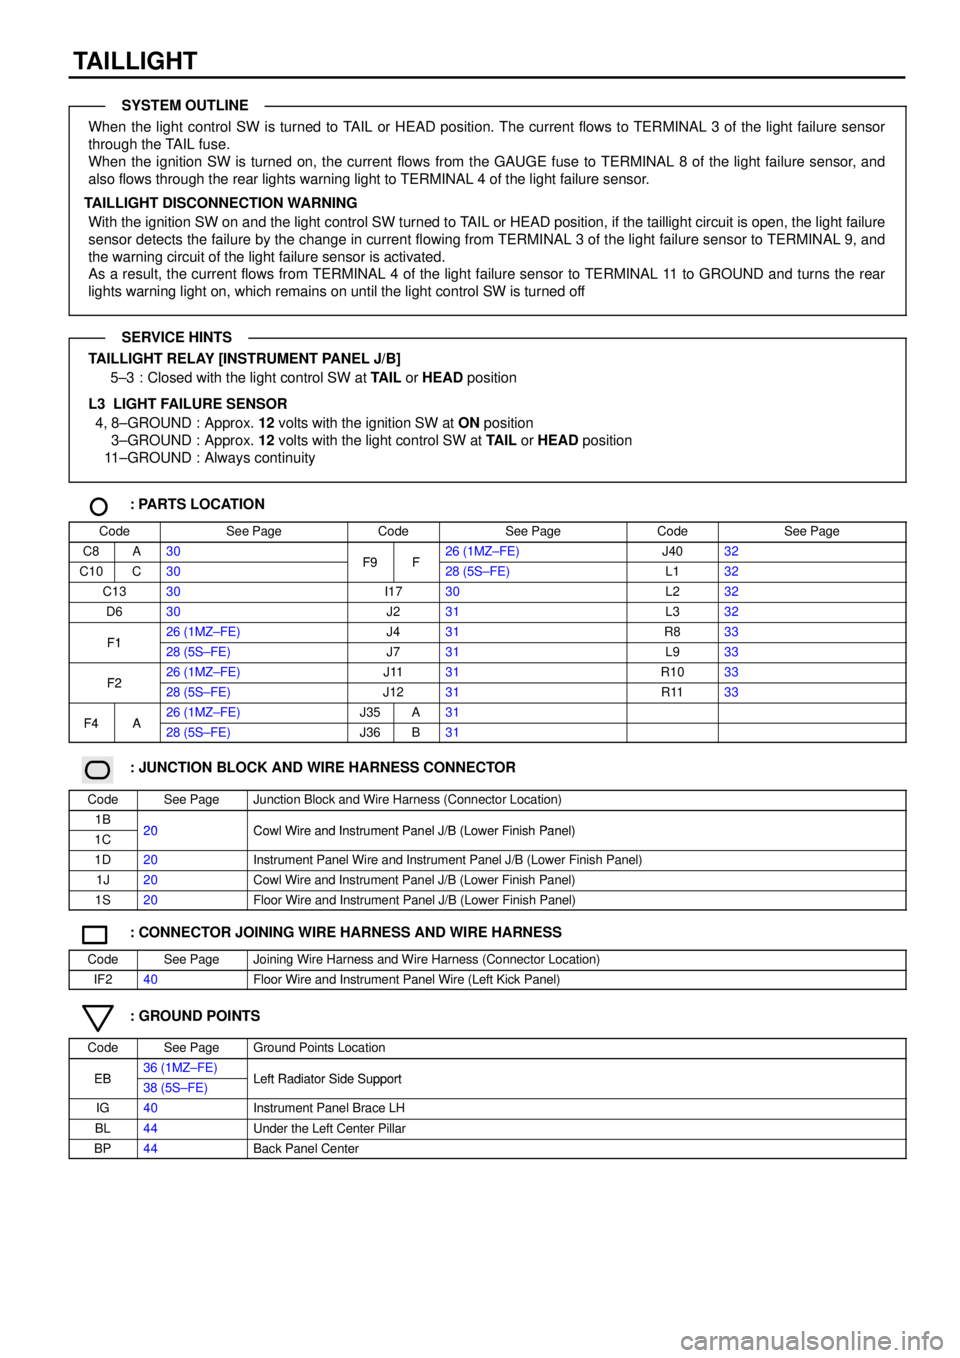
TAILLIGHT
When the light control SW is turned to TAIL or HEAD position. The current flows to TERMINAL 3 of the light failure sensor
through the TAIL fuse.
When the ignition SW is turned on, the current flows from the GAUGE fuse to TERMINAL 8 of the light failure sensor, and
also flows through the rear lights warning light to TERMINAL 4 of the light failure sensor.
TAILLIGHT DISCONNECTION WARNING
With the ignition SW on and the light control SW turned to TAIL or HEAD position, if the taillight circuit is open, the light failure
sensor detects the failure by the change in current flowing from TERMINAL 3 of the light failure sensor to TERMINAL 9, and
the warning circuit of the light failure sensor is activated.
As a result, the current flows from TERMINAL 4 of the light failure sensor to TERMINAL 11 to GROUND and turns the rear
lights warning light on, which remains on until the light control SW is turned off
TAILLIGHT RELAY [INSTRUMENT PANEL J/B]
5±3 : Closed with the light control SW at TAIL or HEAD position
L3 LIGHT FAILURE SENSOR
4, 8±GROUND : Approx. 12 volts with the ignition SW at ON position
3±GROUND : Approx. 12 volts with the light control SW at TAIL or HEAD position
11±GROUND : Always continuity
: PARTS LOCATION
CodeSee PageCodeSee PageCodeSee Page
C8A30F9F26 (1MZ±FE)J4032
C10C30F9F28 (5S±FE)L132
C1330I1730L232
D630J231L332
F126 (1MZ±FE)J431R833F128 (5S±FE)J731L933
F226 (1MZ±FE)J1131R1033F228 (5S±FE)J1231R1133
F4A26 (1MZ±FE)J35A31F4A28 (5S±FE)J36B31
: JUNCTION BLOCK AND WIRE HARNESS CONNECTOR
CodeSee PageJunction Block and Wire Harness (Connector Location)
1B20Cowl Wire and Instrument Panel J/B (Lower Finish Panel)1C20Cowl Wire and Instrument Panel J/B (Lower Finish Panel)
1D20Instrument Panel Wire and Instrument Panel J/B (Lower Finish Panel)
1J20Cowl Wire and Instrument Panel J/B (Lower Finish Panel)
1S20Floor Wire and Instrument Panel J/B (Lower Finish Panel)
: CONNECTOR JOINING WIRE HARNESS AND WIRE HARNESS
CodeSee PageJoining Wire Harness and Wire Harness (Connector Location)
IF240Floor Wire and Instrument Panel Wire (Left Kick Panel)
: GROUND POINTS
CodeSee PageGround Points Location
EB36 (1MZ±FE)Left Radiator Side SupportEB38 (5S±FE)Left Radiator Side Support
IG40Instrument Panel Brace LH
BL44Under the Left Center Pillar
BP44Back Panel Center
SYSTEM OUTLINE
SERVICE HINTS
Page 4366 of 4592
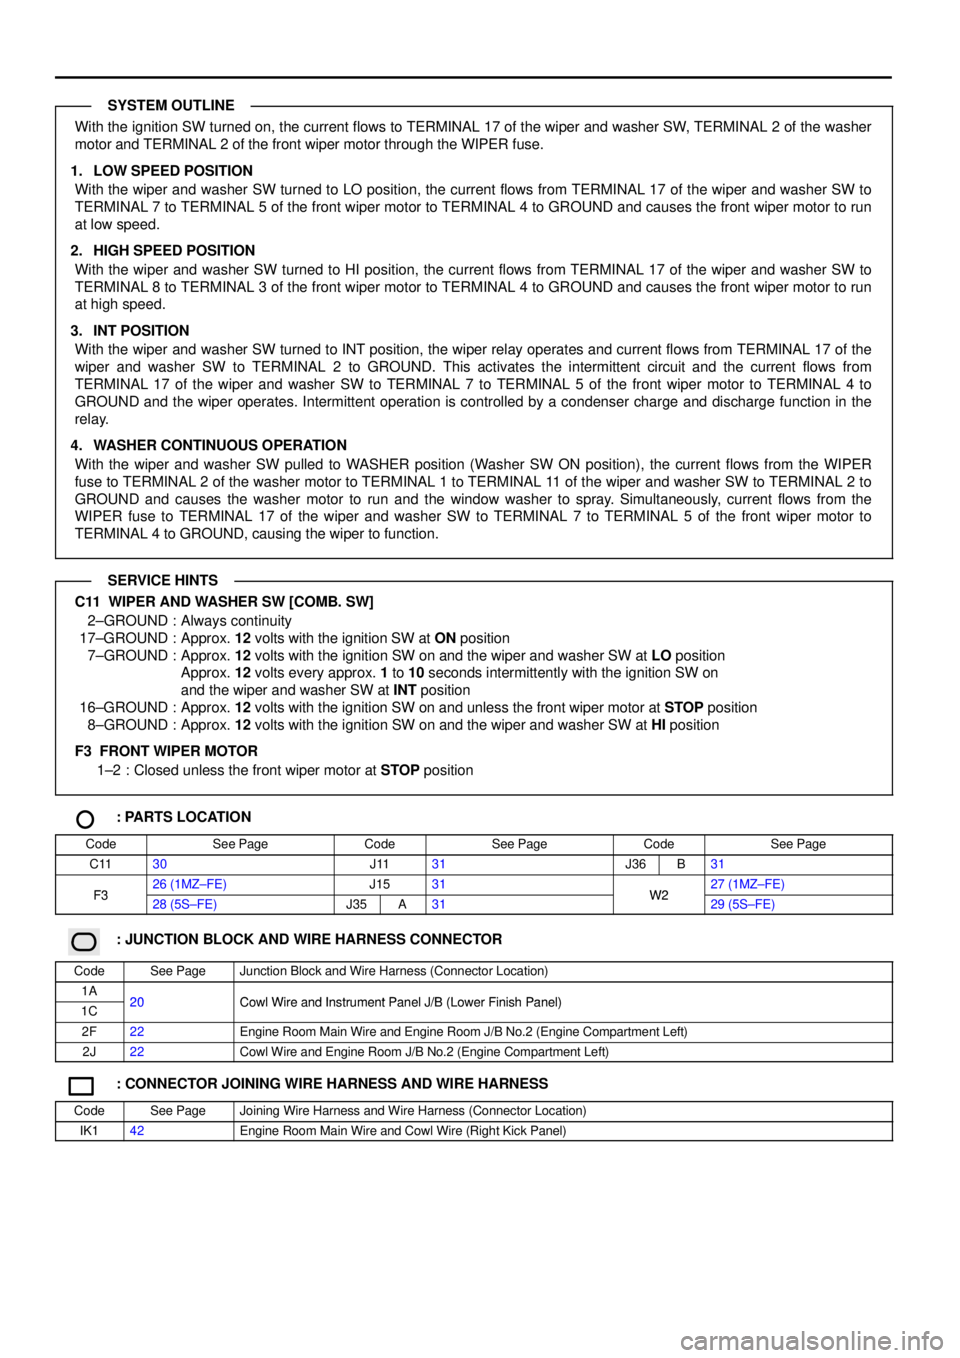
With the ignition SW turned on, the current flows to TERMINAL 17 of the wiper and washer SW, TERMINAL 2 of the washer
motor and TERMINAL 2 of the front wiper motor through the WIPER fuse.
1. LOW SPEED POSITION
With the wiper and washer SW turned to LO position, the current flows from TERMINAL 17 of the wiper and washer SW to
TERMINAL 7 to TERMINAL 5 of the front wiper motor to TERMINAL 4 to GROUND and causes the front wiper motor to run
at low speed.
2. HIGH SPEED POSITION
With the wiper and washer SW turned to HI position, the current flows from TERMINAL 17 of the wiper and washer SW to
TERMINAL 8 to TERMINAL 3 of the front wiper motor to TERMINAL 4 to GROUND and causes the front wiper motor to run
at high speed.
3. INT POSITION
With the wiper and washer SW turned to INT position, the wiper relay operates and current flows from TERMINAL 17 of the
wiper and washer SW to TERMINAL 2 to GROUND. This activates the intermittent circuit and the current flows from
TERMINAL 17 of the wiper and washer SW to TERMINAL 7 to TERMINAL 5 of the front wiper motor to TERMINAL 4 to
GROUND and the wiper operates. Intermittent operation is controlled by a condenser charge and discharge function in the
relay.
4. WASHER CONTINUOUS OPERATION
With the wiper and washer SW pulled to WASHER position (Washer SW ON position), the current flows from the WIPER
fuse to TERMINAL 2 of the washer motor to TERMINAL 1 to TERMINAL 11 of the wiper and washer SW to TERMINAL 2 to
GROUND and causes the washer motor to run and the window washer to spray. Simultaneously, current flows from the
WIPER fuse to TERMINAL 17 of the wiper and washer SW to TERMINAL 7 to TERMINAL 5 of the front wiper motor to
TERMINAL 4 to GROUND, causing the wiper to function.
C11 WIPER AND WASHER SW [COMB. SW]
2±GROUND : Always continuity
17±GROUND : Approx. 12 volts with the ignition SW at ON position
7±GROUND : Approx. 12 volts with the ignition SW on and the wiper and washer SW at LO position
Approx. 12 volts every approx. 1 to 10 seconds intermittently with the ignition SW on
and the wiper and washer SW at INT position
16±GROUND : Approx. 12 volts with the ignition SW on and unless the front wiper motor at STOP position
8±GROUND : Approx. 12 volts with the ignition SW on and the wiper and washer SW at HI position
F3 FRONT WIPER MOTOR
1±2 : Closed unless the front wiper motor at STOP position
: PARTS LOCATION
CodeSee PageCodeSee PageCodeSee Page
C1130J1131J36B31
F326 (1MZ±FE)J1531W227 (1MZ±FE)F328 (5S±FE)J35A31W229 (5S±FE)
: JUNCTION BLOCK AND WIRE HARNESS CONNECTOR
CodeSee PageJunction Block and Wire Harness (Connector Location)
1A20Cowl Wire and Instrument Panel J/B (Lower Finish Panel)1C20Cowl Wire and Instrument Panel J/B (Lower Finish Panel)
2F22Engine Room Main Wire and Engine Room J/B No.2 (Engine Compartment Left)
2J22Cowl Wire and Engine Room J/B No.2 (Engine Compartment Left)
: CONNECTOR JOINING WIRE HARNESS AND WIRE HARNESS
CodeSee PageJoining Wire Harness and Wire Harness (Connector Location)
IK142Engine Room Main Wire and Cowl Wire (Right Kick Panel)
SYSTEM OUTLINE
SERVICE HINTS
Page 4371 of 4592

POWER WINDOW
With the ignition SW turned on, current flows through the GAUGE fuse to TERMINAL 7 of the integration relay to TERMINAL
(A) 12 (w/o theft deterrent system), (B) 3 (w/ theft deterrent system) to TERMINAL 1 of the power relay to TERMINAL 2 to
GROUND, this activates the relay and the current flowing to TERMINAL 5 of the relay from the POWER fuse flows to
TERMINAL 3 of the relay to TERMINALS 10 and 11 of the power window master SW.
1. MANUAL OPERATION (DRIVER'S WINDOW)
With the ignition SW turned on and with the power window master SW (Driver's) in UP position, the current flowing from
TERMINALS 10 and 11 of the power window master SW flows to TERMINAL 1 of the master SW to TERMINAL 1 of the
power window motor to TERMINAL 2 to TERMINAL 5 of the master SW to TERMINALS 3 and 4 to GROUND and causes
the power window motor to rotate in the up direction. The window ascends only while the SW is being pushed.
In down operation, the flow of current from TERMINALS 10 and 11 of the power window master SW to TERMINAL 5 of the
master SW causes the flow of current from TERMINAL 2 of the power window motor to TERMINAL 1 to TERMINAL 1 of the
master SW to TERMINALS 3 and 4 to GROUND, flowing in the opposite detection to manual up operation and causing the
motor to rotate in reverse, lowering the window.
2. AUTO DOWN OPERATION (DRIVER'S WINDOW)
When the driver's window SW is pushed strongly to the down side, the current flowing to TERMINALS 10 and 11 of the
power window master SW flows to the down contact point and auto down contact point of the driver's SW.
This activates the relay (Down side) inside the power window master SW and the hold circuit also turns on at the same time,
so the relay (Down side) remains activated even when the SW is released.
Current flows at this time from TERMINALS 10 and 11 of the power window master SW to TERMINAL 5 to TERMINAL 2 of
the power window motor to TERMINAL 1 to TERMINAL 1 of the power window master SW to TERMINALS 3 and 4 to
GROUND, so the motor continues to operate until the driver's window is fully down.
When the driver's window finishes down operation and the hold circuit goes off, so the relay (Down side) also turns off. This
stops the current flowing from TERMINALS 10 and 11 of the power window master SW to TERMINAL 5 is cut off, so the
power window motor stops and auto down operation stops.
When the driver's SW is pulled to the up side during auto down operation, the hold circuit is turned off so the current flowing
from TERMINALS 10 and 11 of the power window master SW to TERMINAL 5 is cut off and the power window motor stops.
If the SW remains pulled up the relay (Up side) is activated, so current flows from TERMINALS 10 and 11 of the power
window master SW to TERMINAL 1 to TERMINAL 1 of the power window motor to TERMINAL 2 to TERMINAL 5 to
TERMINALS 3 and 4 to GROUND, the power window motor rotates in the up direction and manual up operation occurs
while the SW is pulled up.
3. MANUAL OPERATION (FRONT RH WINDOW)
With the power window control SW front RH pulled to the up side, the current flowing from TERMINAL 4 of the power window
control SW flows to TERMINAL 3 of the power window control SW to TERMINAL 2 of the power window motor to TERMINAL
1 to TERMINAL 1 of the power window control SW to TERMINAL 2 to TERMINAL 6 of the master SW to TERMINALS 3 and
4 to GROUND and causes the power window motor front RH to rotate in the up direction. The up operation continues only
while the power window control SW is pulled to the up side. When the window descends, the current flowing to the motor
flows in the opposite direction, from TERMINAL 1 to TERMINAL 2, and the motor rotates in reverse. When the window lock
SW is pushed to the lock side, the ground circuit to the front RH window becomes open.
As a result, even if Open/Close operation of the front RH window is tried, the current from TERMINALS 3 and 4 of the power
window master SW is not grounded and the motor does not rotate, so the front RH window can not be operated and window
lock occurs.
4. MANUAL OPERATION (REAR LH, RH WINDOW)
With the power window control SW rear LH, RH pulled to the up side, the current flowing from TERMINAL 3 of the power
window control SW flows to TERMINAL 1 of the power control SW to TERMINAL 2 of the power window motor to TERMINAL
1 to TERMINAL 5 of the power window control SW to TERMINAL 4 to TERMINAL 12 or 13 of the master SW to TERMINALS
3 and 4 to GROUND and causes the power window motor rear LH, RH to rotate in the up direction. The up operation
continues only while the power window control SW is pulled to the up side. When the window descends, the current flowing
to the motor flows in the opposite direction, from TERMINAL 1 to TERMINAL 2, and the motor rotates in reverse. When the
window lock SW is pushed to the lock side, the ground circuit to the rear LH, RH window becomes open.
As a result, even if Open/Close operation of the rear LH, RH window is tried, the current from TERMINALS 3 and 4 of the
power window master SW is not grounded and the motor does not rotate, so the rear LH, RH window can not be operated
and window lock occurs.
SYSTEM OUTLINE
Page 4372 of 4592
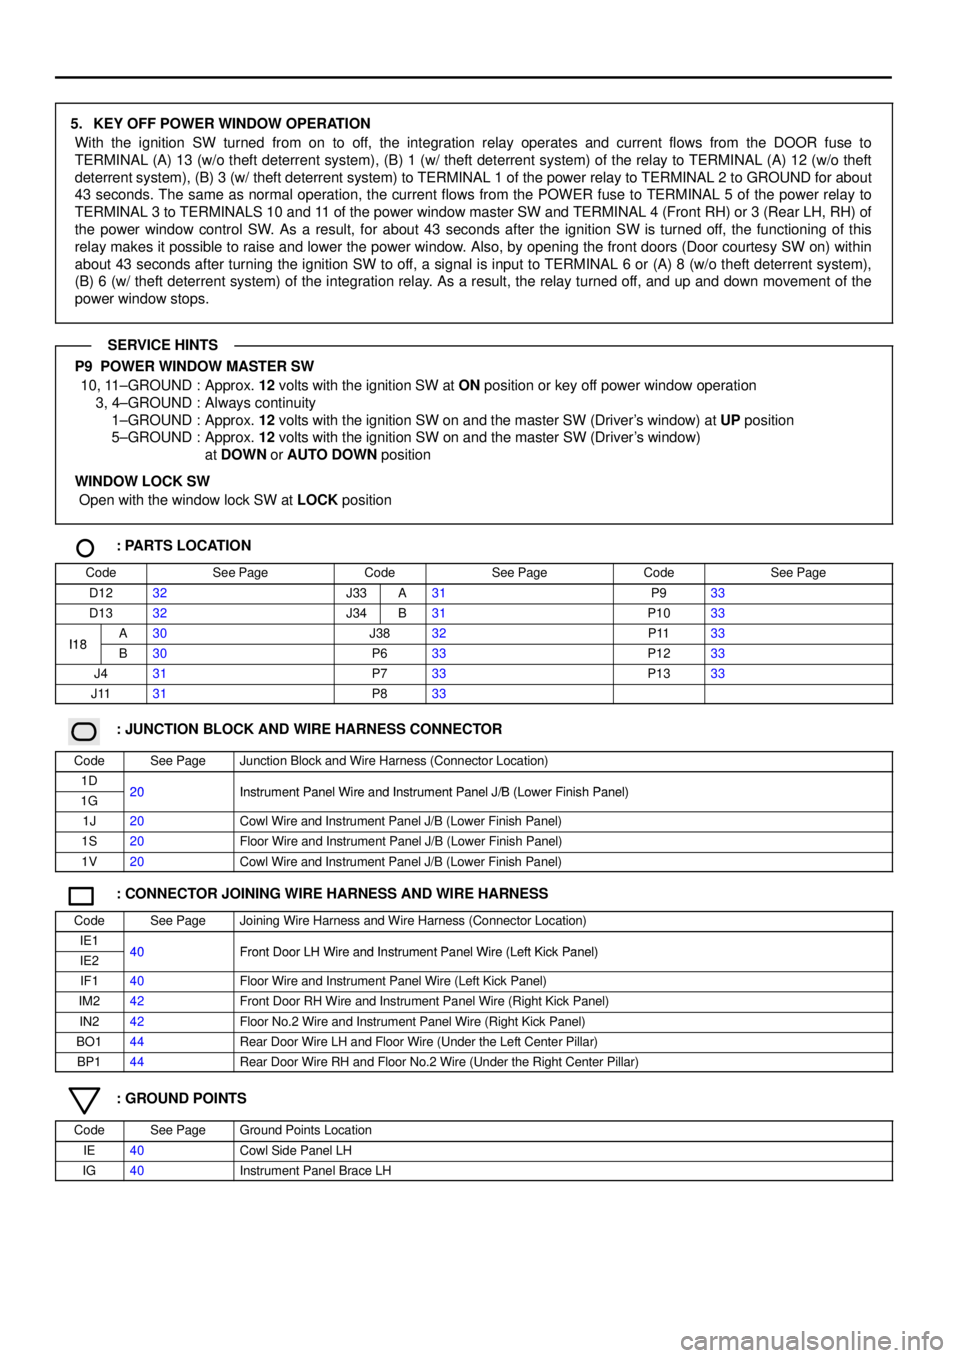
5. KEY OFF POWER WINDOW OPERATION
With the ignition SW turned from on to off, the integration relay operates and current flows from the DOOR fuse to
TERMINAL (A) 13 (w/o theft deterrent system), (B) 1 (w/ theft deterrent system) of the relay to TERMINAL (A) 12 (w/o theft
deterrent system), (B) 3 (w/ theft deterrent system) to TERMINAL 1 of the power relay to TERMINAL 2 to GROUND for about
43 seconds. The same as normal operation, the current flows from the POWER fuse to TERMINAL 5 of the power relay to
TERMINAL 3 to TERMINALS 10 and 11 of the power window master SW and TERMINAL 4 (Front RH) or 3 (Rear LH, RH) of
the power window control SW. As a result, for about 43 seconds after the ignition SW is turned off, the functioning of this
relay makes it possible to raise and lower the power window. Also, by opening the front doors (Door courtesy SW on) within
about 43 seconds after turning the ignition SW to off, a signal is input to TERMINAL 6 or (A) 8 (w/o theft deterrent system),
(B) 6 (w/ theft deterrent system) of the integration relay. As a result, the relay turned off, and up and down movement of the
power window stops.
P9 POWER WINDOW MASTER SW
10, 11±GROUND : Approx. 12 volts with the ignition SW at ON position or key off power window operation
3, 4±GROUND : Always continuity
1±GROUND : Approx. 12 volts with the ignition SW on and the master SW (Driver's window) at UP position
5±GROUND : Approx. 12 volts with the ignition SW on and the master SW (Driver's window)
at DOWN or AUTO DOWN position
WINDOW LOCK SW
Open with the window lock SW at LOCK position
: PARTS LOCATION
CodeSee PageCodeSee PageCodeSee Page
D1232J33A31P933
D1332J34B31P1033
I18A30J3832P1133I18B30P633P1233
J431P733P1333
J1131P833
: JUNCTION BLOCK AND WIRE HARNESS CONNECTOR
CodeSee PageJunction Block and Wire Harness (Connector Location)
1D20Instrument Panel Wire and Instrument Panel J/B (Lower Finish Panel)1G20Instrument Panel Wire and Instrument Panel J/B (Lower Finish Panel)
1J20Cowl Wire and Instrument Panel J/B (Lower Finish Panel)
1S20Floor Wire and Instrument Panel J/B (Lower Finish Panel)
1V20Cowl Wire and Instrument Panel J/B (Lower Finish Panel)
: CONNECTOR JOINING WIRE HARNESS AND WIRE HARNESS
CodeSee PageJoining Wire Harness and Wire Harness (Connector Location)
IE140Front Door LH Wire and Instrument Panel Wire (Left Kick Panel)IE240Front Door LH Wire and Instrument Panel Wire (Left Kick Panel)
IF140Floor Wire and Instrument Panel Wire (Left Kick Panel)
IM242Front Door RH Wire and Instrument Panel Wire (Right Kick Panel)
IN242Floor No.2 Wire and Instrument Panel Wire (Right Kick Panel)
BO144Rear Door Wire LH and Floor Wire (Under the Left Center Pillar)
BP144Rear Door Wire RH and Floor No.2 Wire (Under the Right Center Pillar)
: GROUND POINTS
CodeSee PageGround Points Location
IE40Cowl Side Panel LH
IG40Instrument Panel Brace LH
SERVICE HINTS
Page 4377 of 4592

DOOR LOCK CONTROL (TMC MADE)
Current always flows to TERMINAL (A) 13 (w/o theft deterrent system), (B) 1 (w/ theft deterrent system) of the integration
relay through the DOOR fuse.
When the ignition SW is turned on, the current flowing through the GAUGE Fuse flows to TERMINAL 7 of the integration
relay to TERMINAL (A) 12 (w/o theft deterrent system), (B) 3 (w/ theft deterrent system) to the power relay (Coil side) to
GROUND.
1. MANUAL LOCK OPERATION
When the door lock control SW or door key lock and unlock SW are operated to LOCK position, a lock signal is input to
TERMINAL (A) 1 or (A) 3 (w/o theft deterrent system), (B) 16 or (B) 18 (w/ theft deterrent system) of the integration relay and
causes the relay to function. Current flows from TERMINAL (A) 13 (w/o theft deterrent system), (B) 1 (w/ theft deterrent
system) of the relay to (A) 6 (w/o theft deterrent system), (B) 12 (w/ theft deterrent system) to TERMINAL 2 of the door lock
motors to TERMINAL 3 to TERMINAL (A) 7 (w/o theft deterrent system), (B) 11 and (B) 25 (w/ theft deterrent system) of the
relay to TERMINAL 10 to GROUND and the door lock motor causes the door to lock.
2. MANUAL UNLOCK OPERATION
When the door lock control SW or door key lock and unlock SW are operated to UNLOCK position, an unlock signal is input
to TERMINAL (A) 2, (A) 4 or (A) 5 (w/o theft deterrent system), (B) 17, (B) 19 or (B) 20 (w/ theft deterrent system) of the
integration relay and causes the relay to function. Current flows from TERMINAL (A) 13 (w/o theft deterrent system), (B) 1 (w/
theft deterrent system) of the relay to TERMINAL (A) 7 (w/o theft deterrent system), (B) 11 and (B) 25 (w/ theft deterrent
system) to TERMINAL 3 of the door lock motors to TERMINAL 2 to TERMINAL (A) 6 (w/o theft Deterrent system), (B) 12 (w/
theft deterrent system) of the relay to TERMINAL 10 to GROUND and door lock motors causes door to unlock.
3. DOUBLE OPERATION UNLOCK OPERATION
When the door key lock and unlock SW front LH is turned to the unlock side, only the driver's door is mechanically unlocked.
Turning the door key lock and unlock SW front LH to the unlock side causes a signal to be input to TERMINAL (A) 4 (w/o
theft deterrent system), (B) 19 (w/ theft deterrent system) of the relay, and if the signal is input again within 3 seconds by
turning the SW to the unlock side again, current flows from TERMINAL (A) 7 (w/o theft deterrent system), (B) 11 and (B) 25
(w/ theft deterrent system) of the integration relay to TERMINAL 3 of the door lock motors to TERMINAL 2 of the door lock
motors to TERMINAL (A) 6 (w/o theft deterrent system), (B) 12 (w/ theft deterrent system) of the relay to TERMINAL 10 to
GROUND, causing the door lock motors to operate and unlock the doors.
4. IGNITION KEY REMINDER OPERATION
*Operating door lock knob (Operation of door lock motors)
With ignition key in cylinder (Unlock warning SW on), when the door is opened and locked using door lock knob (Door
lock motor), the door is locked once but each door is unlocked soon by the function of the relay. As a result, the current
flows from TERMINAL (A) 13 (w/o theft deterrent system), (B) 1 (w/ theft deterrent system) of the integration relay to
TERMINAL (A) 7 (w/o theft deterrent system),(B) 11 and (B) 25 (w/ theft deterrent system) to TERMINAL 3 of the door
lock motors to TERMINAL 2 of the door lock motors to TERMINAL (A) 6 (w/o theft deterrent system), (B) 12 (w/ theft
deterrent system) of the relay to TERMINAL 10 to GROUND and causes all the doors to unlock.
*Operating door lock control SW or door key lock and unlock SW
With ignition key in cylinder (Unlock warning SW on), when the door is opened and locked using door lock control SW or
key SW, the door is locked once but each door is unlock by the function of SW contained in motors, which the signal is
input to TERMINAL (A) 9 or (A) 10 (w/o theft deterrent system), (B) 5 or (B) 7 (w/ theft deterrent system) of the relay.
According to this input signal, the current in ECU flows from TERMINAL (A) 13 (w/o theft deterrent system), (B) 1 (w/
theft deterrent system) of the relay to TERMINAL (A) 7 (w/o theft deterrent system), (B) 11 and (B) 25 (w/ theft deterrent
system) to TERMINAL 3 of the door lock motors to TERMINAL 2 of the door lock motors to TERMINAL (A) 6 (w/o theft
deterrent system), (B) 12 (w/ theft deterrent system) of the relay to TERMINAL 10 to GROUND and causes all the doors
to unlock.
*In case of key less lock
With ignition key in cylinder (Unlock warning SW on), when the unlock function is disturbed more than 0.2 seconds, for
example pushing the door lock knob etc., the door holds on lock condition. Closing the door after, door courtesy SW
inputs the signal into TERMINAL 6 or (A) 8 (w/o theft deterrent system), (B) 6 (w/ theft deterrent system) of the
integration relay. By this input signal, the ECU works and current flows from TERMINAL (A) 13 (w/o theft deterrent
system), (B) 1 (w/ theft deterrent system) of the relay to TERMINAL (A) 7 (w/o theft deterrent system), (B) 11 and (B) 25
(w/ theft deterrent system) to TERMINAL 3 of the door lock motors to TERMINAL 2 of the door lock motors to
TERMINAL (A) 6 (w/o theft deterrent system), (B) 12 (w/ theft deterrent system) of the relay to TERMINAL 10 to
GROUND and causes all the doors to unlock.
SYSTEM OUTLINE