1999 SUZUKI GRAND VITARA front
[x] Cancel search: frontPage 4 of 656
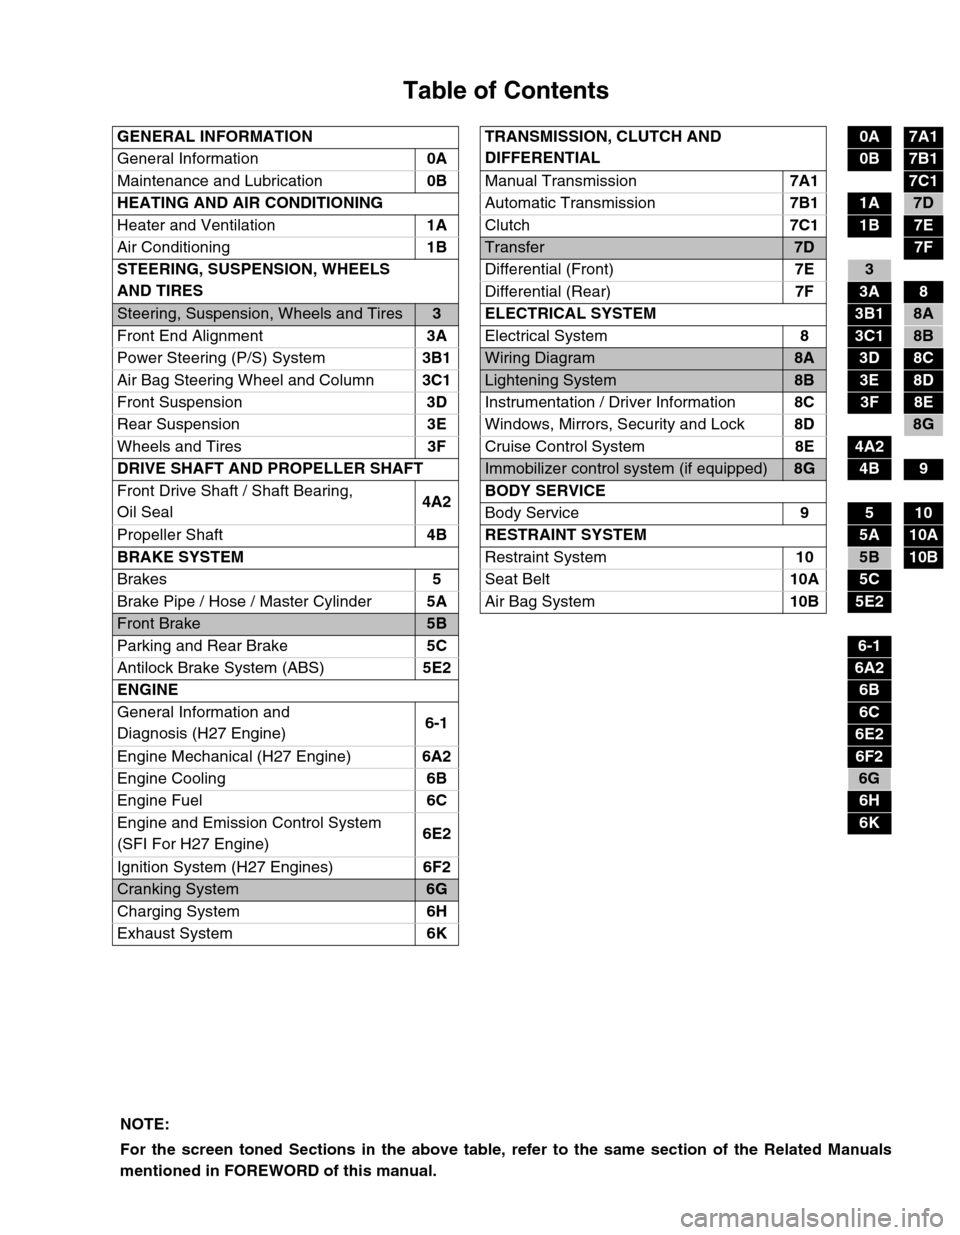
Table of Contents
GENERAL INFORMATION TRANSMISSION, CLUTCH AND
DIFFERENTIAL0A7A1
General Information0A
0B7B1
Maintenance and Lubrication0B
Manual Transmission7A1
7C1
HEATING AND AIR CONDITIONING
Automatic Transmission7B1
1A7D
Heater and Ventilation1A
Clutch7C1
1B7E
Air Conditioning1B
Transfer7D7F
STEERING, SUSPENSION, WHEELS
AND TIRESDifferential (Front)7E
3
Differential (Rear)7F
3A8
Steering, Suspension, Wheels and Tires3 ELECTRICAL SYSTEM3B18A
Front End Alignment3A
Electrical System8
3C18B
Power Steering (P/S) System3B1
Wiring Diagram8A3D8C
Air Bag Steering Wheel and Column3C1
Lightening System8B3E8D
Front Suspension3D
Instrumentation / Driver Information8C
3F8E
Rear Suspension3E
Windows, Mirrors, Security and Lock8D
8G
Wheels and Tires3F
Cruise Control System8E
4A2
DRIVE SHAFT AND PROPELLER SHAFT
Immobilizer control system (if equipped)8G4B9
Front Drive Shaft / Shaft Bearing,
Oil Seal4A2BODY SERVICE
Body Service9
510
Propeller Shaft4B RESTRAINT SYSTEM
5A10A
BRAKE SYSTEM
Restraint System10
5B10B
Brakes5
Seat Belt10A
5C
Brake Pipe / Hose / Master Cylinder5A
Air Bag System10B
5E2
Front Brake5B
Parking and Rear Brake5C
6-1
Antilock Brake System (ABS)5E2
6A2
ENGINE
6B
General Information and
Diagnosis (H27 Engine)6-1
6C
6E2
Engine Mechanical (H27 Engine)6A2
6F2
Engine Cooling6B
6G
Engine Fuel6C
6H
Engine and Emission Control System
(SFI For H27 Engine)6E2
6K
Ignition System (H27 Engines)6F2
Cranking System6G
Charging System6H
Exhaust System6K
NOTE:
For the screen toned Sections in the above table, refer to the same section of the Related Manuals
mentioned in FOREWORD of this manual.
Page 9 of 656
0A-4 GENERAL INFORMATION
WARNING:
SDM
During service procedures, be very careful when handling a Sensing and Diagnostic Module (SDM).
Never strike or jar the SDM.
Never power up the air bag system when the SDM is not rigidly attached to the vehicle. All SDM and
mounting bracket fasteners must be carefully torqued and the arrow must be pointing toward the
front of the vehicle to ensure proper operation of the air bag system.
The SDM could be activated when powered while not rigidly attached to the vehicle which could
cause deployment and result in personal injury.
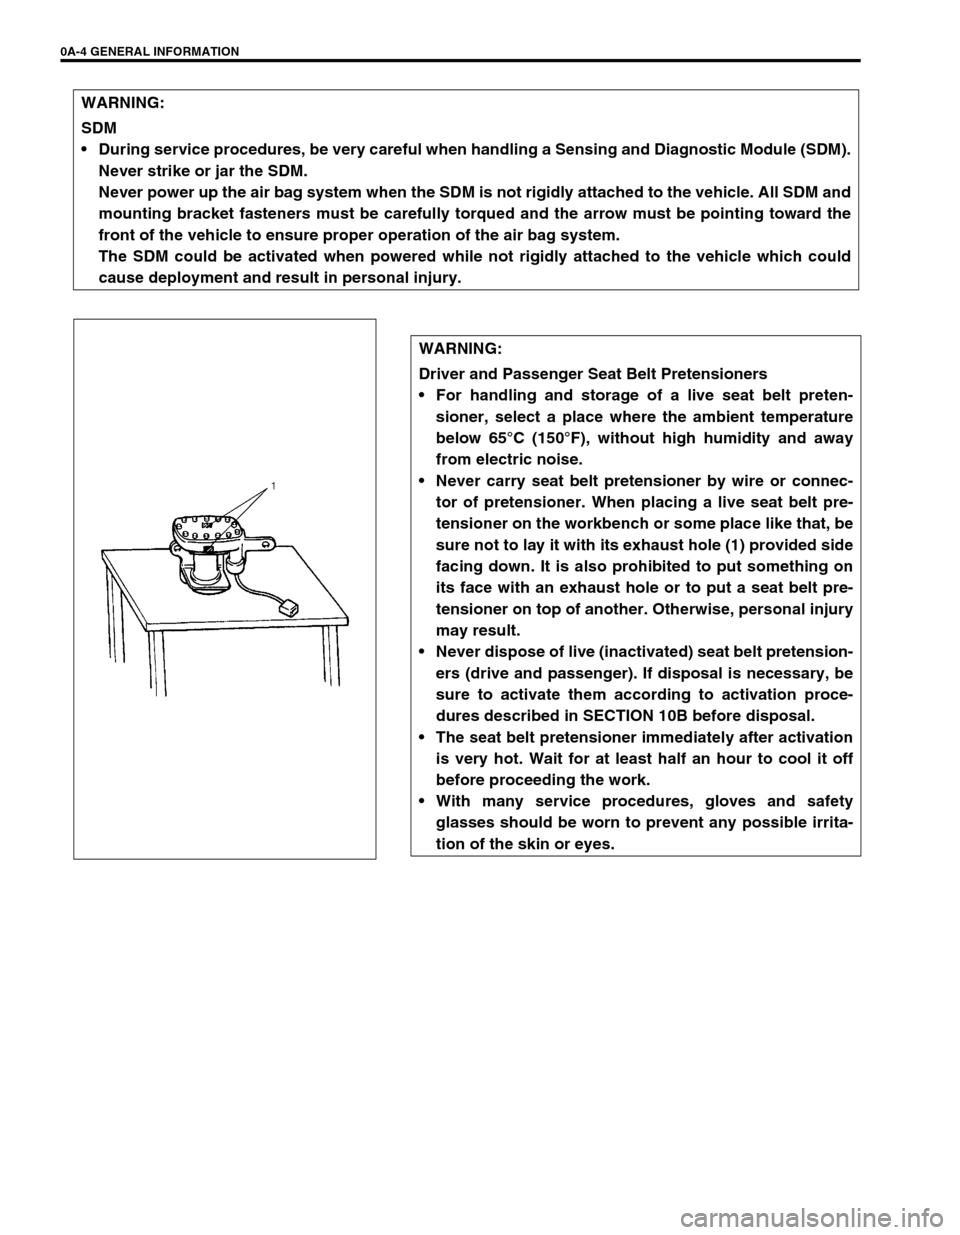
WARNING:
Driver and Passenger Seat Belt Pretensioners
For handling and storage of a live seat belt preten-
sioner, select a place where the ambient temperature
below 65°C (150°F), without high humidity and away
from electric noise.
Never carry seat belt pretensioner by wire or connec-
tor of pretensioner. When placing a live seat belt pre-
tensioner on the workbench or some place like that, be
sure not to lay it with its exhaust hole (1) provided side
facing down. It is also prohibited to put something on
its face with an exhaust hole or to put a seat belt pre-
tensioner on top of another. Otherwise, personal injury
may result.
Never dispose of live (inactivated) seat belt pretension-
ers (drive and passenger). If disposal is necessary, be
sure to activate them according to activation proce-
dures described in SECTION 10B before disposal.
The seat belt pretensioner immediately after activation
is very hot. Wait for at least half an hour to cool it off
before proceeding the work.
With many service procedures, gloves and safety
glasses should be worn to prevent any possible irrita-
tion of the skin or eyes.
Page 11 of 656
0A-6 GENERAL INFORMATION
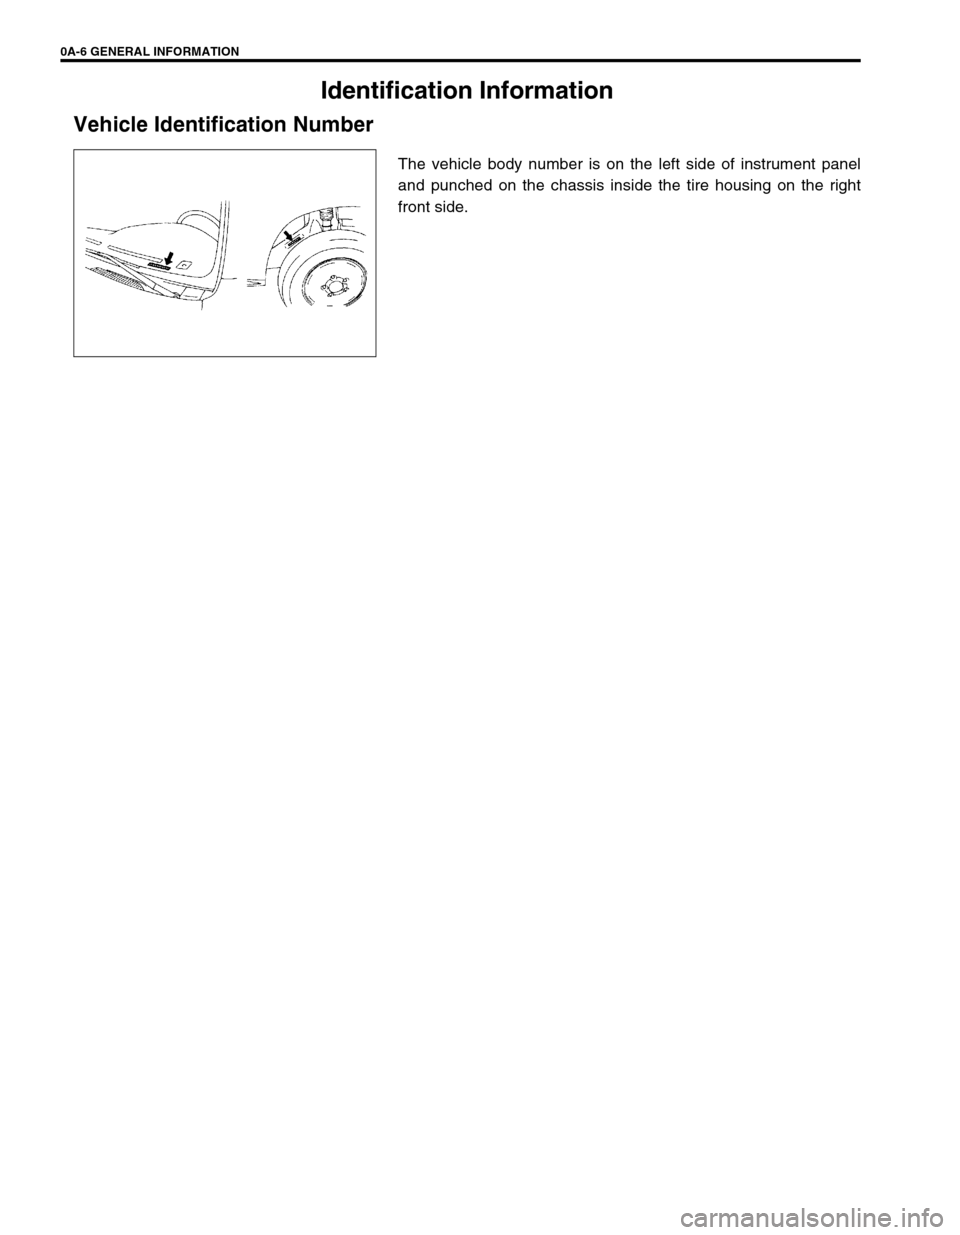
Identification Information
Vehicle Identification Number
The vehicle body number is on the left side of instrument panel
and punched on the chassis inside the tire housing on the right
front side.
Page 24 of 656
HEATER AND VENTILATION 1A-3
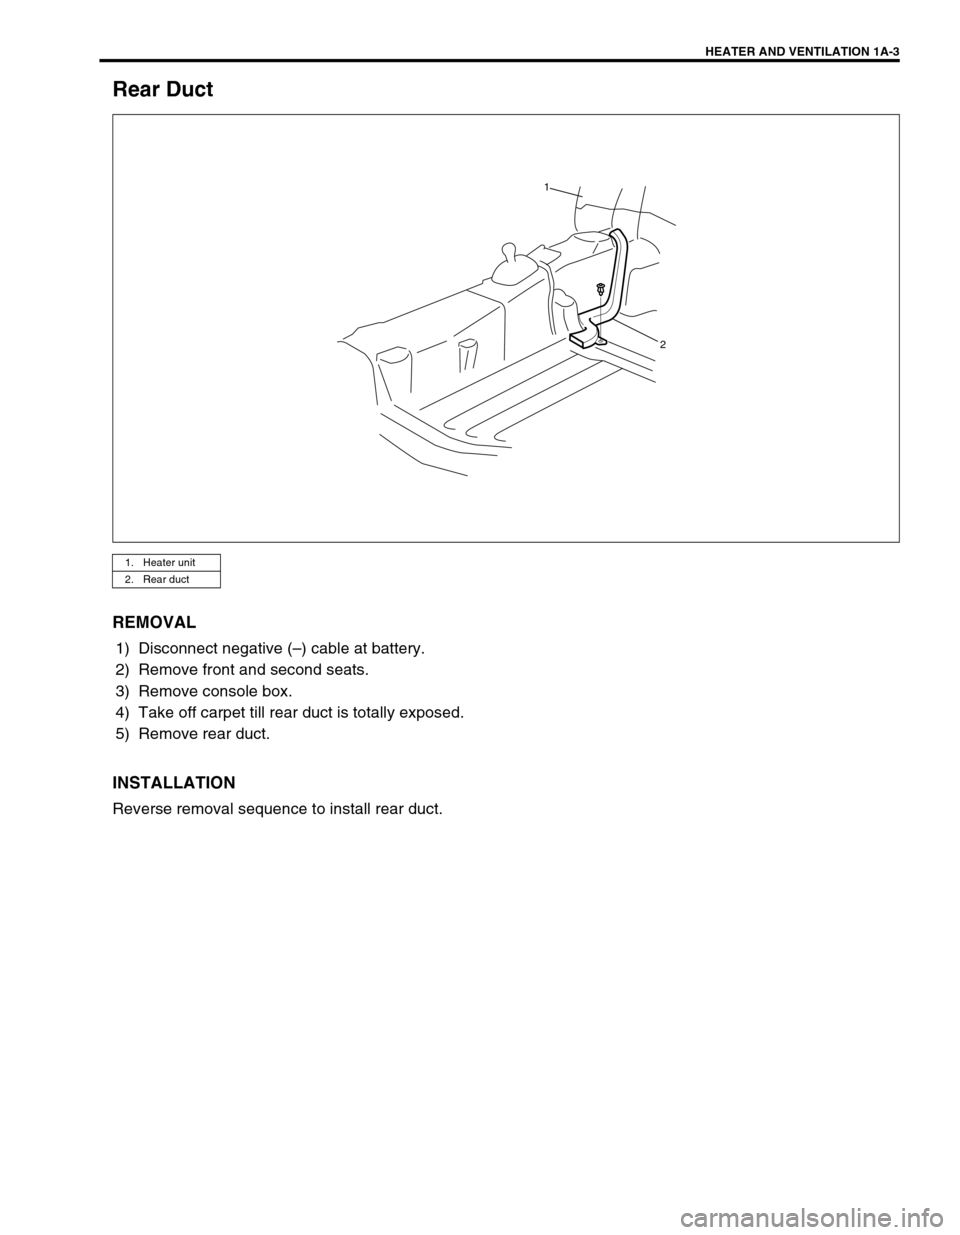
Rear Duct
REMOVAL
1) Disconnect negative (–) cable at battery.
2) Remove front and second seats.
3) Remove console box.
4) Take off carpet till rear duct is totally exposed.
5) Remove rear duct.
INSTALLATION
Reverse removal sequence to install rear duct.
1. Heater unit
2. Rear duct
1
2
Page 26 of 656
AIR CONDITIONING (OPTIONAL) 1B-1
1B
SECTION 1B
AIR CONDITIONING (OPTIONAL)
CONTENTS
General Description ....................................... 1B-3
Refrigerant Type .......................................... 1B-3
Refrigerant Flow of Air Conditioning System 1B-3
Major Components And Location ................. 1B-4
Diagnosis ........................................................ 1B-6
General ........................................................ 1B-6
Main A/C system (front A/C system) ........ 1B-6
Rear A/C system ...................................... 1B-8
Quickly Checking of Refrigerant Charge
(If Equipped with Sight Glass) ...................... 1B-9
Performance Diagnosis .............................. 1B-10
Performance diagnosis table .................. 1B-12
Detail diagnosis table (at ambient temperature within 30 - 35 °C
(85 - 95 °F)) ............................................ 1B-13
Wiring Circuit.............................................. 1B-14
Inspection of A/C Controller and Its
Circuits ....................................................... 1B-15
Voltage check......................................... 1B-15
Refrigerant Recovery, Evacuation and
Charging ....................................................... 1B-19
Operation Procedure for Charging A/C with
Refrigerant ................................................. 1B-19
Recovery .................................................... 1B-20
Evacuating ................................................. 1B-21
Evacuating procedure ............................ 1B-21
Checking system for pressure leaks ...... 1B-22 WARNING:
For vehicles equipped with Supplemental Restraint (Air Bag) System:
Service on and around the air bag system components or wiring must be performed only by an
authorized SUZUKI dealer. Refer to “Air Bag System Components and Wiring Location View” under
“General Description” in air bag system section in order to confirm whether you are performing ser-
vice on or near the air bag system components or wiring. Please observe all WARNINGS and “Ser-
vice Precautions” under “On-Vehicle Service” in air bag system section before performing service
on or around the air bag system components or wiring. Failure to follow WARNINGS could result in
unintentional activation of the system or could render the system inoperative. Either of these two
conditions may result in severe injury.
Technical service work must be started at least 90 seconds after the ignition switch is turned to the
“LOCK” position and the negative cable is disconnected from the battery. Otherwise, the system
may be activated by reserve energy in the Sensing and Diagnostic Module (SDM).
CAUTION:
The air conditioning system of this vehicle uses refrigerant HFC-134a (R-134a).
None of refrigerant, compressor oil and component parts is interchangeable between two types of
A/C: one using refrigerant CFC-12 (R-12) and the other using refrigerant HFC-134a (R-134a).
Be sure to check which refrigerant is used before any service work including inspection and mainte-
nance. For identification between these two types, refer to “REFRIGERANT TYPE” in this section.
When replenishing or changing refrigerant and compressor oil and when replacing parts, make sure
that the material or the part to be used is appropriate to the A/C installed in the vehicle being serviced.
Use of incorrect one will result in leakage of refrigerant, damage in parts or other faulty condition.
NOTE:
For the descriptions (items) not found in this section, refer to the same section of the Service Man-
ual mentioned in FOREWORD of this manual.
For basic servicing method of the air conditioning system that is not described in this section, refer
to “AIR CONDITIONING BASIC MANUAL (99520-02130)”.
Page 29 of 656
![SUZUKI GRAND VITARA 1999 2.G Owners Manual 1B-4 AIR CONDITIONING (OPTIONAL)
Major Components And Location
[A] : Dual A/C model 6. Receiver/dryer 13. Suction pipe 20. Ventilation air
[B] : Single A/C model 7. Front expansion valve 14. Discharge SUZUKI GRAND VITARA 1999 2.G Owners Manual 1B-4 AIR CONDITIONING (OPTIONAL)
Major Components And Location
[A] : Dual A/C model 6. Receiver/dryer 13. Suction pipe 20. Ventilation air
[B] : Single A/C model 7. Front expansion valve 14. Discharge](/manual-img/20/7583/w960_7583-28.png)
1B-4 AIR CONDITIONING (OPTIONAL)
Major Components And Location
[A] : Dual A/C model 6. Receiver/dryer 13. Suction pipe 20. Ventilation air
[B] : Single A/C model 7. Front expansion valve 14. Discharge pipe 21. Rear A/C air
1. Front cooling unit 8. Heater unit 15. Recirculation air 22. Room air
2. Front A/C evaporator 9. Rear A/C unit 16. Fresh air 23. Solenoid valve
3. Front blower fan motor 10. Rear blower fan motor 17. Defroster air 24. Rear A/C evaporator
4. Compressor 11. Rear expansion valve 18. Demister air
5. Condenser assembly 12. Liquid pipe 19. Foot air
17 17
18 18
16 [A]
[B]15
21
2211
23
9
24
10 141320
21
19 19
4 12
6 312
78
17 17
18 18
16
15
20
19 19 1
2
8 5
7
12
6
513
4 14
Page 30 of 656
![SUZUKI GRAND VITARA 1999 2.G Owners Manual AIR CONDITIONING (OPTIONAL) 1B-5
[A] : Dual A/C LH steering model 4. Condenser 11. Low pressure charge valve
[B] : Dual A/C RH steering model 5. Sight glass 12. Floor liquid pipe
[C] : Single A/C LH s SUZUKI GRAND VITARA 1999 2.G Owners Manual AIR CONDITIONING (OPTIONAL) 1B-5
[A] : Dual A/C LH steering model 4. Condenser 11. Low pressure charge valve
[B] : Dual A/C RH steering model 5. Sight glass 12. Floor liquid pipe
[C] : Single A/C LH s](/manual-img/20/7583/w960_7583-29.png)
AIR CONDITIONING (OPTIONAL) 1B-5
[A] : Dual A/C LH steering model 4. Condenser 11. Low pressure charge valve
[B] : Dual A/C RH steering model 5. Sight glass 12. Floor liquid pipe
[C] : Single A/C LH steering model 6. Refrigerant (dual) pressure sensor 13. Floor suction pipe
[D] : Single A/C RH steering model 7. Discharge pipe 14. Rear A/C unit
1. Front cooling unit 8. Liquid pipe 15. Rear A/C duct No.1
2. Heater unit 9. Suction pipe 16. Rear A/C duct No.2
3. Compressor 10. High pressure charge valve
[A]
[B]
[C][D]
10
7
9 3 4 6 5 1181
213
12 16
1514
1 2
13
12 16
1514
7
10
5
6
4
38
9 11
1 2
7
10
5
6
4
38
9 11
10
7
9 3 4 6 5 1181
2
Page 31 of 656

1B-6 AIR CONDITIONING (OPTIONAL)
Diagnosis
General
Main A/C system (front A/C system)
Condition Possible Cause Correction
Cool air does not
come out (A/C system
does not operative)No refrigerant Perform recover, evacuation and
charging.
Fuse blown Check “IG METER”, “REAR DEFG”
and “A/C” fuses, and check for
short circuit to ground.
A/C switch faulty Check A/C switch.
Blower motor switch faulty Check blower motor switch.
A/C evaporator temperature sensor (A/C evap-
orator thermistor) faultyCheck A/C evaporator tempera-
ture sensor (A/C evaporator ther-
mistor).
Refrigerant (dual) pressure switch faulty Check refrigerant (dual) pressure
switch.
Wiring or grounding faulty Repair as necessary.
A/C ON permission signal in ECM faulty Check A/C ON permission signal.
A/C controller and its circuit faulty Check A/C controller and its circuit.
Cool air does not
come out (A/C com-
pressor does not
operative (won’t rota-
tive))Magnet clutch faulty Check magnet clutch.
Compressor relay faulty Check compressor thermal switch.
Compressor relay faulty Check compressor relay.
Drive belt loose or broken Adjust or replace drive belt.
Compressor faulty Check compressor.
A/C ON permission signal in ECM faulty Check A/C ON permission signal.
A/C controller faulty Check A/C controller.
Cool air does not
come out (A/C con-
denser cooling fan
motor does not opera-
tive)Condenser cooling fan motor relay faulty Check condenser cooling fan motor
relay.
Wiring or grounding faulty Repair as necessary.
A/C condenser fan motor relay signal in ECM
faultyCheck A/C condenser cooling fan
motor relay signal.
Condenser cooling fan motor faulty Check condenser cooling fan
motor.
Cool air does not
come out (Blower
motor does not opera-
tive)Fuse blown Check “FRONT BLOW” and
“REAR DEFG” fuses, and check for
short circuit to ground.
Blower motor relay faulty Check blower motor relay.
Blower motor resistor faulty Check blower motor resistor.
Blower motor switch faulty Check blower motor switch.
Wiring or grounding faulty Repair as necessary.
Blower motor faulty Check blower motor.