1999 SUZUKI GRAND VITARA front
[x] Cancel search: frontPage 77 of 656
3C1-2 AIR BAG STEERING WHEEL AND COLUMN
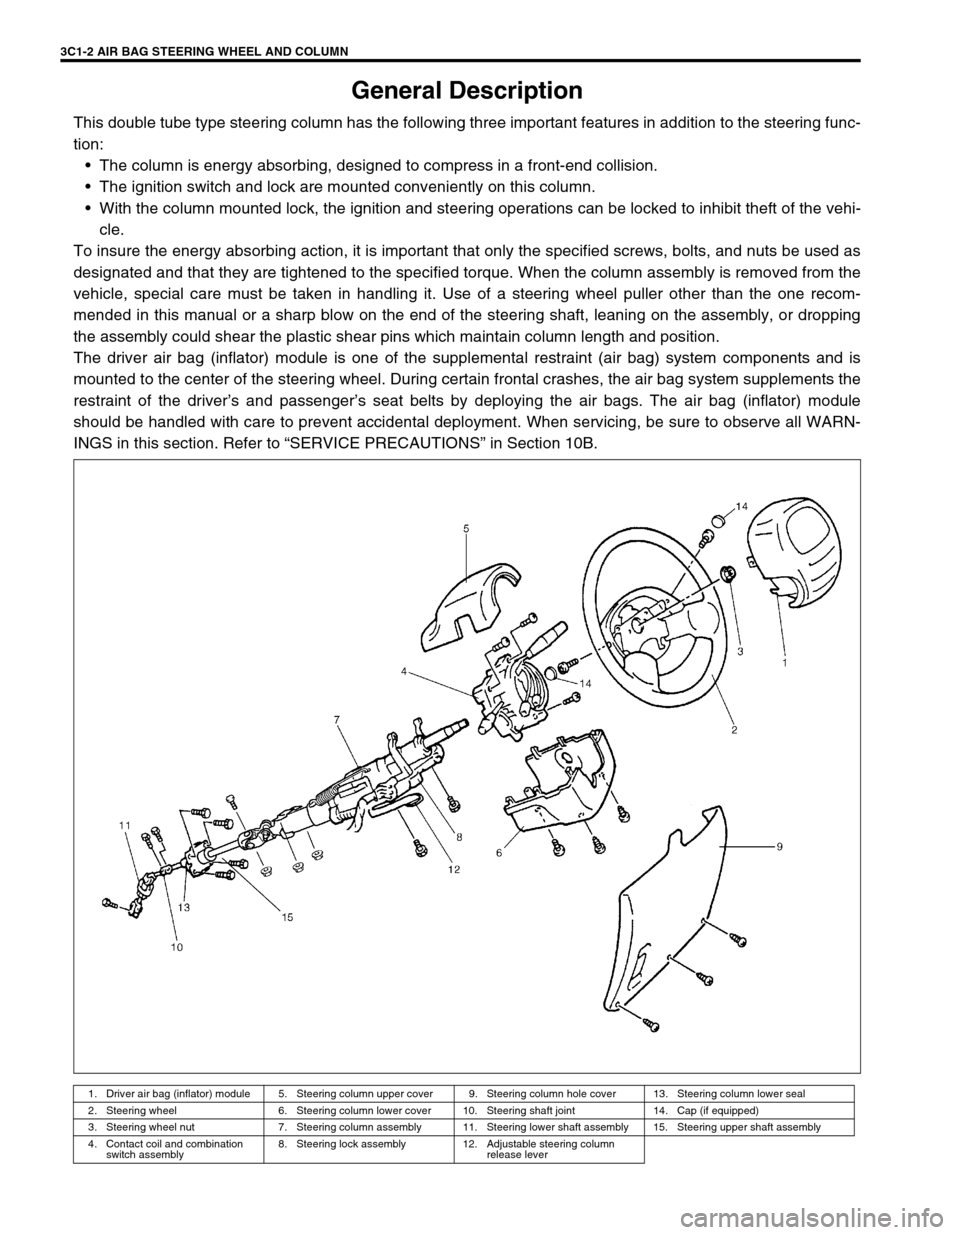
General Description
This double tube type steering column has the following three important features in addition to the steering func-
tion:
The column is energy absorbing, designed to compress in a front-end collision.
The ignition switch and lock are mounted conveniently on this column.
With the column mounted lock, the ignition and steering operations can be locked to inhibit theft of the vehi-
cle.
To insure the energy absorbing action, it is important that only the specified screws, bolts, and nuts be used as
designated and that they are tightened to the specified torque. When the column assembly is removed from the
vehicle, special care must be taken in handling it. Use of a steering wheel puller other than the one recom-
mended in this manual or a sharp blow on the end of the steering shaft, leaning on the assembly, or dropping
the assembly could shear the plastic shear pins which maintain column length and position.
The driver air bag (inflator) module is one of the supplemental restraint (air bag) system components and is
mounted to the center of the steering wheel. During certain frontal crashes, the air bag system supplements the
restraint of the driver’s and passenger’s seat belts by deploying the air bags. The air bag (inflator) module
should be handled with care to prevent accidental deployment. When servicing, be sure to observe all WARN-
INGS in this section. Refer to “SERVICE PRECAUTIONS” in Section 10B.
1. Driver air bag (inflator) module 5. Steering column upper cover 9. Steering column hole cover 13. Steering column lower seal
2. Steering wheel 6. Steering column lower cover 10. Steering shaft joint 14. Cap (if equipped)
3. Steering wheel nut 7. Steering column assembly 11. Steering lower shaft assembly 15. Steering upper shaft assembly
4. Contact coil and combination
switch assembly8. Steering lock assembly 12. Adjustable steering column
release lever
Page 79 of 656
3C1-4 AIR BAG STEERING WHEEL AND COLUMN
Steering Column
REMOVAL
1) Disconnect negative (–) cable at battery.
2) Disable air bag system. Refer to “DISABLING AIR BAG SYSTEM” under “SERVICE PRECAUTIONS” in
Section 10B.
3) Remove steering wheel and contact coil and combination switch assembly, if necessary. Refer to “STEER-
ING WHEEL” and “CONTACT COIL AND COMBINATION SWITCH ASSEMBLY” in this section.
Perform the following procedure if not removing steering wheel and/or combination switch.
a) Turn steering wheel so that vehicle’s front tires are at straight-ahead position.
b) Turn ignition switch to “LOCK” position and remove key.
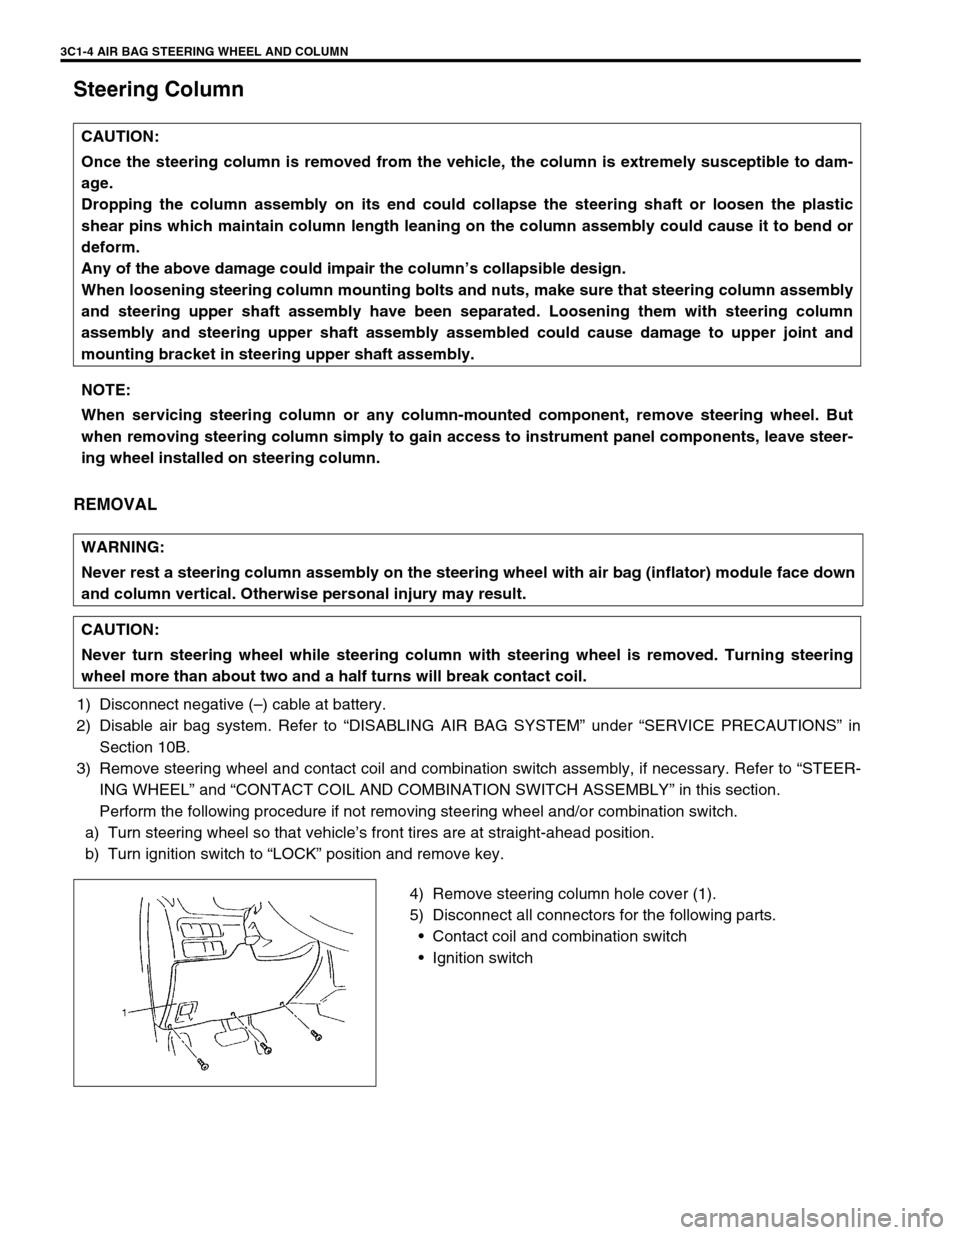
4) Remove steering column hole cover (1).
5) Disconnect all connectors for the following parts.
Contact coil and combination switch
Ignition switch CAUTION:
Once the steering column is removed from the vehicle, the column is extremely susceptible to dam-
age.
Dropping the column assembly on its end could collapse the steering shaft or loosen the plastic
shear pins which maintain column length leaning on the column assembly could cause it to bend or
deform.
Any of the above damage could impair the column’s collapsible design.
When loosening steering column mounting bolts and nuts, make sure that steering column assembly
and steering upper shaft assembly have been separated. Loosening them with steering column
assembly and steering upper shaft assembly assembled could cause damage to upper joint and
mounting bracket in steering upper shaft assembly.
NOTE:
When servicing steering column or any column-mounted component, remove steering wheel. But
when removing steering column simply to gain access to instrument panel components, leave steer-
ing wheel installed on steering column.
WARNING:
Never rest a steering column assembly on the steering wheel with air bag (inflator) module face down
and column vertical. Otherwise personal injury may result.
CAUTION:
Never turn steering wheel while steering column with steering wheel is removed. Turning steering
wheel more than about two and a half turns will break contact coil.
Page 80 of 656
AIR BAG STEERING WHEEL AND COLUMN 3C1-5
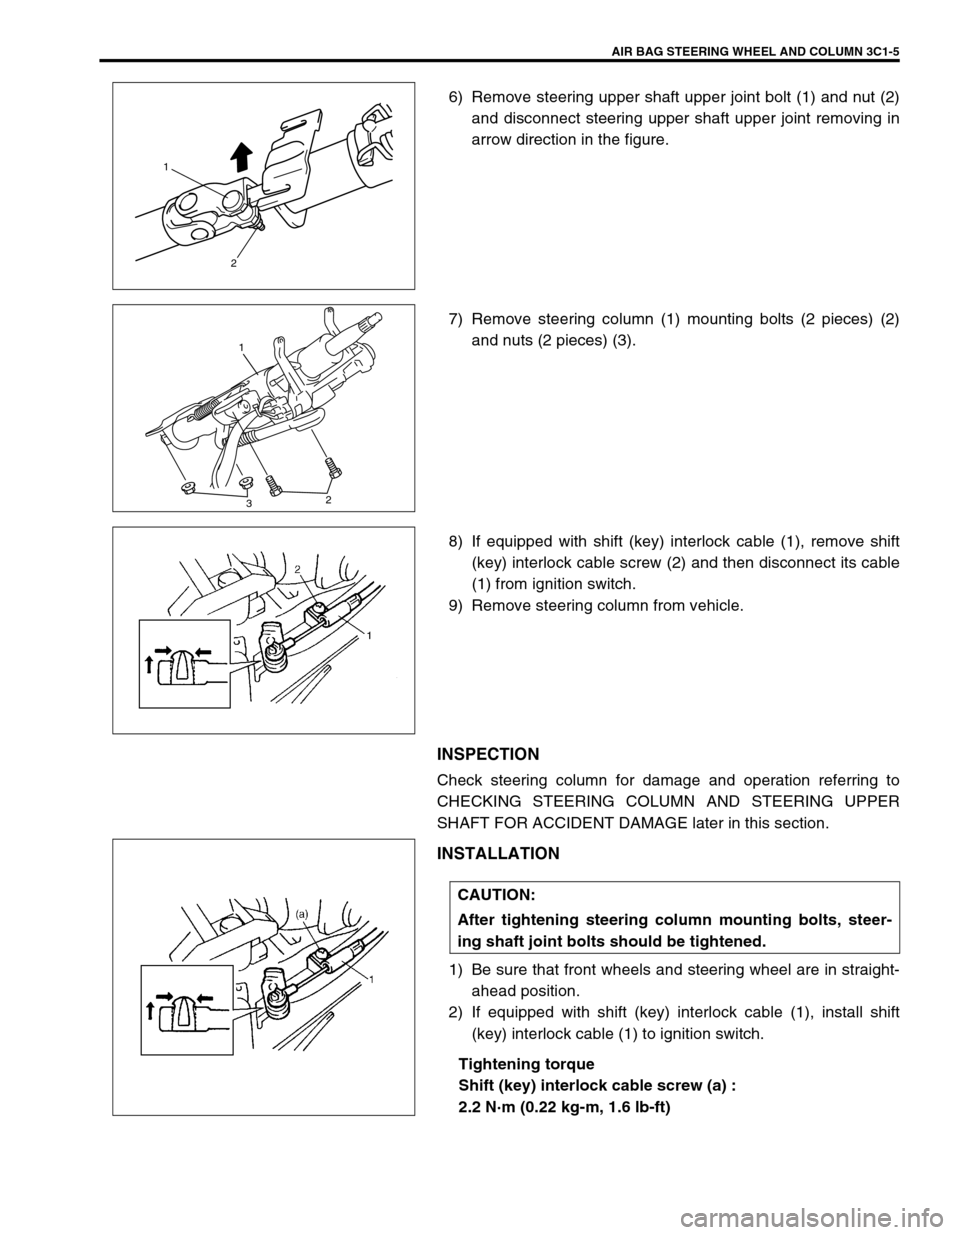
6) Remove steering upper shaft upper joint bolt (1) and nut (2)
and disconnect steering upper shaft upper joint removing in
arrow direction in the figure.
7) Remove steering column (1) mounting bolts (2 pieces) (2)
and nuts (2 pieces) (3).
8) If equipped with shift (key) interlock cable (1), remove shift
(key) interlock cable screw (2) and then disconnect its cable
(1) from ignition switch.
9) Remove steering column from vehicle.
INSPECTION
Check steering column for damage and operation referring to
CHECKING STEERING COLUMN AND STEERING UPPER
SHAFT FOR ACCIDENT DAMAGE later in this section.
INSTALLATION
1) Be sure that front wheels and steering wheel are in straight-
ahead position.
2) If equipped with shift (key) interlock cable (1), install shift
(key) interlock cable (1) to ignition switch.
Tightening torque
Shift (key) interlock cable screw (a) :
2.2 N·m (0.22 kg-m, 1.6 lb-ft)
1
2
1
32
CAUTION:
After tightening steering column mounting bolts, steer-
ing shaft joint bolts should be tightened.
Page 82 of 656
AIR BAG STEERING WHEEL AND COLUMN 3C1-7
Steering Upper Shaft Assembly
REMOVAL
1) Turn steering wheel so that vehicle’s front tires are at
straight-ahead position.
2) Turn ignition switch to “LOCK” position and remove key.
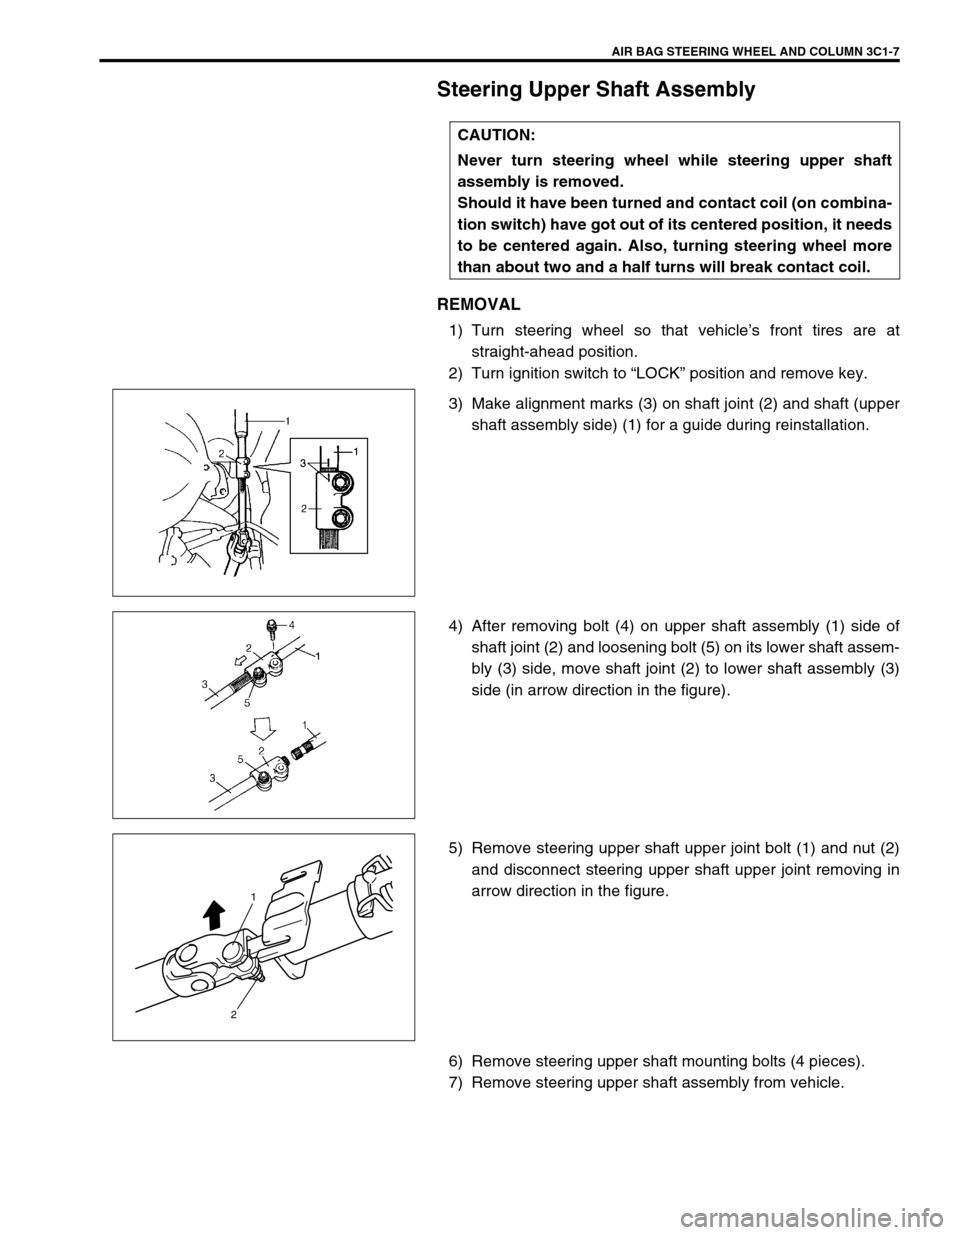
3) Make alignment marks (3) on shaft joint (2) and shaft (upper
shaft assembly side) (1) for a guide during reinstallation.
4) After removing bolt (4) on upper shaft assembly (1) side of
shaft joint (2) and loosening bolt (5) on its lower shaft assem-
bly (3) side, move shaft joint (2) to lower shaft assembly (3)
side (in arrow direction in the figure).
5) Remove steering upper shaft upper joint bolt (1) and nut (2)
and disconnect steering upper shaft upper joint removing in
arrow direction in the figure.
6) Remove steering upper shaft mounting bolts (4 pieces).
7) Remove steering upper shaft assembly from vehicle.CAUTION:
Never turn steering wheel while steering upper shaft
assembly is removed.
Should it have been turned and contact coil (on combina-
tion switch) have got out of its centered position, it needs
to be centered again. Also, turning steering wheel more
than about two and a half turns will break contact coil.
1
2
Page 83 of 656

3C1-8 AIR BAG STEERING WHEEL AND COLUMN
INSPECTION
Check steering shaft damage and operation referring to CHECK
STEERING COLUMN AND STEERING UPPER SHAFT FOR
ACCIDENT DAMAGE later in this section.
INSTALLATION
1) Be sure that front tires and steering wheel are in straight
ahead position.
2) Install steering upper shaft assembly to dash panel. Tighten
steering upper shaft mounting bolts (1) to specified torque.
Tightening torque
Steering upper shaft mounting bolts (a) :
23 N·m (2.3 kg-m, 17.0 lb-ft)
3) Install steering shaft joint (1) to steering upper shaft (2) by
matching it to marks (3) made before removal.
4) Install shaft joint bolt (upper shaft assembly side) (2) to
steering shaft joint (1). Tighten shaft joint bolt (upper shaft
assembly side) (2) to specified torque first and then shaft
joint bolt (lower shaft assembly side) (3) to specified torque.
Tightening torque
Steering shaft joint bolt (c) : 25 N·m (2.5 kg-m, 18.0 lb-ft)
5) Align cutting point “A” of steering column assembly (1) with
bolt hole “B” of steering upper shaft upper joint as shown in
the figure. Then connect steering upper shaft upper joint.
1, (a)
“B”
“A”
1
Page 84 of 656
AIR BAG STEERING WHEEL AND COLUMN 3C1-9
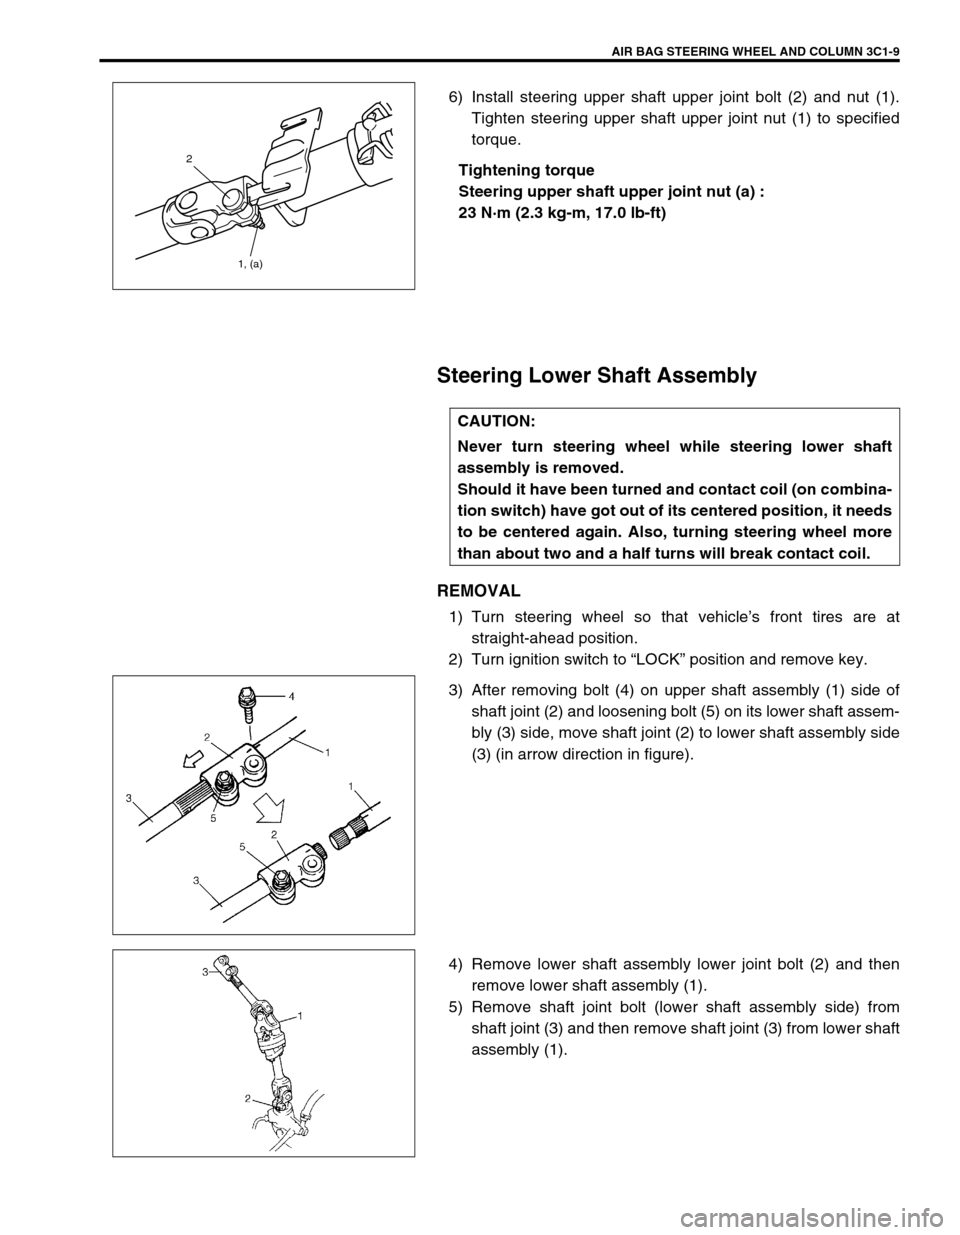
6) Install steering upper shaft upper joint bolt (2) and nut (1).
Tighten steering upper shaft upper joint nut (1) to specified
torque.
Tightening torque
Steering upper shaft upper joint nut (a) :
23 N·m (2.3 kg-m, 17.0 lb-ft)
Steering Lower Shaft Assembly
REMOVAL
1) Turn steering wheel so that vehicle’s front tires are at
straight-ahead position.
2) Turn ignition switch to “LOCK” position and remove key.
3) After removing bolt (4) on upper shaft assembly (1) side of
shaft joint (2) and loosening bolt (5) on its lower shaft assem-
bly (3) side, move shaft joint (2) to lower shaft assembly side
(3) (in arrow direction in figure).
4) Remove lower shaft assembly lower joint bolt (2) and then
remove lower shaft assembly (1).
5) Remove shaft joint bolt (lower shaft assembly side) from
shaft joint (3) and then remove shaft joint (3) from lower shaft
assembly (1).
1, (a) 2
CAUTION:
Never turn steering wheel while steering lower shaft
assembly is removed.
Should it have been turned and contact coil (on combina-
tion switch) have got out of its centered position, it needs
to be centered again. Also, turning steering wheel more
than about two and a half turns will break contact coil.
Page 85 of 656

3C1-10 AIR BAG STEERING WHEEL AND COLUMN
INSTALLATION
1) Be sure that front wheels and steering wheel are in straight
ahead position.
2) Align flat part “A” of lower shaft assembly (1) with bolt hole
“B” of shaft joint as shown in the figure. Then insert shaft
joint (1) into lower shaft assembly (2).
3) Install shaft joint bolt (lower shaft assembly side) to shaft
joint (2). Then tighten it by hand.
4) Insert pinion shaft into lower shaft assembly lower joint (2)
with slit (1) of lower joint, marks (4) on pinion shaft (5) and
gear case (6) aligned.
And then install lower shaft assembly lower joint bolt (3) to
lower shaft assembly lower joint (2). Tighten it to specified
torque.
Tightening torque
Lower shaft assembly lower joint bolt (a) :
25 N·m (2.5 kg-m, 18.0 lb-ft)
5) Install steering shaft joint (2) to steering upper shaft (1).
6) Install shaft joint bolt (upper shaft assembly side) (2) to shaft
joint (1). Tighten shaft joint bolt (upper shaft assembly side)
(2) to specified torque first and then shaft joint bolt (lower
shaft assembly side) (3) to specified torque.
Tightening torque
Steering shaft joint bolt (b) : 25 N·m (2.5 kg-m, 18.0 lb-ft)
NOTE:
Be sue that front wheels and steering wheel are in
straight-ahead position.
Page 88 of 656
FRONT SUSPENSION 3D-1
3D
SECTION 3D
FRONT SUSPENSION
CONTENTS
On-Vehicle Service......................................... 3D-1
Suspension Control Arm/Bushings .............. 3D-1Tightening Torque Specification .................. 3D-2
On-Vehicle Service
Suspension Control Arm/Bushings
INSTALLATION
For the details, refer to the same item of the same section in the
Service Manual mentioned in the FOREWORD of this manual
noting following point.
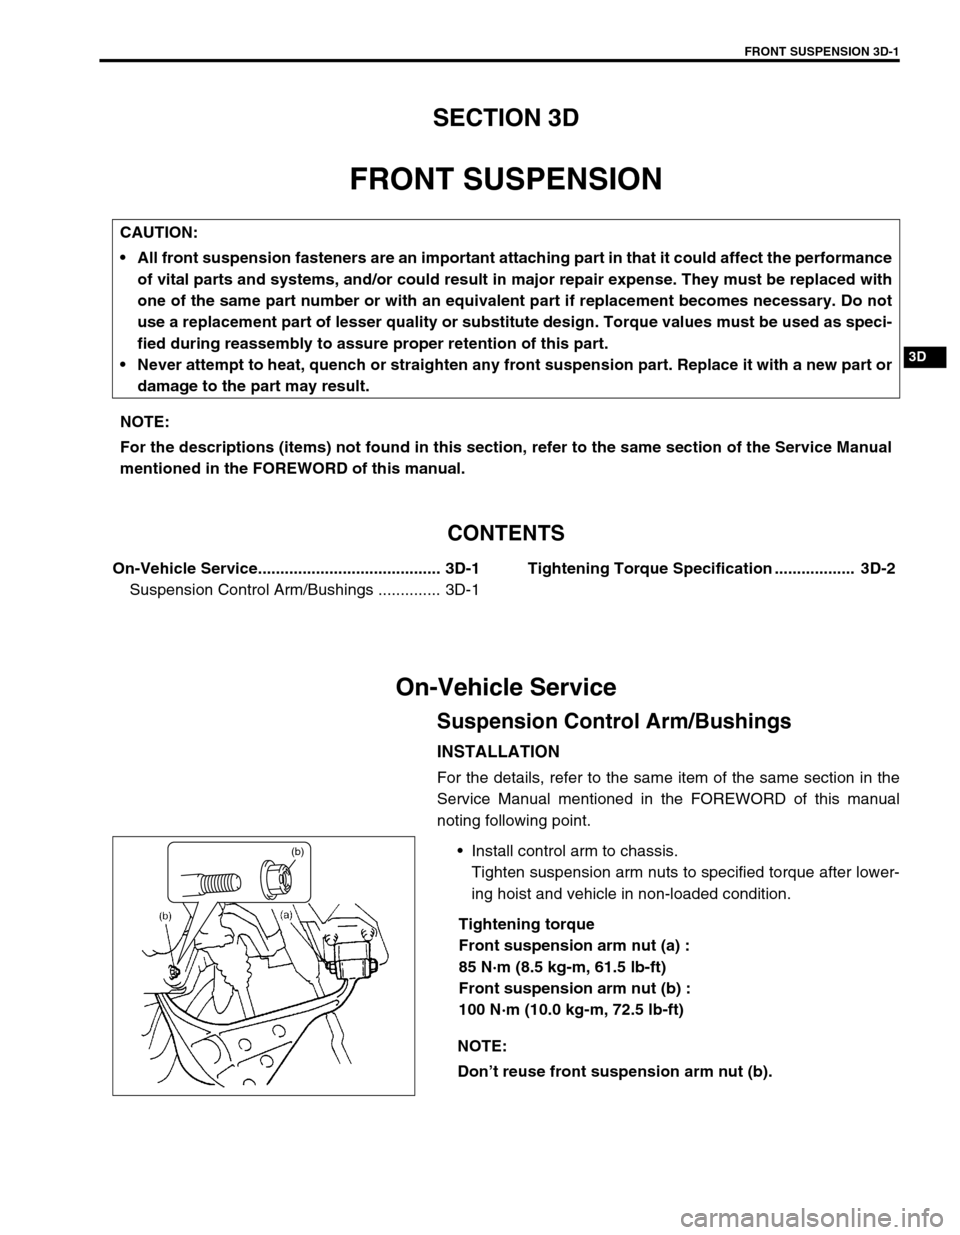
Install control arm to chassis.
Tighten suspension arm nuts to specified torque after lower-
ing hoist and vehicle in non-loaded condition.
Tightening torque
Front suspension arm nut (a) :
85 N·m (8.5 kg-m, 61.5 lb-ft)
Front suspension arm nut (b) :
100 N·m (10.0 kg-m, 72.5 lb-ft) CAUTION:
All front suspension fasteners are an important attaching part in that it could affect the performance
of vital parts and systems, and/or could result in major repair expense. They must be replaced with
one of the same part number or with an equivalent part if replacement becomes necessary. Do not
use a replacement part of lesser quality or substitute design. Torque values must be used as speci-
fied during reassembly to assure proper retention of this part.
Never attempt to heat, quench or straighten any front suspension part. Replace it with a new part or
damage to the part may result.
NOTE:
For the descriptions (items) not found in this section, refer to the same section of the Service Manual
mentioned in the FOREWORD of this manual.
NOTE:
Don’t reuse front suspension arm nut (b).
(b)