1999 NISSAN PICK-UP height
[x] Cancel search: heightPage 455 of 666
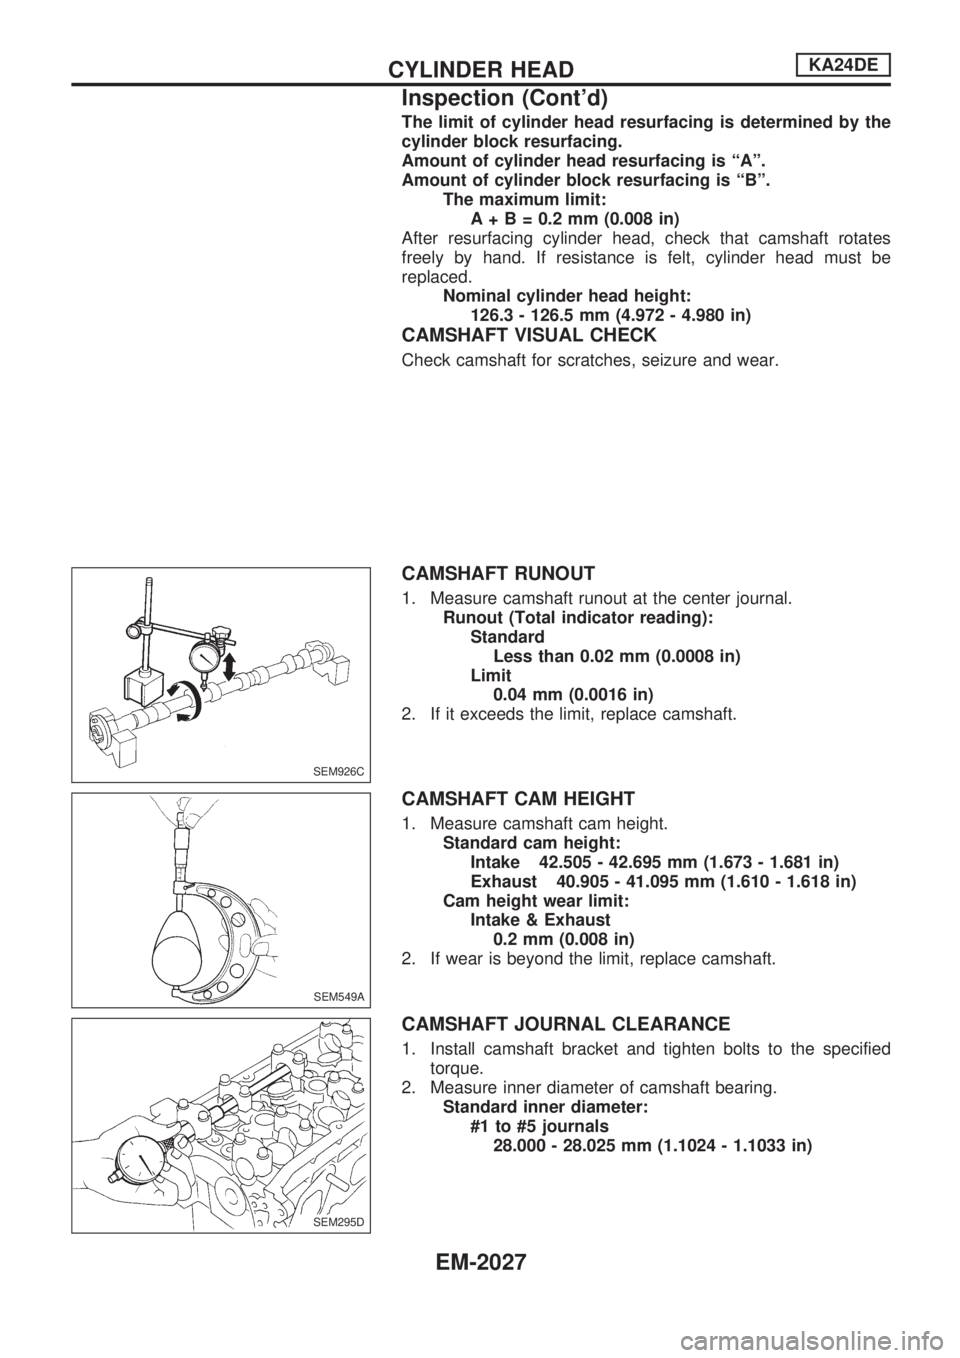
The limit of cylinder head resurfacing is determined by the
cylinder block resurfacing.
Amount of cylinder head resurfacing is ªAº.
Amount of cylinder block resurfacing is ªBº.
The maximum limit:
A+B=0.2mm(0.008 in)
After resurfacing cylinder head, check that camshaft rotates
freely by hand. If resistance is felt, cylinder head must be
replaced.
Nominal cylinder head height:
126.3 - 126.5 mm (4.972 - 4.980 in)
CAMSHAFT VISUAL CHECK
Check camshaft for scratches, seizure and wear.
CAMSHAFT RUNOUT
1. Measure camshaft runout at the center journal.
Runout (Total indicator reading):
Standard
Less than 0.02 mm (0.0008 in)
Limit
0.04 mm (0.0016 in)
2. If it exceeds the limit, replace camshaft.
CAMSHAFT CAM HEIGHT
1. Measure camshaft cam height.
Standard cam height:
Intake 42.505 - 42.695 mm (1.673 - 1.681 in)
Exhaust 40.905 - 41.095 mm (1.610 - 1.618 in)
Cam height wear limit:
Intake & Exhaust
0.2 mm (0.008 in)
2. If wear is beyond the limit, replace camshaft.
CAMSHAFT JOURNAL CLEARANCE
1. Install camshaft bracket and tighten bolts to the specified
torque.
2. Measure inner diameter of camshaft bearing.
Standard inner diameter:
#1 to #5 journals
28.000 - 28.025 mm (1.1024 - 1.1033 in)
SEM926C
SEM549A
SEM295D
CYLINDER HEADKA24DE
Inspection (Cont'd)
EM-2027
Page 459 of 666
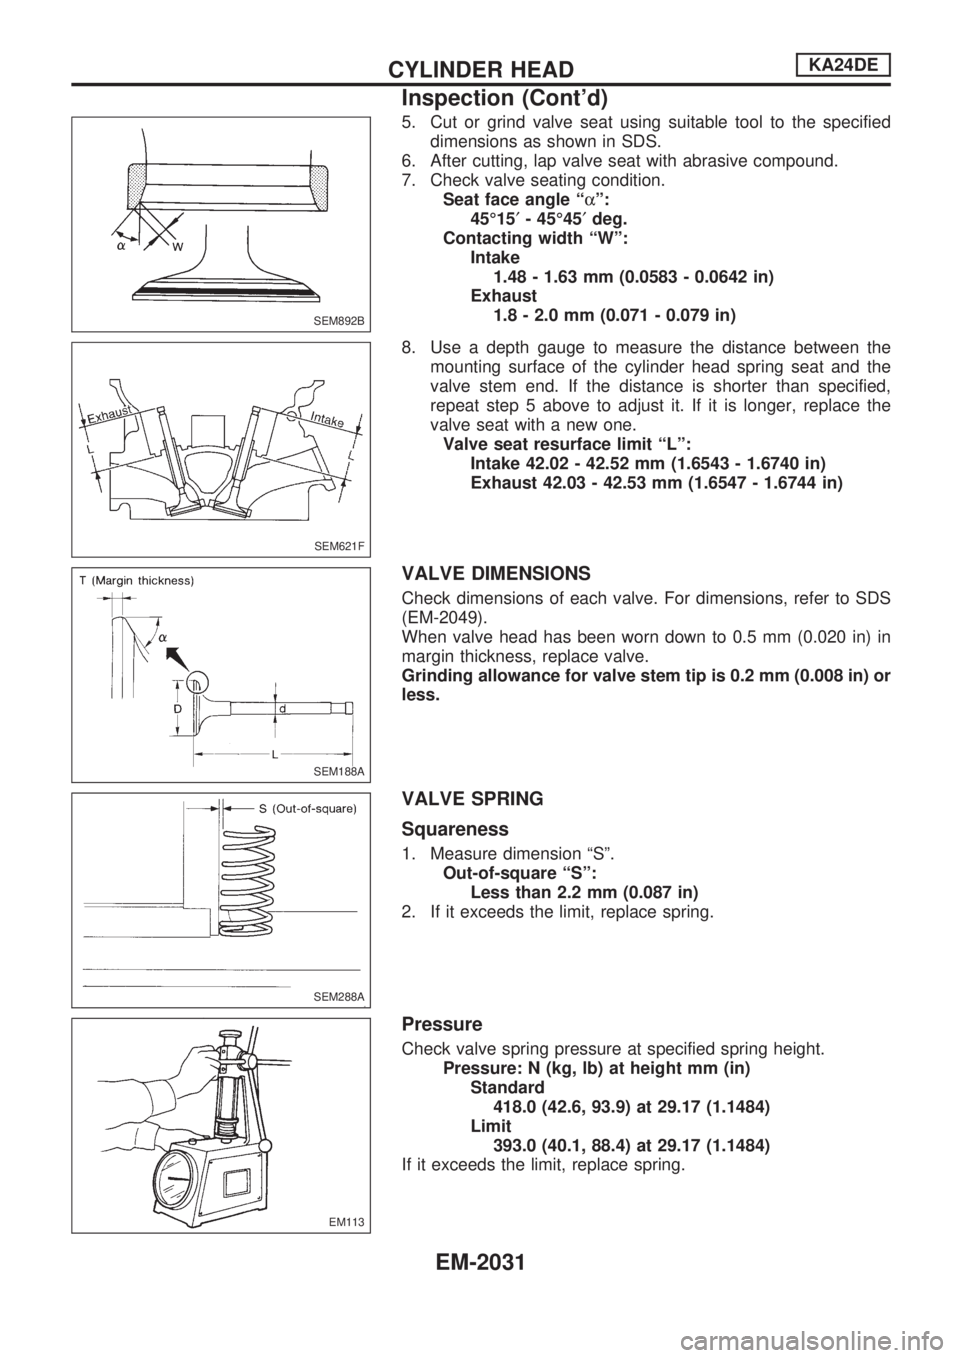
5. Cut or grind valve seat using suitable tool to the specified
dimensions as shown in SDS.
6. After cutting, lap valve seat with abrasive compound.
7. Check valve seating condition.
Seat face angle ªaº:
45É15¢- 45É45¢deg.
Contacting width ªWº:
Intake
1.48 - 1.63 mm (0.0583 - 0.0642 in)
Exhaust
1.8 - 2.0 mm (0.071 - 0.079 in)
8. Use a depth gauge to measure the distance between the
mounting surface of the cylinder head spring seat and the
valve stem end. If the distance is shorter than specified,
repeat step 5 above to adjust it. If it is longer, replace the
valve seat with a new one.
Valve seat resurface limit ªLº:
Intake 42.02 - 42.52 mm (1.6543 - 1.6740 in)
Exhaust 42.03 - 42.53 mm (1.6547 - 1.6744 in)
VALVE DIMENSIONS
Check dimensions of each valve. For dimensions, refer to SDS
(EM-2049).
When valve head has been worn down to 0.5 mm (0.020 in) in
margin thickness, replace valve.
Grinding allowance for valve stem tip is 0.2 mm (0.008 in) or
less.
VALVE SPRING
Squareness
1. Measure dimension ªSº.
Out-of-square ªSº:
Less than 2.2 mm (0.087 in)
2. If it exceeds the limit, replace spring.
Pressure
Check valve spring pressure at specified spring height.
Pressure: N (kg, lb) at height mm (in)
Standard
418.0 (42.6, 93.9) at 29.17 (1.1484)
Limit
393.0 (40.1, 88.4) at 29.17 (1.1484)
If it exceeds the limit, replace spring.
SEM892B
SEM621F
SEM188A
SEM288A
EM113
CYLINDER HEADKA24DE
Inspection (Cont'd)
EM-2031
Page 469 of 666
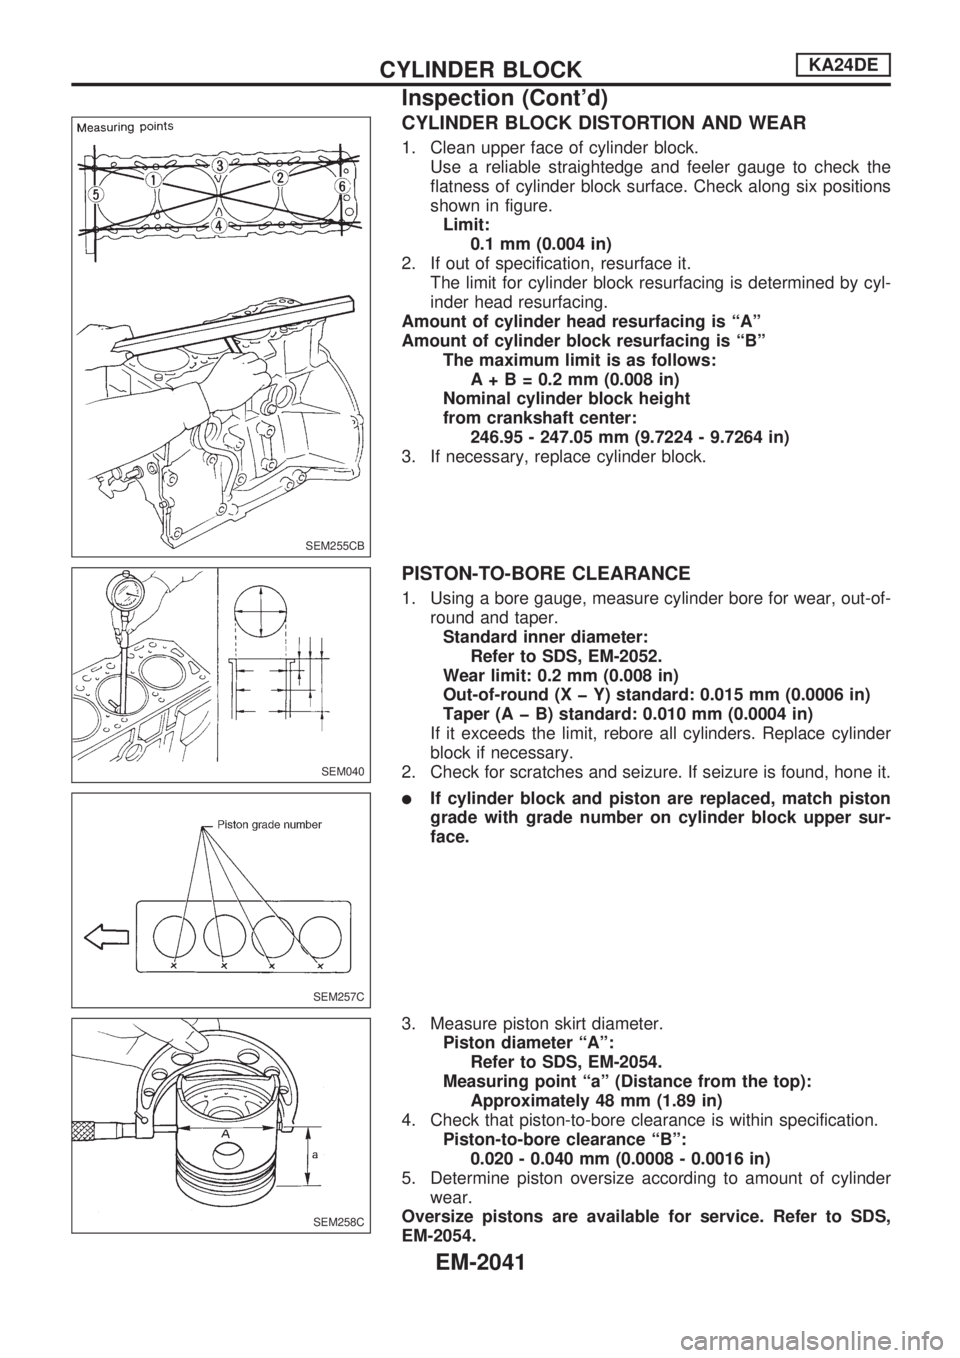
CYLINDER BLOCK DISTORTION AND WEAR
1. Clean upper face of cylinder block.
Use a reliable straightedge and feeler gauge to check the
flatness of cylinder block surface. Check along six positions
shown in figure.
Limit:
0.1 mm (0.004 in)
2. If out of specification, resurface it.
The limit for cylinder block resurfacing is determined by cyl-
inder head resurfacing.
Amount of cylinder head resurfacing is ªAº
Amount of cylinder block resurfacing is ªBº
The maximum limit is as follows:
A+B=0.2mm(0.008 in)
Nominal cylinder block height
from crankshaft center:
246.95 - 247.05 mm (9.7224 - 9.7264 in)
3. If necessary, replace cylinder block.
PISTON-TO-BORE CLEARANCE
1. Using a bore gauge, measure cylinder bore for wear, out-of-
round and taper.
Standard inner diameter:
Refer to SDS, EM-2052.
Wear limit: 0.2 mm (0.008 in)
Out-of-round (X þ Y) standard: 0.015 mm (0.0006 in)
Taper (A þ B) standard: 0.010 mm (0.0004 in)
If it exceeds the limit, rebore all cylinders. Replace cylinder
block if necessary.
2. Check for scratches and seizure. If seizure is found, hone it.
lIf cylinder block and piston are replaced, match piston
grade with grade number on cylinder block upper sur-
face.
3. Measure piston skirt diameter.
Piston diameter ªAº:
Refer to SDS, EM-2054.
Measuring point ªaº (Distance from the top):
Approximately 48 mm (1.89 in)
4. Check that piston-to-bore clearance is within specification.
Piston-to-bore clearance ªBº:
0.020 - 0.040 mm (0.0008 - 0.0016 in)
5. Determine piston oversize according to amount of cylinder
wear.
Oversize pistons are available for service. Refer to SDS,
EM-2054.
SEM255CB
SEM040
SEM257C
SEM258C
CYLINDER BLOCKKA24DE
Inspection (Cont'd)
EM-2041
Page 478 of 666
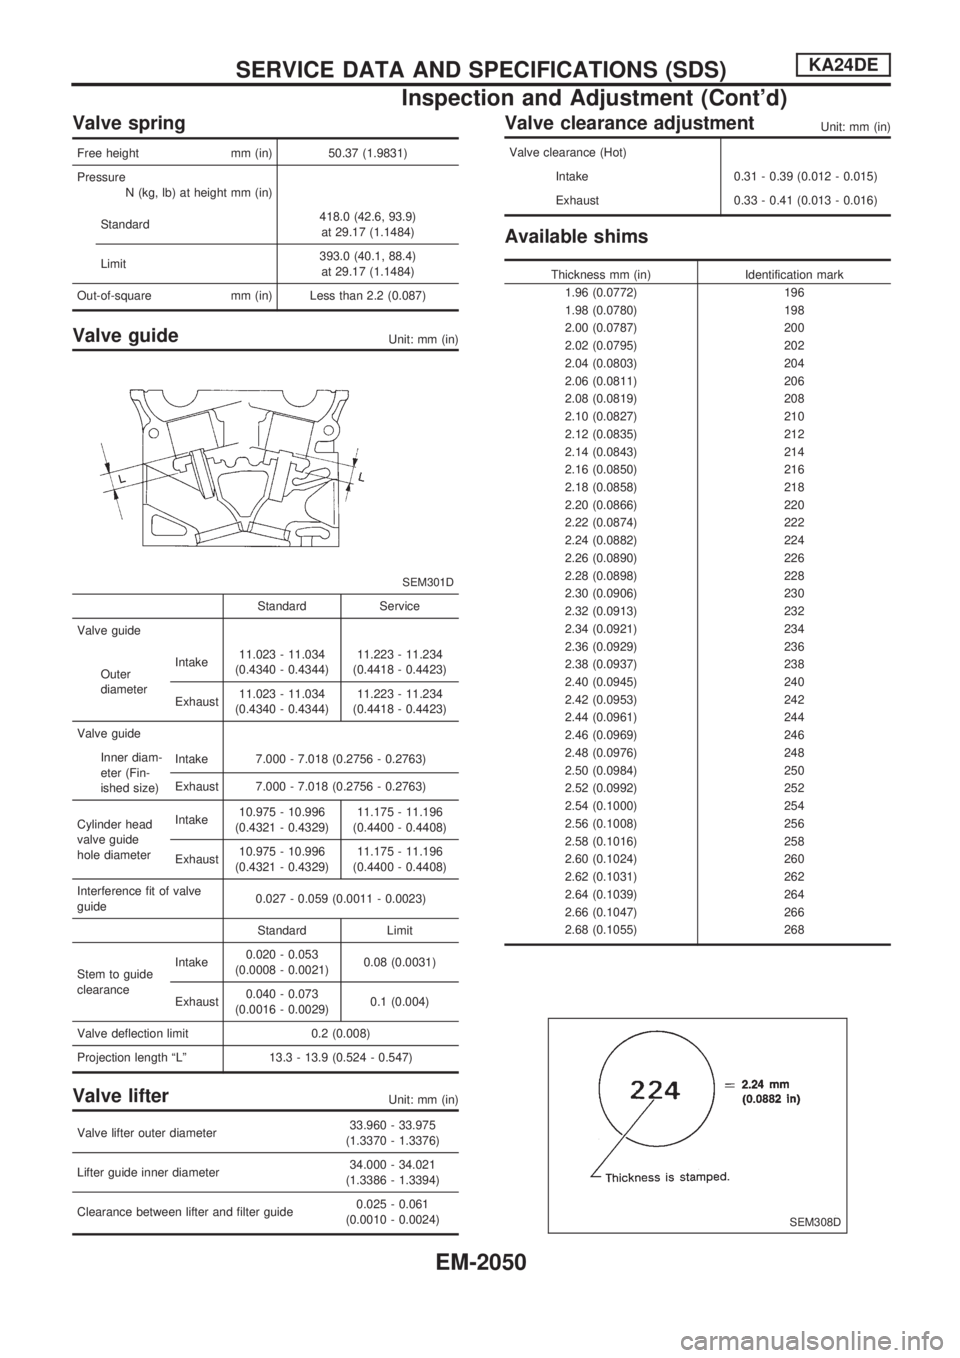
Valve spring
Free height mm (in) 50.37 (1.9831)
Pressure
N (kg, lb) at height mm (in)
Standard418.0 (42.6, 93.9)
at 29.17 (1.1484)
Limit393.0 (40.1, 88.4)
at 29.17 (1.1484)
Out-of-square mm (in) Less than 2.2 (0.087)
Valve guideUnit: mm (in)
SEM301D
Standard Service
Valve guide
Outer
diameterIntake11.023 - 11.034
(0.4340 - 0.4344)11.223 - 11.234
(0.4418 - 0.4423)
Exhaust11.023 - 11.034
(0.4340 - 0.4344)11.223 - 11.234
(0.4418 - 0.4423)
Valve guide
Inner diam-
eter (Fin-
ished size)Intake 7.000 - 7.018 (0.2756 - 0.2763)
Exhaust 7.000 - 7.018 (0.2756 - 0.2763)
Cylinder head
valve guide
hole diameterIntake10.975 - 10.996
(0.4321 - 0.4329)11.175 - 11.196
(0.4400 - 0.4408)
Exhaust10.975 - 10.996
(0.4321 - 0.4329)11.175 - 11.196
(0.4400 - 0.4408)
Interference fit of valve
guide0.027 - 0.059 (0.0011 - 0.0023)
Standard Limit
Stem to guide
clearanceIntake0.020 - 0.053
(0.0008 - 0.0021)0.08 (0.0031)
Exhaust0.040 - 0.073
(0.0016 - 0.0029)0.1 (0.004)
Valve deflection limit 0.2 (0.008)
Projection length ªLº 13.3 - 13.9 (0.524 - 0.547)
Valve lifterUnit: mm (in)
Valve lifter outer diameter33.960 - 33.975
(1.3370 - 1.3376)
Lifter guide inner diameter34.000 - 34.021
(1.3386 - 1.3394)
Clearance between lifter and filter guide0.025 - 0.061
(0.0010 - 0.0024)
Valve clearance adjustmentUnit: mm (in)
Valve clearance (Hot)
Intake 0.31 - 0.39 (0.012 - 0.015)
Exhaust 0.33 - 0.41 (0.013 - 0.016)
Available shims
Thickness mm (in) Identification mark
1.96 (0.0772) 196
1.98 (0.0780) 198
2.00 (0.0787) 200
2.02 (0.0795) 202
2.04 (0.0803) 204
2.06 (0.0811) 206
2.08 (0.0819) 208
2.10 (0.0827) 210
2.12 (0.0835) 212
2.14 (0.0843) 214
2.16 (0.0850) 216
2.18 (0.0858) 218
2.20 (0.0866) 220
2.22 (0.0874) 222
2.24 (0.0882) 224
2.26 (0.0890) 226
2.28 (0.0898) 228
2.30 (0.0906) 230
2.32 (0.0913) 232
2.34 (0.0921) 234
2.36 (0.0929) 236
2.38 (0.0937) 238
2.40 (0.0945) 240
2.42 (0.0953) 242
2.44 (0.0961) 244
2.46 (0.0969) 246
2.48 (0.0976) 248
2.50 (0.0984) 250
2.52 (0.0992) 252
2.54 (0.1000) 254
2.56 (0.1008) 256
2.58 (0.1016) 258
2.60 (0.1024) 260
2.62 (0.1031) 262
2.64 (0.1039) 264
2.66 (0.1047) 266
2.68 (0.1055) 268
SEM308D
SERVICE DATA AND SPECIFICATIONS (SDS)KA24DE
Inspection and Adjustment (Cont'd)
EM-2050
Page 479 of 666
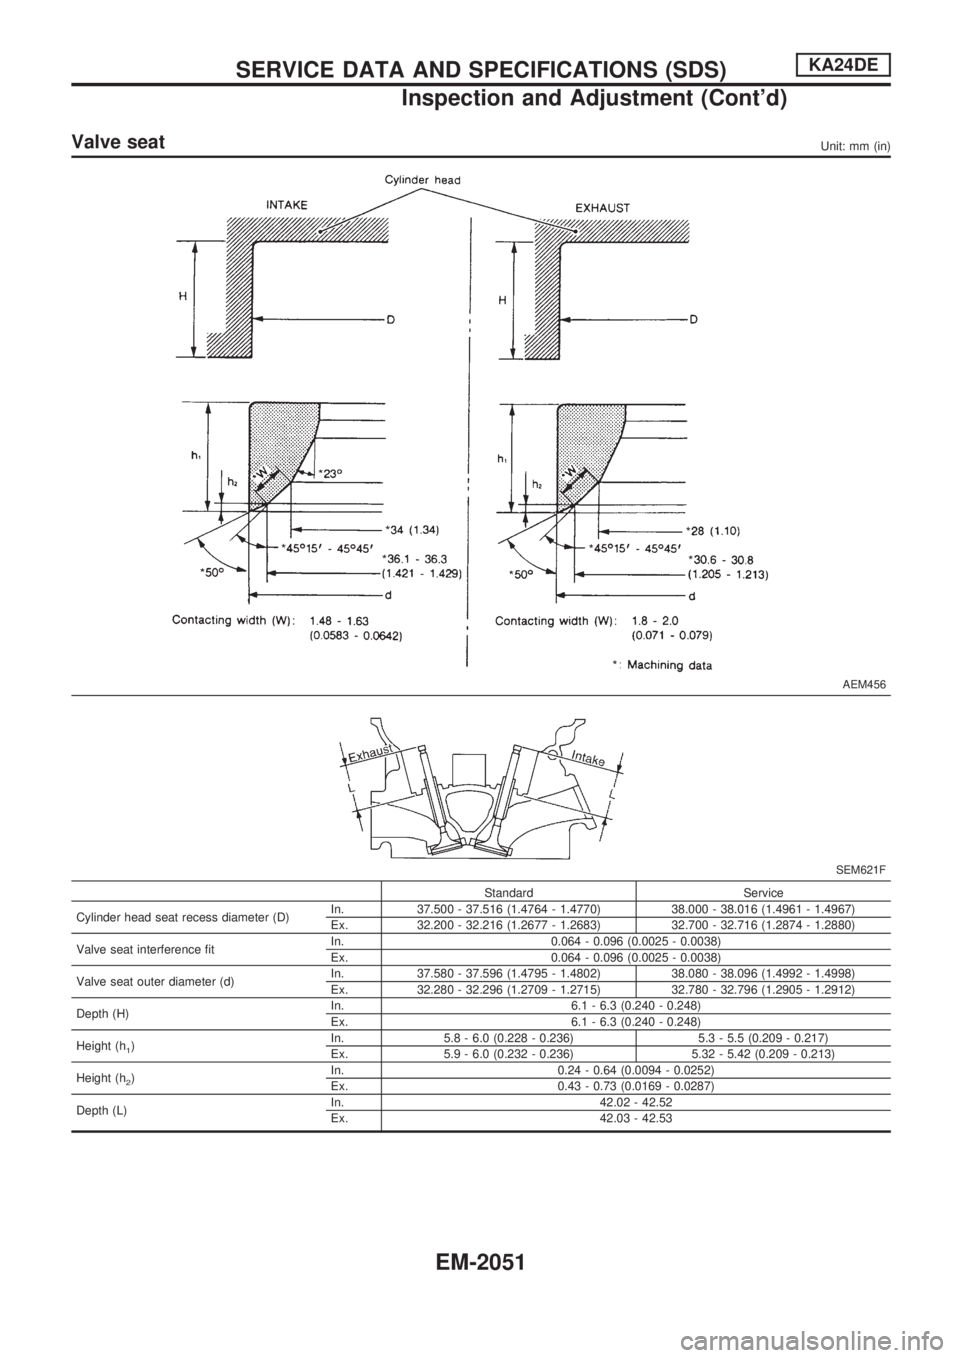
Valve seatUnit: mm (in)
AEM456
SEM621F
Standard Service
Cylinder head seat recess diameter (D)In. 37.500 - 37.516 (1.4764 - 1.4770) 38.000 - 38.016 (1.4961 - 1.4967)
Ex. 32.200 - 32.216 (1.2677 - 1.2683) 32.700 - 32.716 (1.2874 - 1.2880)
Valve seat interference fitIn. 0.064 - 0.096 (0.0025 - 0.0038)
Ex. 0.064 - 0.096 (0.0025 - 0.0038)
Valve seat outer diameter (d)In. 37.580 - 37.596 (1.4795 - 1.4802) 38.080 - 38.096 (1.4992 - 1.4998)
Ex. 32.280 - 32.296 (1.2709 - 1.2715) 32.780 - 32.796 (1.2905 - 1.2912)
Depth (H)In. 6.1 - 6.3 (0.240 - 0.248)
Ex. 6.1 - 6.3 (0.240 - 0.248)
Height (h
1)In. 5.8 - 6.0 (0.228 - 0.236) 5.3 - 5.5 (0.209 - 0.217)
Ex. 5.9 - 6.0 (0.232 - 0.236) 5.32 - 5.42 (0.209 - 0.213)
Height (h
2)In. 0.24 - 0.64 (0.0094 - 0.0252)
Ex. 0.43 - 0.73 (0.0169 - 0.0287)
Depth (L)In. 42.02 - 42.52
Ex. 42.03 - 42.53
SERVICE DATA AND SPECIFICATIONS (SDS)KA24DE
Inspection and Adjustment (Cont'd)
EM-2051
Page 480 of 666
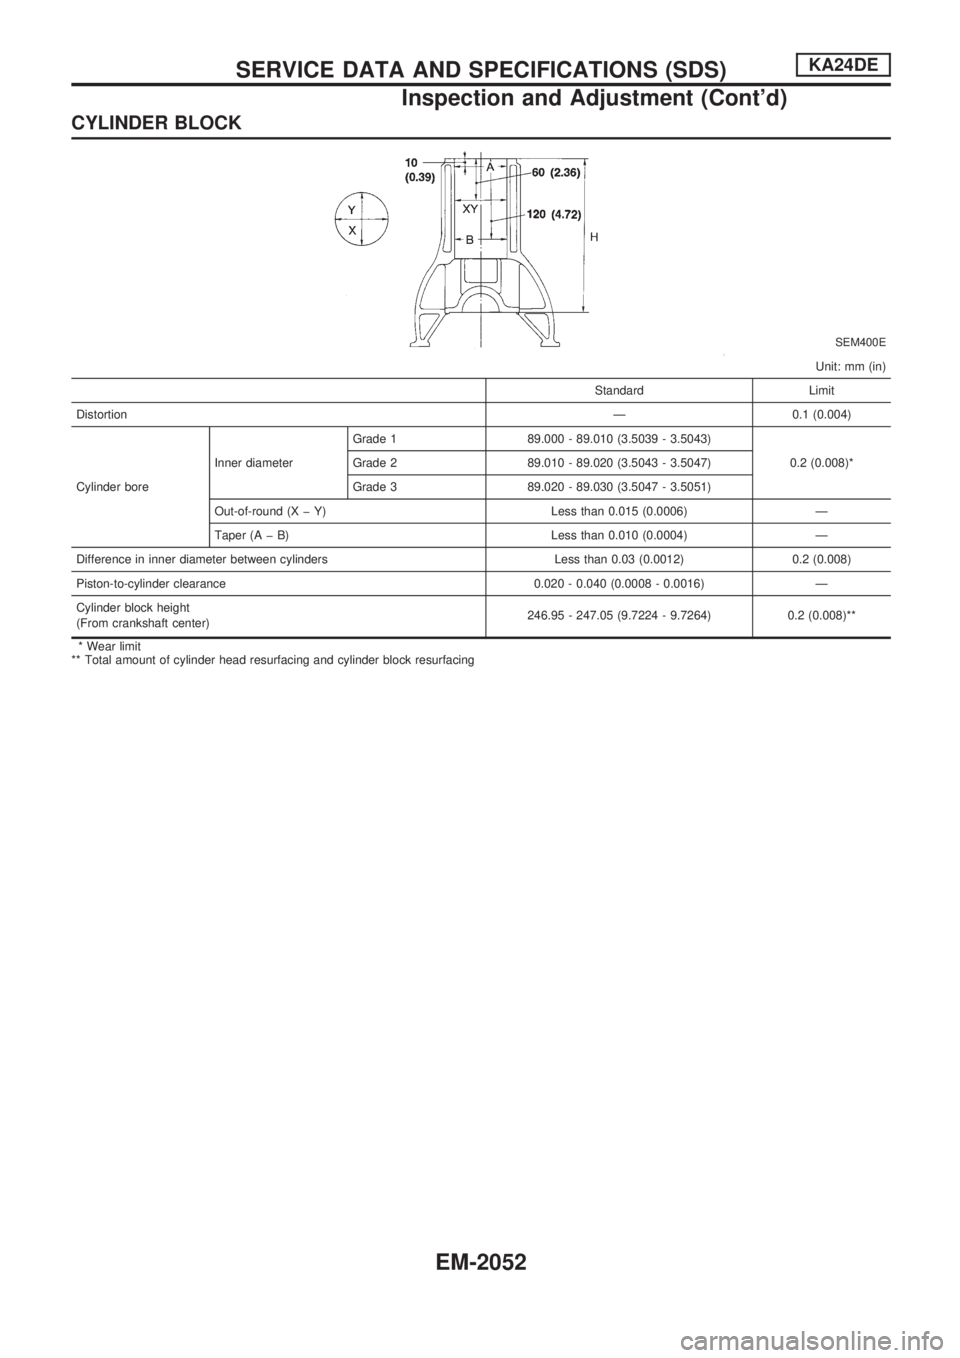
CYLINDER BLOCK
SEM400E
Unit: mm (in)
Standard Limit
DistortionÐ 0.1 (0.004)
Cylinder boreInner diameterGrade 1 89.000 - 89.010 (3.5039 - 3.5043)
0.2 (0.008)* Grade 2 89.010 - 89.020 (3.5043 - 3.5047)
Grade 3 89.020 - 89.030 (3.5047 - 3.5051)
Out-of-round (X þ Y) Less than 0.015 (0.0006) Ð
Taper (A þ B) Less than 0.010 (0.0004) Ð
Difference in inner diameter between cylinders Less than 0.03 (0.0012) 0.2 (0.008)
Piston-to-cylinder clearance 0.020 - 0.040 (0.0008 - 0.0016) Ð
Cylinder block height
(From crankshaft center)246.95 - 247.05 (9.7224 - 9.7264) 0.2 (0.008)**
* Wear limit
** Total amount of cylinder head resurfacing and cylinder block resurfacing
SERVICE DATA AND SPECIFICATIONS (SDS)KA24DE
Inspection and Adjustment (Cont'd)
EM-2052
Page 481 of 666
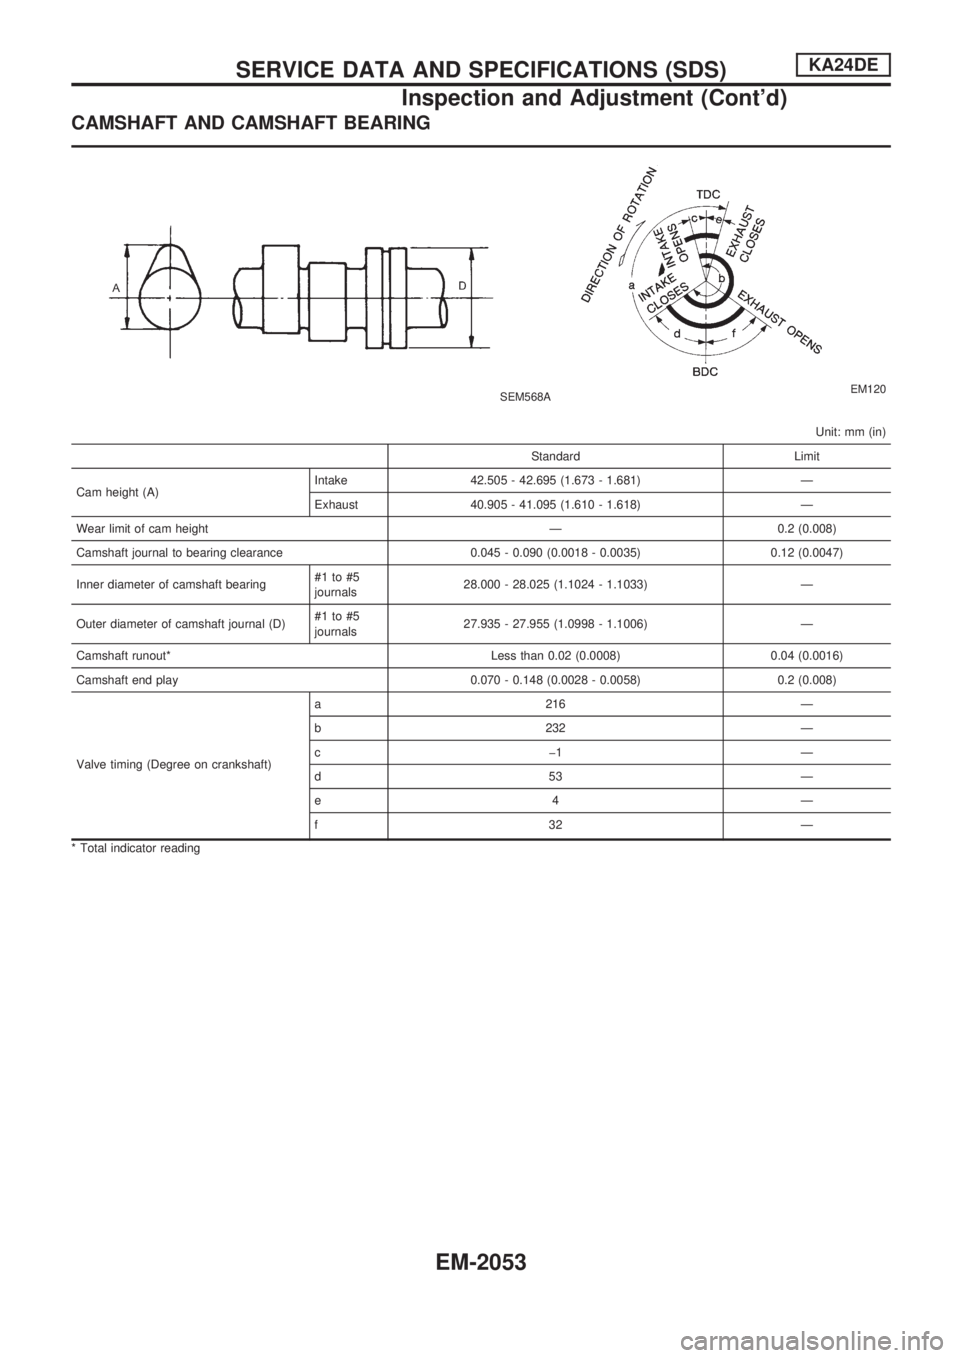
CAMSHAFT AND CAMSHAFT BEARING
SEM568AEM120
Unit: mm (in)
Standard Limit
Cam height (A)Intake 42.505 - 42.695 (1.673 - 1.681) Ð
Exhaust 40.905 - 41.095 (1.610 - 1.618) Ð
Wear limit of cam height Ð 0.2 (0.008)
Camshaft journal to bearing clearance 0.045 - 0.090 (0.0018 - 0.0035) 0.12 (0.0047)
Inner diameter of camshaft bearing#1 to #5
journals28.000 - 28.025 (1.1024 - 1.1033) Ð
Outer diameter of camshaft journal (D)#1 to #5
journals27.935 - 27.955 (1.0998 - 1.1006) Ð
Camshaft runout* Less than 0.02 (0.0008) 0.04 (0.0016)
Camshaft end play 0.070 - 0.148 (0.0028 - 0.0058) 0.2 (0.008)
Valve timing (Degree on crankshaft)a 216 Ð
b 232 Ð
cþ1 Ð
d53 Ð
e4 Ð
f32 Ð
* Total indicator reading
SERVICE DATA AND SPECIFICATIONS (SDS)KA24DE
Inspection and Adjustment (Cont'd)
EM-2053
Page 488 of 666
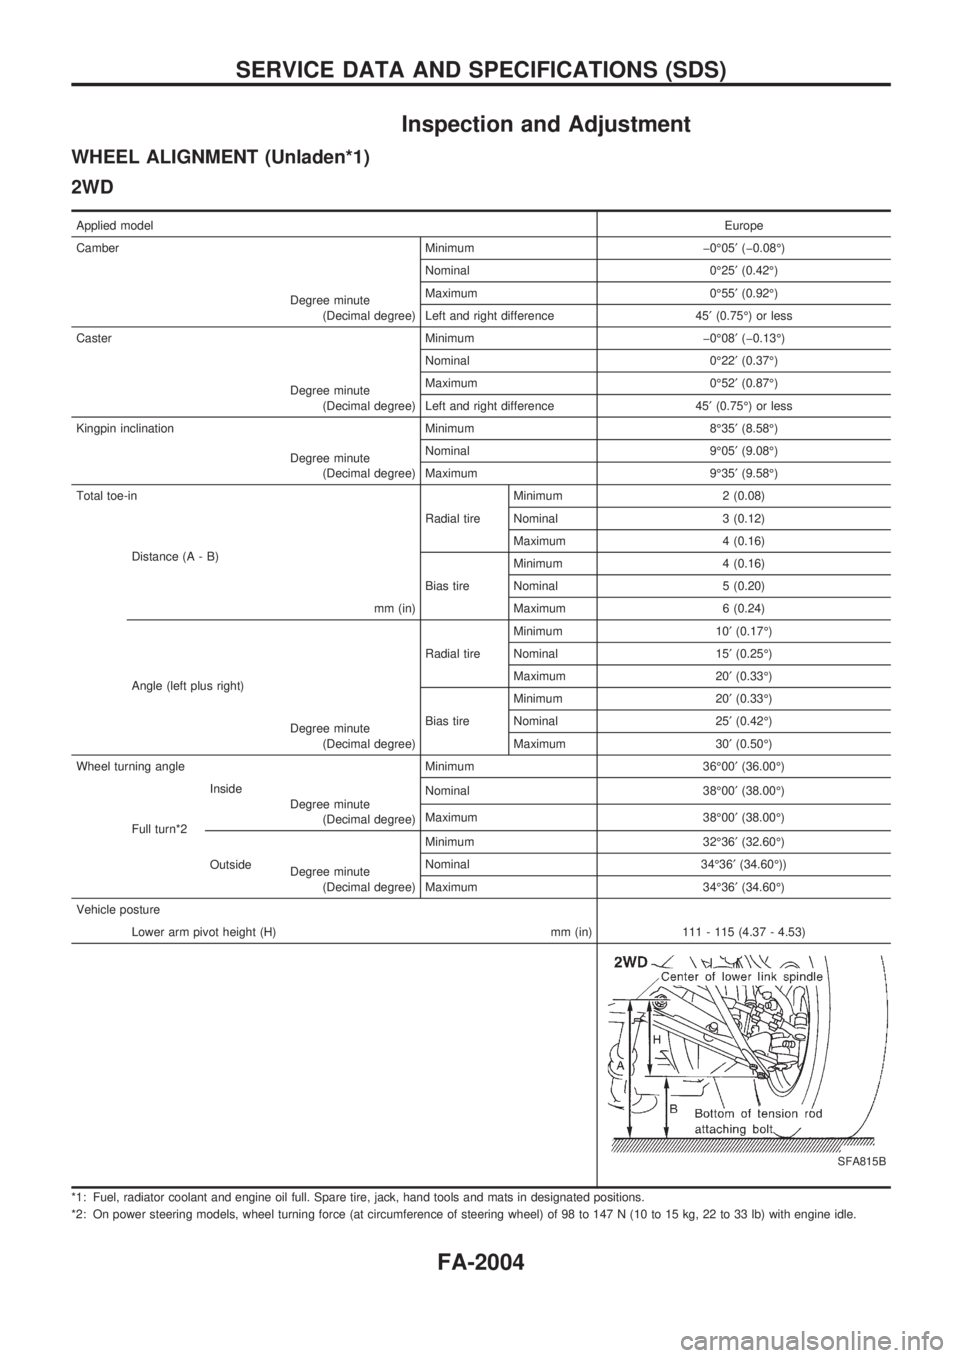
Inspection and Adjustment
WHEEL ALIGNMENT (Unladen*1)
2WD
Applied modelEurope
Camber Minimum þ0É05¢(þ0.08É)
Degree minute
(Decimal degree)Nominal 0É25¢(0.42É)
Maximum 0É55¢(0.92É)
Left and right difference 45¢(0.75É) or less
Caster Minimum þ0É08¢(þ0.13É)
Degree minute
(Decimal degree)Nominal 0É22¢(0.37É)
Maximum 0É52¢(0.87É)
Left and right difference 45¢(0.75É) or less
Kingpin inclination Minimum 8É35¢(8.58É)
Degree minute
(Decimal degree)Nominal 9É05¢(9.08É)
Maximum 9É35¢(9.58É)
Total toe-in
Radial tireMinimum 2 (0.08)
Distance (A - B)
mm (in)Nominal 3 (0.12)
Maximum 4 (0.16)
Bias tireMinimum 4 (0.16)
Nominal 5 (0.20)
Maximum 6 (0.24)
Angle (left plus right)
Degree minute
(Decimal degree)Radial tireMinimum 10¢(0.17É)
Nominal 15¢(0.25É)
Maximum 20¢(0.33É)
Bias tireMinimum 20¢(0.33É)
Nominal 25¢(0.42É)
Maximum 30¢(0.50É)
Wheel turning angle Minimum 36É00¢(36.00É)
Full turn*2Inside
Degree minute
(Decimal degree)Nominal 38É00¢(38.00É)
Maximum 38É00¢(38.00É)
OutsideMinimum 32É36¢(32.60É)
Degree minute
(Decimal degree)Nominal 34É36¢(34.60É))
Maximum 34É36¢(34.60É)
Vehicle posture
Lower arm pivot height (H) mm (in) 111 - 115 (4.37 - 4.53)
SFA815B
*1: Fuel, radiator coolant and engine oil full. Spare tire, jack, hand tools and mats in designated positions.
*2: On power steering models, wheel turning force (at circumference of steering wheel) of 98 to 147 N (10 to 15 kg, 22 to 33 lb) with engine idle.
SERVICE DATA AND SPECIFICATIONS (SDS)
FA-2004