1999 DODGE NEON torque
[x] Cancel search: torquePage 22 of 1200
DESCRIPTION AND OPERATION
FRONT SUSPENSION
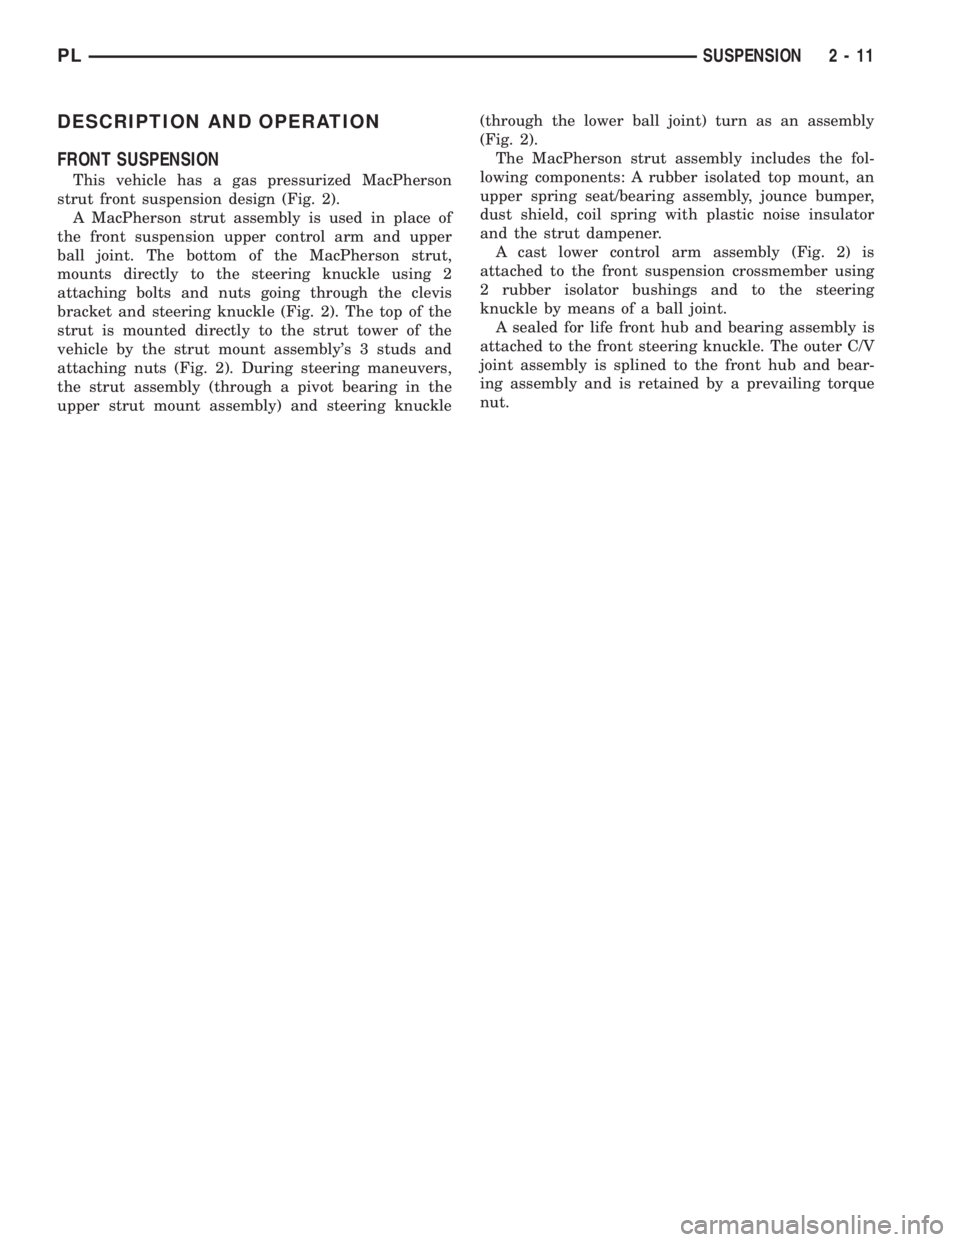
This vehicle has a gas pressurized MacPherson
strut front suspension design (Fig. 2).
A MacPherson strut assembly is used in place of
the front suspension upper control arm and upper
ball joint. The bottom of the MacPherson strut,
mounts directly to the steering knuckle using 2
attaching bolts and nuts going through the clevis
bracket and steering knuckle (Fig. 2). The top of the
strut is mounted directly to the strut tower of the
vehicle by the strut mount assembly's 3 studs and
attaching nuts (Fig. 2). During steering maneuvers,
the strut assembly (through a pivot bearing in the
upper strut mount assembly) and steering knuckle(through the lower ball joint) turn as an assembly
(Fig. 2).
The MacPherson strut assembly includes the fol-
lowing components: A rubber isolated top mount, an
upper spring seat/bearing assembly, jounce bumper,
dust shield, coil spring with plastic noise insulator
and the strut dampener.
A cast lower control arm assembly (Fig. 2) is
attached to the front suspension crossmember using
2 rubber isolator bushings and to the steering
knuckle by means of a ball joint.
A sealed for life front hub and bearing assembly is
attached to the front steering knuckle. The outer C/V
joint assembly is splined to the front hub and bear-
ing assembly and is retained by a prevailing torque
nut.
PLSUSPENSION 2 - 11
Page 24 of 1200
COMPETITION PACKAGE SUSPENSION
On vehicles that are equipped with the optional
competition package, special front struts are used.
The front struts used on a vehicle equipped with
the competition package are adjustable. The adjust-
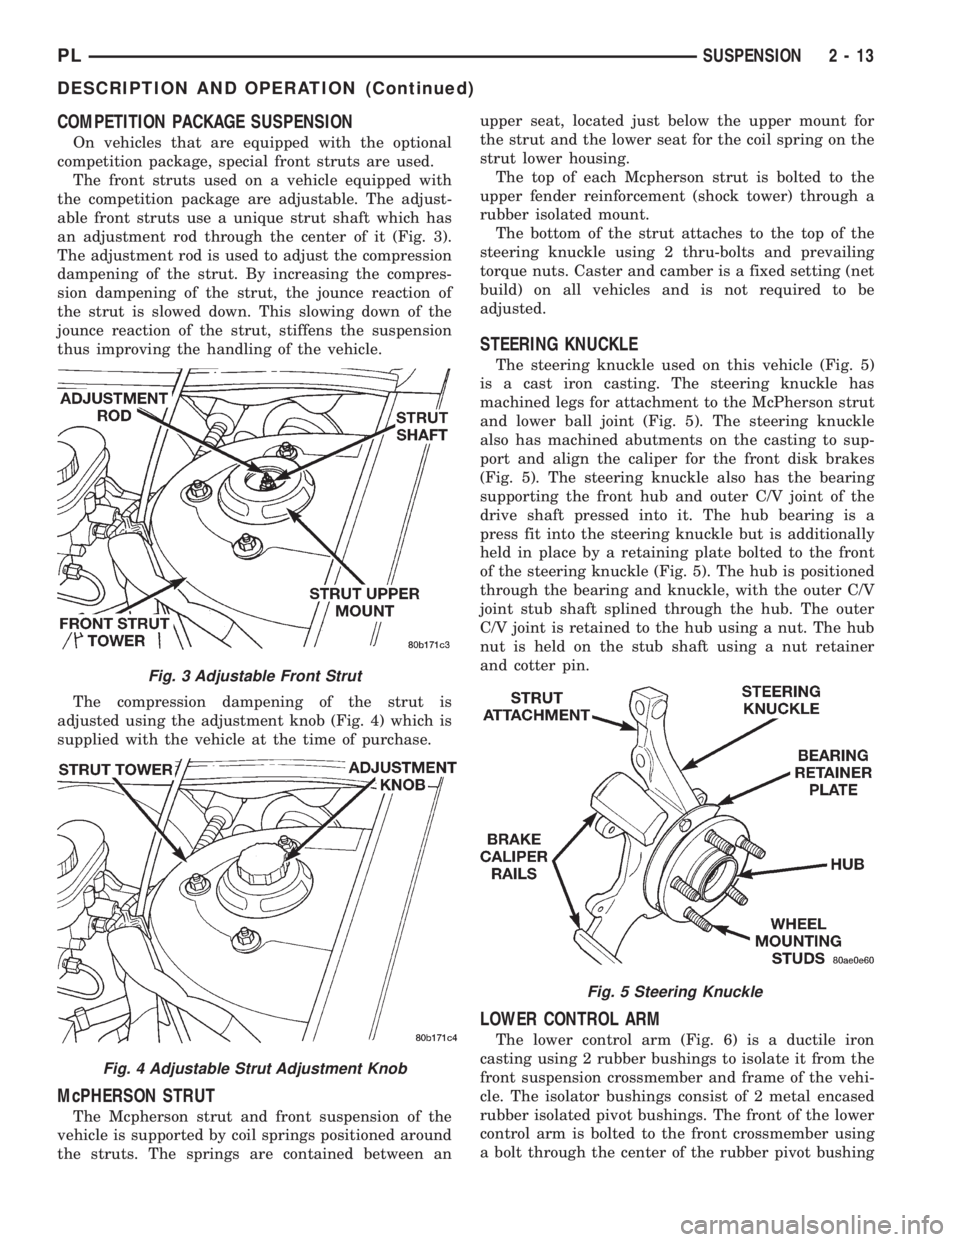
able front struts use a unique strut shaft which has
an adjustment rod through the center of it (Fig. 3).
The adjustment rod is used to adjust the compression
dampening of the strut. By increasing the compres-
sion dampening of the strut, the jounce reaction of
the strut is slowed down. This slowing down of the
jounce reaction of the strut, stiffens the suspension
thus improving the handling of the vehicle.
The compression dampening of the strut is
adjusted using the adjustment knob (Fig. 4) which is
supplied with the vehicle at the time of purchase.
McPHERSON STRUT
The Mcpherson strut and front suspension of the
vehicle is supported by coil springs positioned around
the struts. The springs are contained between anupper seat, located just below the upper mount for
the strut and the lower seat for the coil spring on the
strut lower housing.
The top of each Mcpherson strut is bolted to the
upper fender reinforcement (shock tower) through a
rubber isolated mount.
The bottom of the strut attaches to the top of the
steering knuckle using 2 thru-bolts and prevailing
torque nuts. Caster and camber is a fixed setting (net
build) on all vehicles and is not required to be
adjusted.
STEERING KNUCKLE
The steering knuckle used on this vehicle (Fig. 5)
is a cast iron casting. The steering knuckle has
machined legs for attachment to the McPherson strut
and lower ball joint (Fig. 5). The steering knuckle
also has machined abutments on the casting to sup-
port and align the caliper for the front disk brakes
(Fig. 5). The steering knuckle also has the bearing
supporting the front hub and outer C/V joint of the
drive shaft pressed into it. The hub bearing is a
press fit into the steering knuckle but is additionally
held in place by a retaining plate bolted to the front
of the steering knuckle (Fig. 5). The hub is positioned
through the bearing and knuckle, with the outer C/V
joint stub shaft splined through the hub. The outer
C/V joint is retained to the hub using a nut. The hub
nut is held on the stub shaft using a nut retainer
and cotter pin.
LOWER CONTROL ARM
The lower control arm (Fig. 6) is a ductile iron
casting using 2 rubber bushings to isolate it from the
front suspension crossmember and frame of the vehi-
cle. The isolator bushings consist of 2 metal encased
rubber isolated pivot bushings. The front of the lower
control arm is bolted to the front crossmember using
a bolt through the center of the rubber pivot bushing
Fig. 3 Adjustable Front Strut
Fig. 4 Adjustable Strut Adjustment Knob
Fig. 5 Steering Knuckle
PLSUSPENSION 2 - 13
DESCRIPTION AND OPERATION (Continued)
Page 27 of 1200

nent removal and installation sections in this group
of the service manual.
BALL JOINT ASSEMBLY
With the weight of the vehicle resting on the road
wheels. Grasp the grease fitting as shown in (Fig. 11)
and with no mechanical assistance or added force
attempt to move the grease fitting.
If the ball joint is worn the grease fitting will move
easily. If movement is noted, replacement of the ball
joint is recommended.
STABILIZER BAR
Inspect for broken or distorted sway bar bushings,
bushing retainers, and worn or damaged sway bar to
strut attaching links. If sway bar to front suspension
cradle bushing replacement is required, bushing can
be removed from sway bar by opening slit and peel-
ing bushing off sway bar.
HUB/BEARING
The hub bearing is designed for the life of the vehi-
cle and requires no type of periodic maintenance. The
following procedure may be used for diagnosing the
condition of the hub bearing.
With the wheel, disc brake caliper, and brake rotor
removed, rotate the wheel hub. Any roughness or
resistance to rotation may indicate dirt intrusion or a
failed hub bearing. If the hub bearing exhibits any of
these conditions during diagnosis, the hub bearing
will require replacement, the bearing is not service-
able.
Damaged bearing seals and the resulting excessive
grease loss may also require bearing replacement.
Moderate grease weapage from the hub bearing is
considered normal and should not require replace-
ment of the hub bearing.
REMOVAL AND INSTALLATION
MCPHERSON STRUT
REMOVE
WARNING: DO NOT REMOVE STRUT ROD NUT
WHILE STRUT ASSEMBLY IS INSTALLED IN VEHI-
CLE, OR BEFORE STRUT ASSEMBLY SPRING IS
COMPRESSED.
(1) Loosen wheel nuts.
(2) Raise vehicle on jack stands or centered on a
frame contact type hoist. See Hoisting in the Lubri-
cation and Maintenance section of this manual, for
the required lifting procedure to be used for this
vehicle.
(3) Remove wheel and tire assembly from location
on front of vehicle requiring strut removal.
(4) If both strut assemblies are removed, mark the
strut assemblies right or left according to which side
of the vehicle they were removed from.
(5) Remove hydraulic brake hose routing bracket
and attaching screw from strut damper bracket. If
vehicle is equipped with Anti-Lock brakes, hydraulic
hose routing bracket is combined with speed sensor
cable routing bracket (Fig. 12).
CAUTION: The steering knuckle to strut assembly
attaching bolts are serrated and must not be turned
during removal. Remove nuts while holding bolts
stationary in the steering knuckles.
(6) Remove the 2 bolts (Fig. 13) attaching the strut
to the steering knuckle.
(7) Remove the 3 nuts attaching the upper mount
of the strut (Fig. 14) to the strut tower of the vehicle
.
INSTALL
(1) Install strut assembly into strut tower, aligning
the 3 studs on the upper strut mount into the holes
in shock tower. Install the 3 upper strut mount
retaining nut and washer assemblies (Fig. 14).
Torque the 3 nuts to 31 N´m (23 ft. lbs.).
CAUTION: The steering knuckle to strut assembly
attaching bolts are serrated and must not be turned
during installation. Install nuts while holding bolts
stationary in the steering knuckles.
(2) Align strut assembly with steering knuckle.
Position arm of steering knuckle into strut assembly,
aligning the strut assembly to steering knuckle
mounting holes. Install the 2 strut assembly to steer-
ing knuckle attaching bolts (Fig. 13). Attaching bolts
should be installed with the nuts facing the front of
the vehicle. Torque both attaching bolts to 53 N´m
Fig. 11 Checking Ball Joint Wear
2 - 16 SUSPENSIONPL
DIAGNOSIS AND TESTING (Continued)
Page 28 of 1200

(40 ft. lbs.) plus an additional 1/4 turn after specified
torque is met.
(3) Install hydraulic brake hose routing bracket
and attaching screw onto strut damper bracket. Ifvehicle is equipped with Anti-Lock brakes, hydraulic
hose routing bracket is combined with speed sensor
cable routing bracket (Fig. 12). Torque bracket
attaching bolts (Fig. 12) to 13 N´m (10 ft. lbs.).
(4) Tighten the wheel mounting stud nuts in
proper sequence until all nuts are torqued to half
specification. Then repeat the tightening sequence to
the full specified torque of 135 N´m (100 ft. lbs.).
STEERING KNUCKLE
REMOVE
(1) Remove cotter pin, nut lock, and spring washer
(Fig. 15).
CAUTION: Wheel bearing damage will result if
after loosening hub nut, vehicle is rolled on the
ground or the weight of the vehicle is allowed to be
supported by the tires.
Fig. 12 Brake Hose And Speed Sensor Cable
Routing Brackets
Fig. 13 Strut To Steering Knuckle Attaching Bolts
Fig. 14 Strut To Shock Tower Mounting
Fig. 15 Cotter Pin, Nut Lock, And Spring Washer
PLSUSPENSION 2 - 17
REMOVAL AND INSTALLATION (Continued)
Page 31 of 1200
CAUTION: The steering knuckle to strut assembly
attaching bolts are serrated and must not be turned
during removal. Remove nuts while holding bolts
stationary in the steering knuckles.
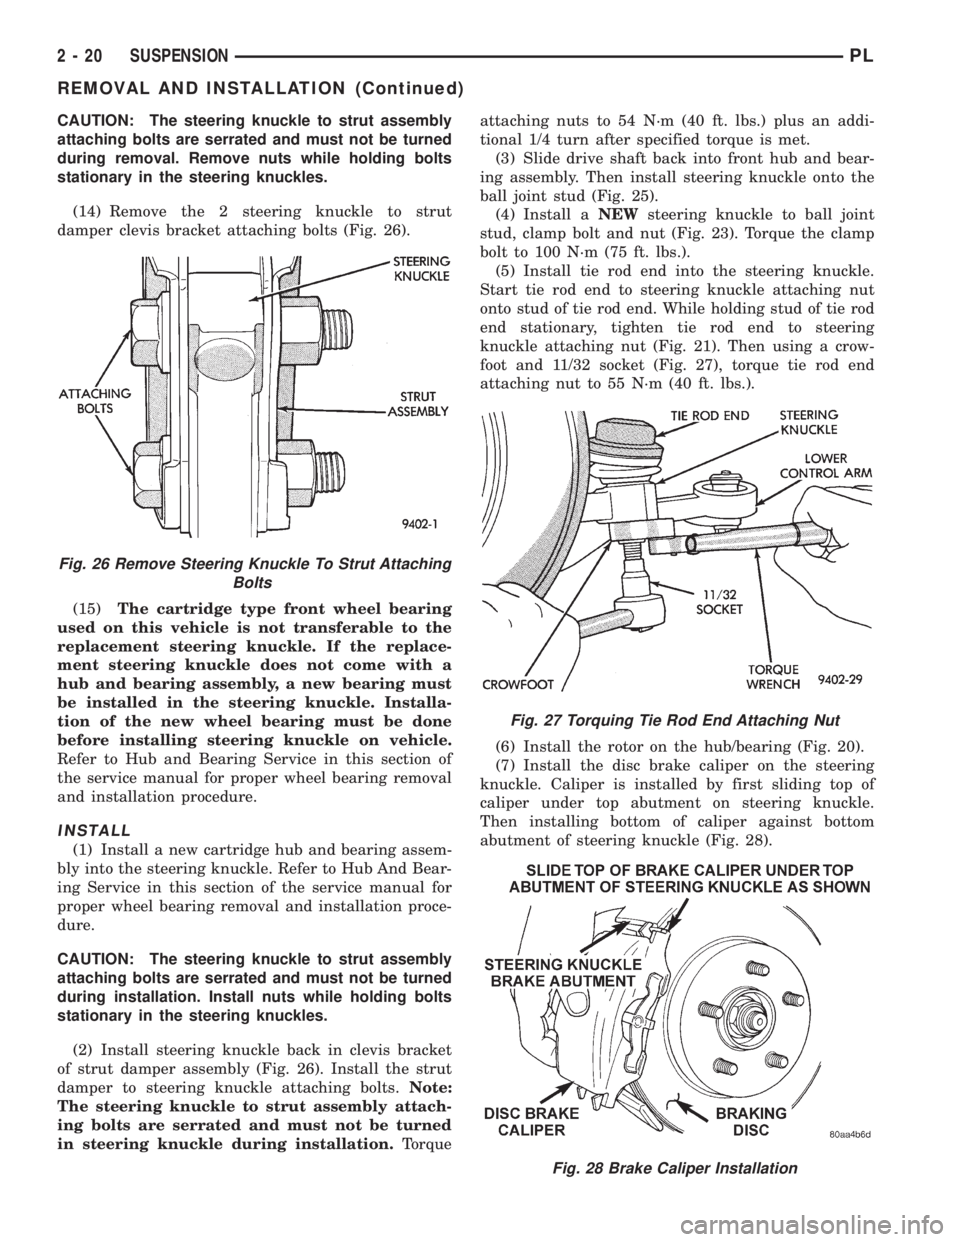
(14) Remove the 2 steering knuckle to strut
damper clevis bracket attaching bolts (Fig. 26).
(15)The cartridge type front wheel bearing
used on this vehicle is not transferable to the
replacement steering knuckle. If the replace-
ment steering knuckle does not come with a
hub and bearing assembly, a new bearing must
be installed in the steering knuckle. Installa-
tion of the new wheel bearing must be done
before installing steering knuckle on vehicle.
Refer to Hub and Bearing Service in this section of
the service manual for proper wheel bearing removal
and installation procedure.
INSTALL
(1) Install a new cartridge hub and bearing assem-
bly into the steering knuckle. Refer to Hub And Bear-
ing Service in this section of the service manual for
proper wheel bearing removal and installation proce-
dure.
CAUTION: The steering knuckle to strut assembly
attaching bolts are serrated and must not be turned
during installation. Install nuts while holding bolts
stationary in the steering knuckles.
(2) Install steering knuckle back in clevis bracket
of strut damper assembly (Fig. 26). Install the strut
damper to steering knuckle attaching bolts.Note:
The steering knuckle to strut assembly attach-
ing bolts are serrated and must not be turned
in steering knuckle during installation.Torqueattaching nuts to 54 N´m (40 ft. lbs.) plus an addi-
tional 1/4 turn after specified torque is met.
(3) Slide drive shaft back into front hub and bear-
ing assembly. Then install steering knuckle onto the
ball joint stud (Fig. 25).
(4) Install aNEWsteering knuckle to ball joint
stud, clamp bolt and nut (Fig. 23). Torque the clamp
bolt to 100 N´m (75 ft. lbs.).
(5) Install tie rod end into the steering knuckle.
Start tie rod end to steering knuckle attaching nut
onto stud of tie rod end. While holding stud of tie rod
end stationary, tighten tie rod end to steering
knuckle attaching nut (Fig. 21). Then using a crow-
foot and 11/32 socket (Fig. 27), torque tie rod end
attaching nut to 55 N´m (40 ft. lbs.).
(6) Install the rotor on the hub/bearing (Fig. 20).
(7) Install the disc brake caliper on the steering
knuckle. Caliper is installed by first sliding top of
caliper under top abutment on steering knuckle.
Then installing bottom of caliper against bottom
abutment of steering knuckle (Fig. 28).
Fig. 28 Brake Caliper Installation
Fig. 26 Remove Steering Knuckle To Strut Attaching
Bolts
Fig. 27 Torquing Tie Rod End Attaching Nut
2 - 20 SUSPENSIONPL
REMOVAL AND INSTALLATION (Continued)
Page 32 of 1200
(8) Install the disc brake caliper to steering
knuckle attaching bolts (Fig. 17). Tighten the caliper
attaching bolts to a torque of 31 N´m (23 ft. lbs.).
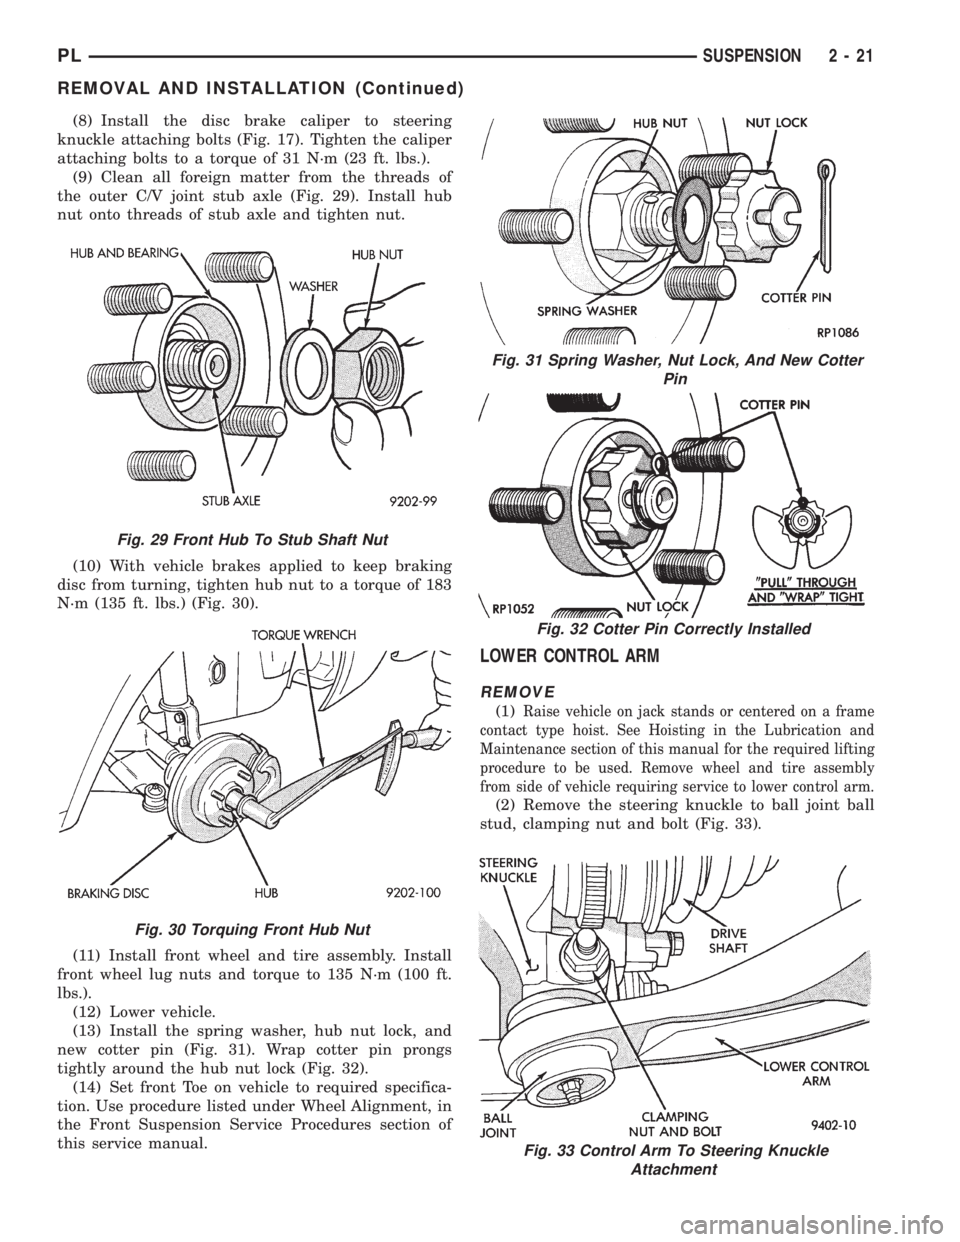
(9) Clean all foreign matter from the threads of
the outer C/V joint stub axle (Fig. 29). Install hub
nut onto threads of stub axle and tighten nut.
(10) With vehicle brakes applied to keep braking
disc from turning, tighten hub nut to a torque of 183
N´m (135 ft. lbs.) (Fig. 30).
(11) Install front wheel and tire assembly. Install
front wheel lug nuts and torque to 135 N´m (100 ft.
lbs.).
(12) Lower vehicle.
(13) Install the spring washer, hub nut lock, and
new cotter pin (Fig. 31). Wrap cotter pin prongs
tightly around the hub nut lock (Fig. 32).
(14) Set front Toe on vehicle to required specifica-
tion. Use procedure listed under Wheel Alignment, in
the Front Suspension Service Procedures section of
this service manual.
LOWER CONTROL ARM
REMOVE
(1)Raise vehicle on jack stands or centered on a frame
contact type hoist. See Hoisting in the Lubrication and
Maintenance section of this manual for the required lifting
procedure to be used. Remove wheel and tire assembly
from side of vehicle requiring service to lower control arm.
(2) Remove the steering knuckle to ball joint ball
stud, clamping nut and bolt (Fig. 33).
Fig. 29 Front Hub To Stub Shaft Nut
Fig. 30 Torquing Front Hub Nut
Fig. 31 Spring Washer, Nut Lock, And New Cotter
Pin
Fig. 32 Cotter Pin Correctly Installed
Fig. 33 Control Arm To Steering Knuckle
Attachment
PLSUSPENSION 2 - 21
REMOVAL AND INSTALLATION (Continued)
Page 33 of 1200
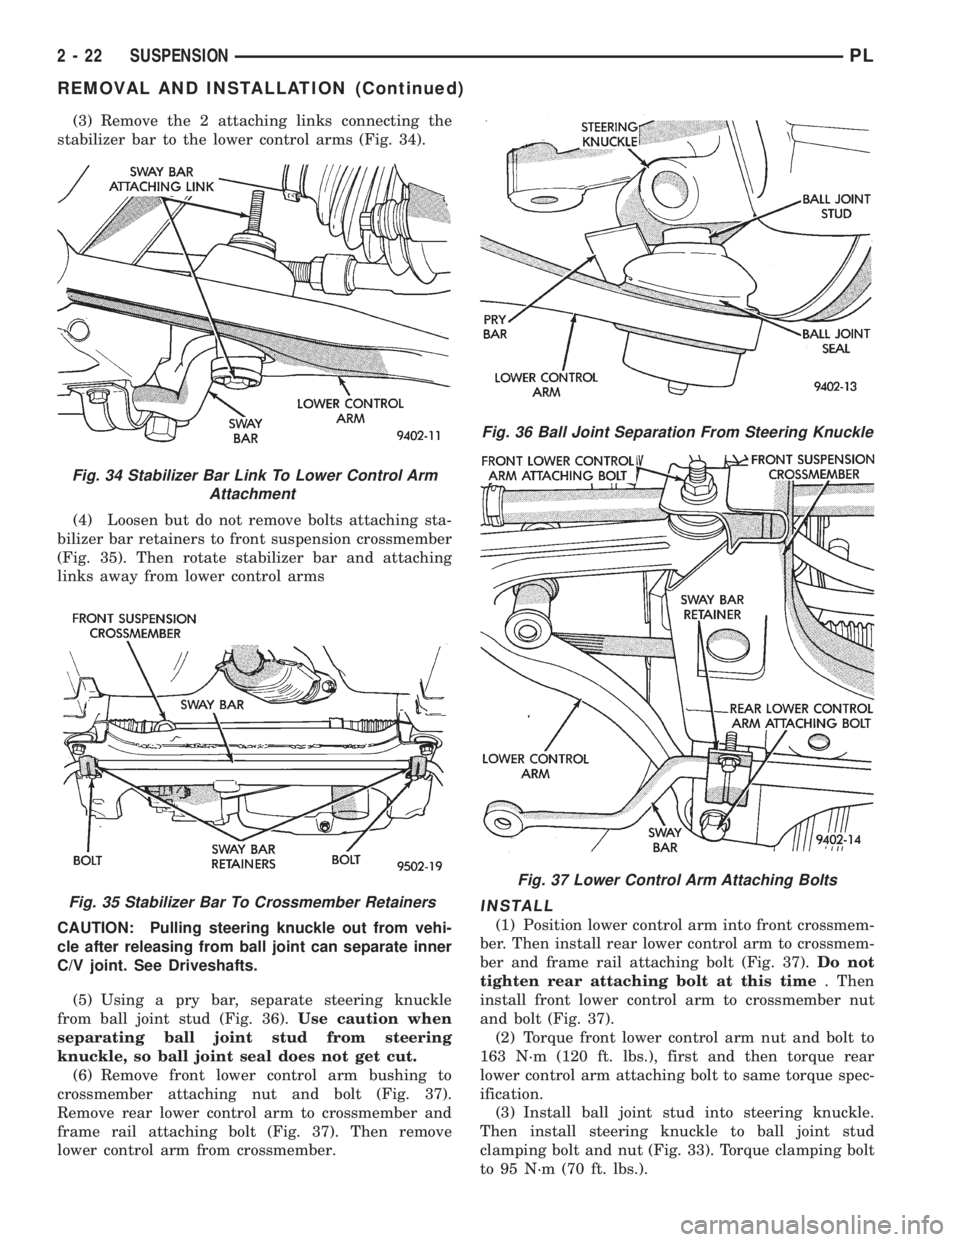
(3) Remove the 2 attaching links connecting the
stabilizer bar to the lower control arms (Fig. 34).
(4) Loosen but do not remove bolts attaching sta-
bilizer bar retainers to front suspension crossmember
(Fig. 35). Then rotate stabilizer bar and attaching
links away from lower control arms
CAUTION: Pulling steering knuckle out from vehi-
cle after releasing from ball joint can separate inner
C/V joint. See Driveshafts.
(5) Using a pry bar, separate steering knuckle
from ball joint stud (Fig. 36).Use caution when
separating ball joint stud from steering
knuckle, so ball joint seal does not get cut.
(6) Remove front lower control arm bushing to
crossmember attaching nut and bolt (Fig. 37).
Remove rear lower control arm to crossmember and
frame rail attaching bolt (Fig. 37). Then remove
lower control arm from crossmember.
INSTALL
(1) Position lower control arm into front crossmem-
ber. Then install rear lower control arm to crossmem-
ber and frame rail attaching bolt (Fig. 37).Do not
tighten rear attaching bolt at this time. Then
install front lower control arm to crossmember nut
and bolt (Fig. 37).
(2) Torque front lower control arm nut and bolt to
163 N´m (120 ft. lbs.), first and then torque rear
lower control arm attaching bolt to same torque spec-
ification.
(3) Install ball joint stud into steering knuckle.
Then install steering knuckle to ball joint stud
clamping bolt and nut (Fig. 33). Torque clamping bolt
to 95 N´m (70 ft. lbs.).
Fig. 34 Stabilizer Bar Link To Lower Control Arm
Attachment
Fig. 35 Stabilizer Bar To Crossmember Retainers
Fig. 36 Ball Joint Separation From Steering Knuckle
Fig. 37 Lower Control Arm Attaching Bolts
2 - 22 SUSPENSIONPL
REMOVAL AND INSTALLATION (Continued)
Page 34 of 1200
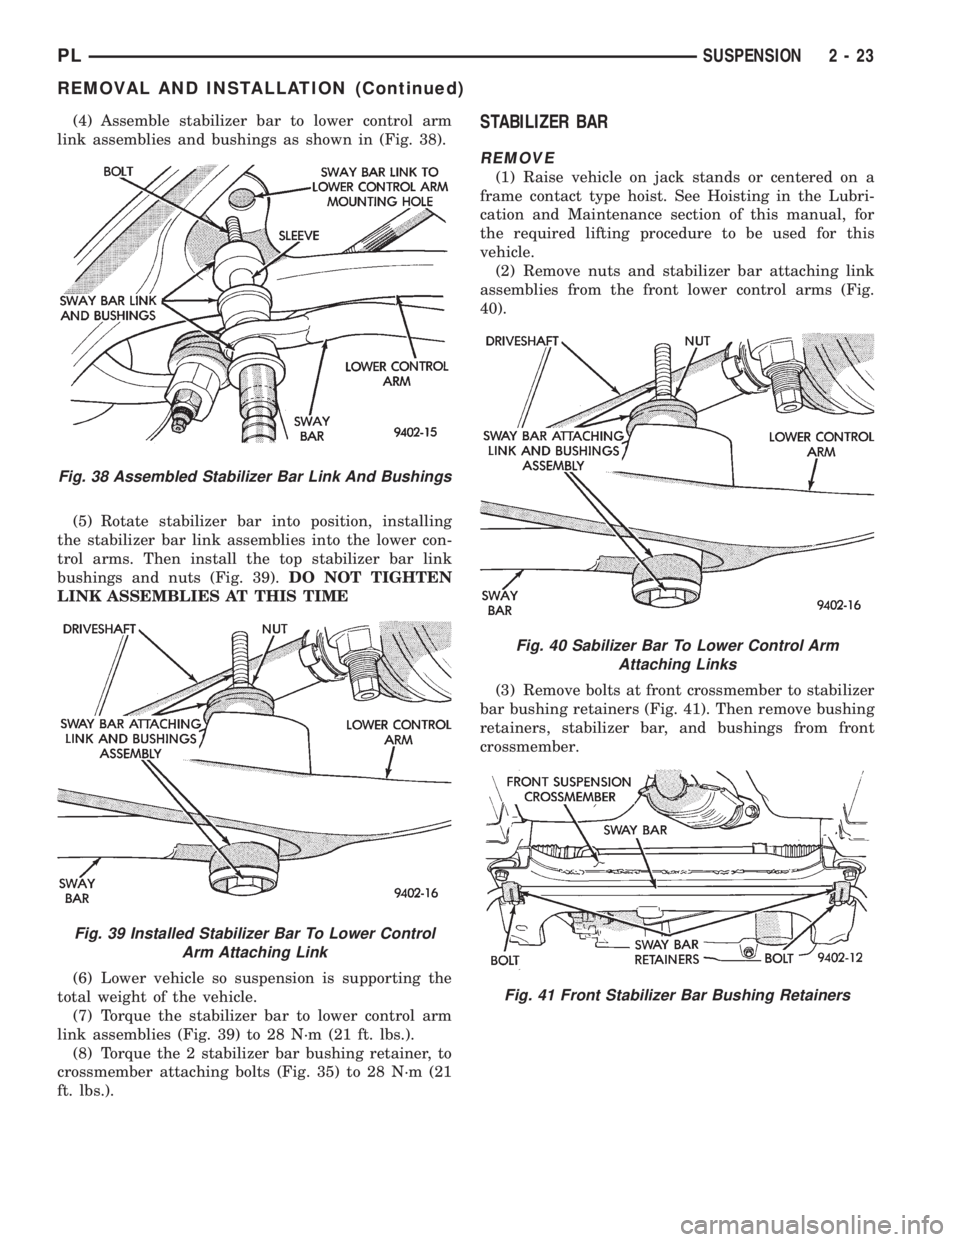
(4) Assemble stabilizer bar to lower control arm
link assemblies and bushings as shown in (Fig. 38).
(5) Rotate stabilizer bar into position, installing
the stabilizer bar link assemblies into the lower con-
trol arms. Then install the top stabilizer bar link
bushings and nuts (Fig. 39).DO NOT TIGHTEN
LINK ASSEMBLIES AT THIS TIME
(6) Lower vehicle so suspension is supporting the
total weight of the vehicle.
(7) Torque the stabilizer bar to lower control arm
link assemblies (Fig. 39) to 28 N´m (21 ft. lbs.).
(8) Torque the 2 stabilizer bar bushing retainer, to
crossmember attaching bolts (Fig. 35) to 28 N´m (21
ft. lbs.).STABILIZER BAR
REMOVE
(1) Raise vehicle on jack stands or centered on a
frame contact type hoist. See Hoisting in the Lubri-
cation and Maintenance section of this manual, for
the required lifting procedure to be used for this
vehicle.
(2) Remove nuts and stabilizer bar attaching link
assemblies from the front lower control arms (Fig.
40).
(3) Remove bolts at front crossmember to stabilizer
bar bushing retainers (Fig. 41). Then remove bushing
retainers, stabilizer bar, and bushings from front
crossmember.
Fig. 38 Assembled Stabilizer Bar Link And Bushings
Fig. 39 Installed Stabilizer Bar To Lower Control
Arm Attaching Link
Fig. 40 Sabilizer Bar To Lower Control Arm
Attaching Links
Fig. 41 Front Stabilizer Bar Bushing Retainers
PLSUSPENSION 2 - 23
REMOVAL AND INSTALLATION (Continued)