Page 145 of 214

T100(U)145
If your vehicle overheats
If your engine coolant temperature
gauge indicates overheating, if you ex-
perience a loss of power, or if you hear
a loud knocking or pinging noise, the
engine has probably over-heated. You
should follow this procedure...
1. Pull safely off the road, stop the ve- hicle and turn on your emergency
flashers. Put the transmission in ”P”
(automatic) or neutral (manual) and ap-
ply the parking brake. Turn off the air
conditioning if it is being used.
2. If coolant or steam is boiling out of the radiator or reservoir, stop the engine.
Wait until the steam subsides before
opening the hood. If there is no coolant
boiling over or steam, leave the engine
running.
CAUTION
To help avoid personal injury, keep
the hood closed until there is no
steam. Escaping steam or coolant is
a sign of very high pressure.
3. Visually check to see if the engine drive belt (fan belt) is broken or loose.
Look for obvious coolant leaks from the
radiator, hoses, and under the vehicle.
However, note that water draining from
the air conditioning is normal if it has
been used.
CAUTION
When the engine is running, keep
hands and clothing away from the
moving fan and engine drive belts.
4. If the engine drive belt is broken or thecoolant is leaking, stop the engine im-
mediately. Call a Toyota dealer for as-
sistance.
5. If the engine drive belt is O.K. and there are no obvious leaks, you may
help the engine cool down more quickly
by running it at about 1500 rpm for a
few minutes with the accelerator pedal
lightly depressed.
6. Check the coolant reservoir. If it is dry, add coolant to the reservoir while the
engine is running. Fill it about half full.
CAUTION
Do not attempt to remove the radiator
cap when the engine and radiator are
hot. Serious injury could result from
scalding hot fluid and steam blown
out under pressure.
7. After the engine coolant temperaturehas cooled to normal, again check the
coolant level in the reservoir. If neces-
sary, bring it up to half full again. Seri-
ous coolant loss indicates a leak in the
system. You s hould have it checked as
soon as possible at your Toyota dealer.
Page 146 of 214

T100(U)
146
If you have a flat tire—
1. Reduce your speed gradually, keeping a straight line. Move cautiously off the
road to a safe place well away from
the traffic. Avoid stopping on the center
divider of a highway. Park on a level
spot with firm ground.
2. Stop the engine and turn on your emergency flashers.
3. Firmly set the parking brake and put the transmission in ”P” (automatic) or
reverse (manual).
4. Have everyone get out of the vehicle on the side away from traffic.
5. Read the following instructions thor- oughly.
CAUTION
When jacking, be sure to observe the
following to reduce the possibility of
personal injury: Follow jacking instructions.
Do not start or run the engine while
your vehicle is supported by the
jack.
Stop the vehicle on a level firm
ground, firmly set the parking brake
and put the transmission in “P”
(automatic) or reverse (manual).
Block the wheel diagonally opposite
to the one being changed if neces-
sary.
Make sure to set the jack properly
in the jack point. Raising the ve-
hicle with jack improperly posi-
tioned will damage the vehicle or
may allow the vehicle to fall off the
jack and cause personal injury.
Never get under the vehicle when
the vehicle is supported by the jack
alone.
Use the jack only for lifting your
vehicle during wheel changing.
Do not raise the vehicle with some-
one in the vehicle.
When raising the vehicle, do not
put an object on or under the jack.
Raise the vehicle only high enough
to remove and change the tire.NOTICE
Do not continue driving with a de-
flated tire. Driving even a short dis-
tance can damage a tire beyond re-
pair.
Page 147 of 214

T100(U)147
1. Get the jack, jack handle and wheelnut wrench.
To prepare yourself for an emergency, you
should fam iliarize yourself with the use of
the jack, each of the tools and their stor-
age locations.When removing the jack, turn the joint by
hand towards the CONTRACT direction
until the jack is free. When storing, turn
the joint by hand towards the EXPAND
direction until the jack is firmly secured to
prevent it from flying forward during a
collision or sudden braking.To remove the spare tire:
1. Insert the end of the jack handle into the lowering screw and turn it counter-
clockwise.
2. After the tire is lowered completely to the ground, remove the holding brack-
et.
When storing the spare tire, put it in place
with the outer side of the wheel facing up.
Then secure the tire, taking care that the
tire goes straight up without catching on
any other part, to prevent it from flying
forward during a collision or sudden brak-
ing.
—Required tools and spare
tire (normal-cab models)
Page 148 of 214

T100(U)
148
1. Get the jack and tool bag.
To prepare yourself for an emergency, you
should fam iliarize yourself with the use of
the jack, each of the tools and their stor-
age locations. When removing the jack, turn the joint by
hand towards the CONTRACT direction
until the jack is free. When storing, turn
the joint by hand towards the EXPAND
direction until the jack is firmly secured to
prevent it from flying forward during a
collision or sudden braking.To remove the spare tire:
1. Insert the end of the jack handle exten- sion into the lowering screw and turn
it counterclockwise with the handle,
making sure the handle remains firmly
fitted onto the jack handle extension.
2. After the tire is lowered completely to the ground, remove the holding brack-
et.
When storing the spare tire, put it in place
with the outer side of the wheel facing up.
Then secure the tire, taking care that the
tire goes straight up without catching on
any other part, to prevent it from flying
forward during a collision or sudden brak-
ing.
—Required tools and
spare tire (Xtra-cab models)
Page 149 of 214
T100(U)149
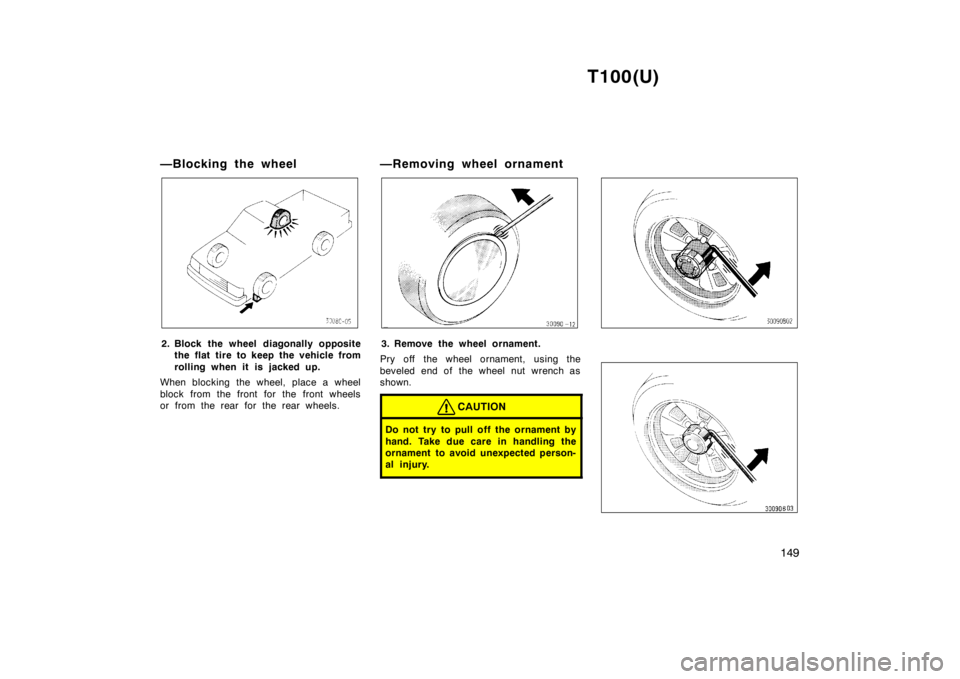
—Blocking the wheel
2. Block the wheel diagonally opposite
the flat tire to keep the vehicle from
rolling when it is j acked up.
When blocking the wheel, place a wheel
block from the front for the front wheels
or from the rear for the rear wheels. —Removing wheel ornament3. Remove the wheel ornament.
Pry off the wheel ornament, using the
beveled end of the wheel nut wrench as
shown.
CAUTION
Do not try to pull off the ornament by
hand. Take due care in handling the
ornament to avoid unexpected person-
al injury.
Page 150 of 214
T100(U)
150
—Loosening wheel nuts
4. Loosen all the wheel nuts.
Always loosen the wheel nuts before rais-
ing the vehicle.
The nuts turn counterclockwise to loosen.
To get maximum leverage, fit the wrench
to the nut so that the handle is on the
right side, as shown above. Grab the
wrench near the end of the handle and
pull up on the handle. Be careful that the
wrench does not slip off the nut.
Do not remove the nuts yet–just unscrew
them about one-half turn. —Positioning the jack5. Position the jack at the correct jack
point as shown.
Make sure the jack is positioned on a
level and solid place.
JACK POINTS:
Two-wheel drive models Front–Under the frame siderail
Rear–Under the rear axle housing
Four-wheel drive models Front–Under the front suspension
crossmember
Rear–Under the rear axle housing
Page 151 of 214
T100(U)151
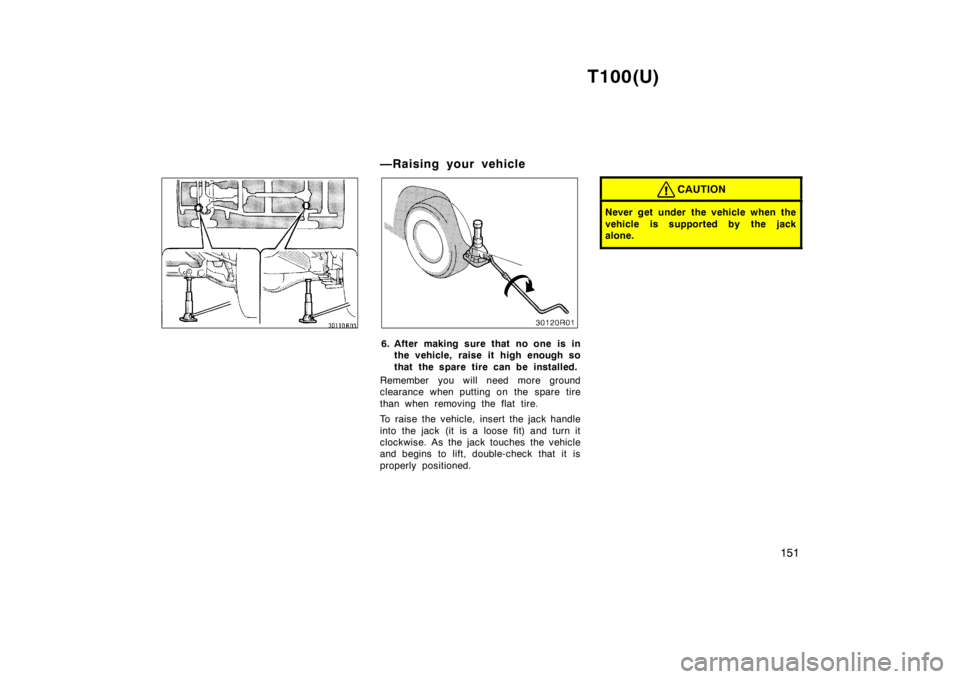
—Raising your vehicle
6. After making sure that no one is inthe vehicle, raise it high enough so
that the spare tire can be installed.
Remember you will need more ground
clearance when putting on the spare tire
than when removing the flat tire.
To raise the vehicle, insert the jack handle
into the jack (it is a loose fit) and turn it
clockwise. As the jack touches the vehicle
and begins to lift, double-check that it is
properly positioned.
CAUTION
Never get under the vehicle when the
vehicle is supported by the jack
alone.
Page 152 of 214
T100(U)
152
—Changing wheels
7. Remove the wheel nuts and change
tires.
Lift the flat tire straight off and put it
aside.
Roll the spare wheel into position and
align the holes in the wheel with the bolts.
Then lift up the wheel and get at least the
top bolt started through its hole. Wiggle
the tire and press it back over the other
bolts.Before putting on wheels, remove any cor-
rosion on the mounting surfaces with a
wire brush or such. Installation of wheels
without good metal-to-metal contact at the
mounting surface can cause wheel nuts to
loosen and eventually cause a wheel to
come off while driving. Therefore after the
first 1600 km (1000 miles), check to see
that the wheel nuts are tight. —Reinstalling wheel nuts8. Reinstall all the wheel nuts finger
tight.
Reinstall the wheel nuts and tighten them
as much as you can by hand. Press back
on the tire and see if you can tighten
them more.—Lowering your vehicle