1998 PONTIAC GRAND PRIX lock
[x] Cancel search: lockPage 123 of 402

Mode 2: Automatic Locking Only
0 Automatic Door Unlocking: Off
Automatic Door Locking: Shift out of PARK (P)
with the ignition on and the driver’s door closed, all
doors will lock automatically.
Mode 3: Automatic Unlocking with Ignition Off
Automatic Door Unlocking: ?’urn off the ignition
with the transaxle in PARK (P) and all doors will
unlock automatically.
Automatic Door Locking: Shift out of PARK (P)
with the ignition on and the driver’s door closed and,
all doors will lock automatically.
Mode 4: Automatic Unlocking and Locking with
Transaxle in
PARK (P)
Automatic Door Unlocking: Shift into PARK (P)
with the ignition
on and all doors will
unlock automatically.
Automatic Door Locking: Shift out of PARK (P)
with the ignition on and the driver’s door closed and
all doors will lock automatically.
Lockout Deterrennast Door
Closed Locking
Your vehicle comes with this feature set in mode 2. To
change the factory setting, do the following:
1. Press UNLOCK on the power lock switch.
2. Count the number of chimes you hear. The number
of chimes tells you which mode your vehicle is set
for. You change the mode by pressing
UNLOCK again.
3. Repeat Step 2 until you hear the number of chimes
Mode 1: Both Off (Doors will always lock immediately
when you press LOCK
on the power lock switch or the
remote keyless entry transmitter,
if equipped.)
that matches the mode you want.
Mode 2: Lockout Deterrent Only (If you leave your key
in the
ignition with the driver’s door open, you will not
be able to lock the doors using your power locks.)
Mode 3: Last Door Closed Locking Only (If the power
lock switch or remote keyless entry transmitter
(if
equipped) is used to lock the vehicle while any door is
open and the key is out of the ignition, you will hear three
chimes. The doors will not lock. Five seconds after the last
door
is closed, all doors will lock.)
Mode 4: Both On (This combines modes 2 and 3.)
2-48
Page 124 of 402

Remote Drivc Unlock Control
Your vehicle comes with this feature set in mode 2. To
change the factory setting while in the programming mode, do the following:
1. Press UNLOCK on the remote keyless
entry transmitter.
2. Count the number of chimes you hear. The number
of chimes tells you which mode your vehicle is set
for. You change the mode by pressing
UNLOCK again.
that matches
the mode you want.
3. Repeat Step 2 until you hear the number of chimes
Mode 1: Remote All Doors Unlock (When you press
UNLOCK on your remote keyless entry transmitter, all
doors will unlock.)
Mode 2: Remote Driver’s Door and All Doors Unlock
(When you press UNLOCK on
your remote keyless
entry transmitter once, the driver’s door will unlock.
If
you press UNLOCK again within five seconds, all doors
will unlock.)
Remote LocWUnlock Confirmation
Your vehicle comes with this feature set in mode 4. TO
change the factory setting while in the programming
mode do the following:
1. Press the LOCK button on the remote keyless
entry transmitter.
2. Count the number of chimes you hear. The number
of chimes tells you which mode your vehicle is set
for. You change the mode by pressing LOCK
on
your remote keyless entry transmitter again.
3. Repeat Step 2 until you hear the number of chimes
that matches the mode you want.
This feature provides feedback to the driver when the
vehicle receives a lockhnlock command from the
remote keyless entry transmitter. The
fsllowing modes
may be selected:
Mode 1: Off (Remote lock and unlock confirmation
are disabled.)
Mode 2: Remote Lock Confirmation with Exterior
Lamps Only Remote Lock Confirmation:
When you use the remote keyless entry transmitter to
lock your vehicle, your headlamps will flash briefly
to let you
know your command is received.
Page 125 of 402

e Remote Unlock Confirmation: When you use the
remote keyless entry
transmitter to unlock your vehicle
or open your trunk, your headlamps will flash briefly
to let you
know when your command is received.
Mode 3: Remote Lock Confirmation with Exterior
Lamps and
Horn
Remote Lock Confirmation: When you use the remote
keyless
entry transmitter to lock your vehicle, the horn
will sound briefly and your headlamps will flash
briefly to let you
know your command is received.
Remote Unlock Confmnation: When you use the
remote keyless entry transmitter to unlock your vehicle
or open your
trunk, your headlamps will flash briefly
to let you
know your command is received.
Mode 4: Remote Lock Confirmation with Exterior
Lights and
Horn (on second LOCK press)
Remote Lock Confirmation: When you use the
remote keyless entry transmitter to lock your vehicle,
your headlamps will flash briefly to let you
know
your command is received. The horn will sound
briefly and the headlamps will flash briefly
if you
press the LOCK button again within five seconds.
remote keyless entry
transmitter to unlock your vehicle
e Remote Unlock Confirmation: When you use the or open your
trunk, your headlamps will flash briefly
to let you know your command is received.
Content Theft-Deterrent
Your vehicle comes with this feature set in mode 4. To
change the factory setting while in the programming
mode, do the following:
1. Turn the parking lamps on, then off.
2. Count the number of chimes you hear. The number
of chimes tells you which mode your vehicle is set
for. You change the mode by turning the parking
lamps on, then
off again.
3. Repeat Step 2 until you hear the number of chimes
that matches the mode you want.
Mode 1: Damage Detection with Reduced Sensitivity
(If anyone seriously damages your vehicle, tampers with
the trunk lock or opens a door while your Content
Theft-Deterrent system is armed,
an alarm will sound
and your headlamps will flash for up to two minutes).
Mode 2: Damage Detection Off (If anyone tampers with
your
trunk lock or opens a door while your Content
Theft-Deterrent system is armed,
an alarm will sound
and your headlamps will flash for up to two minutes.)
Mode 3: All Off (Your Content Theft-Deterrent system
is always disarmed.)
2-50
Page 126 of 402

Mode 4: Damage Detection with Normal Sensitivity (If
anyone damages your vehicle, tampers with your
trunk
lock or enters your vehicle while your Content
Theft-Deterrent system is armed, an alarm will sound and your headlamps will flash for up to two minutes.)
Content Theft-Deterrent Arming
and Disarming
Your vehicle comes with this feature in mode 3. To
change the factory setting, while in the programming
mode do the following:
1.
2.
3.
Insert your second key fully into any door key
cylinder and
turn it to the unlock position. This step
is necessary to prevent accidental programming of
this feature to mode 2. Do not program this feature to
mode
2 without first reading the special note
contained in the description above for that mode.
The door key lock cylinder must remain in the
unlock position during Steps
2 through 4.
Press the horn symbol on your remote keyless
entry transmitter.
Count the number of chimes you hear. The number
of chimes tells you which mode your vehicle is set
for.
You change the mode by pressing the horn
symbol on your remote keyless entry
transmitter again.
4. Repeat Step 3 until you hear the number of chimes
5. Remove your key from the door key cylinder.
Mode 1: Power Lock Switch Arming Off
that matches the mode you want.
0 Your Content Theft-Deterrent system will arm when
you lock the doors with your remote keyless entry
transmitter. The key must be removed from the
ignition when you lock the doors or the Content
Theft-Deterrent system will not
arm.
0 Your Content Theft-Deterrent system will disarm
when you unlock the doors with the keys or your
remote keyless entry transmitter.
Mode 2: Remote Keyless Entry Transmitter
Arm/Disarm Only
0 Your Content Theft-Deterrent system will arm when
you lock the doors with your remote keyless entry
transmitter. The key must be removed from the ignition when you lock the doors or the content
theft-deterrent system will not
arm.
0 Your Content Theft-Deterrent system will disarm
when you unlock the doors with your remote keyless
entry transmitter.
2-51
Page 127 of 402

Special Note: While this mode provides increased
security, it can be a problem if your remote keyless entry
transmitter is damaged, lost or if it fails to operate for
any reason while the Content Theft-Deterrent system is
armed. The Content Theft-Deterrent system must be
disarmed for the engine to run and while in mode
2,
your key can no longer disarm the system.
Mode 3: Standard Arming and Disarming
0
0
0
Your Content Theft-Deterrent system will arm when
you lock the doors using either power door lock
switch while any door is open and the key is
removed from the ignition.
Your Content Theft-Deterrent system will arm when
you lock
the doors with your remote keyless entry
transmitter. The key must be removed from the
ignition when you lock
the doors or the Content
Theft-Deterrent system will not
arm.
Your Content Theft-Deterrent system will disarm
when you unlock
the doors with your key or your
remote keyless entry transmitter.
Mirrors
Adjust all the mirrors so you can see clearly when you
are sitting in a comfortable driving position.
Inside Daymight Rearview Mirror
To reduce glare from lamps behind you, push the lever
away from you (to
the night position). To return the mirror
back to the
day position, pull the lever toward you.
Electrochromic Daymight Rearview Mirror
(If Equipped)
Your vehicle may have an electrochromic dayhight
rearview mirror. Push the button on the bottom of the
mirror to
turn this feature on. The mirror will darken
gradually to reduce glare from headlamps behind you.
This may take a
few moments.
2-52
Page 129 of 402

Storage Compartments
Glove Box
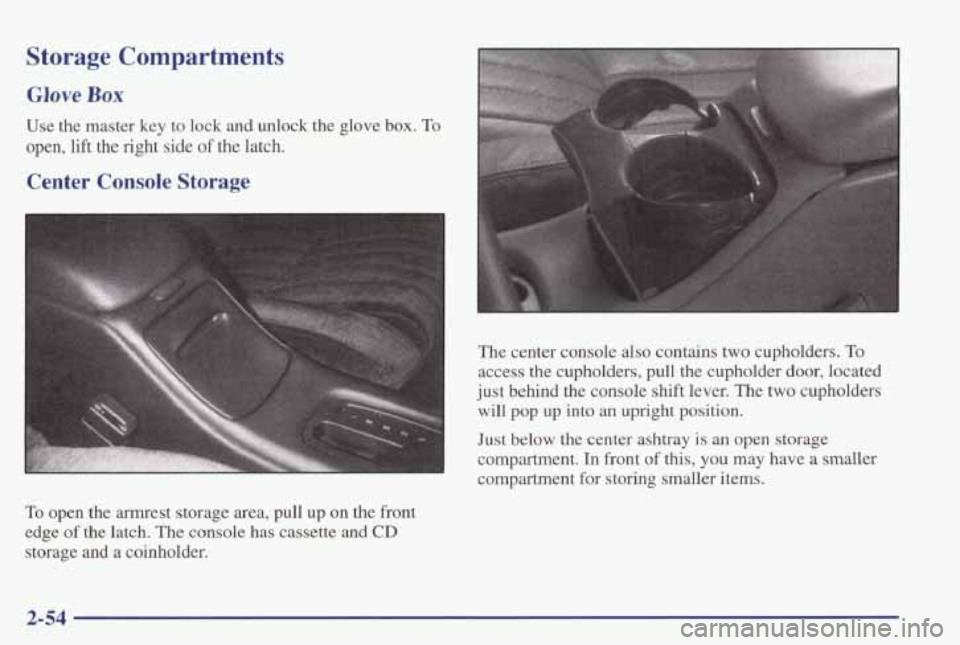
Use the master key to lock and unlock the glove box. To
open, lift the right side of the latch.
Center Console Storage
To open the armrest storage area, pull up on the front
edge of the latch. The console has cassette
and CD
storage and a coinholder. The center console also
contains two cupholders. To
access the cupholders, pull the cupholder door, located
just behind the console shift lever. The two cupholders
will
pop up into an upright position.
Just below the center ashtray is an open storage
compartment.
In front of this, you may have a smaller
compartment for storing smaller items.
2-54
Page 132 of 402

Trunk Access Panel (If Equipped)
If your vehicle has rear seat armrests, you will also have
a
trunk access panel. To use the trunk access panel, pull
your rear armrest down, unlock the access panel and pull
it down.
Rear Armrest Storage (If Equipped)
If you have a trunk access panel, you will also have a
pull down armrest that contains
an open storage bin and
two cupholders.
Convenience Net (If Equipped)
Your vehicle may have a convenience net. You’ll see it
on the back wall
of the trunk.
Put small loads, like grocery bags, in the net. It can help
keep them from falling over during sharp
turns or quick
starts and stops.
The
net isn’t for larger, heavier loads. Store them in the
trunk as far forward as you can.
You can unhook the net
so that it will lie flat when
you’re not using it.
Ashtrays and Lighter
The center front ashtray is an the instrument panel. To
open it, pull at the bottom of the ashtray until it is fully
open.
To remove the ashtray cup, lift the tabs on the
sides and pull out.
Your vehicle has one rear ashtray. There is either one on
the front seat armrest back
or one on the back of the
center console (if
you have that option). To open the
ashtray, press the right side and turn it open.
2-57
Page 133 of 402

To remove the ashtray for cleaning, press the snuffer as
you lift up the bottom of the ashtray.
NOTICE:
Don’t put papers and other things that burn into
your ashtrays.
If you do, cigarettes or other
smoking materials could set them on fire,
causing damage.
To use the lighter, located inside the center front ashtray,
just push it
in all the way and let go. When it’s ready, it
will pop back by itself.
NOTICE: ~~
~~
Don’t hold a cigarette lighter in with your hand
while it is heating. If you do, it won’t be able to
back away from the heating element when
it’s
ready. That can make it overheat, damaging the
lighter and the heating element.
Sun Visors
To block out glare, you can swing down the visors. You
can also swing them from front to side.
Visor Vanity Mirrors
Open the cover to expose the vanity mirror. If your
vehicle has the optional lighted vanity mirrors, the
lamps come on when
you open the cover.
Accessory Power Outlet
If your vehicle has a center console, you have a 12-volt
outlet. It is on the passenger’s side, near the floor.
Remove the tethered cap to use the outlet.
NOTICE:
Adding some electrical equipment to your vehicle
can damage it or keep other things from working
as they should. This wouldn’t be covered by your
warranty. Check with your dealer before adding
electrical equipment and never use anything
requiring more than
20 amps.
2-58