1998 PONTIAC GRAND PRIX sensor
[x] Cancel search: sensorPage 34 of 402

0
0
Your vehicle is equipped with a crash sensing and
diagnostic module, which records information about
the air bag system. The module records information about the readiness of the system, when the sensors
are activated and driver’s safety belt usage at deployment.
Let only qualified technicians work on your
air bag
system. Improper service can mean that your
air
bag system won’t work properly. See your dealer
for service.
NOTICE:
If you damage the covering for the driver’s or the
right front passenger’s air bag, the bag may not
work properly. You may have to replace the air
bag module in the steering wheel or both the air
bag module and the instrument panel for the
right front passenger’s air bag.
Do not open or
break the air bag coverings.
If your vehicle ever gets into a lot of water -- such as
water up to the carpeting
or higher -- or if water enters
your vehicle and
soaks the carpet, the air bag controller
can be soaked and ruined.
If this ever happens, and then
you start your vehicle, the damage could make the
air
bags inflate, even if there’s no crash. You would have to
replace the air bags as well as the sensors and related
parts. If your vehicle
is ever in a flood, or if it’s exposed
to water that soaks the
carpet, you can avoid needless
repair costs by turning
off the vehicle immediately.
Don’t let anyone
start the vehicle, even to tow it, unless
the battery cables are fist disconnected.
Servicing Your Air Bag-Equipped Vehicle
Air bags affect how your vehicle should be serviced.
There are parts of the air bag system in several places
around your vehicle. You don’t want the system to
inflate while someone is working on your vehicle. Your
dealer and the Grand
Prix Service Manual have
information about servicing your vehicle and the
air bag
system.
To purchase a service manual, see “Service and
Owner Publications” in the Index.
1-27
Page 98 of 402
AUTOMATIC OVERDRIVE (D): This position is for
normal driving.
If your vehicle has overdrive, AUTOMATIC
OVERDRIVE
(D) is the overdrive position. If you need
more power for passing, and you’re:
Going less than 35 mph (55 km/h), push your
Going about 35 mph (55 km/h) or more, push the
accelerator pedal about halfway down.
accelerator pedal
all the way down.
You’ll shift down to the next gear
and have
more power.
NOTICE:
If your vehicle seems to start up rather slowly, or
if it seems not to shift gears as you go faster,
something may be wrong with a transaxle system
sensor.
If you drive very far that way, your
vehicle can be damaged.
So, if this happens, have
your vehicle serviced right away. Until then, you
can use
SECOND (2) when you are driving less
than
35 mph (55 km/h) and AUTOMATIC
OVERDRIVE
(D) for higher speeds. THIRD
(3): This
position is also used for normal
driving, but it offers more power and lower fuel
economy than AUTOMATIC OVERDRIVE
(D).
Here are some times you might choose THIRD (3)
instead of AUTOMATIC OVERDRIVE (D):
When driving on hilly, winding roads.
When towing a trailer, so there is less shifting
between gears.
0 When going down a steep hill.
2-23
Page 116 of 402

Daytime Running Lamps
Daytime Running Lamps (DRL) can make it easier for
others to see the front
of your vehicle during the day.
DRL can be helpful in many different driving
conditions, but they can be especially helpful in the
short periods after dawn and before sunset.
A light sensor on top of the instrument panel makes the
DRL work, so be sure it isn’t covered.
The DRL system will make your low-beam headlamps
come on at a reduced brightness when:
0 The ignition is on,
The headlamp switch is off and
0 The parking brake is released.
When the DRL are on, only your low-beam headlamps
will be on. The taillamps, sidemarker and other
lamps won’t be on. Your instrument panel won’t be lit up either.
When it’s dark enough outside, your headlamps will
change to full brightness. The other lamps that come
on
with your headlamps will also come on.
When it’s bright enough outside,
the regular lamps will
go out, and your low-beam headlamps change to the
reduced brightness of DRL.
To idle your vehicle with the DRL off, set the parking
brake while the ignition is
in OFF or LOCK. Then start
your vehicle. The DRL will stay off until you release the
parking brake.
As with any vehicle, you should turn on the regular
headlamp system when you need it.
Fog Lamps
The fog lamps switch is located in the upper, left comer
of the instrument panel, to the left of the instrument
panel cluster.
Page 140 of 402
Air Bag Readiness Light
There is an air bag readiness light on the instrument
panel, which shows
SRS AIR BAG. The system checks
the air bag’s electrical system for malfunctions. The
light tells you if there is
an electrical problem. The
system check includes the
air bag sensors, the air bag
modules, the wiring and
the crash sensing and
diagnostic module. For more information
on the air bag
system, see
“Air Bag” in the Index.
This light will come on
when you start your engine,
and it will flash for a few
should go out. This means
the system is ready.
SRS AI R BAG seconds. Then the light
If the air bag readiness light stays on after you start the
engine or comes on when you are driving, your air bag
system may not work properly. Have your vehicle
serviced right away.
The air bag readiness light should flash for a few
seconds when you turn the ignition key to RUN. If the
light doesn’t come on then, have it fixed so it will be
ready to warn you if there is a problem.
Charging System Light
Ifl
The charging system light
will come on briefly when
you
turn on the ignition, as
a check to show you
it’s
working. Then it will go
out.
If it stays on, or comes on while you are driving, you
may have a problem with the charging system. It could
indicate that you have a loose
drive belt or another
electrical problem. Have it checked right away. Driving
while
this light is on could drain your battery.
If you must drive a short distance with the light on, be
certain to turn
off all your accessories, such as the radio
and air conditioner.
Page 247 of 402
I NOTICE:
Do not tow with sling-type equipment or
fascidfog lamp damage will occur. Use wheel-lift
or carcarrier equipment. Additional ramping
may be required for carcarrier equipment. Use
safety chains and wheel straps.
Towing a vehicle over rough surfaces could
damage a vehicle. Damage can occur from vehicle
to
ground or vehicle to wheel-lift equipment. To
help avoid damage, raise the vehicle until
adequate clearance is obtained between the
ground and/or wheel-lift equipment.
Do not attach winch cables or J-hooks to
suspension components when using carcarrier
equipment. Always use
T-hooks inserted in the
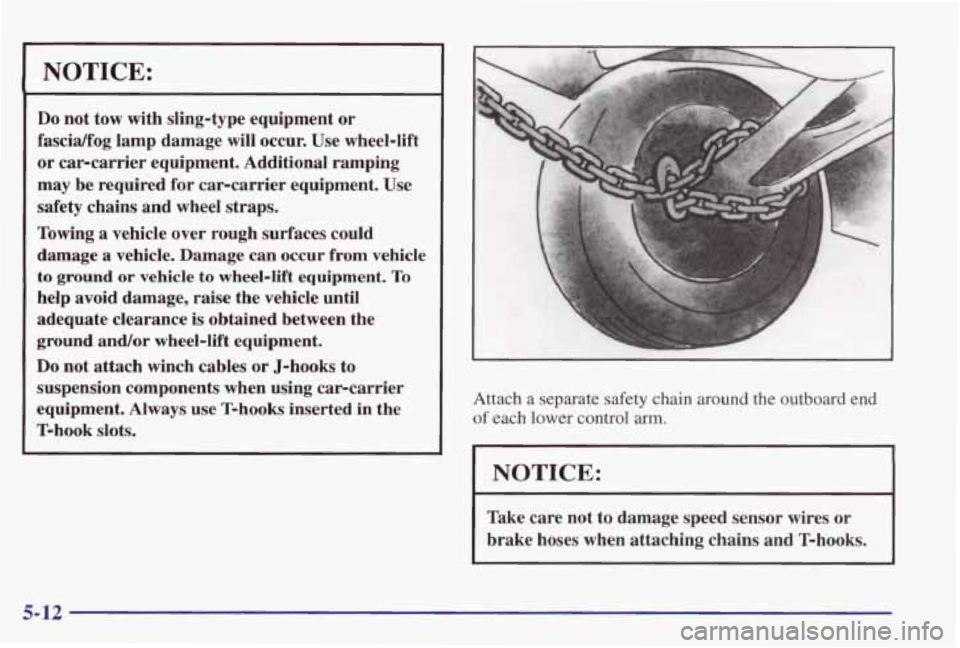
T-hook slots. Attach a separate safety chain around
the outboard end of each lower control arm.
NOTICE:
I
Take care not to damage speed sensor wires or
brake hoses when attaching chains and T-hooks.
5-12
Page 249 of 402
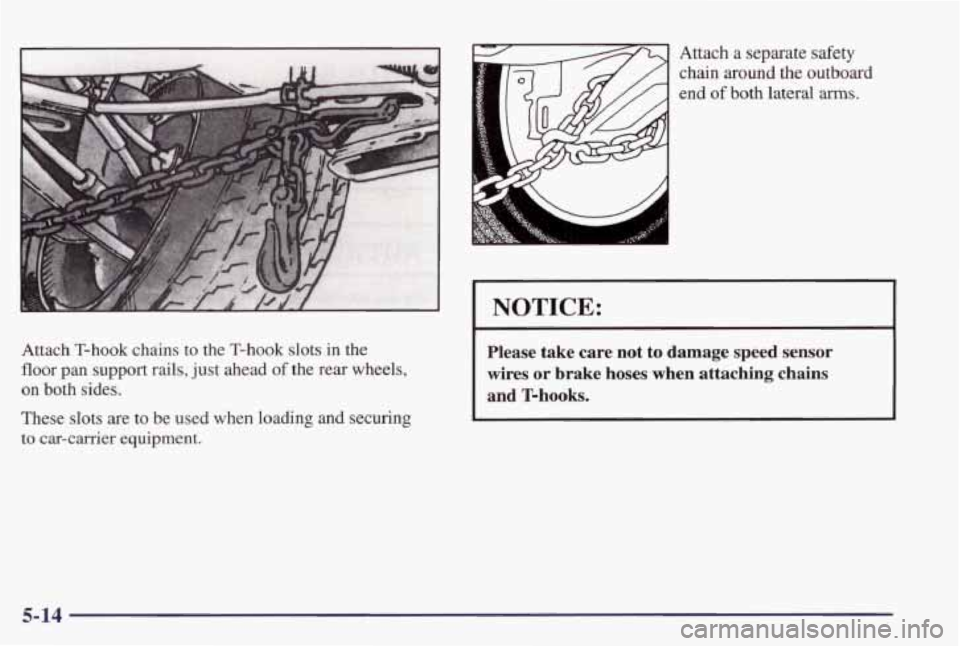
Attach a separate safety
chain around the outboard
end of both lateral arms.
NOTICE:
Attach T-hook chains to the T-hook slots in the
floor pan support rails, just ahead of the rear wheels,
on both sides.
These slots are to be used when loading and securing
to cm-carrier equipment.
Please take care not to damage speed sensor wires or brake hoses when attaching chains
and
T-hooks.
5-14
Page 342 of 402
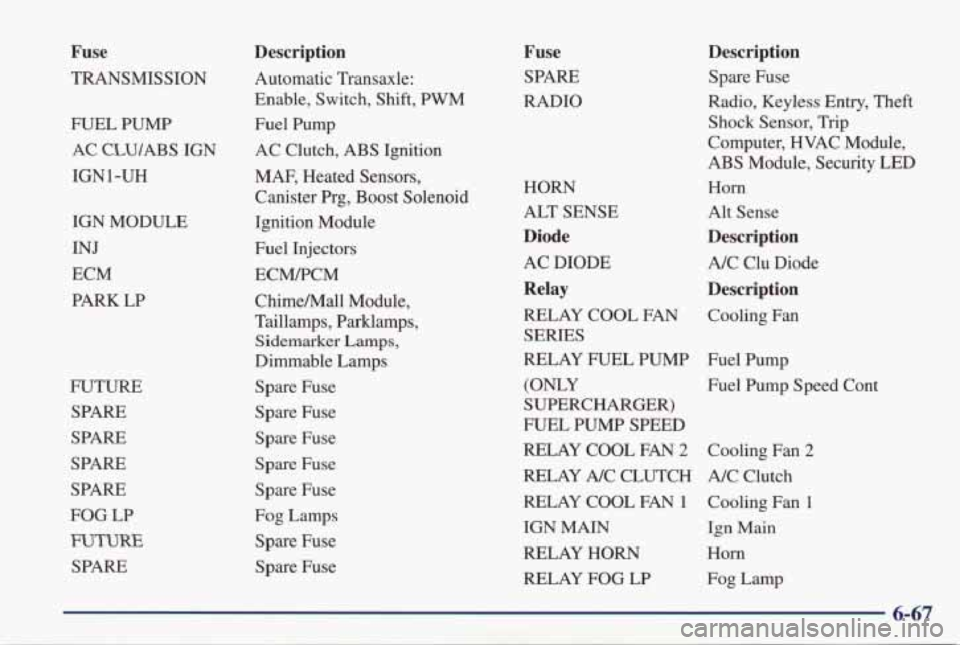
Fuse
TRANSMISSION
mJEL PUMP
AC CLU/ABS IGN
IGN1-UH
IGN MODULE
INJ
ECM
PARK LP
FUTURE
SPARE
SPARE
SPARE
SPARE
FOG LP
mTUm
SPARE
Description
Automatic Transaxle:
Enable, Switch, Shift,
PWM
Fuel Pump
AC Clutch, ABS Ignition
MAF, Heated Sensors,
Canister Prg, Boost Solenoid
Ignition Module
Fuel Injectors
ECM/PCM
ChimeMall Module,
Taillamps, Parklamps,
Sidemarker Lamps,
Dimmable Lamps
Spare Fuse
Spare Fuse
Spare Fuse
Spare Fuse
Spare Fuse
Fog Lamps Spare Fuse
Spare Fuse
Fuse
SPARE
RADIO
HORN
ALT SENSE
Diode
AC DIODE
Relay
RELAY COOL FAN
SERIES
RELAY FUEL PUMP
(ONLY
SUPERCHARGER)
FUEL PUMP SPEED
RELAY COOL FAN
2
RELAY A/C CLUTCH
RELAY COOL FAN
1
IGN MAIN
RELAY HORN
RELAY FOG LP
Description
Spare Fuse
Radio, Keyless Entry,
Theft
Shock Sensor, Trip
Computer, HVAC Module,
ABS Module, Security LED
Horn
Alt Sense
Description
A/C Clu Diode
Description
Cooling Fan
Fuel Pump
Fuel Pump Speed Cont
Cooling Fan
2
A/C Clutch Cooling Fan
1
Ign Main
Horn
Fog Lamp