1998 OPEL FRONTERA brake fluid
[x] Cancel search: brake fluidPage 4413 of 6000
5B–1 ANTI–LOCK BRAKE SYSTEM
BRAKES
ANTI-LOCK BRAKE SYSTEM
CONTENTS
Service Precaution 5B–1. . . . . . . . . . . . . . . . . . . . . .
Electronic Hydraulic Control Unit 5B–2. . . . . . . . . .
Electronic Hydraulic Control Unit and
Associated Parts 5B–2. . . . . . . . . . . . . . . . . . . . . .
Removal 5B–2. . . . . . . . . . . . . . . . . . . . . . . . . . . . .
Installation 5B–2. . . . . . . . . . . . . . . . . . . . . . . . . . . .
G-Sensor 5B–3. . . . . . . . . . . . . . . . . . . . . . . . . . . . . .
Removal 5B–3. . . . . . . . . . . . . . . . . . . . . . . . . . . . .
Inspection and Repair 5B–3. . . . . . . . . . . . . . . . . .
Installation 5B–3. . . . . . . . . . . . . . . . . . . . . . . . . . . .
Front Wheel Speed Sensor 5B–4. . . . . . . . . . . . . . . Front Wheel Speed Sensor and
Associated Parts 5B–4. . . . . . . . . . . . . . . . . . . . . .
Removal 5B–4. . . . . . . . . . . . . . . . . . . . . . . . . . . . .
Inspection and Repair 5B–5. . . . . . . . . . . . . . . . . .
Installation 5B–5. . . . . . . . . . . . . . . . . . . . . . . . . . . .
Rear Wheel Speed Sensor 5B–6. . . . . . . . . . . . . . .
Rear Wheel Speed Sensor and
Associated Parts 5B–6. . . . . . . . . . . . . . . . . . . . . .
Removal 5B–6. . . . . . . . . . . . . . . . . . . . . . . . . . . . .
Inspection and Repair 5B–6. . . . . . . . . . . . . . . . . .
Installation 5B–6. . . . . . . . . . . . . . . . . . . . . . . . . . . .
Service Precaution
WARNING: IF SO EQUIPPED WITH A
SUPPLEMENTAL RESTRAINT SYSTEM(SRS),
REFER TO THE SRS COMPONENT AND WIRING
LOCATION VIEW IN ORDER TO DETERMINE
WHETHER YOU ARE PERFORMING SERVICE ON OR
NEAR THE SRS COMPONENTS OR THE SRS
WIRING. WHEN YOU ARE PERFORMING SERVICE
ON OR NEAR THE SRS COMPONENTS OR THE SRS
WIRING, REFER TO THE SRS SERVICE
INFORMATION. FAILURE TO FOLLOW WARNINGS
COULD RESULT IN POSSIBLE AIR BAG
DEPLOYMENT, PERSONAL INJURY, OR
OTHERWISE UNNEEDED SRS SYSTEM REPAIRS.
CAUTION: Always use the correct fastener in the
proper location. When you replace a fastener, use
ONLY the exact part number for that application.
ISUZU will call out those fasteners that require a
replacement after removal. ISUZU will also call out
the fasteners that require thread lockers or thread
sealant. UNLESS OTHERWISE SPECIFIED, do not
use supplemental coatings (Paints, greases, or other
corrosion inhibitors) on threaded fasteners or
fastener joint interfaces. Generally, such coatings
adversely affect the fastener torque and the joint
clamping force, and may damage the fastener. When
you install fasteners, use the correct tightening
sequence and specifications. Following these
instructions can help you avoid damage to parts and
systems.CAUTION: Replace all components included in
repair kits used to service this system. Lubricate
rubber parts with clean, fresh brake fluid to ease
assembly. Do not use shop air with in–line
lubricators on brake parts, as damage to rubber
components may result. If any hydraulic component
is removed or brake line disconnected, it may be
necessary to bleed part or all of the brake system.
NOTE: The use of rubber hoses or parts other than those
furnished specifically for the Anti–lock Brake System may
lead to functional problems requiring major overhaul.
Page 4599 of 6000
6B–6
ENGINE COOLING
Draining and Refilling Cooling
System
Before draining the cooling system, inspect the system
and perform any necessary service to ensure that it is
clean, does not leak and is in proper working order. The
engine coolant (EC) level should be between the “MIN”
and “MAX” lines of reserve tank when the engine is cold.
If low, check for leakage and add EC up to the “MAX” line.
There should not be any excessive deposit of rust or
scales around the radiator cap or radiator filler hole, and
the EC should also be free from oil.
Replace the EC if excessively dirty.
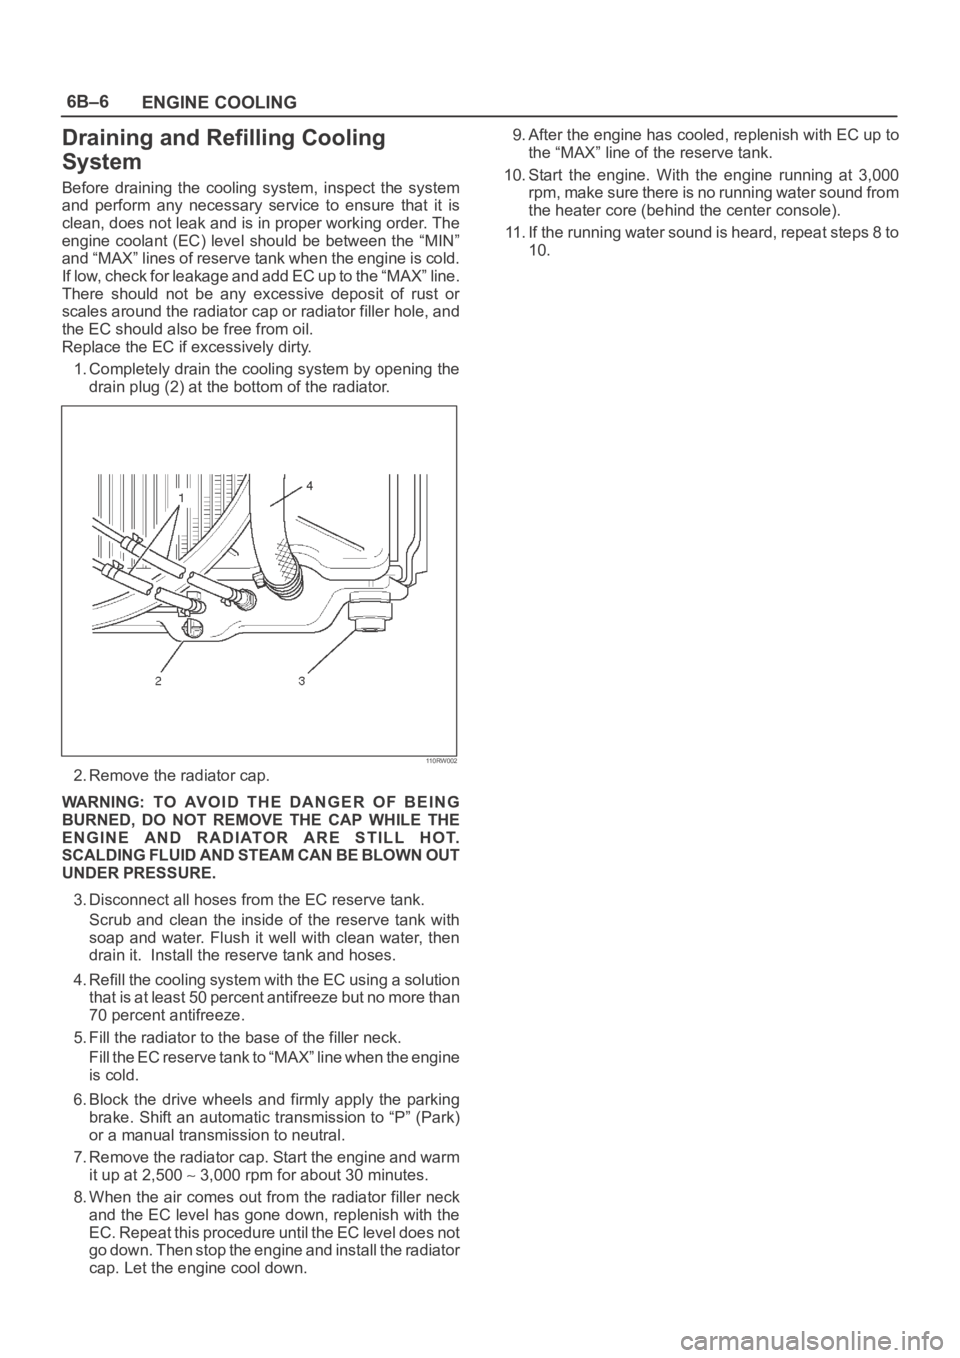
1. Completely drain the cooling system by opening the
drain plug (2) at the bottom of the radiator.
110RW002
2. Remove the radiator cap.
WARNING: TO AVOID THE DANGER OF BEING
BURNED, DO NOT REMOVE THE CAP WHILE THE
ENGINE AND RADIATOR ARE STILL HOT.
SCALDING FLUID AND STEAM CAN BE BLOWN OUT
UNDER PRESSURE.
3. Disconnect all hoses from the EC reserve tank.
Scrub and clean the inside of the reserve tank with
soap and water. Flush it well with clean water, then
drain it. Install the reserve tank and hoses.
4. Refill the cooling system with the EC using a solution
that is at least 50 percent antifreeze but no more than
70 percent antifreeze.
5. Fill the radiator to the base of the filler neck.
Fill the EC reserve tank to “MAX” line when the engine
is cold.
6. Block the drive wheels and firmly apply the parking
brake. Shift an automatic transmission to “P” (Park)
or a manual transmission to neutral.
7. Remove the radiator cap. Start the engine and warm
it up at 2,500
3,000 rpm for about 30 minutes.
8. When the air comes out from the radiator filler neck
and the EC level has gone down, replenish with the
EC. Repeat this procedure until the EC level does not
go down. Then stop the engine and install the radiator
cap. Let the engine cool down.9. After the engine has cooled, replenish with EC up to
the “MAX” line of the reserve tank.
10. Start the engine. With the engine running at 3,000
rpm, make sure there is no running water sound from
the heater core (behind the center console).
11. If the running water sound is heard, repeat steps 8 to
10.
Page 4622 of 6000
ENGINE ELECTRICAL6D1–3
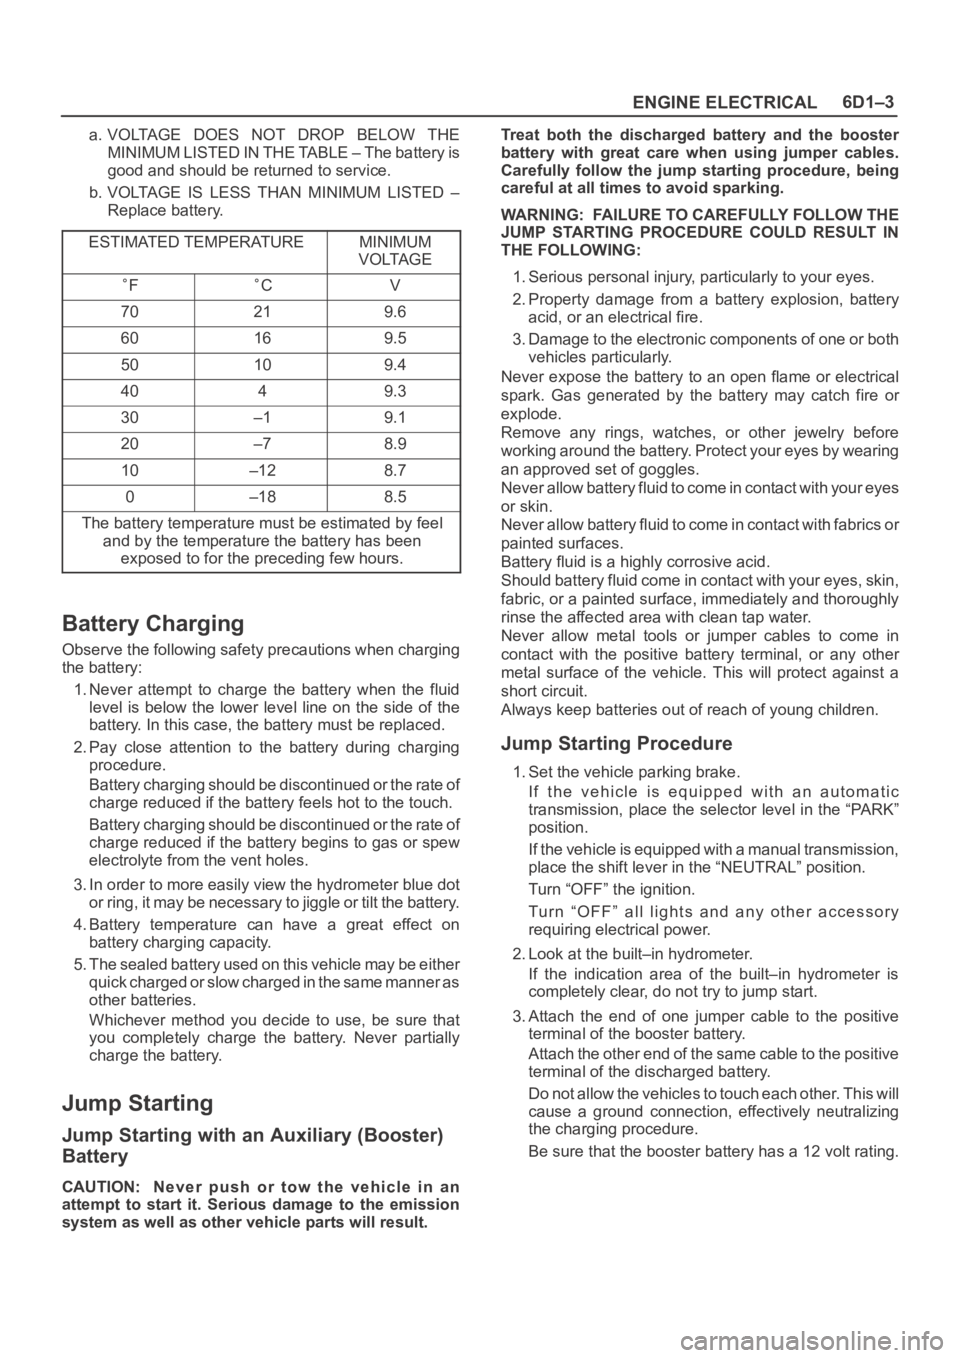
a. VOLTAGE DOES NOT DROP BELOW THE
MINIMUM LISTED IN THE TABLE – The battery is
good and should be returned to service.
b. VOLTAGE IS LESS THAN MINIMUM LISTED –
Replace battery.
ESTIMATED TEMPERATURE
MINIMUM
VOLTAGE
FCV
70219.6
60169.5
50109.4
4049.3
30–19.1
20–78.9
10–128.7
0–188.5
The battery temperature must be estimated by feel
and by the temperature the battery has been
exposed to for the preceding few hours.
Battery Charging
Observe the following safety precautions when charging
the battery:
1. Never attempt to charge the battery when the fluid
level is below the lower level line on the side of the
battery. In this case, the battery must be replaced.
2. Pay close attention to the battery during charging
procedure.
Battery charging should be discontinued or the rate of
charge reduced if the battery feels hot to the touch.
Battery charging should be discontinued or the rate of
charge reduced if the battery begins to gas or spew
electrolyte from the vent holes.
3. In order to more easily view the hydrometer blue dot
or ring, it may be necessary to jiggle or tilt the battery.
4. Battery temperature can have a great effect on
battery charging capacity.
5. The sealed battery used on this vehicle may be either
quick charged or slow charged in the same manner as
other batteries.
Whichever method you decide to use, be sure that
you completely charge the battery. Never partially
charge the battery.
Jump Starting
Jump Starting with an Auxiliary (Booster)
Battery
CAUTION: Never push or tow the vehicle in an
attempt to start it. Serious damage to the emission
system as well as other vehicle parts will result.Treat both the discharged battery and the booster
battery with great care when using jumper cables.
Carefully follow the jump starting procedure, being
careful at all times to avoid sparking.
WARNING: FAILURE TO CAREFULLY FOLLOW THE
JUMP STARTING PROCEDURE COULD RESULT IN
THE FOLLOWING:
1. Serious personal injury, particularly to your eyes.
2. Property damage from a battery explosion, battery
acid, or an electrical fire.
3. Damage to the electronic components of one or both
vehicles particularly.
Never expose the battery to an open flame or electrical
spark. Gas generated by the battery may catch fire or
explode.
Remove any rings, watches, or other jewelry before
working around the battery. Protect your eyes by wearing
an approved set of goggles.
Never allow battery fluid to come in contact with your eyes
or skin.
Never allow battery fluid to come in contact with fabrics or
painted surfaces.
Battery fluid is a highly corrosive acid.
Should battery fluid come in contact with your eyes, skin,
fabric, or a painted surface, immediately and thoroughly
rinse the affected area with clean tap water.
Never allow metal tools or jumper cables to come in
contact with the positive battery terminal, or any other
metal surface of the vehicle. This will protect against a
short circuit.
Always keep batteries out of reach of young children.
Jump Starting Procedure
1. Set the vehicle parking brake.
If the vehicle is equipped with an automatic
transmission, place the selector level in the “PARK”
position.
If the vehicle is equipped with a manual transmission,
place the shift lever in the “NEUTRAL” position.
Turn “OFF” the ignition.
Turn “OFF” all lights and any other accessory
requiring electrical power.
2. Look at the built–in hydrometer.
If the indication area of the built–in hydrometer is
completely clear, do not try to jump start.
3. Attach the end of one jumper cable to the positive
terminal of the booster battery.
Attach the other end of the same cable to the positive
terminal of the discharged battery.
Do not allow the vehicles to touch each other. This will
cause a ground connection, effectively neutralizing
the charging procedure.
Be sure that the booster battery has a 12 volt rating.
Page 4674 of 6000
6E–17 ENGINE DRIVEABILITY AND EMISSIONS
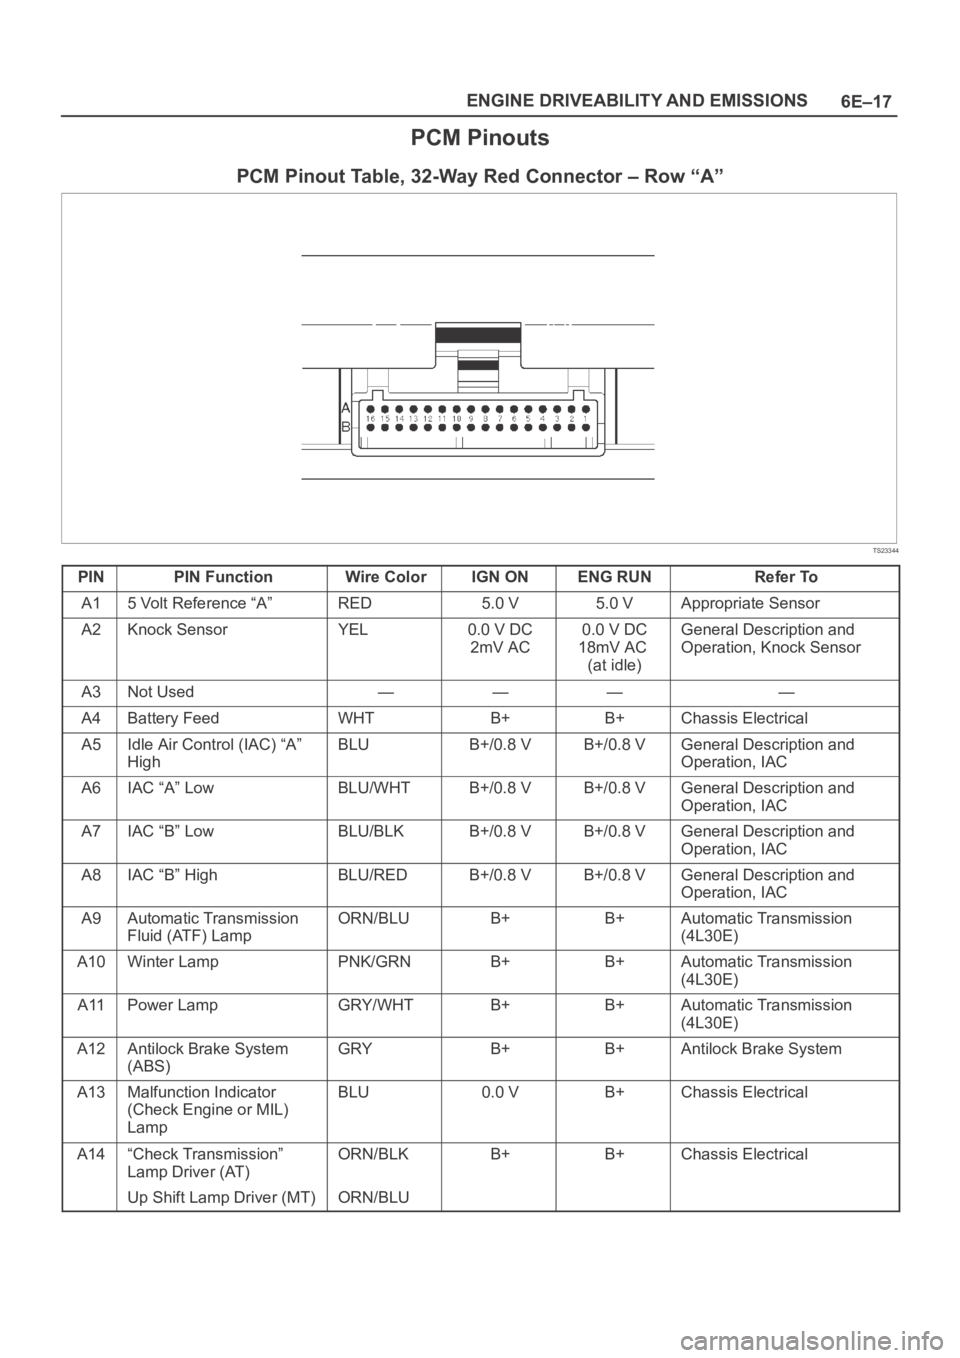
PCM Pinouts
PCM Pinout Table, 32-Way Red Connector – Row “A”
TS23344
PINPIN FunctionWire ColorIGN ONENG RUNRefer To
A15 Volt Reference “A”RED5.0 V5.0 VAppropriate Sensor
A2Knock SensorYEL0.0 V DC
2mV AC0.0 V DC
18mV AC
(at idle)General Description and
Operation, Knock Sensor
A3Not Used————
A4Battery FeedWHTB+B+Chassis Electrical
A5Idle Air Control (IAC) “A”
HighBLUB+/0.8 VB+/0.8 VGeneral Description and
Operation, IAC
A6IAC “A” LowBLU/WHTB+/0.8 VB+/0.8 VGeneral Description and
Operation, IAC
A7IAC “B” LowBLU/BLKB+/0.8 VB+/0.8 VGeneral Description and
Operation, IAC
A8IAC “B” HighBLU/REDB+/0.8 VB+/0.8 VGeneral Description and
Operation, IAC
A9Automatic Transmission
Fluid (ATF) LampORN/BLUB+B+Automatic Transmission
(4L30E)
A10Winter LampPNK/GRNB+B+Automatic Transmission
(4L30E)
A11Power LampGRY/WHTB+B+Automatic Transmission
(4L30E)
A12Antilock Brake System
(ABS)GRYB+B+Antilock Brake System
A13Malfunction Indicator
(Check Engine or MIL)
LampBLU0.0 VB+Chassis Electrical
A14“Check Transmission”
Lamp Driver (AT)ORN/BLKB+B+Chassis Electrical
Up Shift Lamp Driver (MT)ORN/BLU
Page 4684 of 6000
6E–27 ENGINE DRIVEABILITY AND EMISSIONS
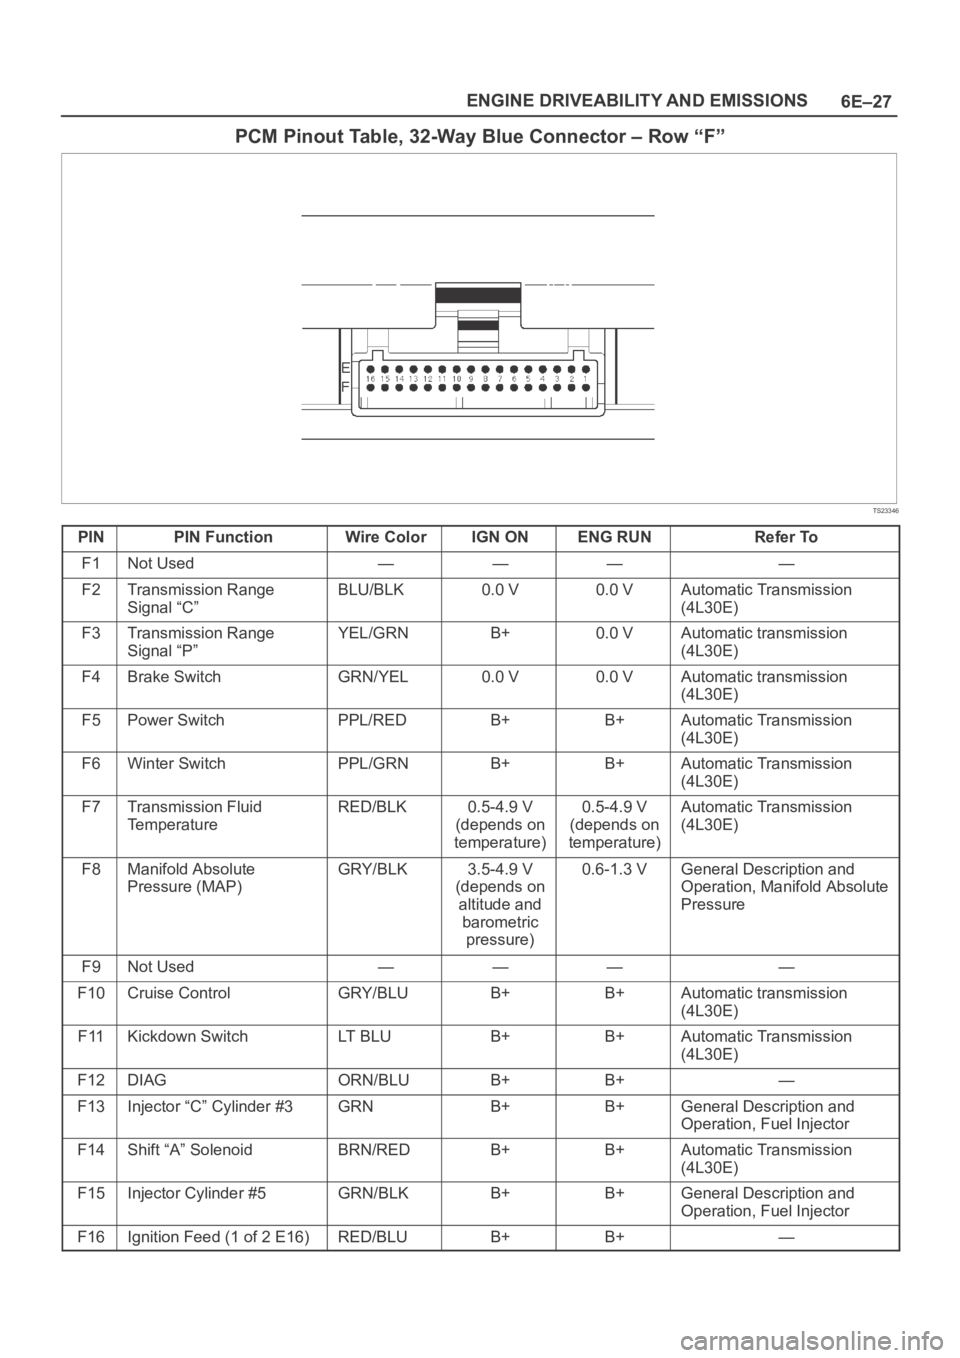
PCM Pinout Table, 32-Way Blue Connector – Row “F”
TS23346
PINPIN FunctionWire ColorIGN ONENG RUNRefer To
F1Not Used————
F2Transmission Range
Signal “C”BLU/BLK0.0 V0.0 VAutomatic Transmission
(4L30E)
F3Transmission Range
Signal “P”YEL/GRNB+0.0 VAutomatic transmission
(4L30E)
F4Brake SwitchGRN/YEL0.0 V0.0 VAutomatic transmission
(4L30E)
F5Power SwitchPPL/REDB+B+Automatic Transmission
(4L30E)
F6Winter SwitchPPL/GRNB+B+Automatic Transmission
(4L30E)
F7Transmission Fluid
TemperatureRED/BLK0.5-4.9 V
(depends on
temperature)0.5-4.9 V
(depends on
temperature)Automatic Transmission
(4L30E)
F8Manifold Absolute
Pressure (MAP)GRY/BLK3.5-4.9 V
(depends on
altitude and
barometric
pressure)0.6-1.3 VGeneral Description and
Operation, Manifold Absolute
Pressure
F9Not Used————
F10Cruise ControlGRY/BLUB+B+Automatic transmission
(4L30E)
F11Kickdown SwitchLT B L UB+B+Automatic Transmission
(4L30E)
F12DIAGORN/BLUB+B+—
F13Injector “C” Cylinder #3GRNB+B+General Description and
Operation, Fuel Injector
F14Shift “A” SolenoidBRN/REDB+B+Automatic Transmission
(4L30E)
F15Injector Cylinder #5GRN/BLKB+B+General Description and
Operation, Fuel Injector
F16Ignition Feed (1 of 2 E16)RED/BLUB+B+—
Page 5406 of 6000

ENGINE ELECTRICAL 6D – 3
ON-VEHICLE SERVICE
BATTERY CHARGING
Observe the following safety precautions when
charging the battery:
1. Never attempt to charge the battery when the fluid
level is below the lower level line on the side of the
battery. In this case, the battery must be replaced.
2. Pay close attention to the battery during the
charging procedure.
Battery charging should be discontinued or the rate
of charge reduced if the battery feels hot to the
touch.
Battery charging should be discontinued or the rate
of charge reduced if the battery begins to gas or
spew electrolyte from the vent holes.
3. In order to more easily view the hydrometer blue
dot or ring, it may be necessary to jiggle or tilt the
battery.
4. Battery temperature can have a great effect on
battery charging capacity.
5. The sealed battery used on this vehicle may be
either quick-charged or slow-charged in the same
manner as other batteries.
Whichever method you decide to use, be sure that
you completely charge the battery. Never partially
charge the battery.
JUMP STARTING
JUMP STARTING WITH AN AUXILIARY
(BOOSTER) BATTERY
CAUTION: Never push or tow the vehicle in an
attempt to start it. Serious damage to the emission
system as well as other vehicle parts will result.
Treat both the discharged battery and the booster
battery with great care when using jumper cables.
Carefully follow the jump starting procedure, being
careful at all times to avoid sparking.
WARNING: Failure to carefully follow the jump
starting procedure could result in the following:
1. Serious personal injury, particularly to your
eyes.
2. Property damage from a battery explosion,
battery acid, or an electrical fire.
3. Damage to the electronic components of one or
both vehicles.
Never expose the battery to an open flame or electrical
spark. Gas generated by the battery may catch fire or
explode. Remove any rings, watches, or other jewelry
before working around the battery. Protect your eyes by
wearing an approved set of goggles.
Never allow battery fluid to come in contact with your
eyes or skin.
Never allow battery fluid to come in contact with fabrics
or painted surfaces.
Battery fluid is a highly corrosive acid.Should battery fluid come in contact with your eyes,
skin, fabric, or a painted surface, immediately and
thoroughly rinse the affected area with clean tap water.
Never allow metal tools or jumper cables to come in
contact with the positive battery terminal, or any other
metal surface of the vehicle. This will protect against a
short circuit.
Always keep batteries out of the reach of young
children.
JUMP STARTING PROCEDURE
1. Set the vehicle parking brake.
If the vehicle is equipped with an automatic
transmission, place the selector lever in the “PARK”
position.
If the vehicle is equipped with a manual
transmission place the shift lever in the “NEUTRAL”
position.
Turn “OFF” the ignition.
Turn “OFF” all lights and any other accessory
requiring electrical power.
2. Look at the built-in hydrometer.
If the indication area of the built-in hydrometer is
completely clear, do not try to jump start.
3. Attach the end of one jumper cable to the positive
terminal of the booster battery.
Attach the other end of the same cable to the
positive terminal of the discharged battery.
Do not allow the vehicles to touch each other.
This will cause a ground connection, effectively
neutralizing the charging procedure.
Be sure that the booster battery has a 12 volt rating.
4. Attach one end of the remaining cable to the
negative terminal of the booster battery.
Attach the other end of the same cable to a solid
engine ground (such as the A/C compressor
bracket or the generator mounting bracket) of the
vehicle with the discharged battery.
This ground connection must be at least 450 mm
(18 in) from the battery of the vehicle whose battery
is being charged.
WARNING: Never attach the end of the jumper
cable directly to the negative terminal of the dead
battery.
5. Start the engine of the vehicle with the good battery.
Make sure that all unnecessary electrical
accessories have been turned “OFF”.
6. Start the engine of the vehicle with the dead battery.
7. To remove the jumper cables, follow the above
directions in the reverse order.
Be sure to first disconnect the negative cable from
the vehicle with the discharged battery.
Page 5699 of 6000
7A–10
AUTOMATIC TRANSMISSION (4L30–E)
Checking Transmission Fluid Level
and Condition
Checking fluid level and condition (color and odor) at
regular intervals will provide early diagnosis information
about the transmission. This information may be used to
correct a condition that, if not detected early, could result
in major transmission repairs.
IMPORTANT:When new, automatic transmission fluid
is red in color. As the vehicle is driven, the transmission
fluid will begin to look darker in color. The color may
eventually appear light brown.
A dark brown color with burnt odor may indicate
excessive fluid deterioration and signal a need for fluid
change.
Fluid Level
When adding or changing fluid, use only DEXRON –III.
Refer to Maintenance and Lubrication in General
Information section for maintenance information and
servicing interval.
CAUTION: DO NOT OVERFILL.
Overfilling will cause foaming, loss of fluid, abnor-
mal shifting and possible damage to the transmis-
sion.
1. Park the vehicle on level ground and apply the parking
brake firmly.
2. Check fluid level with engine running at idle.
NOTE: Be sure that transmission fluid temperature is
below 30
C (86F).
3. Move the selector lever through all gear ranges.
4. Move the selector lever to “Park”.
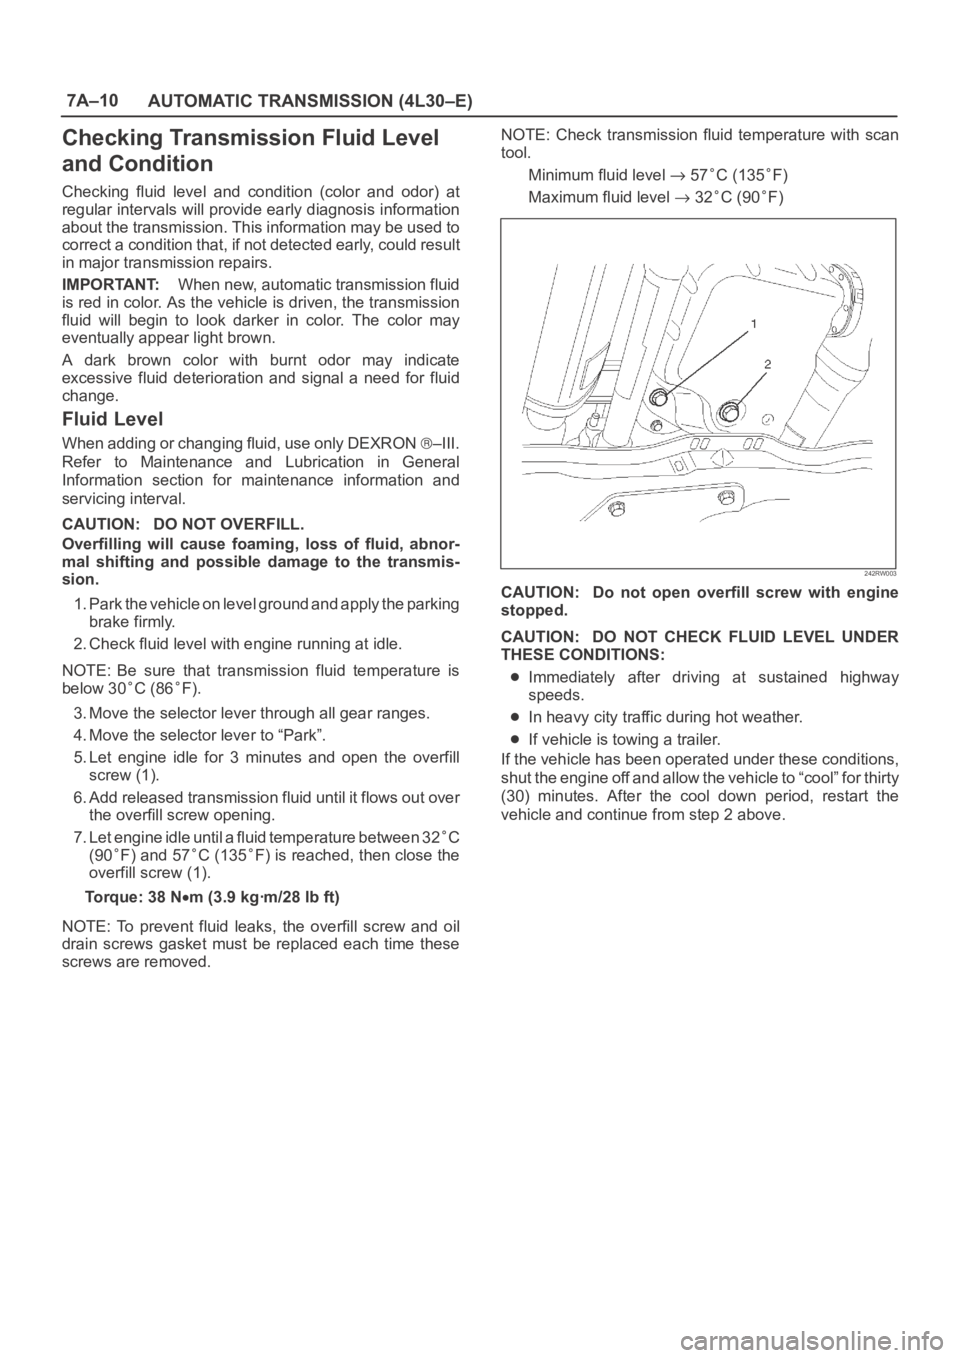
5. Let engine idle for 3 minutes and open the overfill
screw (1).
6. Add released transmission fluid until it flows out over
the overfill screw opening.
7. Let engine idle until a fluid temperature between 32
C
(90
F) and 57C (135F) is reached, then close the
overfill screw (1).
Torque: 38 N
m (3.9 kgꞏm/28 lb ft)
NOTE: To prevent fluid leaks, the overfill screw and oil
drain screws gasket must be replaced each time these
screws are removed.NOTE: Check transmission fluid temperature with scan
tool.
Minimum fluid level
57C (135F)
Maximum fluid level
32C (90F)
242RW003
CAUTION: Do not open overfill screw with engine
stopped.
CAUTION: DO NOT CHECK FLUID LEVEL UNDER
THESE CONDITIONS:
Immediately after driving at sustained highway
speeds.
In heavy city traffic during hot weather.
If vehicle is towing a trailer.
If the vehicle has been operated under these conditions,
shut the engine off and allow the vehicle to “cool” for thirty
(30) minutes. After the cool down period, restart the
vehicle and continue from step 2 above.
Page 5702 of 6000
7A–13 AUTOMATIC TRANSMISSION (4L30–E)
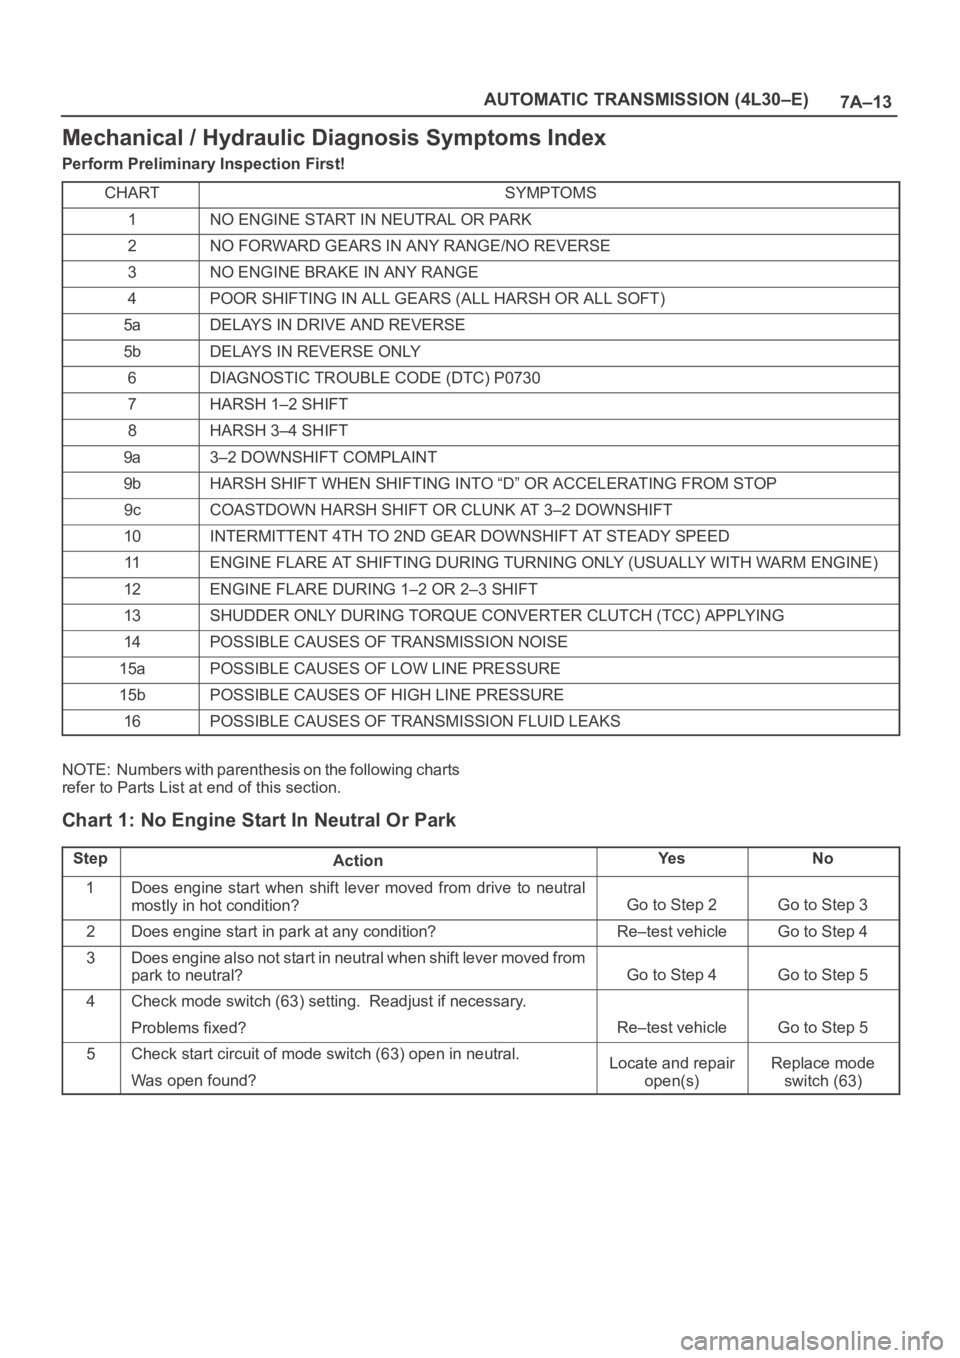
Mechanical / Hydraulic Diagnosis Symptoms Index
Perform Preliminary Inspection First!
CHART
SYMPTOMS
1NO ENGINE START IN NEUTRAL OR PARK
2NO FORWARD GEARS IN ANY RANGE/NO REVERSE
3NO ENGINE BRAKE IN ANY RANGE
4POOR SHIFTING IN ALL GEARS (ALL HARSH OR ALL SOFT)
5aDELAYS IN DRIVE AND REVERSE
5bDELAYS IN REVERSE ONLY
6DIAGNOSTIC TROUBLE CODE (DTC) P0730
7HARSH 1–2 SHIFT
8HARSH 3–4 SHIFT
9a3–2 DOWNSHIFT COMPLAINT
9bHARSH SHIFT WHEN SHIFTING INTO “D” OR ACCELERATING FROM STOP
9cCOASTDOWN HARSH SHIFT OR CLUNK AT 3–2 DOWNSHIFT
10INTERMITTENT 4TH TO 2ND GEAR DOWNSHIFT AT STEADY SPEED
11ENGINE FLARE AT SHIFTING DURING TURNING ONLY (USUALLY WITH WARM ENGINE)
12ENGINE FLARE DURING 1–2 OR 2–3 SHIFT
13SHUDDER ONLY DURING TORQUE CONVERTER CLUTCH (TCC) APPLYING
14POSSIBLE CAUSES OF TRANSMISSION NOISE
15aPOSSIBLE CAUSES OF LOW LINE PRESSURE
15bPOSSIBLE CAUSES OF HIGH LINE PRESSURE
16POSSIBLE CAUSES OF TRANSMISSION FLUID LEAKS
NOTE: Numbers with parenthesis on the following charts
refer to Parts List at end of this section.
Chart 1: No Engine Start In Neutral Or Park
StepActionYe sNo
1Does engine start when shift lever moved from drive to neutral
mostly in hot condition?
Go to Step 2Go to Step 3
2Does engine start in park at any condition?Re–test vehicleGo to Step 4
3Does engine also not start in neutral when shift lever moved from
park to neutral?
Go to Step 4Go to Step 5
4Check mode switch (63) setting. Readjust if necessary.
Problems fixed?
Re–test vehicleGo to Step 5
5Check start circuit of mode switch (63) open in neutral.
Was open found?Locate and repair
open(s)Replace mode
switch (63)