1998 OPEL FRONTERA air condition
[x] Cancel search: air conditionPage 4216 of 6000
4C–10
DRIVE SHAFT SYSTEM
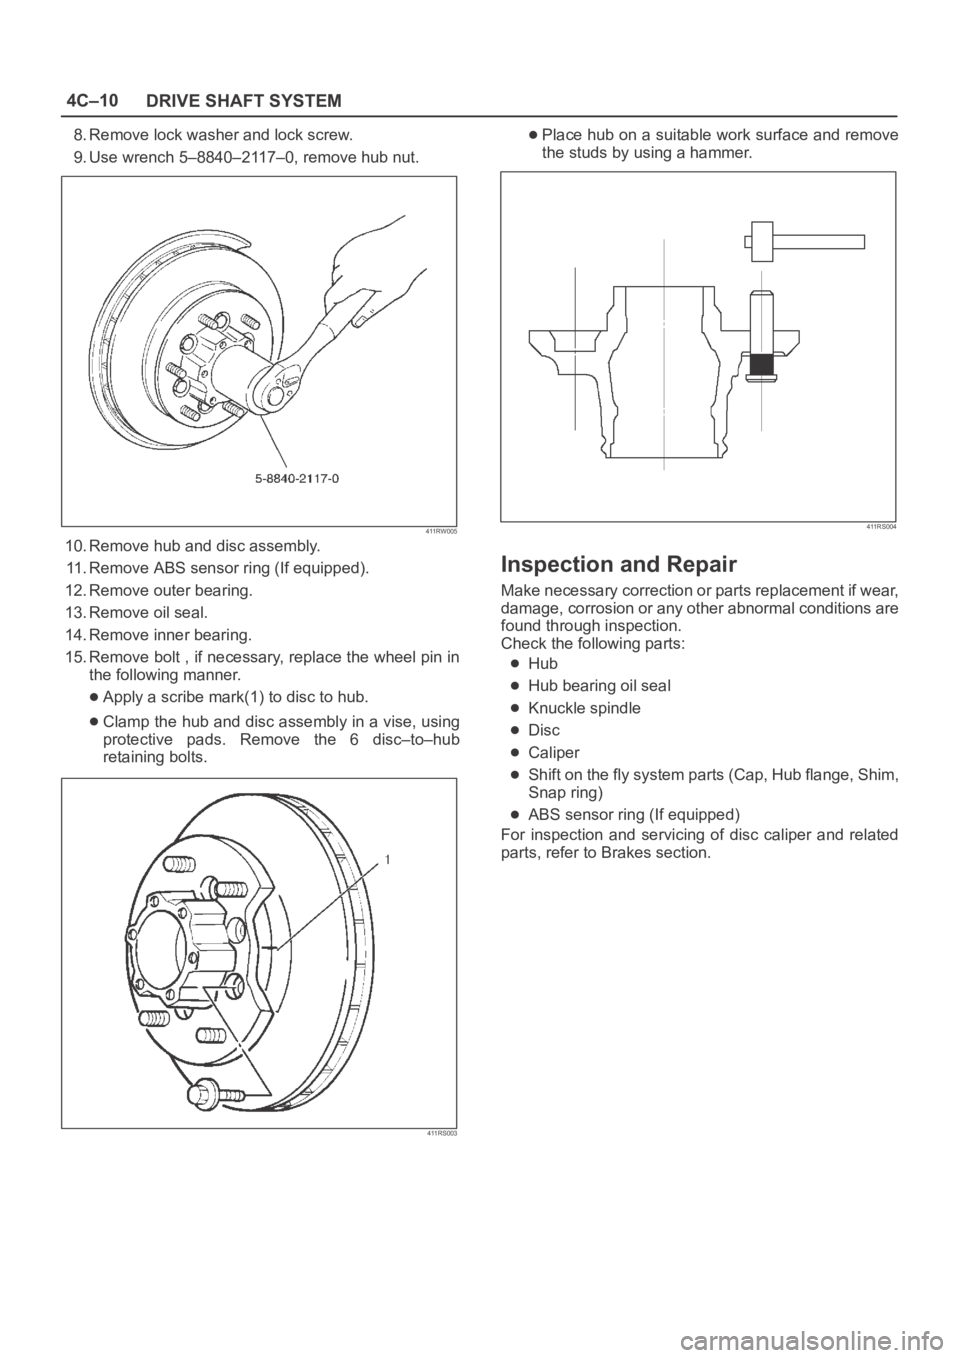
8. Remove lock washer and lock screw.
9. Use wrench 5–8840–2117–0, remove hub nut.
411RW005
10. Remove hub and disc assembly.
11. Remove ABS sensor ring (If equipped).
12. Remove outer bearing.
13. Remove oil seal.
14. Remove inner bearing.
15. Remove bolt , if necessary, replace the wheel pin in
the following manner.
Apply a scribe mark(1) to disc to hub.
Clamp the hub and disc assembly in a vise, using
protective pads. Remove the 6 disc–to–hub
retaining bolts.
411RS003
Place hub on a suitable work surface and remove
the studs by using a hammer.
411RS004
Inspection and Repair
Make necessary correction or parts replacement if wear,
damage, corrosion or any other abnormal conditions are
found through inspection.
Check the following parts:
Hub
Hub bearing oil seal
Knuckle spindle
Disc
Caliper
Shift on the fly system parts (Cap, Hub flange, Shim,
Snap ring)
ABS sensor ring (If equipped)
For inspection and servicing of disc caliper and related
parts, refer to Brakes section.
Page 4222 of 6000
4C–16
DRIVE SHAFT SYSTEM
Inspection and Repair
Make necessary correction or parts replacement if wear,
damage, corrosion or any other abnormal condition are
found through inspection.
Check the following parts.
Hub
Hub bearing, oil seal
Knuckle spindle
Disc
Caliper
Free wheeling hub parts (Clutch, knob, follower,
inner, ring and spring)
ABS sensor ring (if so equipped)
For inspection and servicing of disc caliper, and relative
parts, refer to Brakes section.
Reassembly
1. Install spacer.
Apply about 1 g wheel bearing grease to both face of
spacer.
2. Install ring.
Apply about 3 g wheel bearing grease to inside face
of ring.
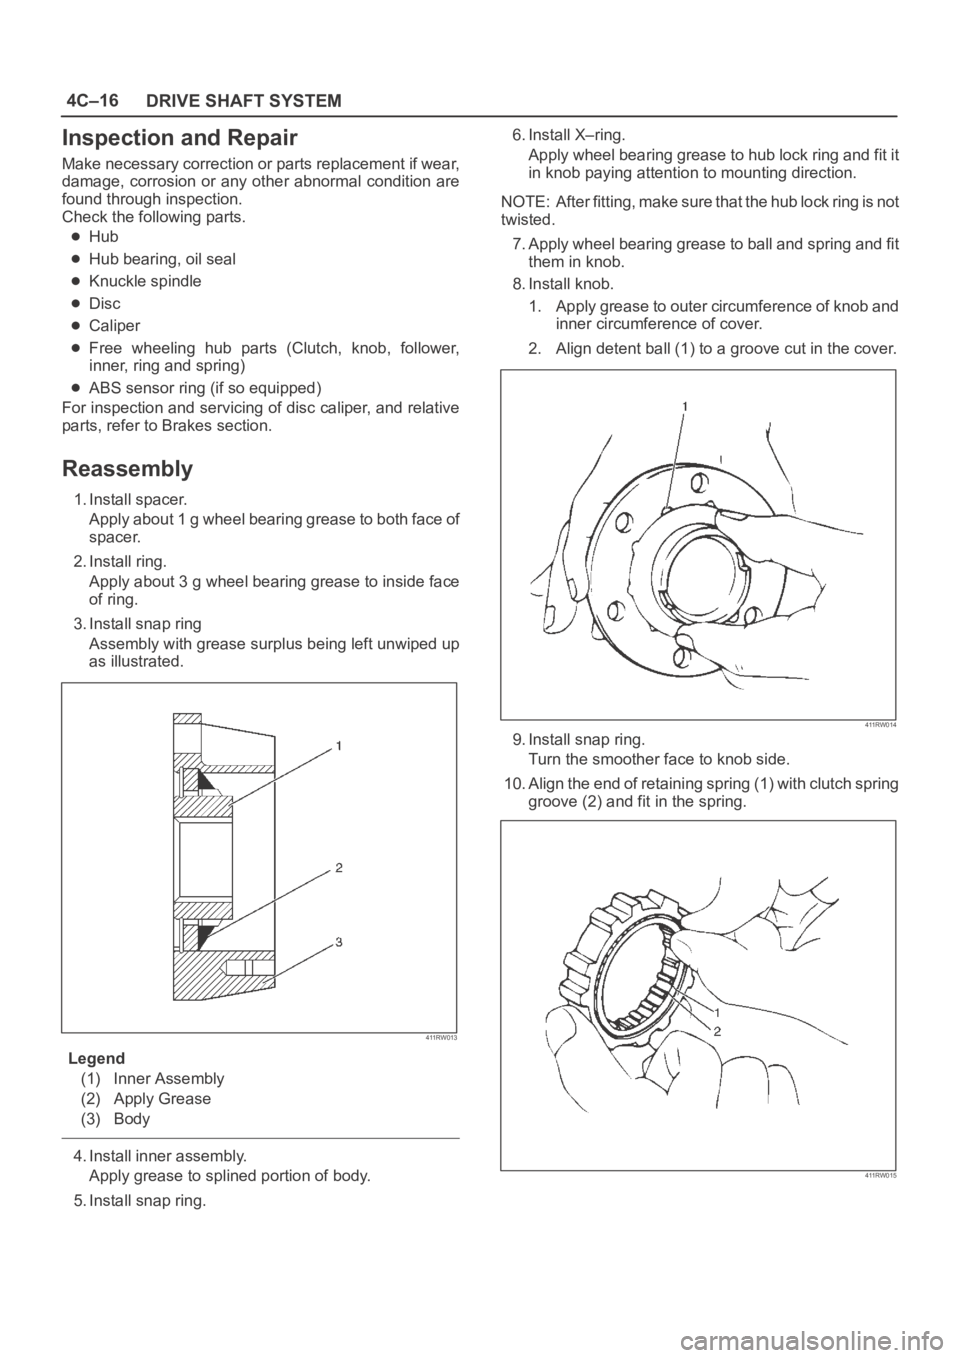
3. Install snap ring
Assembly with grease surplus being left unwiped up
as illustrated.
411RW013
Legend
(1) Inner Assembly
(2) Apply Grease
(3) Body
4. Install inner assembly.
Apply grease to splined portion of body.
5. Install snap ring.6. Install X–ring.
Apply wheel bearing grease to hub lock ring and fit it
in knob paying attention to mounting direction.
NOTE: After fitting, make sure that the hub lock ring is not
twisted.
7. Apply wheel bearing grease to ball and spring and fit
them in knob.
8. Install knob.
1. Apply grease to outer circumference of knob and
inner circumference of cover.
2. Align detent ball (1) to a groove cut in the cover.
411RW014
9. Install snap ring.
Turn the smoother face to knob side.
10. Align the end of retaining spring (1) with clutch spring
groove (2) and fit in the spring.
411RW015
Page 4231 of 6000
4C–25 DRIVE SHAFT SYSTEM
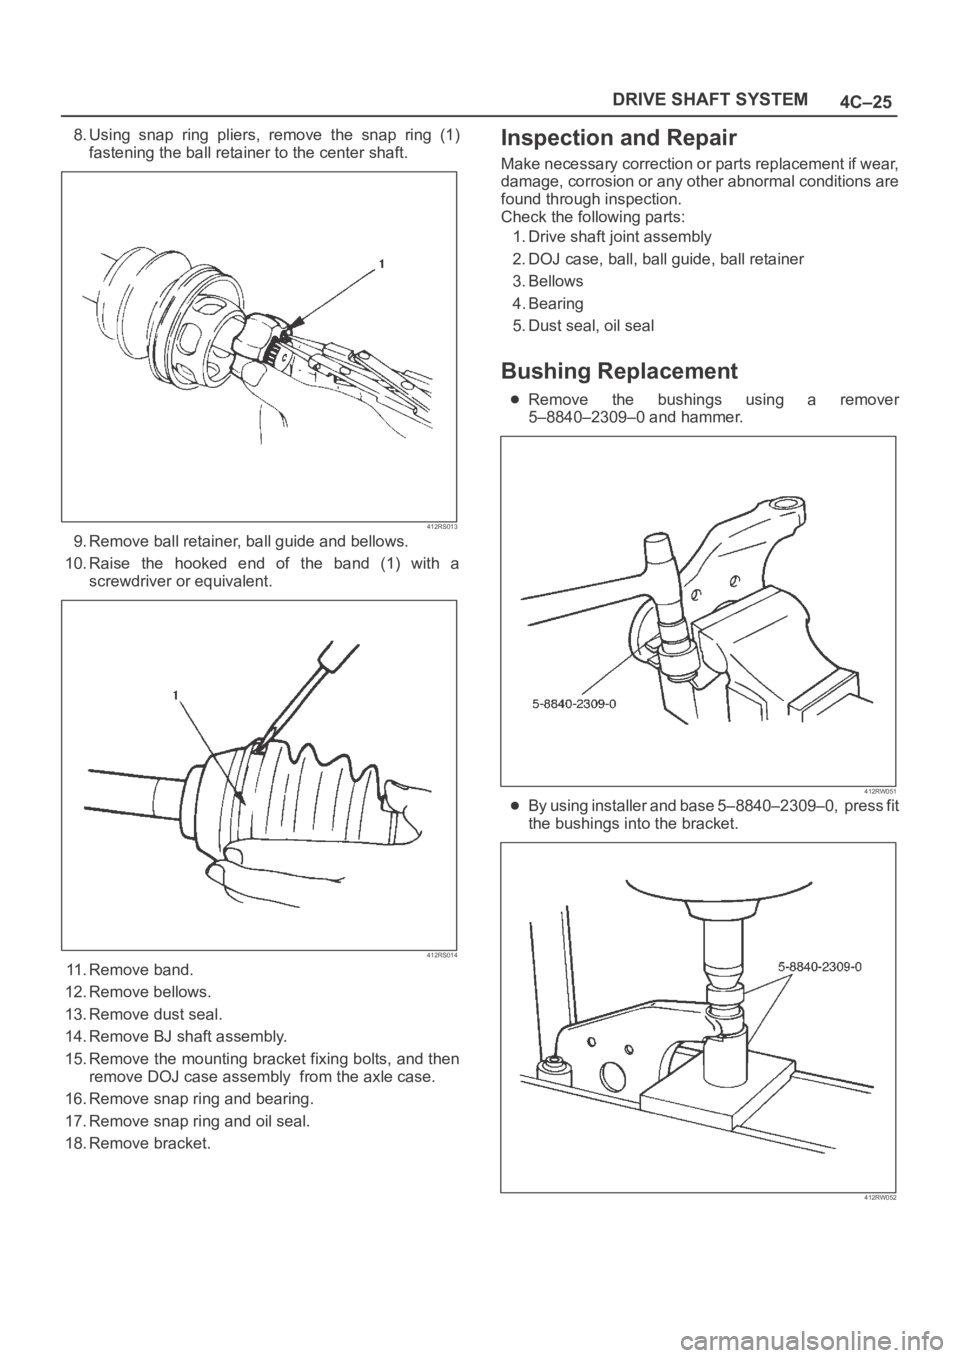
8. Using snap ring pliers, remove the snap ring (1)
fastening the ball retainer to the center shaft.
412RS013
9. Remove ball retainer, ball guide and bellows.
10. Raise the hooked end of the band (1) with a
screwdriver or equivalent.
412RS014
11. Remove band.
12. Remove bellows.
13. Remove dust seal.
14. Remove BJ shaft assembly.
15. Remove the mounting bracket fixing bolts, and then
remove DOJ case assembly from the axle case.
16. Remove snap ring and bearing.
17. Remove snap ring and oil seal.
18. Remove bracket.
Inspection and Repair
Make necessary correction or parts replacement if wear,
damage, corrosion or any other abnormal conditions are
found through inspection.
Check the following parts:
1. Drive shaft joint assembly
2. DOJ case, ball, ball guide, ball retainer
3. Bellows
4. Bearing
5. Dust seal, oil seal
Bushing Replacement
Remove the bushings using a remover
5–8840–2309–0 and hammer.
412RW051
By using installer and base 5–8840–2309–0, press fit
the bushings into the bracket.
412RW052
Page 4248 of 6000
4C–42
DRIVE SHAFT SYSTEM
3. Make sure of proper position for reinstallation by
applying setting marks, then remove spider .
Inspection and Repair
Make necessary correction or parts replacement if wear,
damage, corrosion or any other abnormal condition is
found through inspection.
NOTE: When any part of the journal assembly (spider,
needle roller bearing) requires replacement, be sure to
replace the entire assembly.
Check the following parts for wear, damage, noise or any
other abnormal conditions:
1. Spider
2. Needle roller bearing
3. Yoke
4. Flange
5. Constant velocity joint
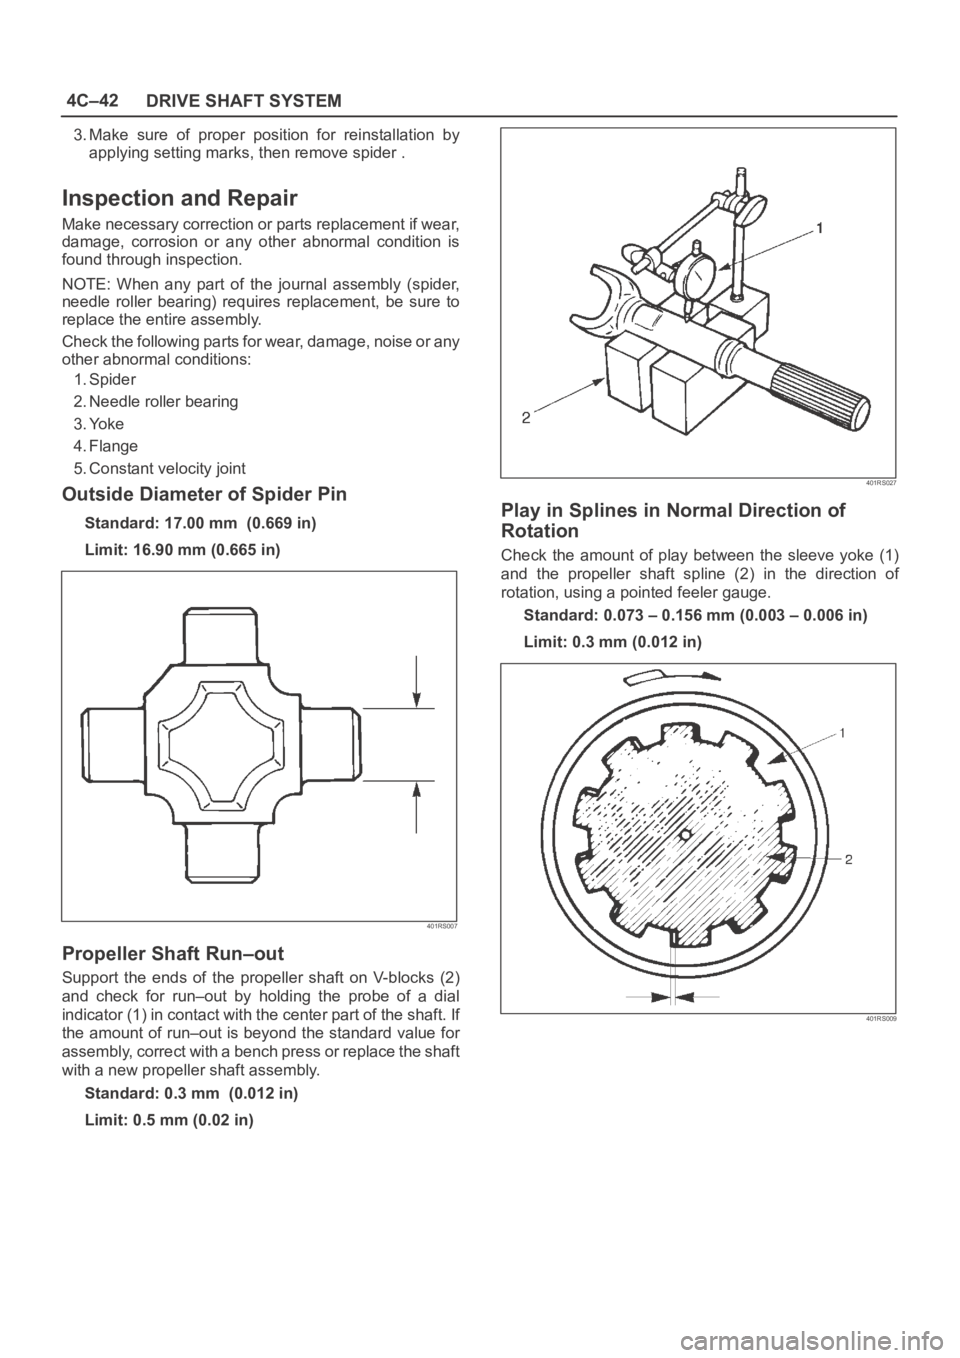
Outside Diameter of Spider Pin
Standard: 17.00 mm (0.669 in)
Limit: 16.90 mm (0.665 in)
401RS007
Propeller Shaft Run–out
Support the ends of the propeller shaft on V-blocks (2)
and check for run–out by holding the probe of a dial
indicator (1) in contact with the center part of the shaft. If
the amount of run–out is beyond the standard value for
assembly, correct with a bench press or replace the shaft
with a new propeller shaft assembly.
Standard: 0.3 mm (0.012 in)
Limit: 0.5 mm (0.02 in)
401RS027
Play in Splines in Normal Direction of
Rotation
Check the amount of play between the sleeve yoke (1)
and the propeller shaft spline (2) in the direction of
rotation, using a pointed feeler gauge.
Standard: 0.073 – 0.156 mm (0.003 – 0.006 in)
Limit: 0.3 mm (0.012 in)
401RS009
Page 4258 of 6000
4C–52
DRIVE SHAFT SYSTEM
3. Make sure of proper position for reinstallation by
applying setting marks, then remove spider with
grease fitting.
Inspection and Repair
Make necessary correction or parts replacement if wear,
damage, corrosion or any other abnormal condition is
found through inspection.
NOTE: When any part of the journal assembly (spider,
needle roller bearing, grease fitting) requires
replacement, be sure to replace the entire assembly.
Check the following parts for wear, damage, noise or any
other abnormal conditions:
1. Spider
2. Needle roller bearing
3. Yoke
4. Flange
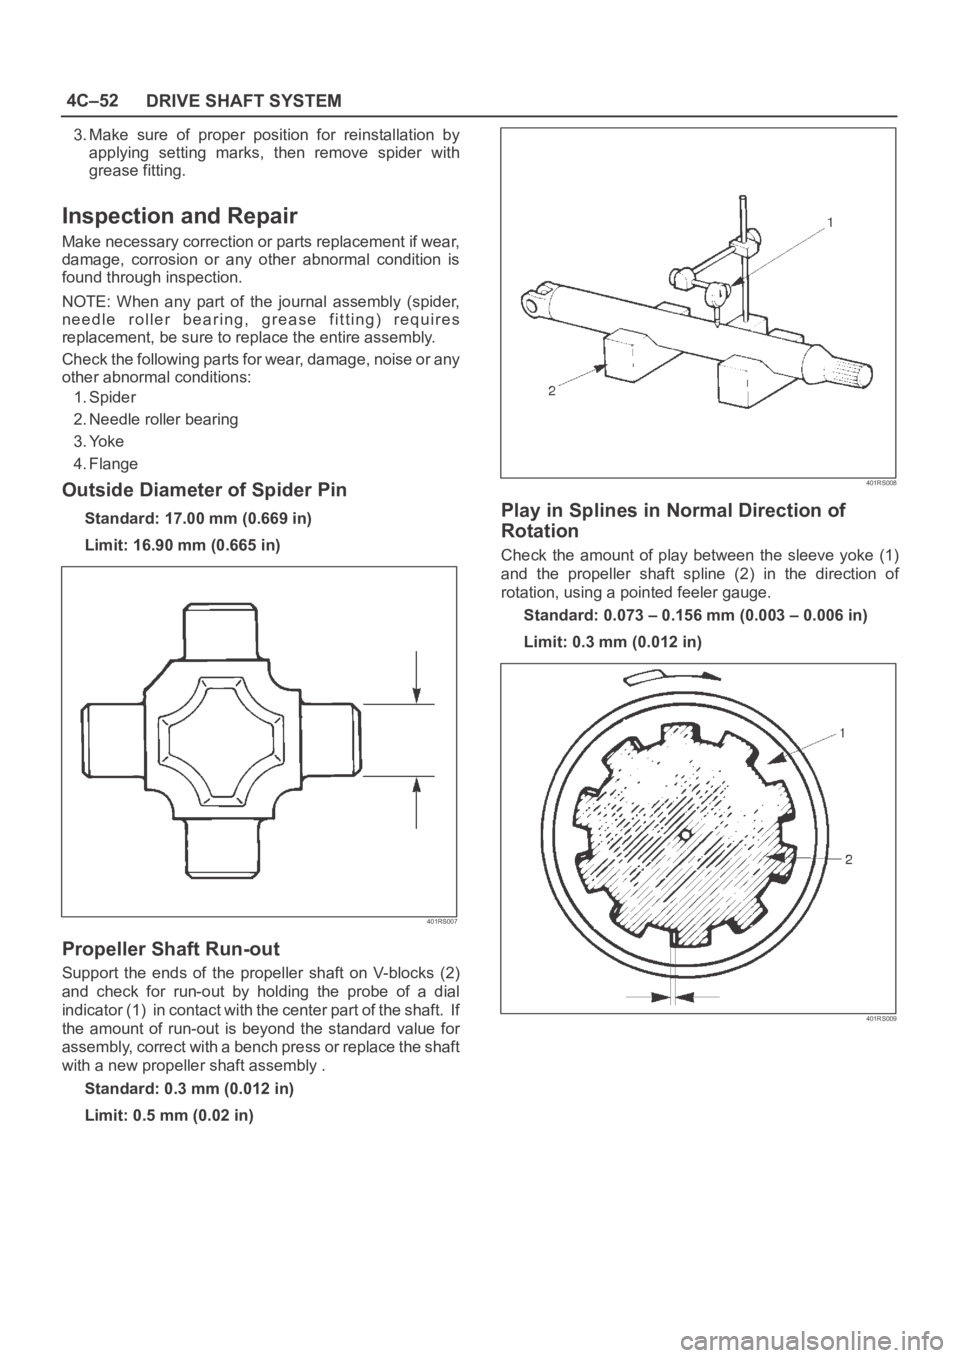
Outside Diameter of Spider Pin
Standard: 17.00 mm (0.669 in)
Limit: 16.90 mm (0.665 in)
401RS007
Propeller Shaft Run-out
Support the ends of the propeller shaft on V-blocks (2)
and check for run-out by holding the probe of a dial
indicator (1) in contact with the center part of the shaft. If
the amount of run-out is beyond the standard value for
assembly, correct with a bench press or replace the shaft
with a new propeller shaft assembly .
Standard: 0.3 mm (0.012 in)
Limit: 0.5 mm (0.02 in)
401RS008
Play in Splines in Normal Direction of
Rotation
Check the amount of play between the sleeve yoke (1)
and the propeller shaft spline (2) in the direction of
rotation, using a pointed feeler gauge.
Standard: 0.073 – 0.156 mm (0.003 – 0.006 in)
Limit: 0.3 mm (0.012 in)
401RS009
Page 4294 of 6000
TRANSFER CASE (STANDARD TYPE)
4D1–33
NOTE: Do not reuse the stopper plate. (Shift On The Fly
model)
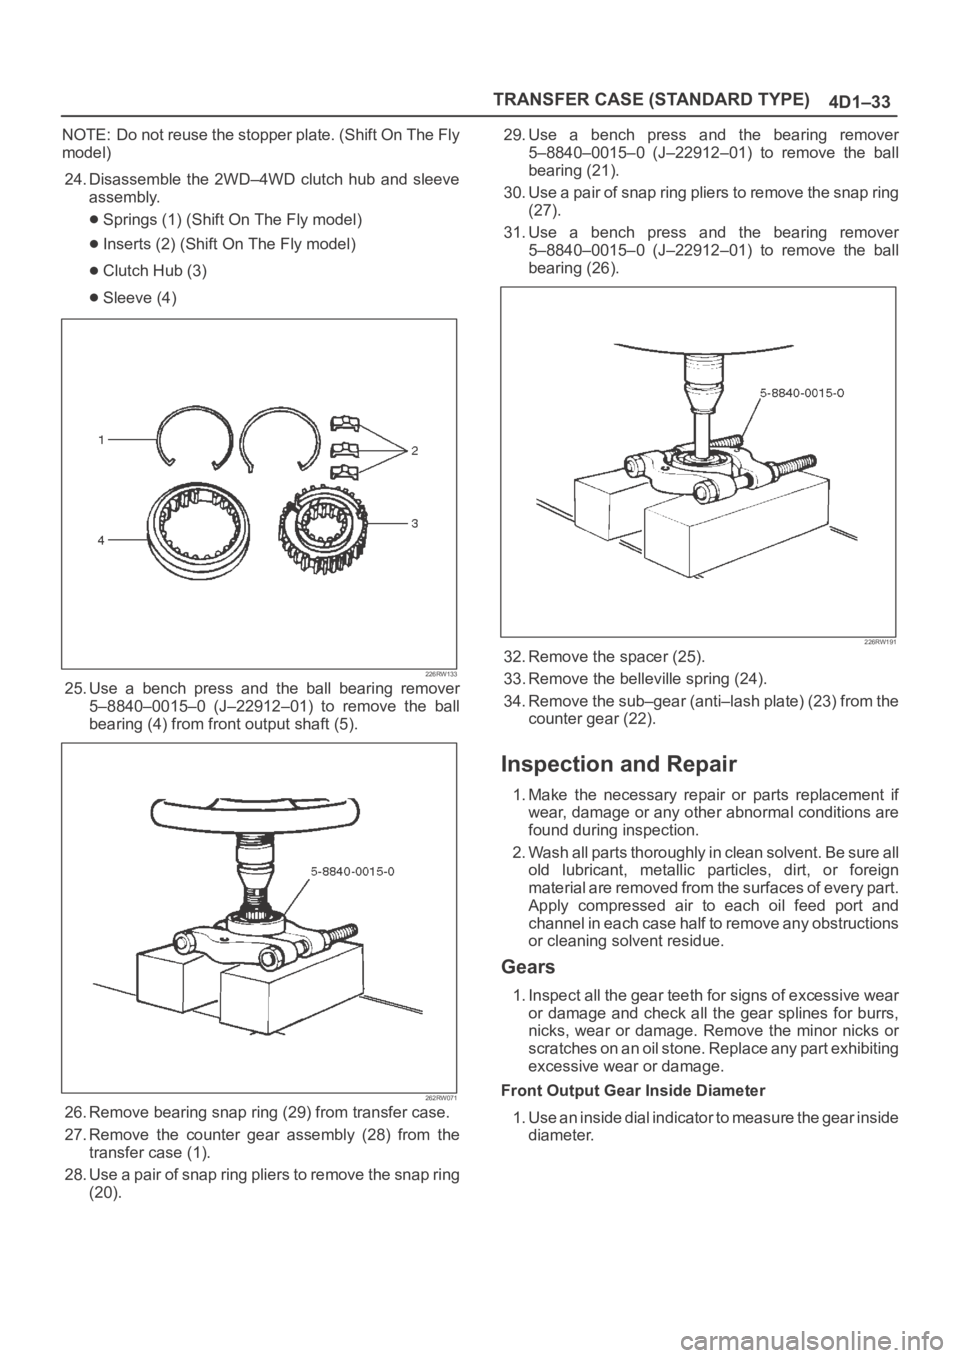
24. Disassemble the 2WD–4WD clutch hub and sleeve
assembly.
Springs (1) (Shift On The Fly model)
Inserts (2) (Shift On The Fly model)
Clutch Hub (3)
Sleeve (4)
226RW133
25. Use a bench press and the ball bearing remover
5–8840–0015–0 (J–22912–01) to remove the ball
bearing (4) from front output shaft (5).
262RW071
26. Remove bearing snap ring (29) from transfer case.
27. Remove the counter gear assembly (28) from the
transfer case (1).
28. Use a pair of snap ring pliers to remove the snap ring
(20).29. Use a bench press and the bearing remover
5–8840–0015–0 (J–22912–01) to remove the ball
bearing (21).
30. Use a pair of snap ring pliers to remove the snap ring
(27).
31. Use a bench press and the bearing remover
5–8840–0015–0 (J–22912–01) to remove the ball
bearing (26).
226RW191
32. Remove the spacer (25).
33. Remove the belleville spring (24).
34. Remove the sub–gear (anti–lash plate) (23) from the
counter gear (22).
Inspection and Repair
1. Make the necessary repair or parts replacement if
wear, damage or any other abnormal conditions are
found during inspection.
2. Wash all parts thoroughly in clean solvent. Be sure all
old lubricant, metallic particles, dirt, or foreign
material are removed from the surfaces of every part.
Apply compressed air to each oil feed port and
channel in each case half to remove any obstructions
or cleaning solvent residue.
Gears
1. Inspect all the gear teeth for signs of excessive wear
or damage and check all the gear splines for burrs,
nicks, wear or damage. Remove the minor nicks or
scratches on an oil stone. Replace any part exhibiting
excessive wear or damage.
Front Output Gear Inside Diameter
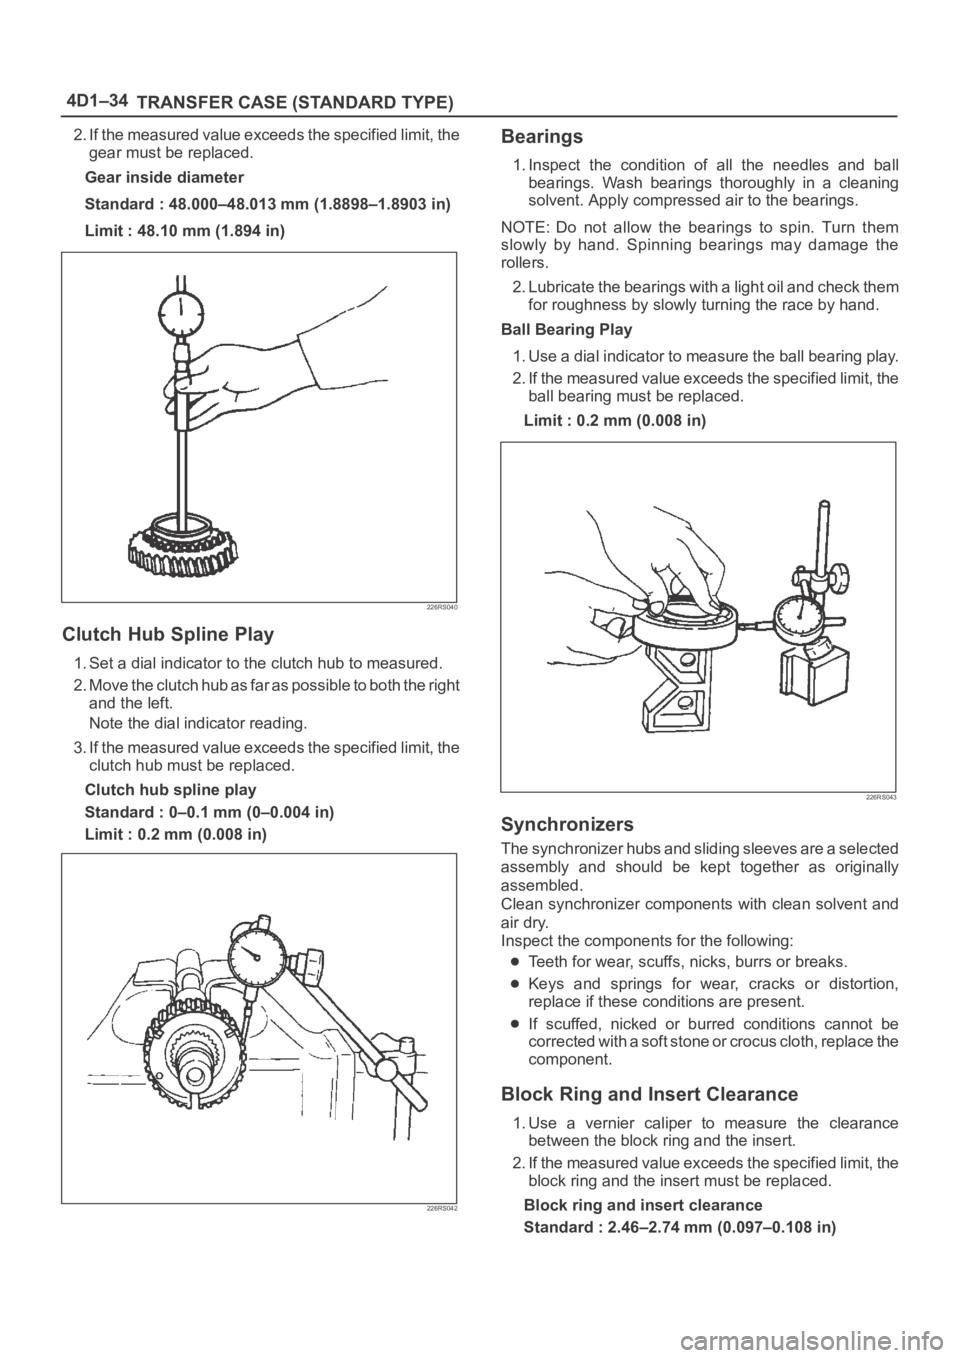
1. Use an inside dial indicator to measure the gear inside
diameter.
Page 4295 of 6000
4D1–34
TRANSFER CASE (STANDARD TYPE)
2. If the measured value exceeds the specified limit, the
gear must be replaced.
Gear inside diameter
Standard : 48.000–48.013 mm (1.8898–1.8903 in)
Limit : 48.10 mm (1.894 in)
226RS040
Clutch Hub Spline Play
1. Set a dial indicator to the clutch hub to measured.
2. Move the clutch hub as far as possible to both the right
and the left.
Note the dial indicator reading.
3. If the measured value exceeds the specified limit, the
clutch hub must be replaced.
Clutch hub spline play
Standard : 0–0.1 mm (0–0.004 in)
Limit : 0.2 mm (0.008 in)
226RS042
Bearings
1. Inspect the condition of all the needles and ball
bearings. Wash bearings thoroughly in a cleaning
solvent. Apply compressed air to the bearings.
NOTE: Do not allow the bearings to spin. Turn them
slowly by hand. Spinning bearings may damage the
rollers.
2. Lubricate the bearings with a light oil and check them
for roughness by slowly turning the race by hand.
Ball Bearing Play
1. Use a dial indicator to measure the ball bearing play.
2. If the measured value exceeds the specified limit, the
ball bearing must be replaced.
Limit : 0.2 mm (0.008 in)
226RS043
Synchronizers
The synchronizer hubs and sliding sleeves are a selected
assembly and should be kept together as originally
assembled.
Clean synchronizer components with clean solvent and
air dry.
Inspect the components for the following:
Teeth for wear, scuffs, nicks, burrs or breaks.
Keys and springs for wear, cracks or distortion,
replace if these conditions are present.
If scuffed, nicked or burred conditions cannot be
corrected with a soft stone or crocus cloth, replace the
component.
Block Ring and Insert Clearance
1. Use a vernier caliper to measure the clearance
between the block ring and the insert.
2. If the measured value exceeds the specified limit, the
block ring and the insert must be replaced.
Block ring and insert clearance
Standard : 2.46–2.74 mm (0.097–0.108 in)
Page 4386 of 6000
5A–36
BRAKE CONTROL SYSTEM
StepNo Ye s
Action
10Is the input of 4WD controller normal?
Go to Step 11
Replace
controller or
repair harness.
Go to Step 11
11Reconnect all components and ensure all components are
properly mounted.
Was this step finished?Repeat the “Basic
diagnostic flow
chart.”
Go to Step 11
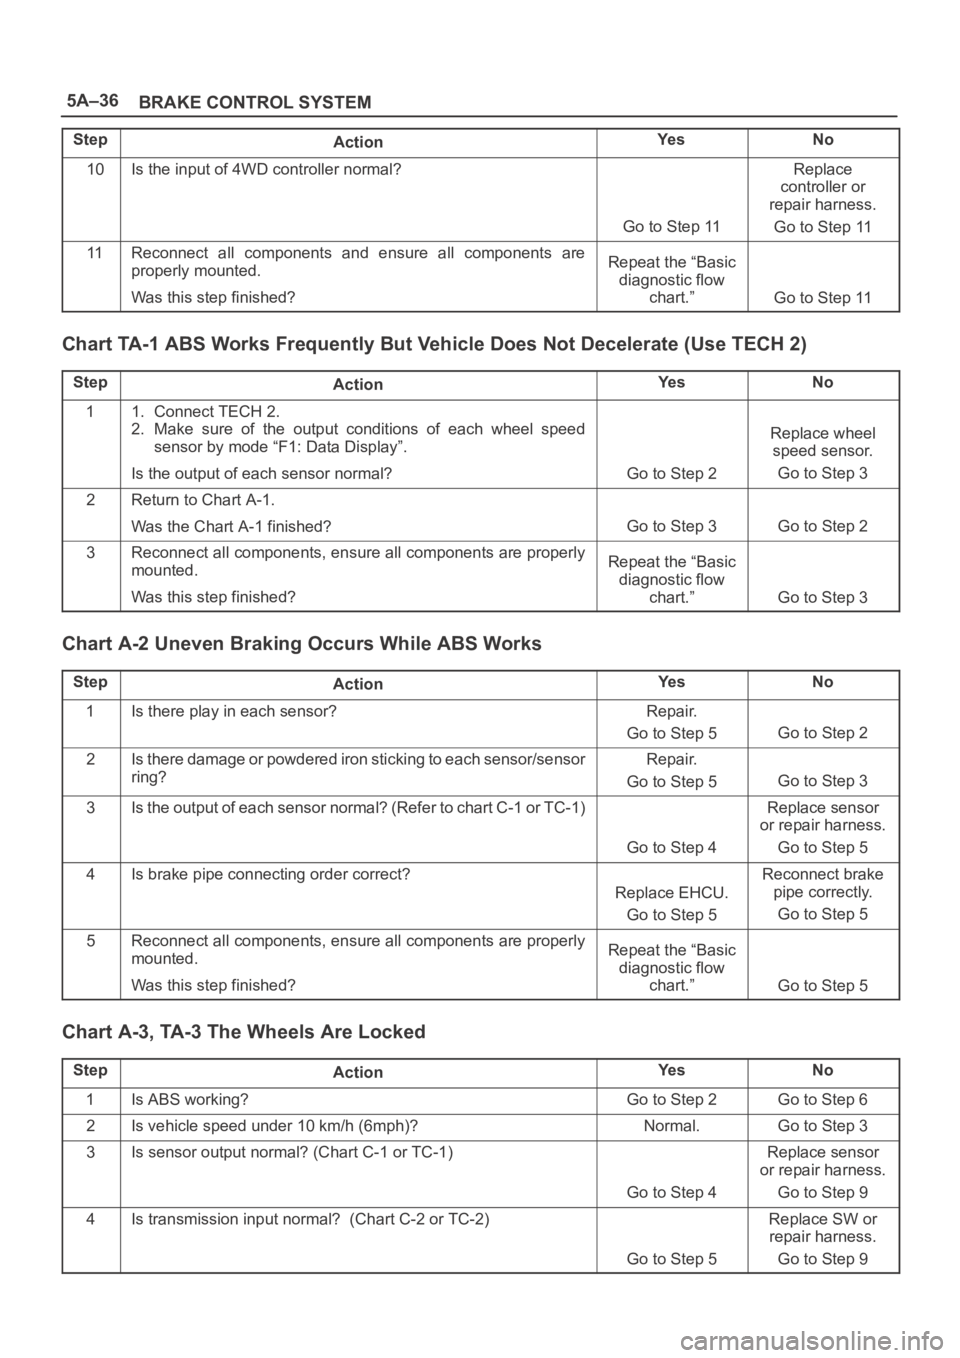
Chart TA-1 ABS Works Frequently But Vehicle Does Not Decelerate (Use TECH 2)
StepActionYe sNo
11. Connect TECH 2.
2. Make sure of the output conditions of each wheel speed
sensor by mode “F1: Data Display”.
Is the output of each sensor normal?
Go to Step 2
Replace wheel
speed sensor.
Go to Step 3
2Return to Chart A-1.
Was the Chart A-1 finished?
Go to Step 3Go to Step 2
3Reconnect all components, ensure all components are properly
mounted.
Was this step finished?Repeat the “Basic
diagnostic flow
chart.”
Go to Step 3
Chart A-2 Uneven Braking Occurs While ABS Works
StepActionYe sNo
1Is there play in each sensor?Repair.
Go to Step 5
Go to Step 2
2Is there damage or powdered iron sticking to each sensor/sensor
ring?Repair.
Go to Step 5
Go to Step 3
3Is the output of each sensor normal? (Refer to chart C-1 or TC-1)
Go to Step 4
Replace sensor
or repair harness.
Go to Step 5
4Is brake pipe connecting order correct?
Replace EHCU.
Go to Step 5
Reconnect brake
pipe correctly.
Go to Step 5
5Reconnect all components, ensure all components are properly
mounted.
Was this step finished?Repeat the “Basic
diagnostic flow
chart.”
Go to Step 5
Chart A-3, TA-3 The Wheels Are Locked
StepActionYe sNo
1Is ABS working?Go to Step 2Go to Step 6
2Is vehicle speed under 10 km/h (6mph)?Normal.Go to Step 3
3Is sensor output normal? (Chart C-1 or TC-1)
Go to Step 4
Replace sensor
or repair harness.
Go to Step 9
4Is transmission input normal? (Chart C-2 or TC-2)
Go to Step 5
Replace SW or
repair harness.
Go to Step 9