1998 OPEL FRONTERA length
[x] Cancel search: lengthPage 3450 of 6000
SUPPLEMENTAL RESTRAINT SYSTEM9J–13
HARNESS TO ANY POWER SOURCE BEFORE
CONNECTING DEPLOYMENT HARNESS TO THE
DRIVER AIR BAG ASSEMBLY. DEPLOYMENT
HARNESS SHALL REMAIN SHORTED AND NOT BE
CONNECTED TO A POWER SOURCE UNTIL THE AIR
BAG IS TO BE DEPLOYED. THE AIR BAG
ASSEMBLY WILL IMMEDIATELY DEPLOY THE AIR
BAG WHEN A POWER SOURCE IS CONNECTED TO
IT. WEAR SAFETY GLASSES THROUGHOUT THIS
ENTIRE DEPLOYMENT AND DISPOSAL
PROCEDURE.
NOTE: This information applies only to driver air bag
assembly . Refer to “Deployment Outside Vehicle
(Passenger Air Bag assembly)” in this section for
information on passenger air bag assembly scrapping.
1. Turn ignition switch to “LOCK”, remove key.
2. Inspect 5–8840–2468–0 SRS Deployment Harness
and appropriate pigtail adapter for damage. If
harness or pigtail adapter is damaged, discard and
obtain a replacement.
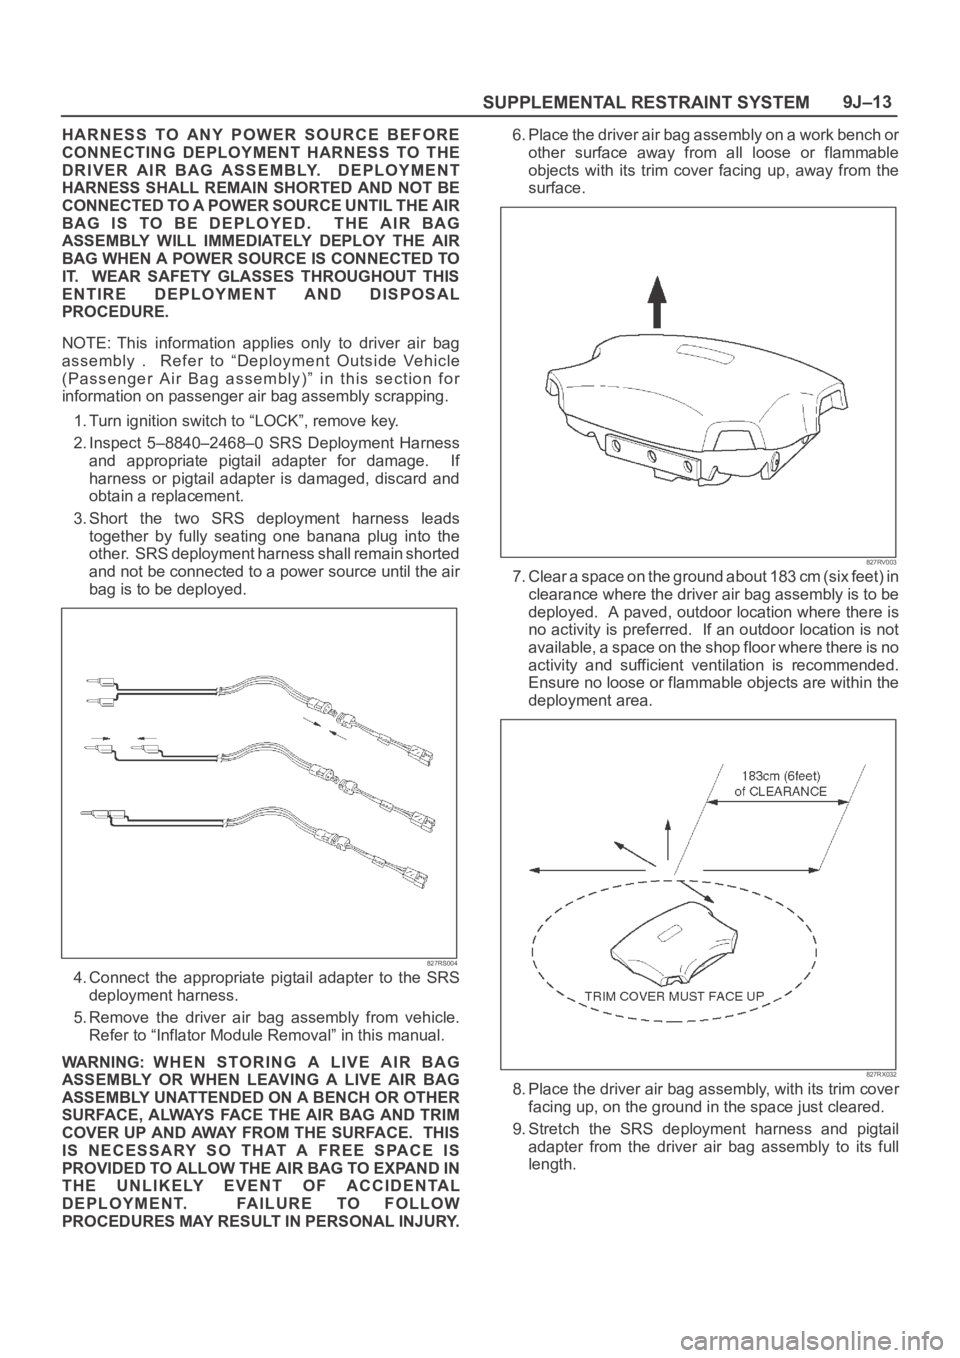
3. Short the two SRS deployment harness leads
together by fully seating one banana plug into the
other. SRS deployment harness shall remain shorted
and not be connected to a power source until the air
bag is to be deployed.
827RS004
4. Connect the appropriate pigtail adapter to the SRS
deployment harness.
5. Remove the driver air bag assembly from vehicle.
Refer to “Inflator Module Removal” in this manual.
WARNING: WHEN STORING A LIVE AIR BAG
ASSEMBLY OR WHEN LEAVING A LIVE AIR BAG
ASSEMBLY UNATTENDED ON A BENCH OR OTHER
SURFACE, ALWAYS FACE THE AIR BAG AND TRIM
COVER UP AND AWAY FROM THE SURFACE. THIS
IS NECESSARY SO THAT A FREE SPACE IS
PROVIDED TO ALLOW THE AIR BAG TO EXPAND IN
THE UNLIKELY EVENT OF ACCIDENTAL
DEPLOYMENT. FAILURE TO FOLLOW
PROCEDURES MAY RESULT IN PERSONAL INJURY.6. Place the driver air bag assembly on a work bench or
other surface away from all loose or flammable
objects with its trim cover facing up, away from the
surface.
827RV003
7. Clear a space on the ground about 183 cm (six feet) in
clearance where the driver air bag assembly is to be
deployed. A paved, outdoor location where there is
no activity is preferred. If an outdoor location is not
available, a space on the shop floor where there is no
activity and sufficient ventilation is recommended.
Ensure no loose or flammable objects are within the
deployment area.
827RX032
8. Place the driver air bag assembly, with its trim cover
facing up, on the ground in the space just cleared.
9. Stretch the SRS deployment harness and pigtail
adapter from the driver air bag assembly to its full
length.
Page 3453 of 6000
SUPPLEMENTAL RESTRAINT SYSTEM 9J–16
5. Remove passenger air bag assembly from vehicle.
Refer to “Passenger Air Bag Assembly Removal ” in
this Section 9J–3.
6. Clear a space on the ground approximately 183 cm
(six feet) in clearance where the fixture with attached
air bag assembly is to be placed for deployment. A
paved outdoor location where there is no activity is
preferred. If an outdoor location is not available, a
space on the shop floor where is no activity and
sufficient ventilation is recommended. Ensure that no
loose or flammable objects are within the deployment
area.
7. Place the 5–8840–2420–0 on the bench vice. This is
necessary to provide sufficient stabilization of the
fixture during deployment.
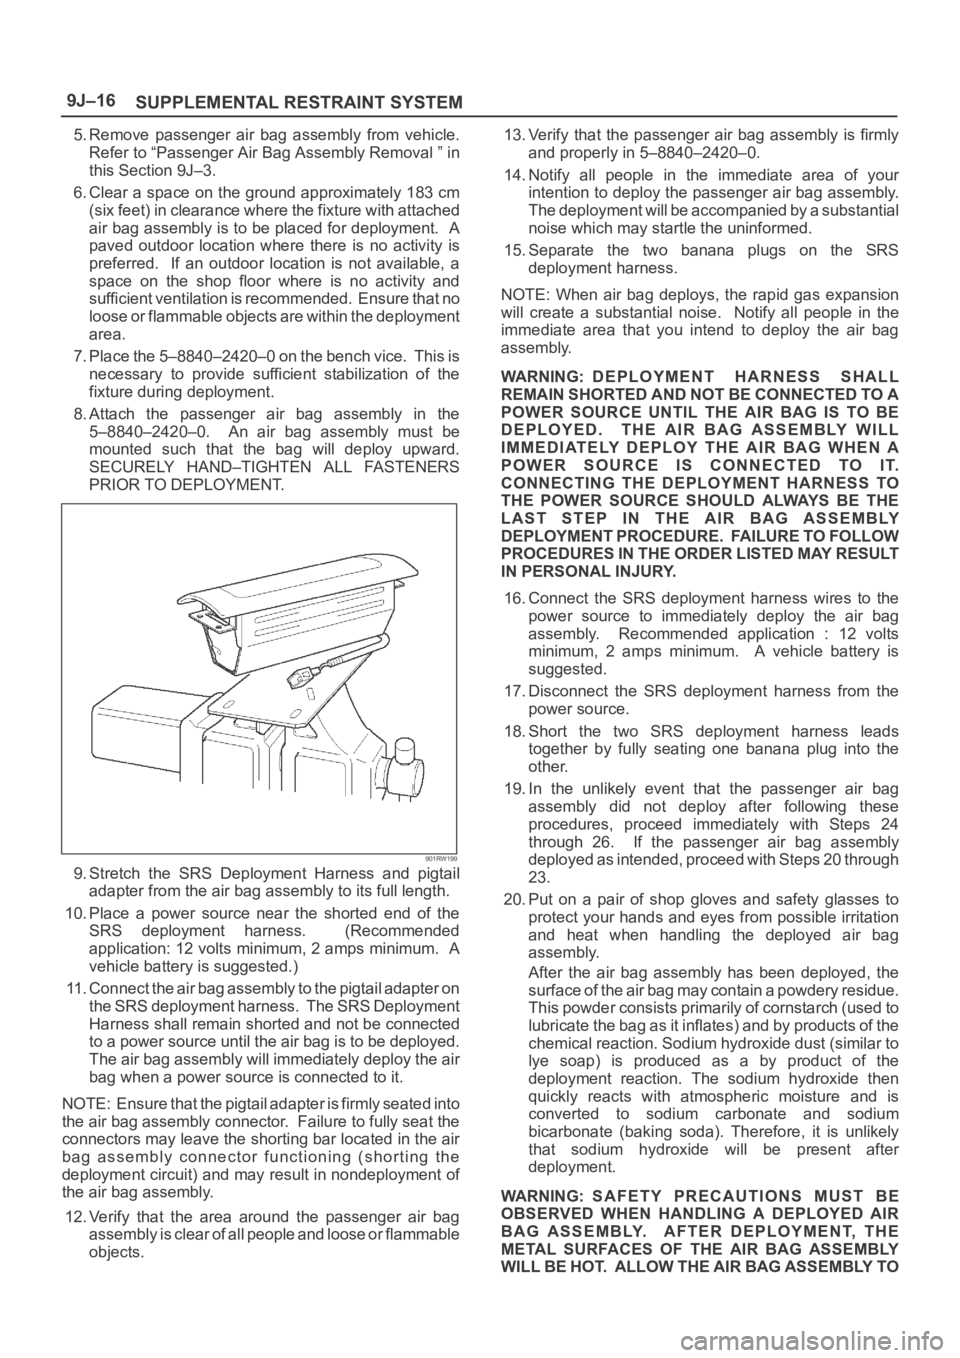
8. Attach the passenger air bag assembly in the
5–8840–2420–0. An air bag assembly must be
mounted such that the bag will deploy upward.
SECURELY HAND–TIGHTEN ALL FASTENERS
PRIOR TO DEPLOYMENT.
901RW199
9. Stretch the SRS Deployment Harness and pigtail
adapter from the air bag assembly to its full length.
10. Place a power source near the shorted end of the
SRS deployment harness. (Recommended
application: 12 volts minimum, 2 amps minimum. A
vehicle battery is suggested.)
11. Connect the air bag assembly to the pigtail adapter on
the SRS deployment harness. The SRS Deployment
Harness shall remain shorted and not be connected
to a power source until the air bag is to be deployed.
The air bag assembly will immediately deploy the air
bag when a power source is connected to it.
NOTE: Ensure that the pigtail adapter is firmly seated into
the air bag assembly connector. Failure to fully seat the
connectors may leave the shorting bar located in the air
bag assembly connector functioning (shorting the
deployment circuit) and may result in nondeployment of
the air bag assembly.
12. Verify that the area around the passenger air bag
assembly is clear of all people and loose or flammable
objects.13. Verify that the passenger air bag assembly is firmly
and properly in 5–8840–2420–0.
14. Notify all people in the immediate area of your
intention to deploy the passenger air bag assembly.
The deployment will be accompanied by a substantial
noise which may startle the uninformed.
15. Separate the two banana plugs on the SRS
deployment harness.
NOTE: When air bag deploys, the rapid gas expansion
will create a substantial noise. Notify all people in the
immediate area that you intend to deploy the air bag
assembly.
WARNING: DEPLOYMENT HARNESS SHALL
REMAIN SHORTED AND NOT BE CONNECTED TO A
POWER SOURCE UNTIL THE AIR BAG IS TO BE
DEPLOYED. THE AIR BAG ASSEMBLY WILL
IMMEDIATELY DEPLOY THE AIR BAG WHEN A
POWER SOURCE IS CONNECTED TO IT.
CONNECTING THE DEPLOYMENT HARNESS TO
THE POWER SOURCE SHOULD ALWAYS BE THE
LAST STEP IN THE AIR BAG ASSEMBLY
DEPLOYMENT PROCEDURE. FAILURE TO FOLLOW
PROCEDURES IN THE ORDER LISTED MAY RESULT
IN PERSONAL INJURY.
16. Connect the SRS deployment harness wires to the
power source to immediately deploy the air bag
assembly. Recommended application : 12 volts
minimum, 2 amps minimum. A vehicle battery is
suggested.
17. Disconnect the SRS deployment harness from the
power source.
18. Short the two SRS deployment harness leads
together by fully seating one banana plug into the
other.
19. In the unlikely event that the passenger air bag
assembly did not deploy after following these
procedures, proceed immediately with Steps 24
through 26. If the passenger air bag assembly
deployed as intended, proceed with Steps 20 through
23.
20. Put on a pair of shop gloves and safety glasses to
protect your hands and eyes from possible irritation
and heat when handling the deployed air bag
assembly.
After the air bag assembly has been deployed, the
surface of the air bag may contain a powdery residue.
Th is p ow de r con sis ts prim a r ily of c or n sta r ch ( u sed to
lubricate the bag as it inflates) and by products of the
chemical reaction. Sodium hydroxide dust (similar to
lye soap) is produced as a by product of the
deployment reaction. The sodium hydroxide then
quickly reacts with atmospheric moisture and is
converted to sodium carbonate and sodium
bicarbonate (baking soda). Therefore, it is unlikely
that sodium hydroxide will be present after
deployment.
WARNING: SAFETY PRECAUTIONS MUST BE
OBSERVED WHEN HANDLING A DEPLOYED AIR
BAG ASSEMBLY. AFTER DEPLOYMENT, THE
METAL SURFACES OF THE AIR BAG ASSEMBLY
WILL BE HOT. ALLOW THE AIR BAG ASSEMBLY TO
Page 3458 of 6000
SUPPLEMENTAL RESTRAINT SYSTEM9J–21
THROUGHOUT THIS ENTIRE DEPLOYMENT AND
DISPOSAL PROCEDURE.
9. Twist together one connector wire lead to one
deployment wire. The connection should be
mechanically secure.
10. Bend twisted connection made in the previous step
flat and wrap tightly with electrical tape to insulate and
secure.
11. Twist together, bend and tape the remaining
connector wire lead to the remaining deployment
wire.
12. Connect the deployment harness to the driver air bag
assembly, yellow 2–pin connector at the base of the
steering column. Route deployment harness out the
driver side of the vehicle.
WARNING: DEPLOYMENT WIRES SHALL REMAIN
SHORTED AND NOT BE CONNECTED TO A POWER
SOURCE UNTIL THE AIR BAG IS TO BE DEPLOYED.
THE AIR BAG ASSEMBLY WILL IMMEDIATELY
DEPLOY THE AIR BAG WHEN A POWER SOURCE IS
CONNECTED TO IT.
CONNECTING THE DEPLOYMENT WIRES TO THE
POWER SOURCE SHOULD ALWAYS BE THE FINAL
STEP IN THE AIR BAG ASSEMBLY DEPLOYMENT
PROCEDURE.
FAILURE TO FOLLOW PROCEDURES IN THE
ORDER LISTED COULD RESULT IN PERSONAL
INJURY.
13. Disconnect passenger air bag assembly, yellow 2–pin
connector located behind glove box assembly.
14. Cut the passenger air bag assembly harness
connector from the vehicle leaving at least 15 cm (six
inches) of wire at the connector.
15. Strip 13 mm (1/2 inch) of insulation from blue–white
and pink–blue wire lead of the connector.
16. Cut two 900 cm (30 feet) deployment wires from 0.8
mm
(18 gauge) or thicker multi–strand wire. These
wires will be used to fabricate the passenger
deployment harness.
17. Strip 13 mm (1/2 inch) of insulation from both ends of
the wires cut in the previous step.
18. Short the wires by twisting together one end from
each. Deployment wires shall remain shorted and not
be connected to a power source until the air bag is to
be deployed.
WARNING: FAILURE TO FOLLOW PROCEDURES IN
THE ORDER LISTED COULD RESULT IN PERSONAL
INJURY. NEVER CONNECT DEPLOYMENT WIRES
TO ANY POWER SOURCE BEFORE CONNECTING
DEPLOYMENT WIRES TO THE AIR BAG ASSEMBLY
LEADS. DEPLOYMENT WIRES SHALL REMAIN
SHORTED AND NOT BE CONNECTED TO A POWER
SOURCE UNTIL THE AIR BAG IS TO BE DEPLOYED.
THE AIR BAG ASSEMBLY WILL IMMEDIATELY
DEPLOY THE AIR BAG WHEN A POWER SOURCE IS
CONNECTED TO IT. WEAR SAFETY GLASSES
THROUGHOUT THIS ENTIRE DEPLOYMENT AND
DISPOSAL PROCEDURE.19. Twist together one connector wire lead to one
deployment wire. The connection should be
mechanically secure.
20. Bend twisted connection made in the previous step
flat and wrap tightly with electrical tape to insulate and
secure.
21. Twist together, bend and tape the remaining
connector wire lead to the remaining deployment
wire.
22. Connect the deployment harness to the passenger air
bag assembly, yellow 2–pin connector located behind
the glove box assembly. Route deployment harness
out the passenger side of the vehicle.
WARNING: DEPLOYMENT WIRES SHALL REMAIN
SHORTED AND NOT BE CONNECTED TO A POWER
SOURCE UNTIL THE AIR BAG IS TO BE DEPLOYED.
THE AIR BAG ASSEMBLY WILL IMMEDIATELY
DEPLOY THE AIR BAG WHEN A POWER SOURCE IS
CONNECTED TO IT. CONNECTING THE
DEPLOYMENT WIRES SHOULD ALWAYS BE THE
FINAL STEP IN THE AIR BAG ASSEMBLY
DEPLOYMENT PROCEDURE. FAILURE TO FOLLOW
PROCEDURES IN THE ORDER LISTED COULD
RESULT IN PERSONAL INJURY.
23. Verify that the inside of the vehicle and the area
surrounding the vehicle are clear of all people and
loose or flammable objects.
24. Stretch the driver and passenger deployment
harness to their full length.
25. Completely cover windshield area and front door
window openings with a drop cloth, blanket or similar
item. This reduces the possibility of injury due to
possible fragmentation of the vehicle’s glass or
interior.
26. Notify all people in the immediate area that you intend
to deploy the air bags. The deployment will be
accompanied by a substantial noise which may
startle the uninformed.
27. Separate the two ends of the driver deployment
harness wires.
WARNING: DEPLOYMENT WIRES SHALL REMAIN
SHORTED AND NOT BE CONNECTED TO A POWER
SOURCE UNTIL THE AIR BAG IS TO A POWER
SOURCE UNTIL THE AIR BAG IS TO BE DEPLOYED.
THE AIR BAG ASSEMBLY WILL IMMEDIATELY
DEPLOY THE AIR BAG WHEN A POWER SOURCE IS
CONNECTED TO IT. CONNECTING THE
DEPLOYMENT WIRES TO THE POWER SOURCE
SHOULD ALWAYS BE THE FINAL STEP IN THE AIR
BAG ASSEMBLY DEPLOYMENT PROCEDURE.
FAILURE TO FOLLOW PROCEDURES IN THE
ORDER LISTED COULD RESULT IN PERSONAL
INJURY.
NOTE: When the air bag deploys, the rapid gas
expansion will create a substantial noise. Notify all
people in the immediate area that you intend to deploy the
air bags.
Page 3460 of 6000
SUPPLEMENTAL RESTRAINT SYSTEM9J–23
carbonate and sodium bicarbonate (baking soda).
Therefore, it is unlikely that sodium hydroxide will be
present after deployment.
(Driver air bag assembly)
After the air bag assembly has been deployed, the
surface of the air bag may contain solid particulate. This
solid particulate consists primarily of by products of the
chemical reaction, Potassium Chloride and copper metal
dust. Compounds of Potassium Borate, Strontium
Chloride, Copper Chloride, and Ammonium Chloride may
be found in amounts of about 1 % (each) of the total
particulate.
Deployment Outside Vehicle (Pretensioner
Seat Belt Assembly)
Deployment outside the vehicle is proper when the
vehicle is to be returned to service. This includes, for
example, situations in which the vehicle will be returned to
useful service after a functionally or cosmetically deficient
pretensioner seat belt assembly is replaced. Deployment
and disposal of a malfunctioning pretensioner seat belt
assembly is, of course, subject to any required retention
period.
For deployment of a live (undeployed) pretensioner seat
belt assembly outside the vehicle, the deployment
procedure must be followed exactly. Always wear gloves
and safety glasses during this deployment procedure until
a deployed pretensioner seat belt assembly is scrapped
or until an undeployed pretensioner seat belt assembly is
shipped. Before performing the procedures you should
be familiar with servicing the system and with proper
handling of the pretensioner seat belt assembly.
Procedures should be read fully before they are
performed.
The following procedure requires use of SRS deployment
harness with appropriate pigtail adapter. Do not attempt
procedure without adapter.
WARNING: FAILURE TO FOLLOW PROCEDURES IN
THE ORDER LISTED MAY RESULT IN PERSONAL
INJURY. NEVER CONNECT DEPLOYMENT
HARNESS TO ANY POWER SOURCE BEFORE
CONNECTING DEPLOYMENT HARNESS TO THE
PRETENSIONER SEAT BELT ASSEMBLY.
DEPLOYMENT HARNESS SHALL REMAIN
SHORTED AND NOT BE CONNECTED TO A POWER
SOURCE UNTIL THE PRETENSIONER SEAT BELT IS
TO BE DEPLOYED. THE PRETENSIONER SEAT
BELT ASSEMBLY WILL IMMEDIATELY DEPLOY THE
PRETENSIONER SEAT BELT WHEN A POWER
SOURCE IS CONNECTED TO IT. WEAR GLOVES
AND SAFETY GLASSES THROUGHOUT THIS
ENTIRE DEPLOYMENT AND DISPOSAL
PROCEDURE.
1. Turn ignition switch to “LOCK”, remove key.
2. Remove the pretensioner seat belt assembly from
vehicle. Refer to “Pretensioner Seat Belt Removal” in
this manual.
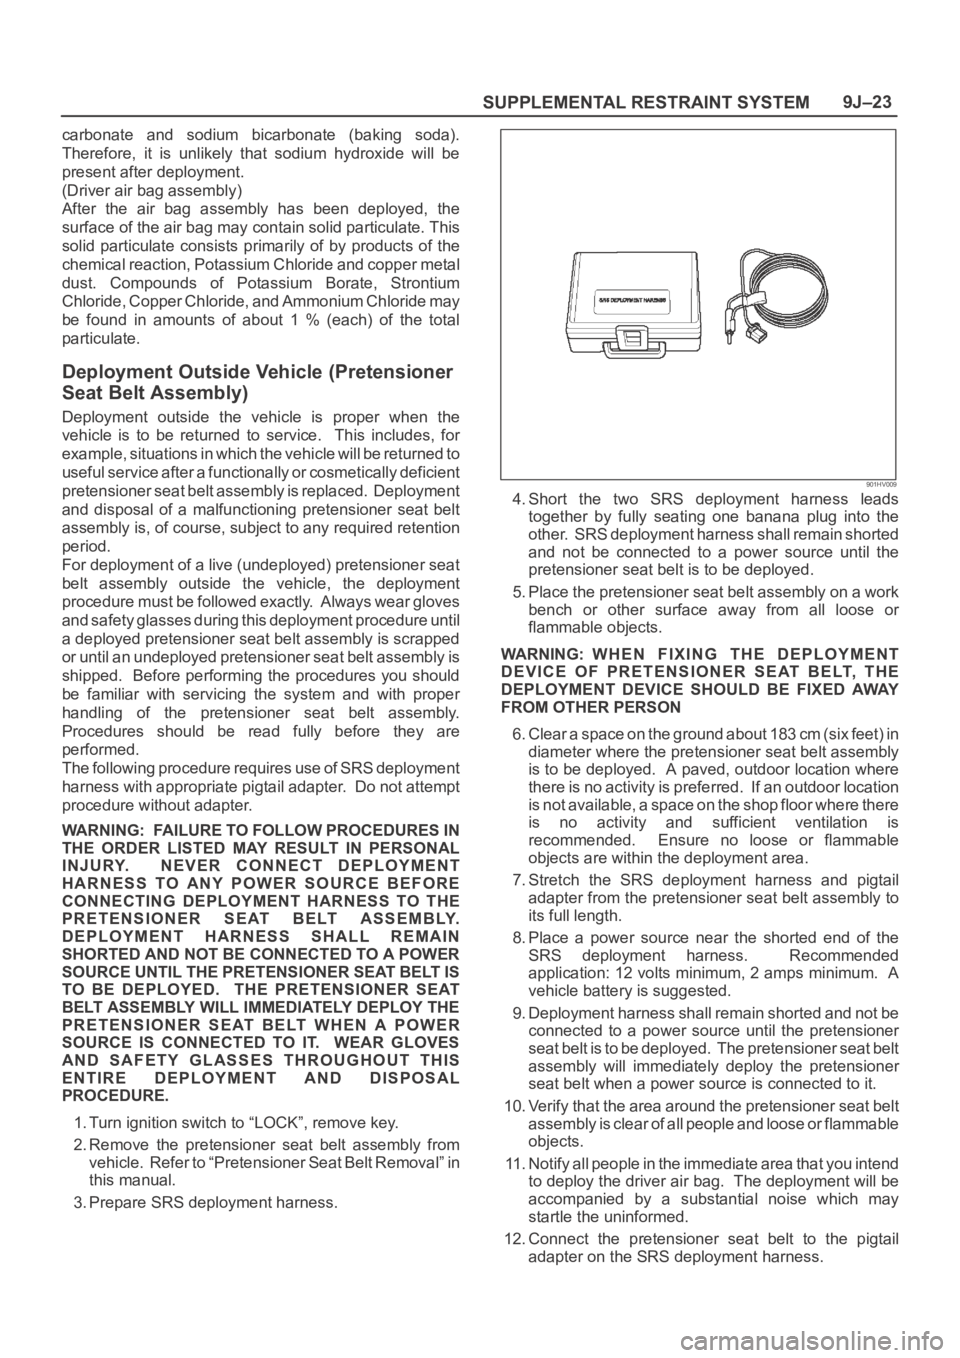
3. Prepare SRS deployment harness.
901HV009
4. Short the two SRS deployment harness leads
together by fully seating one banana plug into the
other. SRS deployment harness shall remain shorted
and not be connected to a power source until the
pretensioner seat belt is to be deployed.
5. Place the pretensioner seat belt assembly on a work
bench or other surface away from all loose or
flammable objects.
WARNING: WHEN FIXING THE DEPLOYMENT
DEVICE OF PRETENSIONER SEAT BELT, THE
DEPLOYMENT DEVICE SHOULD BE FIXED AWAY
FROM OTHER PERSON
6. Clear a space on the ground about 183 cm (six feet) in
diameter where the pretensioner seat belt assembly
is to be deployed. A paved, outdoor location where
there is no activity is preferred. If an outdoor location
is not available, a space on the shop floor where there
is no activity and sufficient ventilation is
recommended. Ensure no loose or flammable
objects are within the deployment area.
7. Stretch the SRS deployment harness and pigtail
adapter from the pretensioner seat belt assembly to
its full length.
8. Place a power source near the shorted end of the
SRS deployment harness. Recommended
application: 12 volts minimum, 2 amps minimum. A
vehicle battery is suggested.
9. Deployment harness shall remain shorted and not be
connected to a power source until the pretensioner
seat belt is to be deployed. The pretensioner seat belt
assembly will immediately deploy the pretensioner
seat belt when a power source is connected to it.
10. Verify that the area around the pretensioner seat belt
assembly is clear of all people and loose or flammable
objects.
11. Notify all people in the immediate area that you intend
to deploy the driver air bag. The deployment will be
accompanied by a substantial noise which may
startle the uninformed.
12. Connect the pretensioner seat belt to the pigtail
adapter on the SRS deployment harness.
Page 3462 of 6000
SUPPLEMENTAL RESTRAINT SYSTEM9J–25
TO ANY POWER SOURCE BEFORE CONNECTING
DEPLOYMENT WIRES TO THE PRETENSIONER
SEAT BELT ASSEMBLY LEADS. DEPLOYMENT
WIRES SHALL REMAIN SHORTED AND NOT BE
CONNECTED TO A POWER SOURCE UNTIL THE
PRETENSIONER SEAT BELT IS TO BE DEPLOYED.
THE PRETENSIONER SEAT BELT ASSEMBLY WILL
IMMEDIATELY DEPLOY THE PRETENSIONER SEAT
BELT WHEN A POWER SOURCE IS CONNECTED TO
IT. WEAR SAFETY GLASSES THROUGHOUT THIS
ENTIRE DEPLOYMENT AND DISPOSAL
PROCEDURE.
1. Turn ignition switch to “LOCK,” remove key and put
on safety glasses.
2. Remove all loose objects from front seats.
3. Disconnect pretensioner seat belt assembly, yellow
2–pin connector located at the base of the seat.
4. Prepare SRS deployment harness.
5. Short the two SRS deployment harness leads
together by fully seating one banana plug into the
other.
6. Deployment harness shall remain shorted and not be
connected to a power source until the pretensioner
seat belt is to be deployed.
7. Route deployment harness out the driver side of the
vehicle.
8. Verify that the inside of the vehicle and the area
surrounding the vehicle are clear of all people and
loose or flammable objects.
9. Stretch the SRS deployment harness to their full
length.
10. Connect the deployment harness to the pretensioner
seat belt assembly, yellow 2-pin connector at the
base of the seat.
WARNING: DEPLOYMENT WIRES SHALL REMAIN
SHORTED AND NOT BE CONNECTED TO A POWER
SOURCE UNTIL THE PRETENSIONER SEAT BELT IS
TO BE DEPLOYED. THE PRETENSIONER SEAT
BELT ASSEMBLY WILL IMMEDIATELY DEPLOY THE
PRETENSIONER SEAT BELT WHEN A POWER
SOURCE IS CONNECTED TO IT. CONNECTING THE
DEPLOYMENT WIRES TO THE POWER SOURCE
SHOULD ALWAYS BE THE FINAL STEP IN THE
PRETENSIONER SEAT BELT ASSEMBLY
DEPLOYMENT PROCEDURE. FAILURE TO FOLLOW
PROCEDURES IN THE ORDER LISTED COULD
RESULT IN PERSONAL INJURY.
11. Notify all people in the immediate area that you intend
to deploy the pretensioner seat belt. The deployment
will be accompanied by a substantial noise which may
startle the uninformed.
12. Separate the two banana plugs on the SRS
deployment harness.
NOTE: When the pretensioner seat belt deploys, the
rapid gas expansion will create a substantial noise. Notify
all people in the immediate area that you intend to deploy
the pretensioner seat belt.13. Connect the SRS deployment harness wires to a
power source to immediately deploy the pretensioner
seat belt assembly. Recommended application: 12
volts minimum, 2 amps minimum. A vehicle battery is
suggested.
WARNING: DEPLOYMENT WIRES SHALL REMAIN
SHORTED AND NOT BE CONNECTED TO A POWER
SOURCE UNTIL THE PRETENSIONER SEAT BELT IS
TO IS TO BE DEPLOYED. THE PRETENSIONER
SEAT BELT ASSEMBLY WILL IMMEDIATELY
DEPLOY THE PRETENSIONER SEAT BELT WHEN A
POWER SOURCE IS CONNECTED TO IT.
CONNECTING THE DEPLOYMENT WIRES SHOULD
ALWAYS BE THE FINAL STEP IN THE
PRETENSIONER SEAT BELT ASSEMBLY
DEPLOYMENT PROCEDURE. FAILURE TO FOLLOW
PROCEDURES IN THE ORDER LISTED COULD
RESULT IN PERSONAL INJURY.
14. Short the two SRS deployment harness leads
together by fully seating one banana plug into the
other.
15. Disconnect the deployment harness to the
pretensioner seat belt assembly, yellow 2-pin
connector at the base of the seat.
16. In the unlikely event that the pretensioner seat belt
assembly did not deploy after following these
procedures, proceed immediately with Steps 18
through 19. If the pretensioner seat belt assembly
deployed as intended, proceed with Steps 14 through
17.
17. With both air bags and pretensioner seat belt
deployed, the vehicle may be scrapped in the same
manner as a non–SRS equipped vehicle.
NOTE: The remaining steps are to be followed in the
unlikely event that the pretensioner seat belt assembly
did not deploy after following these procedures.
18. Remove the undeployed pretensioner seat belt
assembly (s) from the vehicle. For pretensioner seat
belt assembly refer to in the “Pretensioner Seat Belt
Assembly Removal” in this manual.
19.Temporarily store the pretensioner seat belt
assembly with the deployment device facing up, away
from the surface upon which it rests.
Page 4001 of 6000
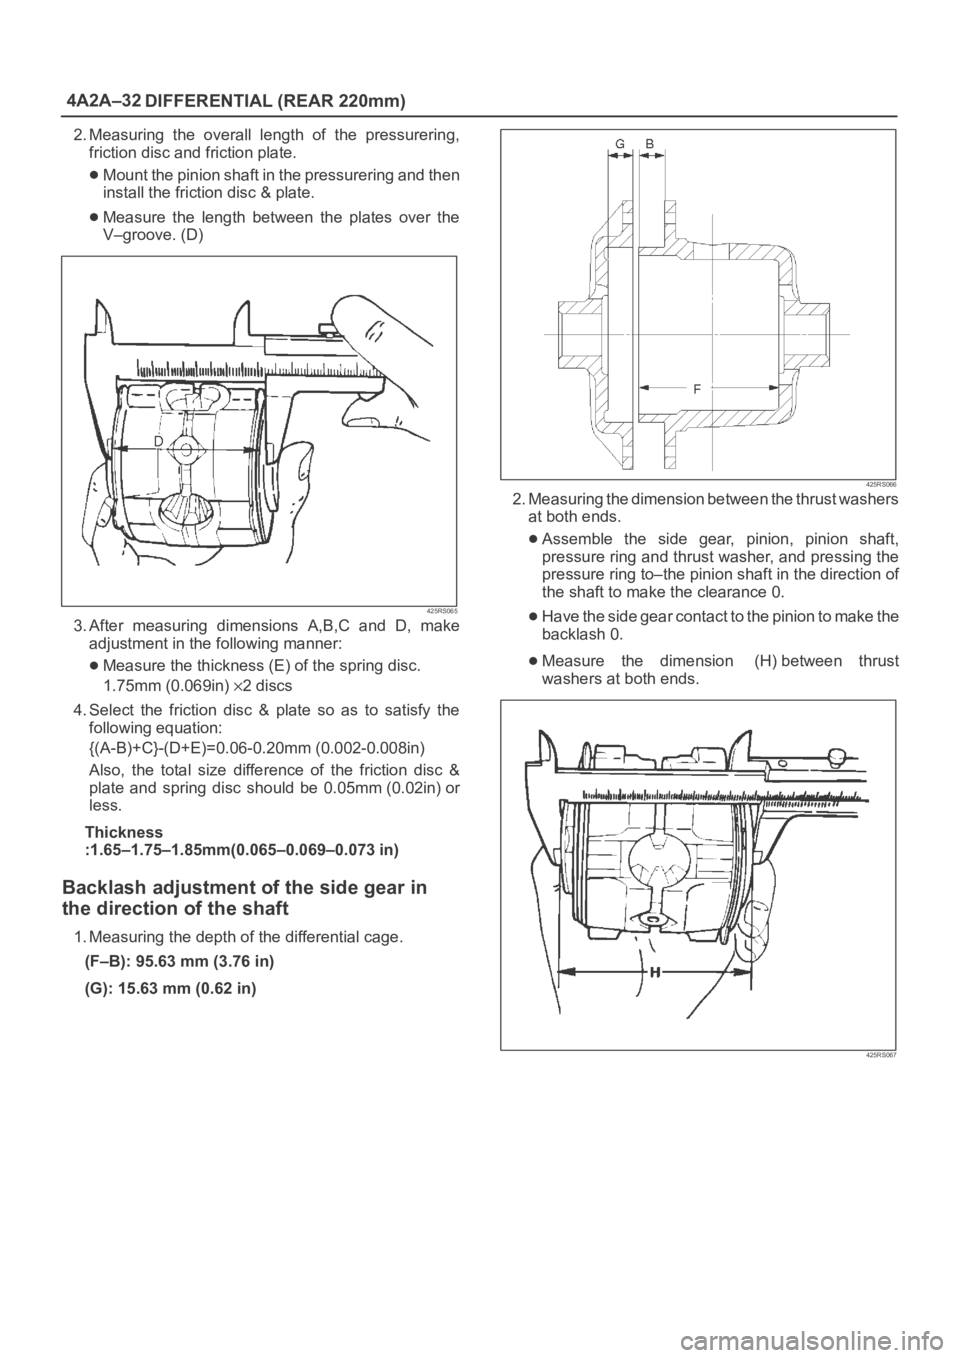
4A2A–32
DIFFERENTIAL (REAR 220mm)
2. Measuring the overall length of the pressurering,
friction disc and friction plate.
Mount the pinion shaft in the pressurering and then
install the friction disc & plate.
Measure the length between the plates over the
V–groove. (D)
425RS065
3. After measuring dimensions A,B,C and D, make
adjustment in the following manner:
Measure the thickness (E) of the spring disc.
1.75mm (0.069in)
2discs
4. Select the friction disc & plate so as to satisfy the
following equation:
{(A-B)+C}-(D+E)=0.06-0.20mm (0.002-0.008in)
Also, the total size difference of the friction disc &
plate and spring disc should be 0.05mm (0.02in) or
less.
Thickness
:1.65–1.75–1.85mm(0.065–0.069–0.073 in)
Backlash adjustment of the side gear in
the direction of the shaft
1. Measuring the depth of the differential cage.
(F–B): 95.63 mm (3.76 in)
(G): 15.63 mm (0.62 in)
425RS066
2. Measuring the dimension between the thrust washers
at both ends.
Assemble the side gear, pinion, pinion shaft,
pressure ring and thrust washer, and pressing the
pressure ring to–the pinion shaft in the direction of
the shaft to make the clearance 0.
Have the side gear contact to the pinion to make the
backlash 0.
Measure the dimension (H) between thrust
washers at both ends.
425RS067
Page 4039 of 6000
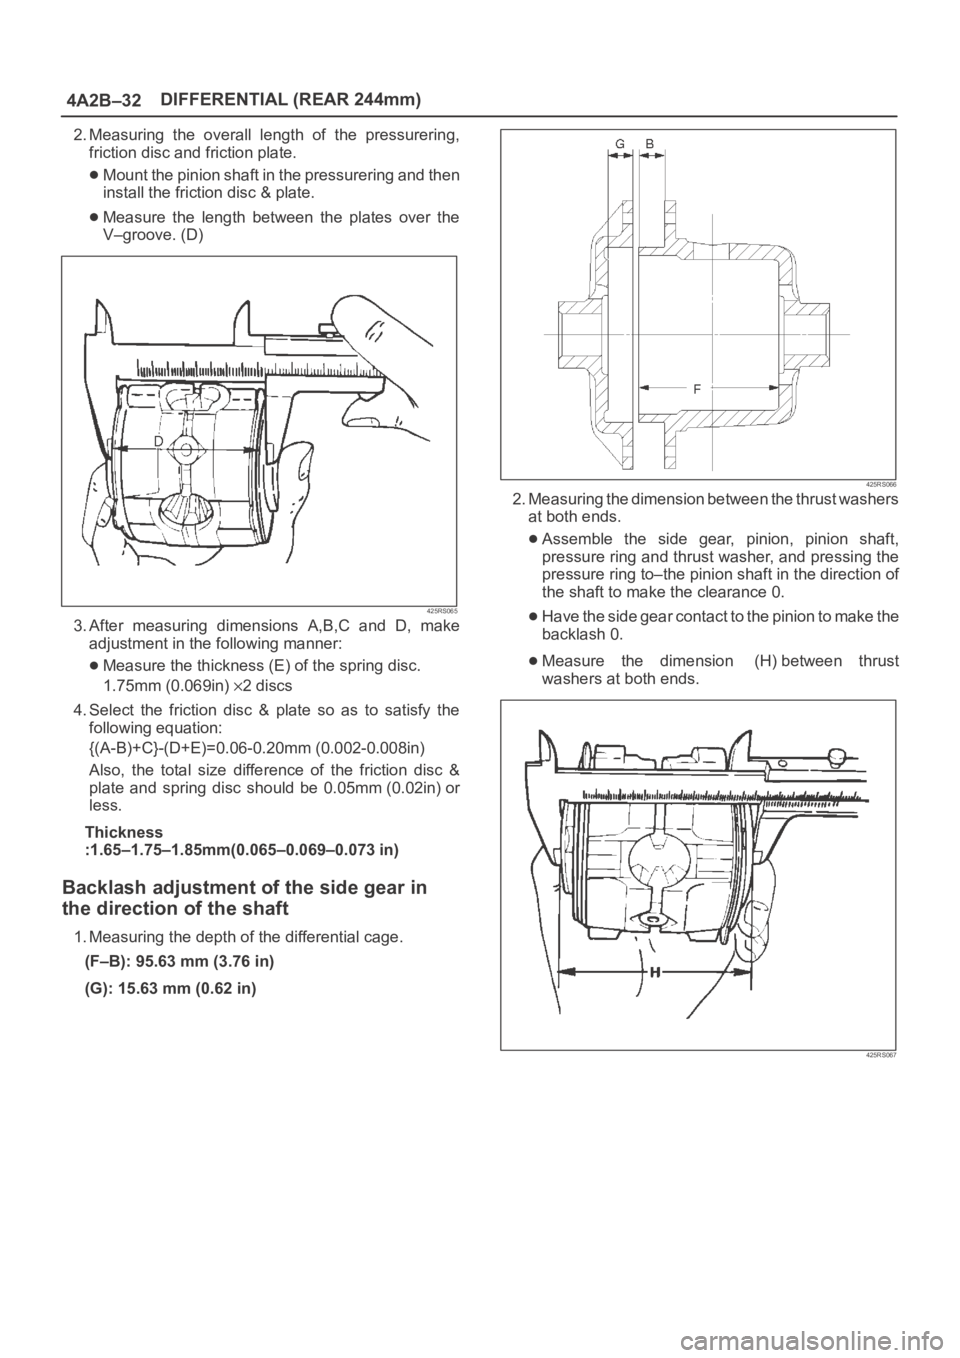
4A2B–32DIFFERENTIAL (REAR 244mm)
2. Measuring the overall length of the pressurering,
friction disc and friction plate.
Mount the pinion shaft in the pressurering and then
install the friction disc & plate.
Measure the length between the plates over the
V–groove. (D)
425RS065
3. After measuring dimensions A,B,C and D, make
adjustment in the following manner:
Measure the thickness (E) of the spring disc.
1.75mm (0.069in)
2discs
4. Select the friction disc & plate so as to satisfy the
following equation:
{(A-B)+C}-(D+E)=0.06-0.20mm (0.002-0.008in)
Also, the total size difference of the friction disc &
plate and spring disc should be 0.05mm (0.02in) or
less.
Thickness
:1.65–1.75–1.85mm(0.065–0.069–0.073 in)
Backlash adjustment of the side gear in
the direction of the shaft
1. Measuring the depth of the differential cage.
(F–B): 95.63 mm (3.76 in)
(G): 15.63 mm (0.62 in)
425RS066
2. Measuring the dimension between the thrust washers
at both ends.
Assemble the side gear, pinion, pinion shaft,
pressure ring and thrust washer, and pressing the
pressure ring to–the pinion shaft in the direction of
the shaft to make the clearance 0.
Have the side gear contact to the pinion to make the
backlash 0.
Measure the dimension (H) between thrust
washers at both ends.
425RS067
Page 4253 of 6000
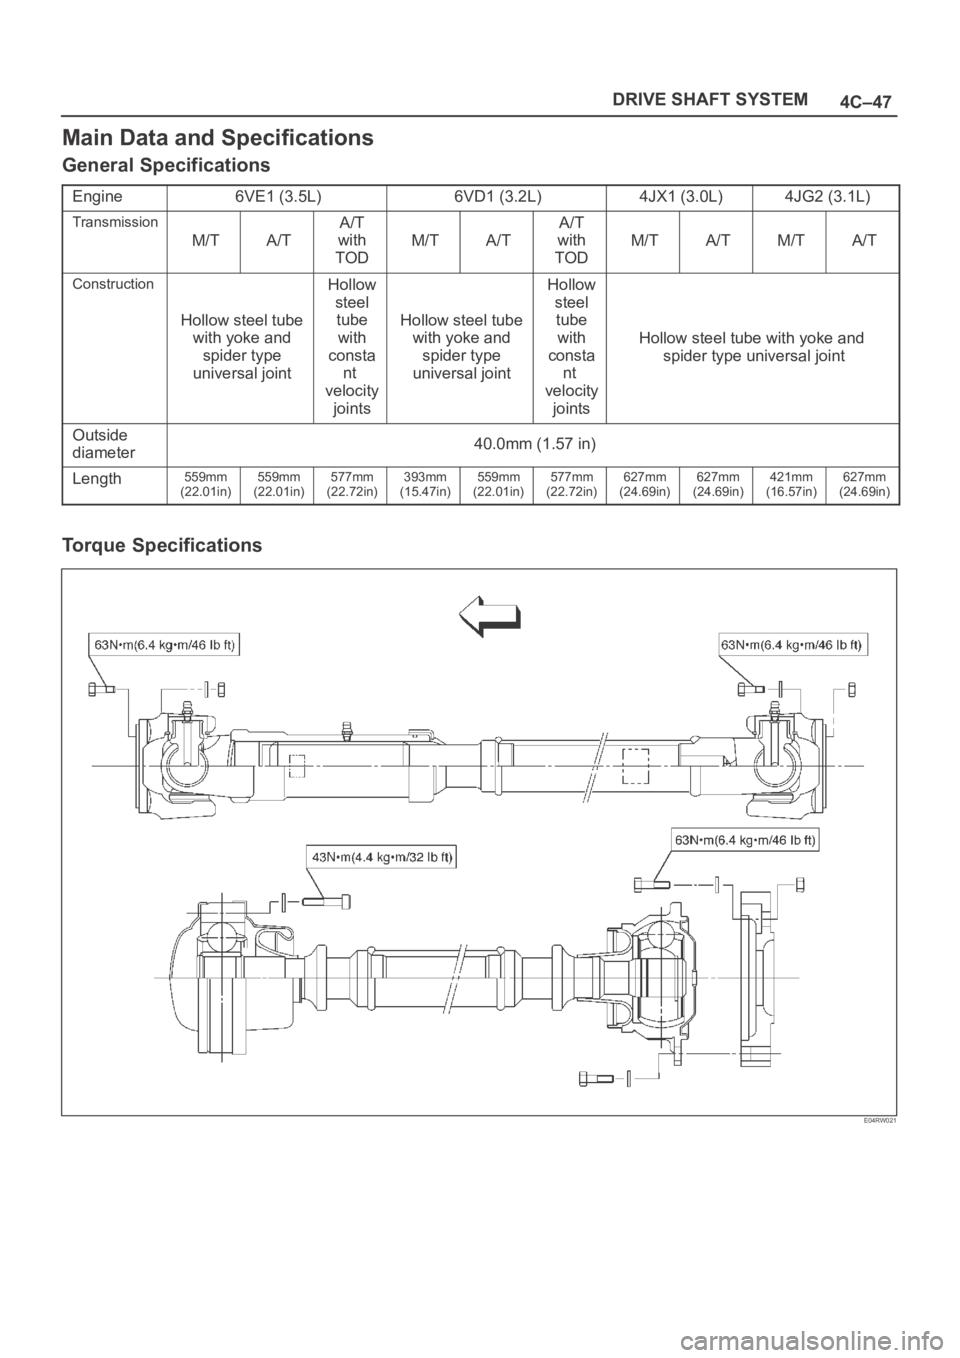
4C–47 DRIVE SHAFT SYSTEM
Main Data and Specifications
General Specifications
Engine6VE1 (3.5L)6VD1 (3.2L)4JX1 (3.0L)4JG2 (3.1L)
Transmission
M/TA/T
A/T
with
TOD
M/TA/T
A/T
with
TOD
M/TA/TM/TA/T
Construction
Hollow steel tube
with yoke and
spider type
universal joint
Hollow
steel
tube
with
consta
nt
velocity
joints
Hollow steel tube
with yoke and
spider type
universal joint
Hollow
steel
tube
with
consta
nt
velocity
joints
Hollow steel tube with yoke and
spider type universal joint
Outside
diameter40.0mm (1.57 in)
Length559mm
(22.01in)559mm
(22.01in)577mm
(22.72in)393mm
(15.47in)559mm
(22.01in)577mm
(22.72in)627mm
(24.69in)627mm
(24.69in)421mm
(16.57in)627mm
(24.69in)
Torque Specifications
E04RW021