1998 OPEL FRONTERA Electrical
[x] Cancel search: ElectricalPage 4762 of 6000
6E–105 ENGINE DRIVEABILITY AND EMISSIONS
The engine oil dip stick not fully seated.
The engine oil fill cap loose or missing.
Test Description
Number(s) below refer to the step number(s) on the
Diagnostic Chart.
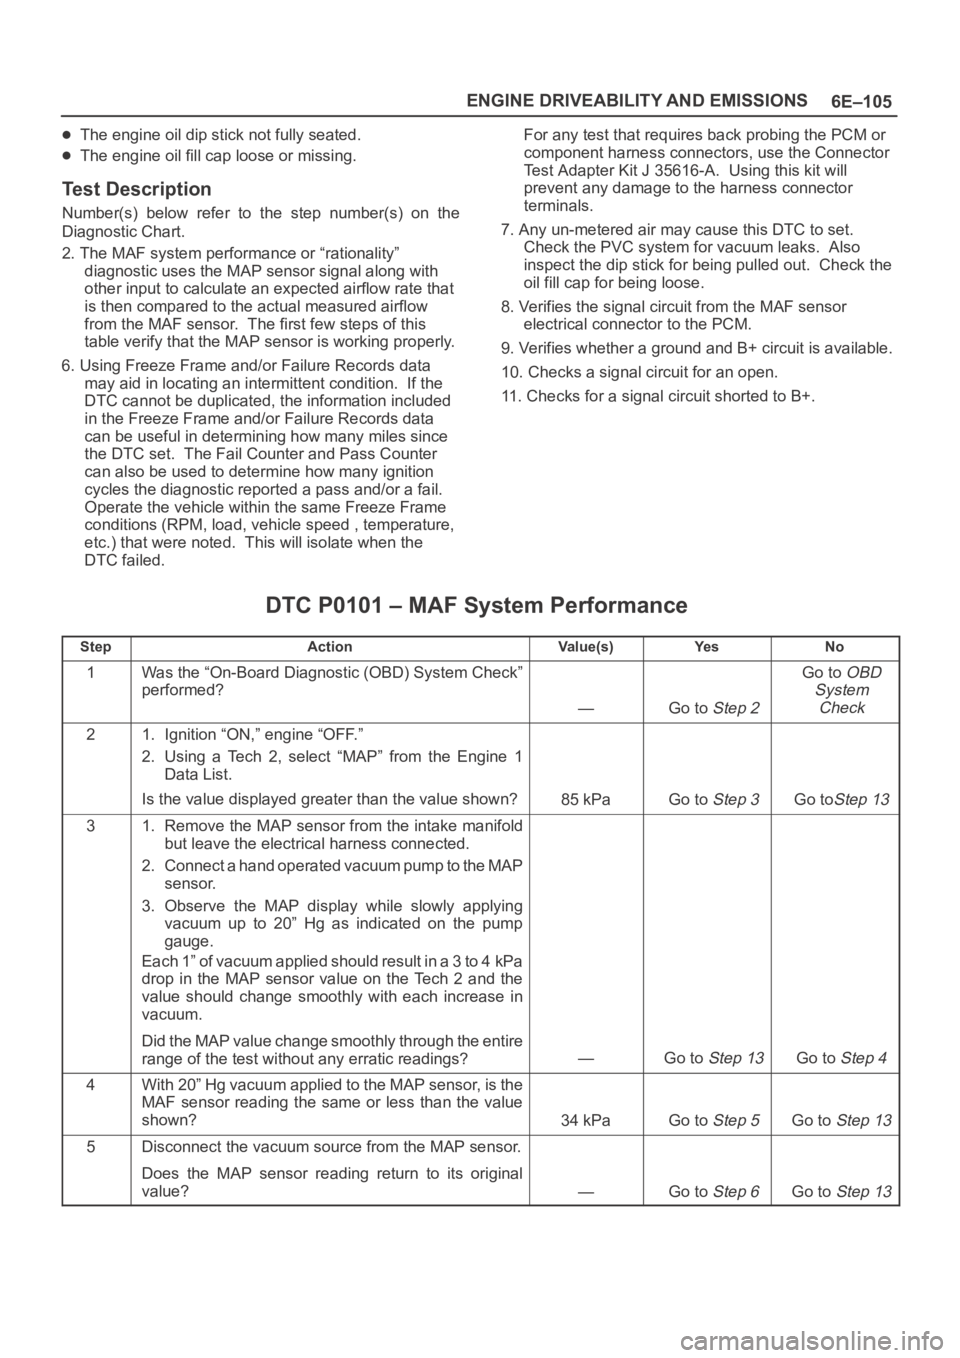
2. The MAF system performance or “rationality”
diagnostic uses the MAP sensor signal along with
other input to calculate an expected airflow rate that
is then compared to the actual measured airflow
from the MAF sensor. The first few steps of this
table verify that the MAP sensor is working properly.
6. Using Freeze Frame and/or Failure Records data
may aid in locating an intermittent condition. If the
DTC cannot be duplicated, the information included
in the Freeze Frame and/or Failure Records data
can be useful in determining how many miles since
the DTC set. The Fail Counter and Pass Counter
can also be used to determine how many ignition
cycles the diagnostic reported a pass and/or a fail.
Operate the vehicle within the same Freeze Frame
conditions (RPM, load, vehicle speed , temperature,
etc.) that were noted. This will isolate when the
DTC failed.For any test that requires back probing the PCM or
component harness connectors, use the Connector
Test Adapter Kit J 35616-A. Using this kit will
prevent any damage to the harness connector
terminals.
7. Any un-metered air may cause this DTC to set.
Check the PVC system for vacuum leaks. Also
inspect the dip stick for being pulled out. Check the
oil fill cap for being loose.
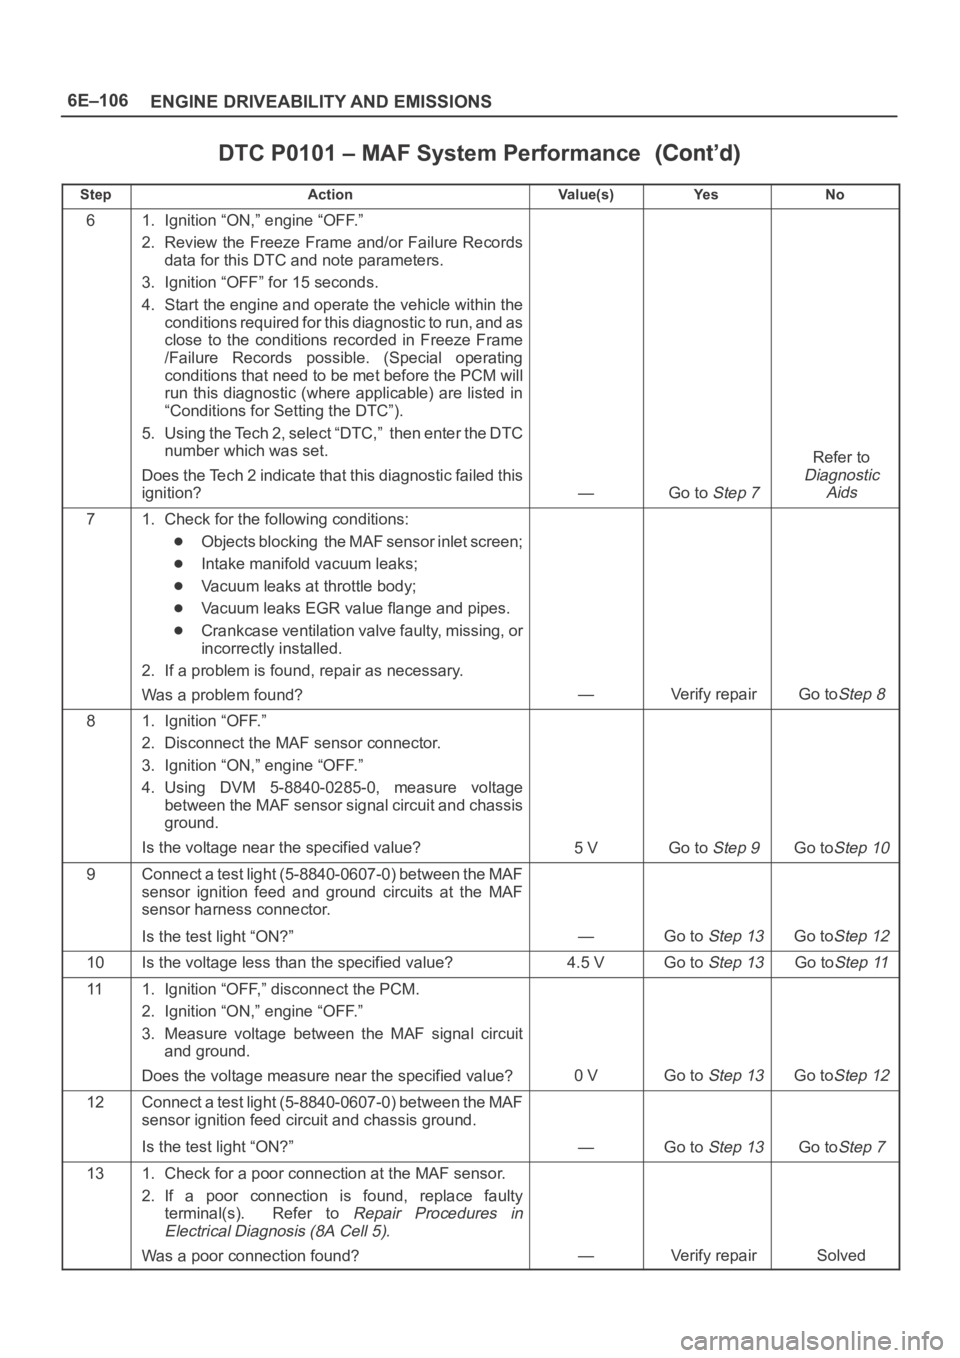
8. Verifies the signal circuit from the MAF sensor
electrical connector to the PCM.
9. Verifies whether a ground and B+ circuit is available.
10. Checks a signal circuit for an open.
11. Checks for a signal circuit shorted to B+.
DTC P0101 – MAF System Performance
StepActionVa l u e ( s )Ye sNo
1Was the “On-Board Diagnostic (OBD) System Check”
performed?
—Go to Step 2
Go to OBD
System
Check
21. Ignition “ON,” engine “OFF.”
2. Using a Tech 2, select “MAP” from the Engine 1
Data List.
Is the value displayed greater than the value shown?
85 kPaGo to Step 3Go toStep 13
31. Remove the MAP sensor from the intake manifold
but leave the electrical harness connected.
2. Connect a hand operated vacuum pump to the MAP
sensor.
3. Observe the MAP display while slowly applying
vacuum up to 20” Hg as indicated on the pump
gauge.
Each 1” of vacuum applied should result in a 3 to 4 kPa
drop in the MAP sensor value on the Tech 2 and the
value should change smoothly with each increase in
vacuum.
Did the MAP value change smoothly through the entire
range of the test without any erratic readings?
—Go to Step 13Go to Step 4
4With 20” Hg vacuum applied to the MAP sensor, is the
MAF sensor reading the same or less than the value
shown?
34 kPaGo to Step 5Go to Step 13
5Disconnect the vacuum source from the MAP sensor.
Does the MAP sensor reading return to its original
value?
—Go to Step 6Go to Step 13
Page 4763 of 6000
6E–106
ENGINE DRIVEABILITY AND EMISSIONS
DTC P0101 – MAF System Performance
StepNo Ye s Va l u e ( s ) Action
61. Ignition “ON,” engine “OFF.”
2. Review the Freeze Frame and/or Failure Records
data for this DTC and note parameters.
3. Ignition “OFF” for 15 seconds.
4. Start the engine and operate the vehicle within the
conditions required for this diagnostic to run, and as
close to the conditions recorded in Freeze Frame
/Failure Records possible. (Special operating
conditions that need to be met before the PCM will
run this diagnostic (where applicable) are listed in
“Conditions for Setting the DTC”).
5. Using the Tech 2, select “DTC,” then enter the DTC
number which was set.
Does the Tech 2 indicate that this diagnostic failed this
ignition?
—Go to Step 7
Refer to
Diagnostic
Aids
71. Check for the following conditions:
Objects blocking the MAF sensor inlet screen;
Intake manifold vacuum leaks;
Vacuum leaks at throttle body;
Vacuum leaks EGR value flange and pipes.
Crankcase ventilation valve faulty, missing, or
incorrectly installed.
2. If a problem is found, repair as necessary.
Was a problem found?
—Verify repairGo toStep 8
81. Ignition “OFF.”
2. Disconnect the MAF sensor connector.
3. Ignition “ON,” engine “OFF.”
4. Using DVM 5-8840-0285-0, measure voltage
between the MAF sensor signal circuit and chassis
ground.
Is the voltage near the specified value?
5 VGo to Step 9Go toStep 10
9Connect a test light (5-8840-0607-0) between the MAF
sensor ignition feed and ground circuits at the MAF
sensor harness connector.
Is the test light “ON?”
—Go to Step 13Go toStep 12
10Is the voltage less than the specified value?4.5 VGo to Step 13Go toStep 11
111. Ignition “OFF,” disconnect the PCM.
2. Ignition “ON,” engine “OFF.”
3. Measure voltage between the MAF signal circuit
and ground.
Does the voltage measure near the specified value?
0 VGo to Step 13Go toStep 12
12Connect a test light (5-8840-0607-0) between the MAF
sensor ignition feed circuit and chassis ground.
Is the test light “ON?”
—Go to Step 13Go toStep 7
131. Check for a poor connection at the MAF sensor.
2. If a poor connection is found, replace faulty
terminal(s). Refer to
Repair Procedures in
Electrical Diagnosis (8A Cell 5).
Was a poor connection found?—Verify repairSolved
Page 4770 of 6000
6E–113 ENGINE DRIVEABILITY AND EMISSIONS
and wiring harnesses related to the sensor. A change
in the display will indicate the location of the fault.
If DTC P0107 cannot be duplicated, the information
included in the Failure Records data can be useful indetermining vehicle mileage since the DTC was last set.
If it is determined that the DTC occurs intermittently,
performing the DTC P0107 Diagnostic Chart may isolate
the cause of the fault.
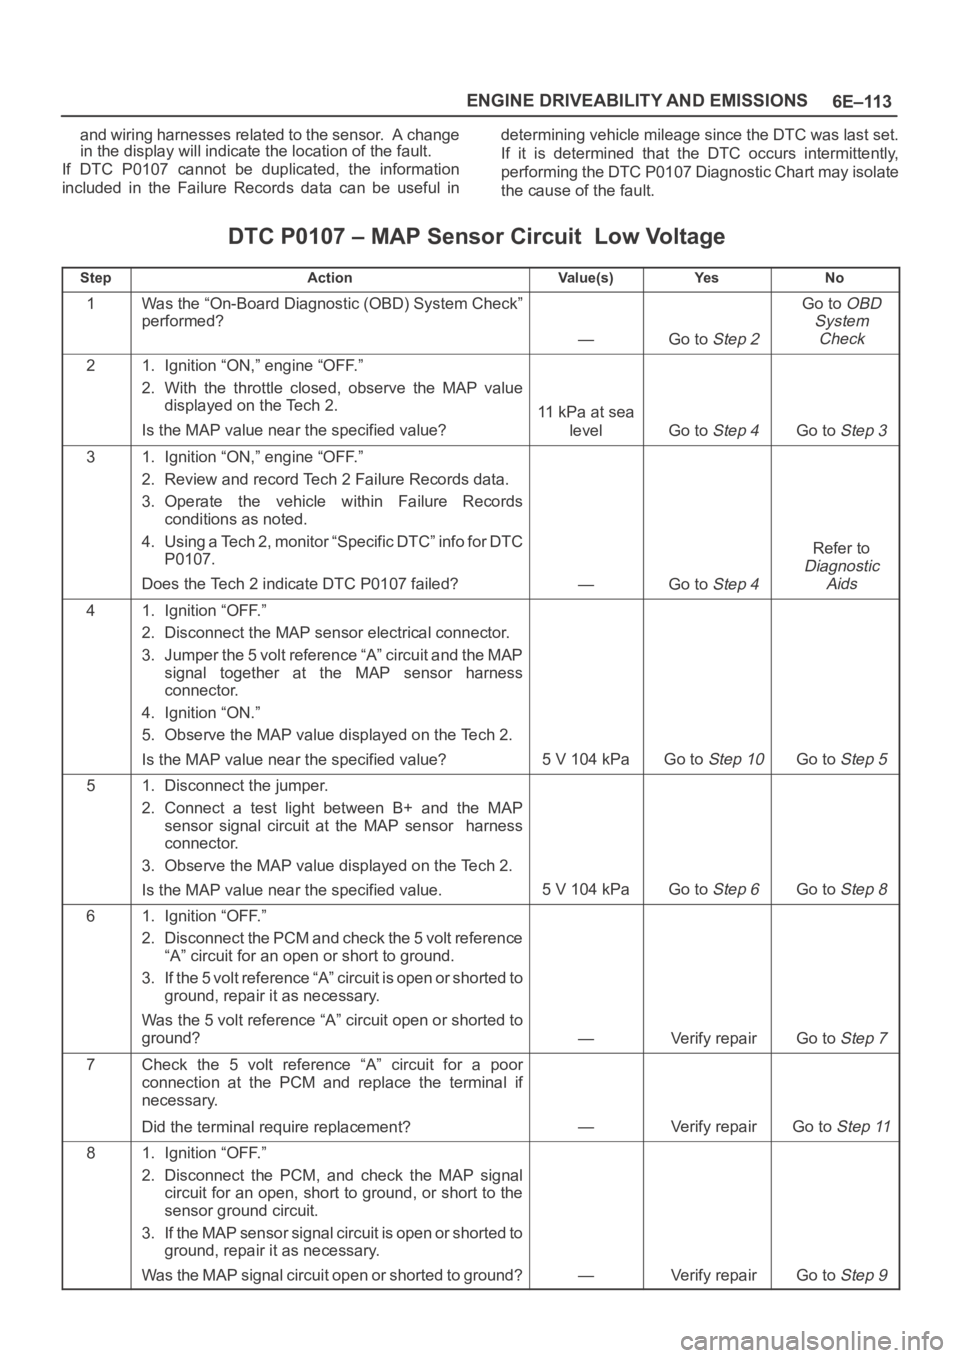
DTC P0107 – MAP Sensor Circuit Low Voltage
StepActionVa l u e ( s )Ye sNo
1Was the “On-Board Diagnostic (OBD) System Check”
performed?
—Go to Step 2
Go to OBD
System
Check
21. Ignition “ON,” engine “OFF.”
2. With the throttle closed, observe the MAP value
displayed on the Tech 2.
Is the MAP value near the specified value?
11 kPa at sea
level
Go to Step 4Go to Step 3
31. Ignition “ON,” engine “OFF.”
2. Review and record Tech 2 Failure Records data.
3. Operate the vehicle within Failure Records
conditions as noted.
4. Using a Tech 2, monitor “Specific DTC” info for DTC
P0107.
Does the Tech 2 indicate DTC P0107 failed?
—Go to Step 4
Refer to
Diagnostic
Aids
41. Ignition “OFF.”
2. Disconnect the MAP sensor electrical connector.
3. Jumper the 5 volt reference “A” circuit and the MAP
signal together at the MAP sensor harness
connector.
4. Ignition “ON.”
5. Observe the MAP value displayed on the Tech 2.
Is the MAP value near the specified value?
5 V 104 kPaGo to Step 10Go to Step 5
51. Disconnect the jumper.
2. Connect a test light between B+ and the MAP
sensor signal circuit at the MAP sensor harness
connector.
3. Observe the MAP value displayed on the Tech 2.
Is the MAP value near the specified value.
5 V 104 kPaGo to Step 6Go to Step 8
61. Ignition “OFF.”
2. Disconnect the PCM and check the 5 volt reference
“A” circuit for an open or short to ground.
3. If the 5 volt reference “A” circuit is open or shorted to
ground, repair it as necessary.
Was the 5 volt reference “A” circuit open or shorted to
ground?
—Verify repairGo to Step 7
7Check the 5 volt reference “A” circuit for a poor
connection at the PCM and replace the terminal if
necessary.
Did the terminal require replacement?
—Verify repairGo to Step 11
81. Ignition “OFF.”
2. Disconnect the PCM, and check the MAP signal
circuit for an open, short to ground, or short to the
sensor ground circuit.
3. If the MAP sensor signal circuit is open or shorted to
ground, repair it as necessary.
Was the MAP signal circuit open or shorted to ground?
—Verify repairGo to Step 9
Page 4773 of 6000
6E–116
ENGINE DRIVEABILITY AND EMISSIONS
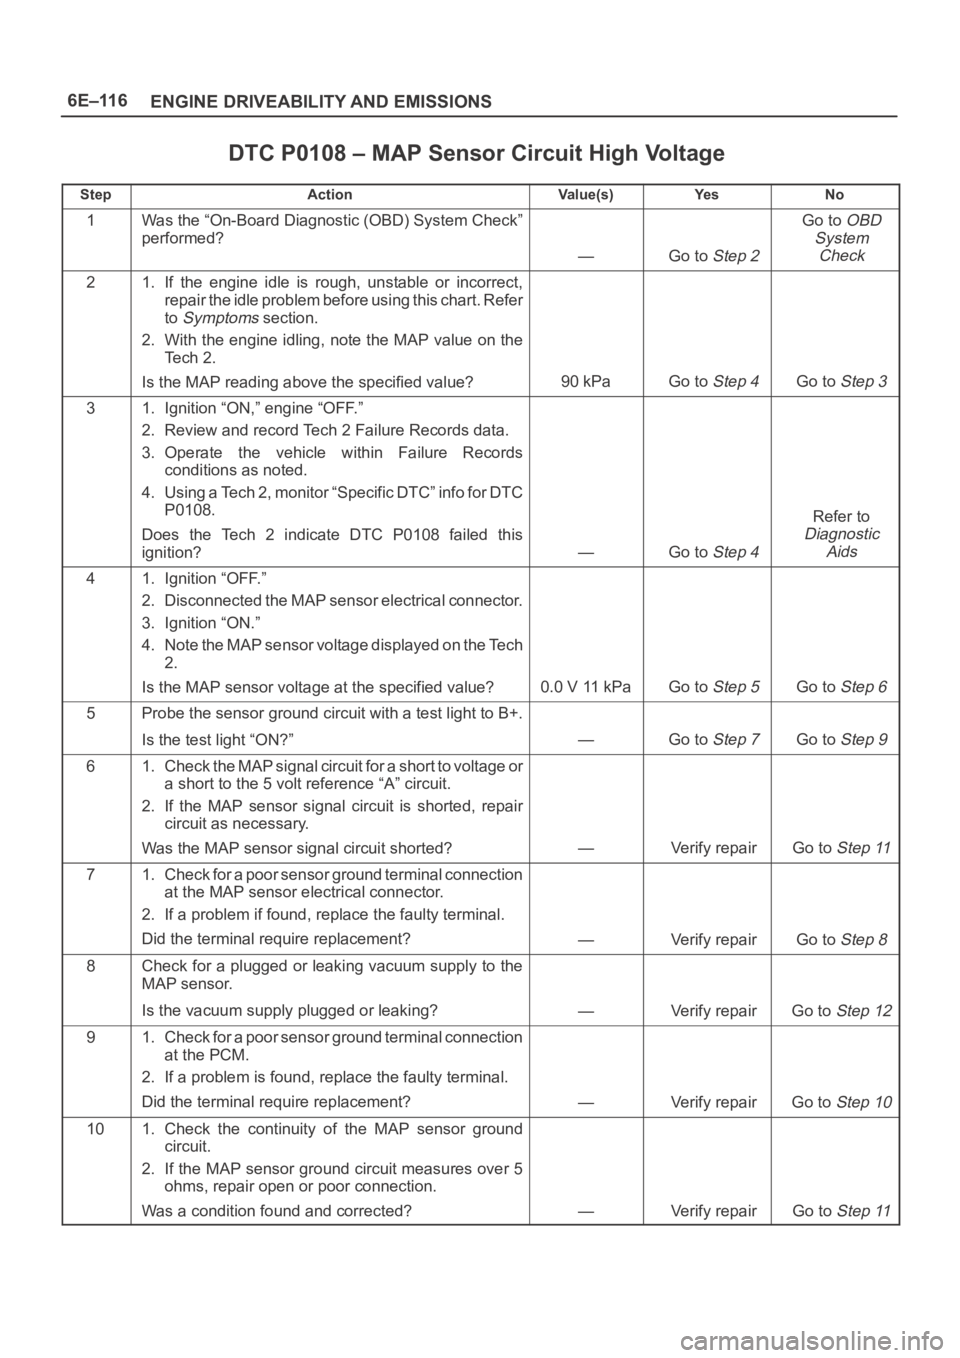
DTC P0108 – MAP Sensor Circuit High Voltage
StepActionVa l u e ( s )Ye sNo
1Was the “On-Board Diagnostic (OBD) System Check”
performed?
—Go to Step 2
Go to OBD
System
Check
21. If the engine idle is rough, unstable or incorrect,
repair the idle problem before using this chart. Refer
to
Symptoms section.
2. With the engine idling, note the MAP value on the
Te c h 2 .
Is the MAP reading above the specified value?
90 kPaGo to Step 4Go to Step 3
31. Ignition “ON,” engine “OFF.”
2. Review and record Tech 2 Failure Records data.
3. Operate the vehicle within Failure Records
conditions as noted.
4. Using a Tech 2, monitor “Specific DTC” info for DTC
P0108.
Does the Tech 2 indicate DTC P0108 failed this
ignition?
—Go to Step 4
Refer to
Diagnostic
Aids
41. Ignition “OFF.”
2. Disconnected the MAP sensor electrical connector.
3. Ignition “ON.”
4. Note the MAP sensor voltage displayed on the Tech
2.
Is the MAP sensor voltage at the specified value?
0.0 V 11 kPaGo to Step 5Go to Step 6
5Probe the sensor ground circuit with a test light to B+.
Is the test light “ON?”
—Go to Step 7Go to Step 9
61. Check the MAP signal circuit for a short to voltage or
a short to the 5 volt reference “A” circuit.
2. If the MAP sensor signal circuit is shorted, repair
circuit as necessary.
Was the MAP sensor signal circuit shorted?
—Verify repairGo to Step 11
71. Check for a poor sensor ground terminal connection
at the MAP sensor electrical connector.
2. If a problem if found, replace the faulty terminal.
Did the terminal require replacement?
—Verify repairGo to Step 8
8Check for a plugged or leaking vacuum supply to the
MAP sensor.
Is the vacuum supply plugged or leaking?
—Verify repairGo to Step 12
91. Check for a poor sensor ground terminal connection
at the PCM.
2. If a problem is found, replace the faulty terminal.
Did the terminal require replacement?
—Verify repairGo to Step 10
101. Check the continuity of the MAP sensor ground
circuit.
2. If the MAP sensor ground circuit measures over 5
ohms, repair open or poor connection.
Was a condition found and corrected?
—Verify repairGo to Step 11
Page 4777 of 6000
6E–120
ENGINE DRIVEABILITY AND EMISSIONS
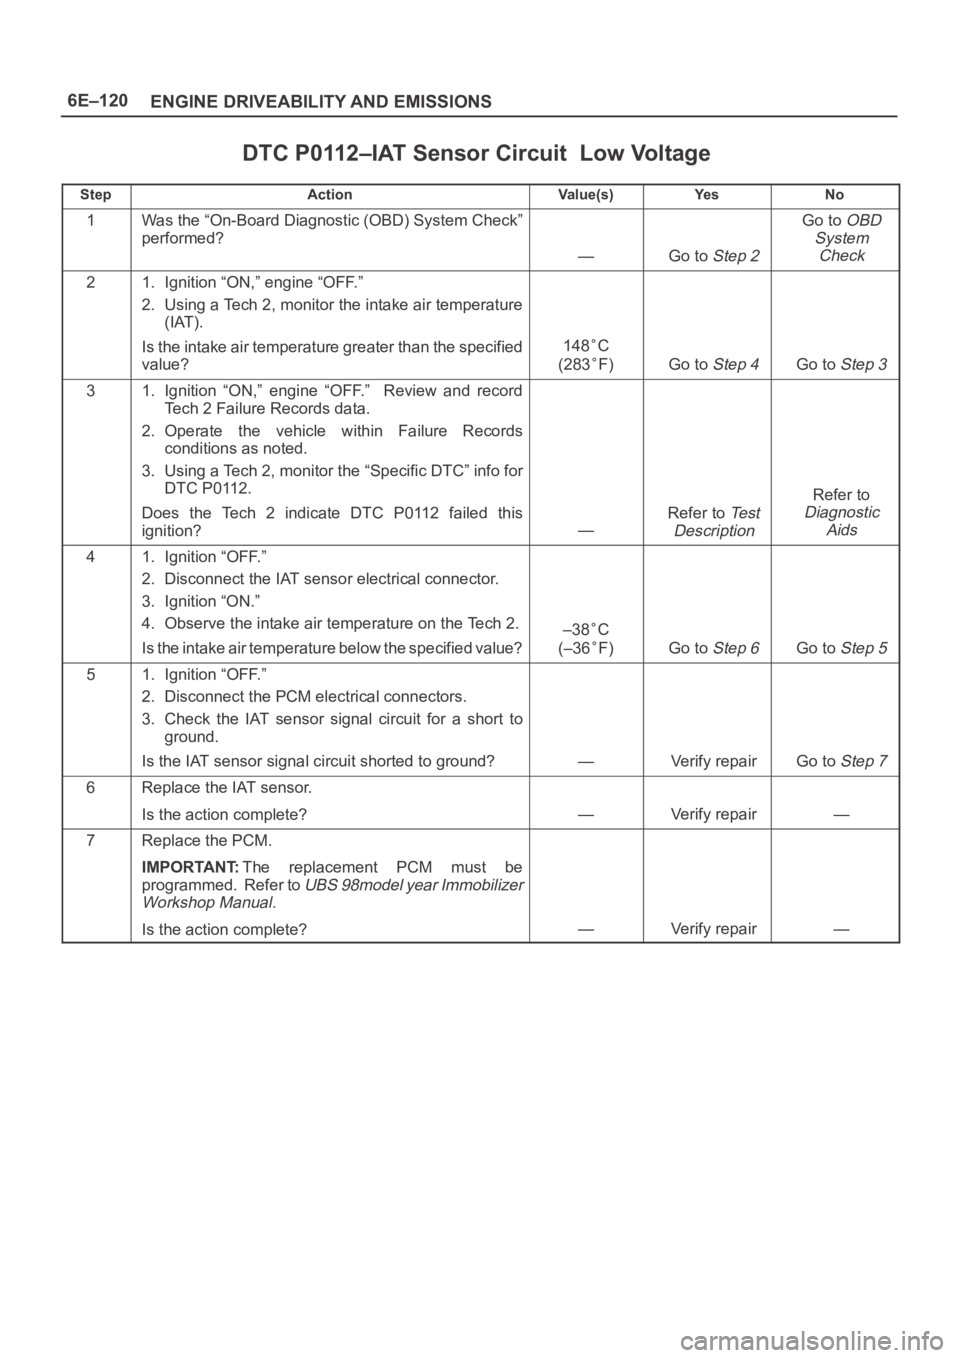
DTC P0112–IAT Sensor Circuit Low Voltage
StepActionVa l u e ( s )Ye sNo
1Was the “On-Board Diagnostic (OBD) System Check”
performed?
—Go to Step 2
Go to OBD
System
Check
21. Ignition “ON,” engine “OFF.”
2. Using a Tech 2, monitor the intake air temperature
(IAT).
Is the intake air temperature greater than the specified
value?
148C
(283
F)Go to Step 4Go to Step 3
31. Ignition “ON,” engine “OFF.” Review and record
Tech 2 Failure Records data.
2. Operate the vehicle within Failure Records
conditions as noted.
3. Using a Tech 2, monitor the “Specific DTC” info for
DTC P0112.
Does the Tech 2 indicate DTC P0112 failed this
ignition?
—
Refer to Te s t
Description
Refer to
Diagnostic
Aids
41. Ignition “OFF.”
2. Disconnect the IAT sensor electrical connector.
3. Ignition “ON.”
4. Observe the intake air temperature on the Tech 2.
Is the intake air temperature below the specified value?
–38C
(–36
F)Go to Step 6Go to Step 5
51. Ignition “OFF.”
2. Disconnect the PCM electrical connectors.
3. Check the IAT sensor signal circuit for a short to
ground.
Is the IAT sensor signal circuit shorted to ground?
—Verify repairGo to Step 7
6Replace the IAT sensor.
Is the action complete?
—Verify repair—
7Replace the PCM.
IMPORTANT:The replacement PCM must be
programmed. Refer to
UBS 98model year Immobilizer
Workshop Manual.
Is the action complete?—Verify repair—
Page 4779 of 6000
6E–122
ENGINE DRIVEABILITY AND EMISSIONS
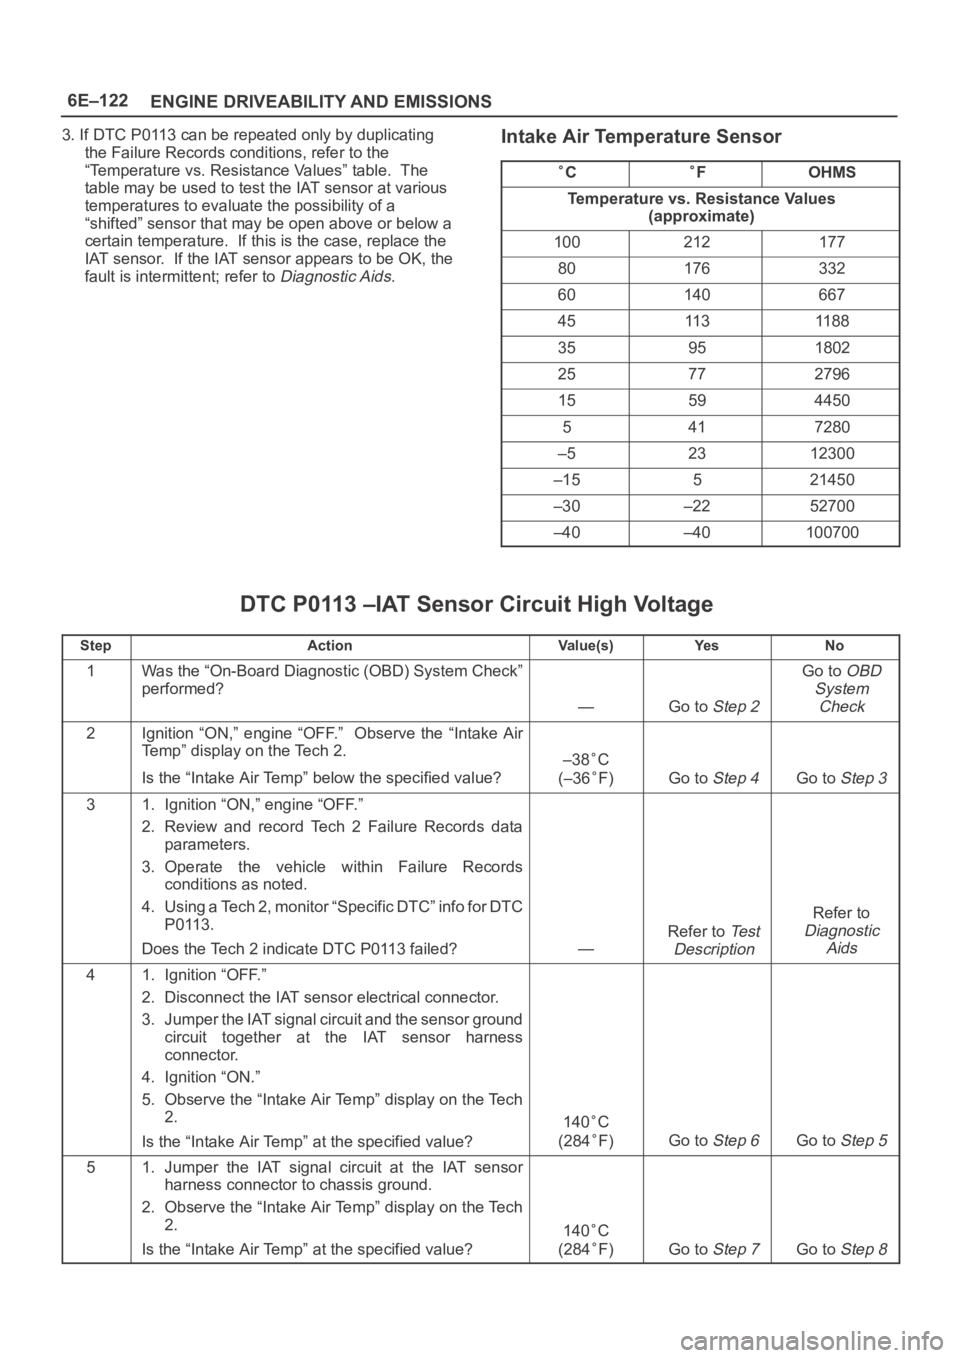
3. If DTC P0113 can be repeated only by duplicating
the Failure Records conditions, refer to the
“Temperature vs. Resistance Values” table. The
table may be used to test the IAT sensor at various
temperatures to evaluate the possibility of a
“shifted” sensor that may be open above or below a
certain temperature. If this is the case, replace the
IAT sensor. If the IAT sensor appears to be OK, the
fault is intermittent; refer to
Diagnostic Aids.
Intake Air Temperature Sensor
CFOHMS
Temperature vs. Resistance Values
(approximate)
100212177
80176332
60140667
4511 31188
35951802
25772796
15594450
5417280
–52312300
–15521450
–30–2252700
–40–40100700
DTC P0113 –IAT Sensor Circuit High Voltage
StepActionVa l u e ( s )Ye sNo
1Was the “On-Board Diagnostic (OBD) System Check”
performed?
—Go to Step 2
Go to OBD
System
Check
2Ignition “ON,” engine “OFF.” Observe the “Intake Air
Temp” display on the Tech 2.
Is the “Intake Air Temp” below the specified value?
–38C
(–36
F)Go to Step 4Go to Step 3
31. Ignition “ON,” engine “OFF.”
2. Review and record Tech 2 Failure Records data
parameters.
3. Operate the vehicle within Failure Records
conditions as noted.
4. Using a Tech 2, monitor “Specific DTC” info for DTC
P0113.
Does the Tech 2 indicate DTC P0113 failed?
—
Refer to Te s t
Description
Refer to
Diagnostic
Aids
41. Ignition “OFF.”
2. Disconnect the IAT sensor electrical connector.
3. Jumper the IAT signal circuit and the sensor ground
circuit together at the IAT sensor harness
connector.
4. Ignition “ON.”
5. Observe the “Intake Air Temp” display on the Tech
2.
Is the “Intake Air Temp” at the specified value?
140C
(284
F)Go to Step 6Go to Step 5
51. Jumper the IAT signal circuit at the IAT sensor
harness connector to chassis ground.
2. Observe the “Intake Air Temp” display on the Tech
2.
Is the “Intake Air Temp” at the specified value?
140C
(284
F)Go to Step 7Go to Step 8
Page 4783 of 6000
6E–126
ENGINE DRIVEABILITY AND EMISSIONS
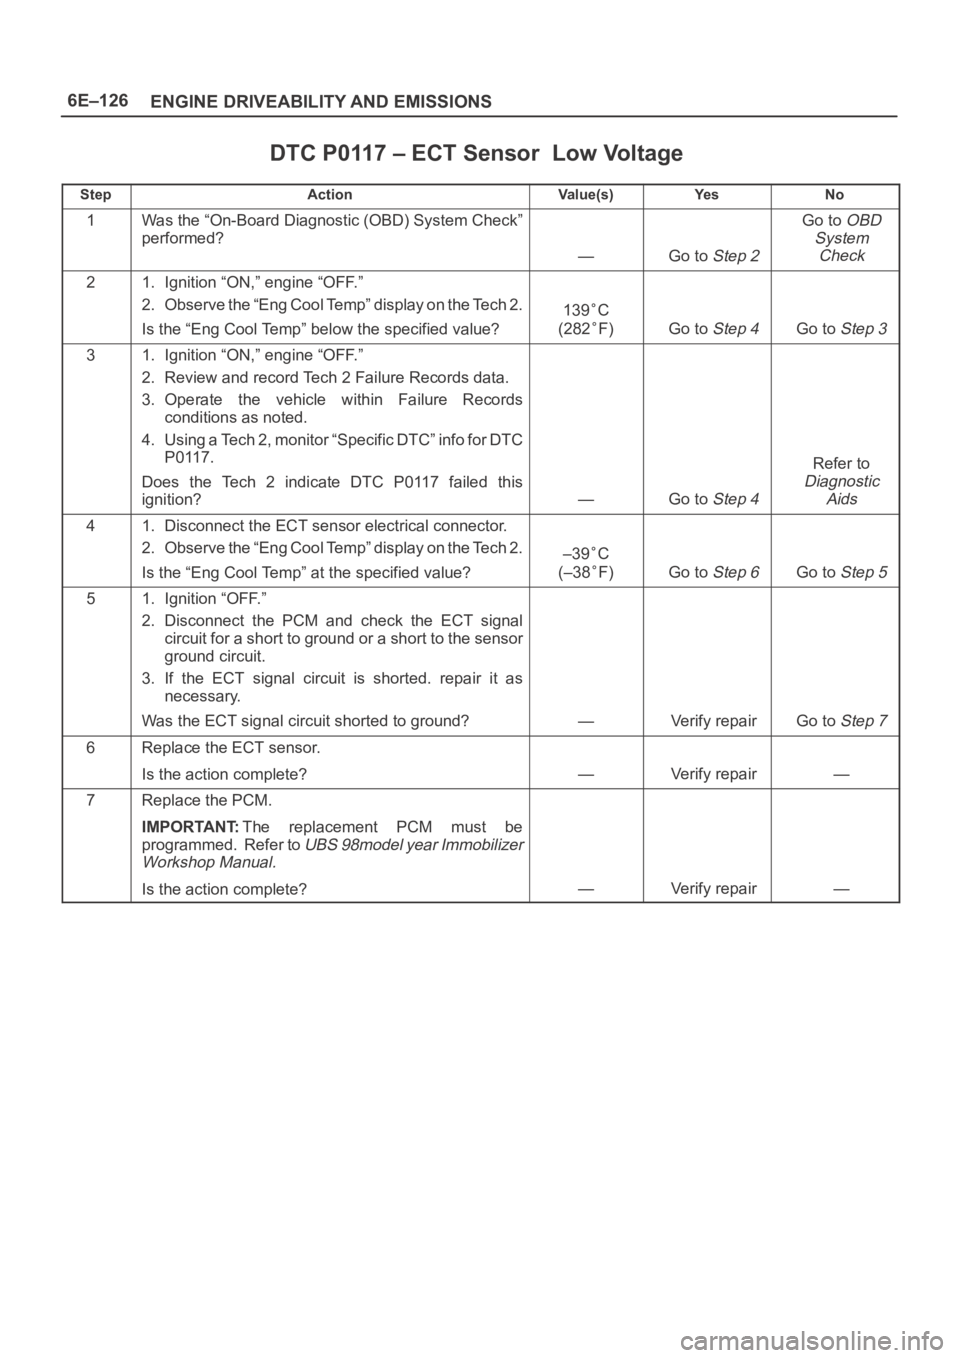
DTC P0117 – ECT Sensor Low Voltage
StepActionVa l u e ( s )Ye sNo
1Was the “On-Board Diagnostic (OBD) System Check”
performed?
—Go to Step 2
Go to OBD
System
Check
21. Ignition “ON,” engine “OFF.”
2. Observe the “Eng Cool Temp” display on the Tech 2.
Is the “Eng Cool Temp” below the specified value?
139C
(282
F)Go to Step 4Go to Step 3
31. Ignition “ON,” engine “OFF.”
2. Review and record Tech 2 Failure Records data.
3. Operate the vehicle within Failure Records
conditions as noted.
4. Using a Tech 2, monitor “Specific DTC” info for DTC
P0117.
Does the Tech 2 indicate DTC P0117 failed this
ignition?
—Go to Step 4
Refer to
Diagnostic
Aids
41. Disconnect the ECT sensor electrical connector.
2. Observe the “Eng Cool Temp” display on the Tech 2.
Is the “Eng Cool Temp” at the specified value?
–39C
(–38
F)Go to Step 6Go to Step 5
51. Ignition “OFF.”
2. Disconnect the PCM and check the ECT signal
circuit for a short to ground or a short to the sensor
ground circuit.
3. If the ECT signal circuit is shorted. repair it as
necessary.
Was the ECT signal circuit shorted to ground?
—Verify repairGo to Step 7
6Replace the ECT sensor.
Is the action complete?
—Verify repair—
7Replace the PCM.
IMPORTANT:The replacement PCM must be
programmed. Refer to
UBS 98model year Immobilizer
Workshop Manual.
Is the action complete?—Verify repair—
Page 4785 of 6000
6E–128
ENGINE DRIVEABILITY AND EMISSIONS
Test Description
Number(s) below refer to the step number(s) on the
Diagnostic Chart.
2. Verifies that the fault is present.
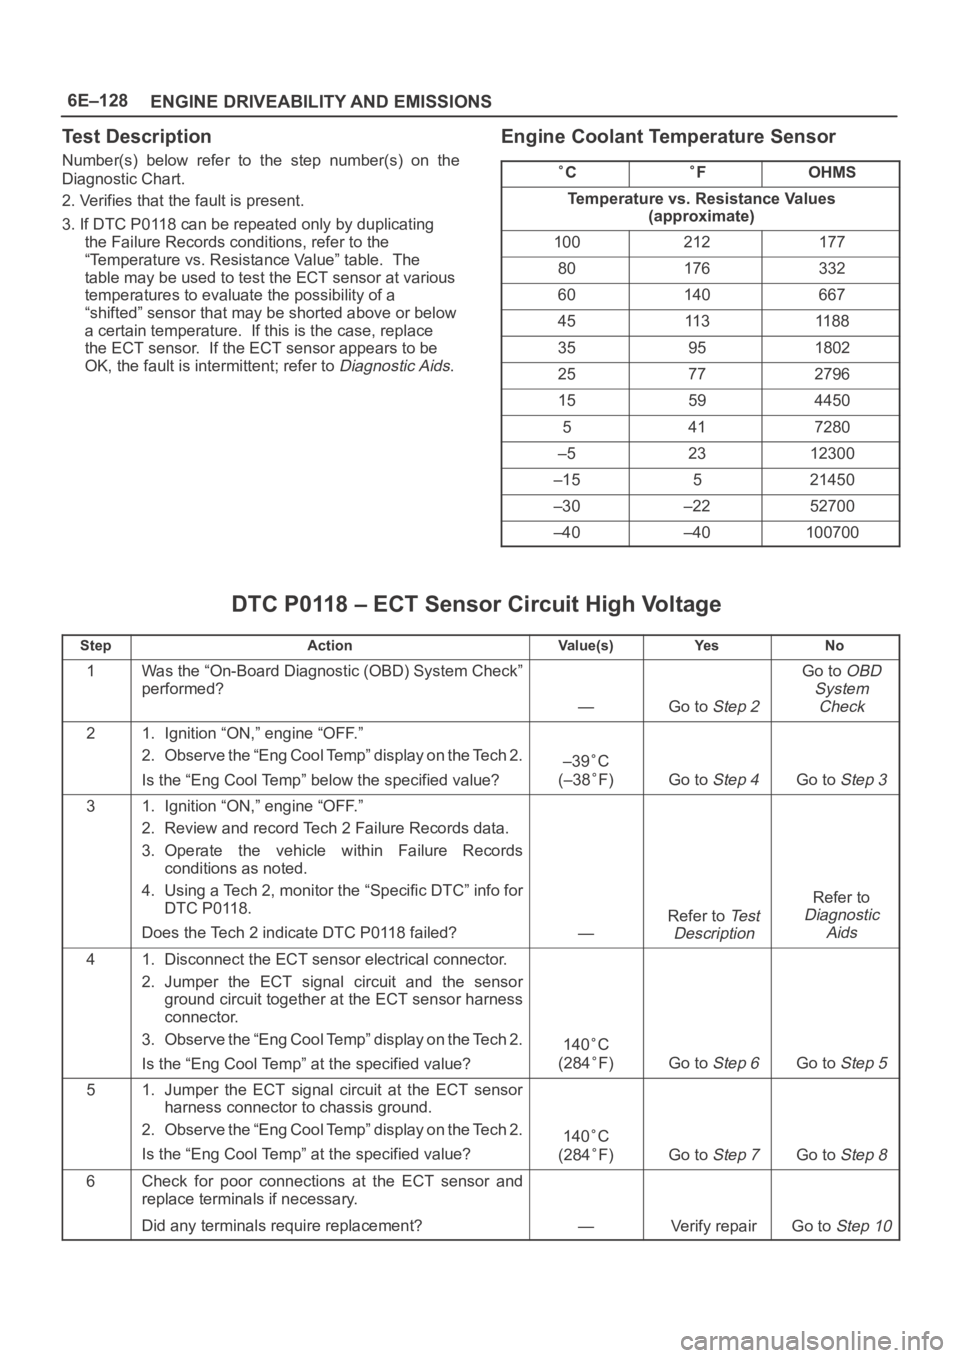
3. If DTC P0118 can be repeated only by duplicating
the Failure Records conditions, refer to the
“Temperature vs. Resistance Value” table. The
table may be used to test the ECT sensor at various
temperatures to evaluate the possibility of a
“shifted” sensor that may be shorted above or below
a certain temperature. If this is the case, replace
the ECT sensor. If the ECT sensor appears to be
OK, the fault is intermittent; refer to
Diagnostic Aids.
Engine Coolant Temperature Sensor
CFOHMS
Temperature vs. Resistance Values
(approximate)
100212177
80176332
60140667
4511 31188
35951802
25772796
15594450
5417280
–52312300
–15521450
–30–2252700
–40–40100700
DTC P0118 – ECT Sensor Circuit High Voltage
StepActionVa l u e ( s )Ye sNo
1Was the “On-Board Diagnostic (OBD) System Check”
performed?
—Go to Step 2
Go to OBD
System
Check
21. Ignition “ON,” engine “OFF.”
2. Observe the “Eng Cool Temp” display on the Tech 2.
Is the “Eng Cool Temp” below the specified value?
–39C
(–38
F)Go to Step 4Go to Step 3
31. Ignition “ON,” engine “OFF.”
2. Review and record Tech 2 Failure Records data.
3. Operate the vehicle within Failure Records
conditions as noted.
4. Using a Tech 2, monitor the “Specific DTC” info for
DTC P0118.
Does the Tech 2 indicate DTC P0118 failed?
—
Refer to Te s t
Description
Refer to
Diagnostic
Aids
41. Disconnect the ECT sensor electrical connector.
2. Jumper the ECT signal circuit and the sensor
ground circuit together at the ECT sensor harness
connector.
3. Observe the “Eng Cool Temp” display on the Tech 2.
Is the “Eng Cool Temp” at the specified value?
140C
(284
F)Go to Step 6Go to Step 5
51. Jumper the ECT signal circuit at the ECT sensor
harness connector to chassis ground.
2. Observe the “Eng Cool Temp” display on the Tech 2.
Is the “Eng Cool Temp” at the specified value?
140C
(284
F)Go to Step 7Go to Step 8
6Check for poor connections at the ECT sensor and
replace terminals if necessary.
Did any terminals require replacement?
—Verify repairGo to Step 10