Page 2563 of 6000
8A–24LIGHTING SYSTEM
Rear Defogger Switch
Removal
1. Disconnect the battery ground cable.
2. Remove the front console assembly(1).
Refer to the Instrument Panel Assembly in Body
Structure section.
3. Remove the lower cluster assembly(2).
Refer to the Instrument Panel Assembly in Body
Structure section.
4. Remove the instrument panel driver lower cover
assembly(3).
Refer to the Instrument Panel Assembly in Body
Structure section.
821RW024
5. Remove the instrument panel cluster assembly(4).
Refer to the Instrument Panel Assembly in Body
Structure section.
6. Disconnect the connector and push the lock from the
back side of the instrument panel cluster assembly to
remove the rear defogger switch(5).
825RW023
Installation
To install, follow the removal steps in the reverse order,
noting the following point.
1. Push in the switch with your fingers until it locks
securely.
Page 2565 of 6000
8A–26LIGHTING SYSTEM
Illumination Controller
Removal
1. Disconnect the battery ground cable.
2. Remove the front console assembly(1).
Refer to the Instrument Panel Assembly in Body
Structure section.
3. Remove the lower cluster assembly(2).
Refer to the Instrument Panel Assembly in Body
Structure section.
4. Remove the instrument panel driver lower cover
assembly(3).
Refer to the Instrument Panel Assembly in Body
Structure section.
821RW024
5. Remove the instrument panel cluster assembly(4).
Refer to the Instrument Panel Assembly in Body
Structure section.
6. Disconnect the connector and push the lock from the
back side of the instrument panel cluster assembly to
remove the illumination controller(5).
825RW026
Installation
To install, follow the removal steps in the reverse order,
noting the following point.
1. Push in the switch with your fingers until the switch is
locked securely.
Page 2576 of 6000

WIPER/WASHER SYSTEM8B–7
Rear Wiper/Washer System
General Description
The circuit consists of the starter switch, rear wiper &
washer switch, rear wiper motor, rear washer motor and
rear intermittent relay.When the wiper & washer switch is turned on with the
starter switch on, the battery voltage is applied to the
wiper motor to activate the wiper.
The washer motor squirts glass cleaning fluid while the
washer switch is being pushed. The intermittent relay is
used to control motion of the wiper.
Rear Wiper and Washer Switch
Removal
1. Disconnect the battery ground cable.
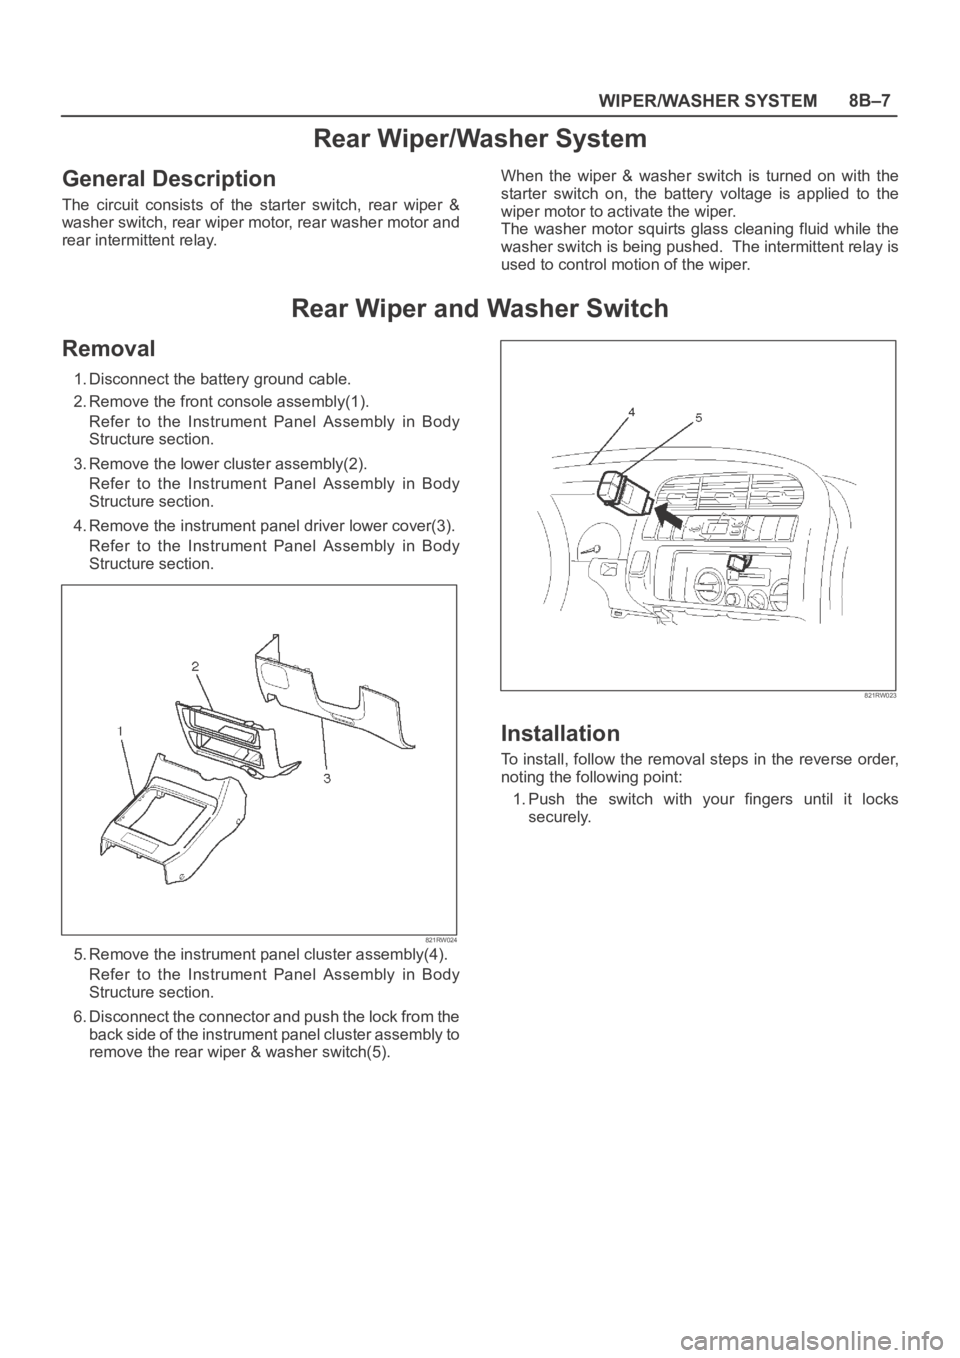
2. Remove the front console assembly(1).
Refer to the Instrument Panel Assembly in Body
Structure section.
3. Remove the lower cluster assembly(2).
Refer to the Instrument Panel Assembly in Body
Structure section.
4. Remove the instrument panel driver lower cover(3).
Refer to the Instrument Panel Assembly in Body
Structure section.
821RW024
5. Remove the instrument panel cluster assembly(4).
Refer to the Instrument Panel Assembly in Body
Structure section.
6. Disconnect the connector and push the lock from the
back side of the instrument panel cluster assembly to
remove the rear wiper & washer switch(5).
821RW023
Installation
To install, follow the removal steps in the reverse order,
noting the following point:
1. Push the switch with your fingers until it locks
securely.
Page 2581 of 6000
8B–12WIPER/WASHER SYSTEM
Headlight Wiper and Washer Switch
Removal
1. Disconnect the battery ground cable.
2. Remove the front console assembly(1).
Refer to the Instrument Panel Assembly in Body
Structure section.
3. Remove the lower cluster assembly(2).
Refer to the Instrument Panel Assembly in Body
Structure section.
4. Remove the instrument panel driver lower cover(3).
Refer to the Instrument Panel Assembly in Body
Structure section.
821RW024
5. Remove the instrument panel cluster assembly(4).
Refer to the Instrument Panel Assembly in Body
Structure section.
6. Disconnect the connector and push the lock from the
back side of the instrument panel cluster assembly to
remove the headlight wiper switch(5).
825RW245
Installation
To install, follow the removal steps in the reverse order,
noting the following point:
1. Push the switch with your fingers until it locks
securely.
Page 2585 of 6000
8C–2ENTERTAINMENT
Cigarette Lighter
General Description
When the cigarette lighter is pushed in with the starter
s w i t c h a t e i t h e r “ A C C ” o r “ O N ” p o s i t i o n , a c i r c u i t i s f o r m e d
in the cigarette lighter case to heat the lighter coil.
The cigarette lighter is sprung back to its original position
after the lighter coil is heated.
Removal
1. Disconnect the battery ground cable.
2. Remove the lower cluster assembly(1).
Refer to the Instrument Panel Assembly removal
steps in Body Structure section.
3. Disconnect the connectors, remove the socket of the
illumination light, the retaining ring(7), the outer
case(6), the cigarette lighter(3) and socket(4), the
bezel(5) and then remove the cigarette lighter
assembly(2).
826RS007
Installation
To install, follow the removal steps in the reverse order,
noting the following point.
1. When installing the bezel, align the projected portion
of the socket with the notch of the bezel.
Page 2586 of 6000
ENTERTAINMENT8C–3
Digital Clock
Removal
1. Disconnect the battery ground cable.
2. Remove the front console assembly(1).
Refer to the Instrument Panel Assembly in Body
Structure section.
3. Remove the lower cluster assembly(2).
Refer to the Instrument Panel Assembly in Body
Structure section.
4. Remove the instrument panel driver lower cover
assembly(3).
Refer to the Instrument Panel Assembly in Body
Structure section.
821RW024
5. Remove the instrument panel cluster assembly(4).
Refer to the Instrument Panel Assembly in Body
Structure section.
6. Disconnect the connector and push the lock from the
back side of the instrument panel cluster assembly to
remove the digital clock(5).
821RW034
Installation
To install, follow the removal steps in the reverse order,
noting the following point.
1. Push in the switch with your fingers until it locks
securely.
Page 2590 of 6000
ENTERTAINMENT8C–7
Radio
Removal
1. Disconnect the battery ground cable.
2. Remove the front console assembly (1).
Refer to the Instrument Panel Assembly in Body
Structure section.
3. Remove the lower cluster assembly (2).
Refer to the Instrument Panel Assembly in Body
Structure section.
4. Remove the instrument panel driver lower cover
assembly (3).
Refer to the Instrument Panel Assembly in Body
Structure section.
821RW024
5. Remove the instrument panel cluster assembly(4).
Refer to the Instrument Panel Assembly in Body
Structure section.
6. Remove two screws and disconnect the radio
connector(5) and antenna feeder plug(6) to remove
the radio(7).
825RW039
Installation
To install, follow the removal steps in the reverse order.
Page 3191 of 6000

8E–14METER AND GAUGE
Removal
1. Disconnect the battery ground cable.
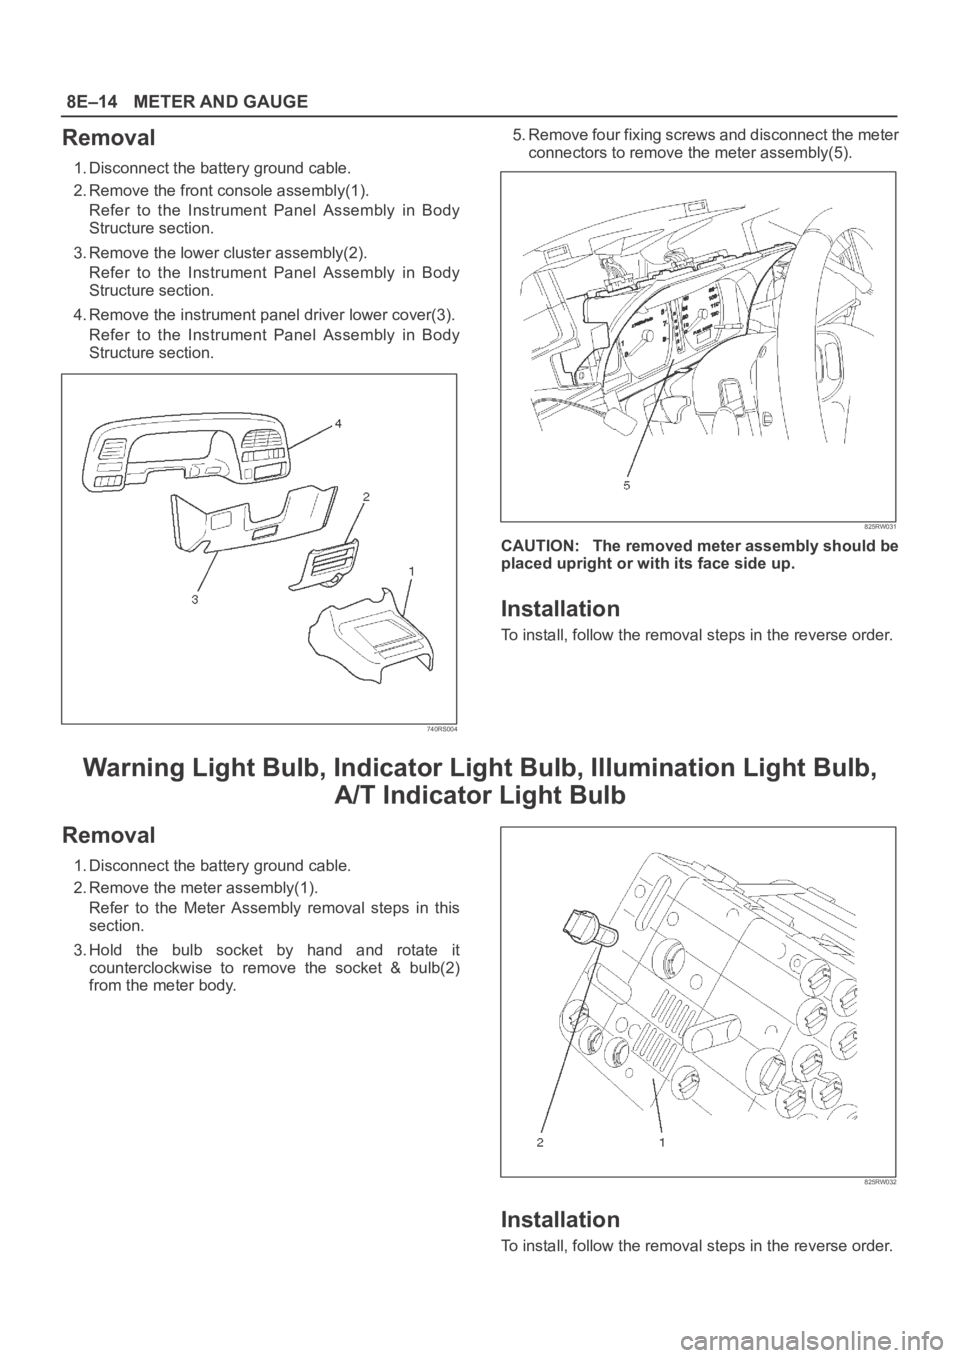
2. Remove the front console assembly(1).
Refer to the Instrument Panel Assembly in Body
Structure section.
3. Remove the lower cluster assembly(2).
Refer to the Instrument Panel Assembly in Body
Structure section.
4. Remove the instrument panel driver lower cover(3).
Refer to the Instrument Panel Assembly in Body
Structure section.
740RS004
5. Remove four fixing screws and disconnect the meter
connectors to remove the meter assembly(5).
825RW031
CAUTION: The removed meter assembly should be
placed upright or with its face side up.
Installation
To install, follow the removal steps in the reverse order.
Warning Light Bulb, Indicator Light Bulb, Illumination Light Bulb,
A/T Indicator Light Bulb
Removal
1. Disconnect the battery ground cable.
2. Remove the meter assembly(1).
Refer to the Meter Assembly removal steps in this
section.
3. Hold the bulb socket by hand and rotate it
counterclockwise to remove the socket & bulb(2)
from the meter body.
825RW032
Installation
To install, follow the removal steps in the reverse order.